Manual for Class D wheeled extinguishers.pdf - Amerex Corporation
Manual for Class D wheeled extinguishers.pdf - Amerex Corporation
Manual for Class D wheeled extinguishers.pdf - Amerex Corporation

You also want an ePaper? Increase the reach of your titles
YUMPU automatically turns print PDFs into web optimized ePapers that Google loves.
13<br />
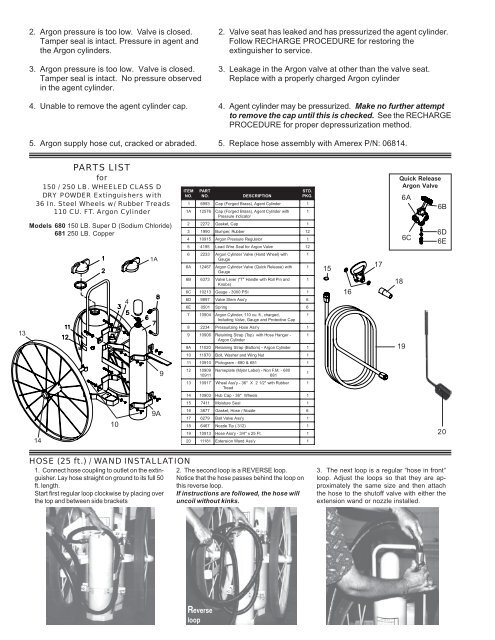
2. Argon pressure is too low. Valve is closed. 2. Valve seat has leaked and has pressurized the agent cylinder.<br />
Tamper seal is intact. Pressure in agent and Follow RECHARGE PROCEDURE <strong>for</strong> restoring the<br />
the Argon cylinders. extinguisher to service.<br />
3. Argon pressure is too low. Valve is closed. 3. Leakage in the Argon valve at other than the valve seat.<br />
Tamper seal is intact. No pressure observed Replace with a properly charged Argon cylinder<br />
in the agent cylinder.<br />
4. Unable to remove the agent cylinder cap. 4. Agent cylinder may be pressurized. Make no further attempt<br />
to remove the cap until this is checked. See the RECHARGE<br />
PROCEDURE <strong>for</strong> proper depressurization method.<br />
5. Argon supply hose cut, cracked or abraded. 5. Replace hose assembly with <strong>Amerex</strong> P/N: 06814.<br />
PARTS LIST<br />
<strong>for</strong><br />
150 / 250 LB. WHEELED CLASS D<br />
DRY POWDER Extinguishers with<br />
36 In. Steel Wheels w/ Rubber Treads<br />
110 CU. FT. Argon Cylinder<br />
Models 680 150 LB. Super D (Sodium Chloride)<br />
681 250 LB. Copper<br />
14<br />
10<br />
4<br />
1A<br />
9A<br />
HOSE (25 ft.) / WAND INSTALLATION<br />
1. Connect hose coupling to outlet on the extinguisher.<br />
Lay hose straight on ground to its full 50<br />
ft. length.<br />
Start first regular loop clockwise by placing over<br />
the top and between side brackets<br />
9<br />
ITEM<br />
PART<br />
STD.<br />
NO.<br />
NO. DESCRIPTION<br />
PKG.<br />
1 6993 Cap( Forged<br />
Brass)<br />
, Agent<br />
Cylinder<br />
1<br />
1A12576 Cap<br />
( Forged<br />
Brass)<br />
, Agent<br />
Cylinder<br />
with<br />
Pressure<br />
Indicator<br />
1<br />
2 2272 Gasket, Cap<br />
1<br />
3 1990 Bumper, Rubber<br />
12<br />
4 10915 ArgonPressureRegulator 1<br />
5 4195 LeadWireSeal<strong>for</strong>ArgonValve 12<br />
6 2233 Argon<br />
Cylinder<br />
Valve<br />
( Hand<br />
Wheel)<br />
with<br />
Gauge<br />
1<br />
6A12467 Argon<br />
Cylinder<br />
Valve<br />
( Quick<br />
Release)<br />
with<br />
Gauge<br />
6B6373 Valve<br />
Lever<br />
( " T"<br />
Handle<br />
with<br />
Roll<br />
Pin<br />
and<br />
Knobs)<br />
6C10213 Gauge-3000PSI 1<br />
6D9897 ValveStemAss'y 6<br />
6E0501 Spring 6<br />
7 1 0904<br />
Argon<br />
Cylinder,<br />
110<br />
cu.<br />
ft.<br />
, charged,<br />
Includi<br />
ng<br />
Valve,<br />
Gauge<br />
and<br />
Protective<br />
Cap<br />
1<br />
8 2234 PressurizingHoseAss'y 1<br />
9 10906 Retaining<br />
Strap<br />
( Top)<br />
with<br />
Hose<br />
Hanger<br />
-<br />
Argon<br />
Cylinder<br />
1<br />
9A11020 RetainingStrap( Bottom)<br />
- Argon<br />
Cylinder<br />
1<br />
1011970 Bolt, Washer<br />
and<br />
Wing<br />
Nut<br />
1<br />
1110910 Pictogram-680&681 1<br />
1210909 10911<br />
Nameplate<br />
( Mylar<br />
Label)<br />
- Non<br />
F.<br />
M.<br />
- 680<br />
681<br />
1<br />
1310917 Wheel<br />
Ass'y<br />
- 36"<br />
X 2 1/<br />
2"<br />
with<br />
Rubber<br />
Tread<br />
1<br />
1410903 HubCap-36" Wheels<br />
1<br />
157411 MoistureSeal 1<br />
163877 Gasket, Hose<br />
/ Nozzle<br />
6<br />
176279 BallValveAss'y 1<br />
186 467<br />
NozzleTip( . 312)<br />
1<br />
191 0913<br />
HoseAss'y-3/ 4"<br />
x 25<br />
Ft.<br />
1<br />
2011181 ExtensionWandAss'y 1<br />
2. The second loop is a REVERSE loop.<br />
Notice that the hose passes behind the loop on<br />
this reverse loop.<br />
If instructions are followed, the hose will<br />
uncoil without kinks.<br />
Reverse<br />
loop<br />
1<br />
1<br />
15<br />
16<br />
17<br />
18<br />
Quick Release<br />
Argon Valve<br />
19<br />
6A<br />
6C<br />
6B<br />
6D<br />
6E<br />
20<br />
3. The next loop is a regular “hose in front”<br />
loop. Adjust the loops so that they are approximately<br />
the same size and then attach<br />
the hose to the shutoff valve with either the<br />
extension wand or nozzle installed.