Breadmaker Instructions:Bread Oven - Coopers of Stortford
Breadmaker Instructions:Bread Oven - Coopers of Stortford
Breadmaker Instructions:Bread Oven - Coopers of Stortford

You also want an ePaper? Increase the reach of your titles
YUMPU automatically turns print PDFs into web optimized ePapers that Google loves.
Trouble shooting<br />
Recipes<br />
Time and temperature setting table<br />
Programs<br />
Installation and maintenance<br />
Technical specification<br />
Features<br />
<strong>Bread</strong> maker components<br />
Safety precautions<br />
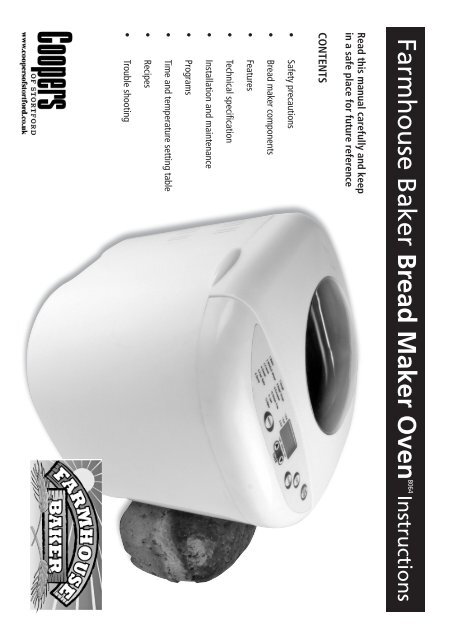
CONTENTS<br />
Read this manual carefully and keep<br />
in a safe place for future reference<br />
Farmhouse Baker <strong>Bread</strong> Maker <strong>Oven</strong> 8064<br />
<strong>Instructions</strong>
2<br />
Do not use the appliance if the cable or plug is damaged.<br />
CAUTION: To prevent overheating do not cover the appliance.<br />
The appliance is not intended to be operated by means <strong>of</strong> an external<br />
timer or on an extension lead.<br />
Stand the appliance on a table or flat surface. Protect your surface as<br />
this appliance will get hot.<br />
Do not wash any part in the dishwasher, hand wash only.<br />
Do not immerse in water.<br />
Do not use outdoors.<br />
Do not use any metal utensils with the bread maker as this will<br />
damage the non stick coating.<br />
Do not pull on the connection cord; use the plug, to disconnect the<br />
appliance from the mains.<br />
Do not overfill or force the machines work capacity.<br />
Never attempt to remove the bread pan during operation.<br />
This appliance is designed for domestic use only.<br />
Keep out <strong>of</strong> the reach <strong>of</strong> children.<br />
If the operating buttons are pressed unintentionally during use, it<br />
may affect the program in use.<br />
This appliance is not intended for use by persons (including children)<br />
with reduced physical, sensory or mental capabilities, or lack <strong>of</strong><br />
experience and knowledge, unless they have been give supervision to<br />
ensure that they do not play with the appliance.<br />
Use only original spare parts or accessories.<br />
Unplug when not in use and before cleaning.<br />
Do not use the appliance when empty.<br />
If any part <strong>of</strong> the unit, cable or plug is damaged, return the unit to<br />
the retailer for repair, there are no user serviceable parts.<br />
During operation the <strong>Bread</strong> maker will get HOT. Always use a cloth or<br />
oven gloves when removing the bread pan.<br />
Before use, clean all the parts <strong>of</strong> the product that will be in contact<br />
with food, as indicated in the cleaning section.<br />
Do not use the appliance and touch the plug and power cord with<br />
wet hands<br />
Read these instructions carefully before switching on the appliance<br />
and keep for future reference. Failure to follow and observe these<br />
instructions could lead to an accident and or damage to the bread<br />
maker.<br />
Ensure that the voltage indicated on the rating plate matches the<br />
mains voltage before plugging in the appliance with an earthed<br />
socket.<br />
SAFETY PRECAUTIONS
3<br />
Instruction manual (1 pc)<br />
Mixing blade (1pc)<br />
Allow the bread to cool down for 15 minutes before cutting.<br />
Measuring spoon (1 pc)<br />
Remove the bread. Shake the bread pan if the loaf is difficult to<br />
remove.<br />
Measuring cup (1 pc)<br />
Remove the bread pan pulling on the handle using a cloth or oven<br />
glove, as it will be HOT.<br />
<strong>Bread</strong> maker main unit (1 pc)<br />
Removable bread pan (1 pc)<br />
Unplug the appliance from the mains.<br />
PACKAGE CONTENTS<br />
After cooking time is up,<br />
Before using the product for the first time, clean the parts that will<br />
come into contact with food in the manner described in the cleaning<br />
section.<br />
Make sure that all <strong>of</strong> the packaging has been removed.<br />
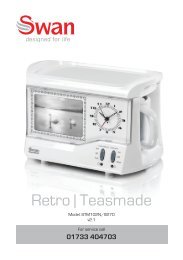
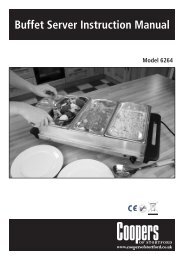
F 2 – Tea spoon (Tsp)<br />
On the first few uses, it’s possible that the bread will not have the<br />
desired appearance, but with a little practice you’ll soon get bread<br />
how you like it.<br />
F 1 – Table spoon (Tbsp)<br />
F – Measuring spoon<br />
INSTALLATION AND MAINTENANCE<br />
Before use:<br />
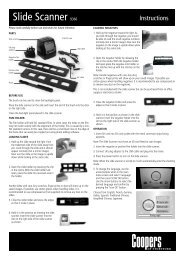
B 6 – light and dark adjustment buttons<br />
C – Removable bread pan<br />
D – Mixing blade<br />
E – Measuring cup<br />
B 3 – Crust colour button<br />
B 4 – Loaf button<br />
B 5 – On/Off button<br />
TECHNICAL SPECIFICATION<br />
Rated voltage 230V~ 50Hz<br />
Rated power 610W<br />
Protection class I<br />
Standby power consumption: 0.5 W<br />
B – Control panel<br />
B 1 – Display screen<br />
B 2 – Menu button<br />
A – Lid<br />
FEATURES
4<br />
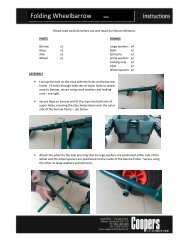
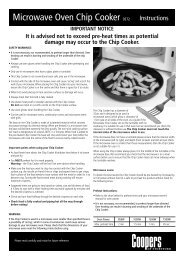
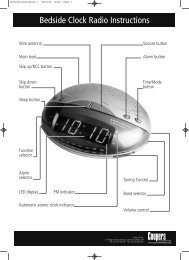
Fig. 1 Fig. 2 Fig. 3<br />
Put the bread pan in place and press both sides until they fit in<br />
correctly (Fig.2).<br />
Unroll the cable completely before plugging it in.<br />
Connect the appliance to the power supply.<br />
After the beep, program 1 (1: P) will appear on the display screen.<br />
Press the menu button (B2) to select the desired program (Table 1).<br />
Press the colour button (B3) to select the desired program (light,<br />
medium, dark). The arrow will move to show the selected colour.<br />
(Fig. 3).<br />
Press the loaf button (B4) to select the desired weight <strong>of</strong> bread (1lb,<br />
1.5lb, and 2lb). The arrow will move to show the selected weight.<br />
Start the program by pressing the start/stop button.<br />
The remaining cooking time will appear on the display screen.<br />
The bread maker has a keep warm function which will operate at<br />
the end <strong>of</strong> the cooking time for one hour. To stop this process, press<br />
the start/stop button for 1 second.<br />
Do not press stop/start whilst the machine is running.<br />
Measuring spoon accessory: (F):<br />
This is used for measuring quantities accurately.<br />
Tbsp = tablespoon, tsp = teaspoon.<br />
Measuring cup accessory: (E):<br />
This is used for measuring quantities accurately.<br />
Accessories:<br />
Clean the appliance.<br />
Unplug the appliance from the power supply.<br />
Once you have finished using the appliance:<br />
Fit the mixing blade in place (Fig. 1).<br />
Add the ingredients – see recipes.<br />
Remove the bread pan by pulling the handle.<br />
Use the adjustment buttons to set the desired cooking from start<br />
time up to 15 hours, in ten minute increments.<br />
Use:<br />
Timer Function:
5<br />
PROGRAMS:<br />
1. Basic<br />
This is probably the most used program as it gives you the best results<br />
with just about any recipe.<br />
2. Whole Wheat<br />
This setting allows for a longer rise time.<br />
3. French<br />
Use this setting to make classic French style bread. French bread takes<br />
longer to knead, rise and bake producing a thicker crust.<br />
4. Sweet<br />
This setting allows for higher amounts <strong>of</strong> sugar, fats and proteins all <strong>of</strong><br />
which tend to increase browning.<br />
5. Fast Bake<br />
This allows a loaf to be baked in one hour. It only bakes 1.5lb loafs with a<br />
medium crust. Timer delay does not work with this setting.<br />
6. Quick<br />
This will make a 1.5lb loaf that has no need to rise and no yeast.<br />
7. Dough<br />
This is a no bake setting for you to prepare dough for rolls, pizzas etc<br />
which you shape by hand and then bake in a conventional oven.<br />
8. Bagel Dough<br />
A no bake setting specially for preparing bagel dough.<br />
9. European<br />
A specific setting for European style recipes.<br />
10. Gluten free<br />
A setting for gluten free recipes.<br />
11. Jam<br />
For making jam using fresh fruit.<br />
12. Bake<br />
This is a bake only setting and can be used for up to one hour.<br />
Crust colour<br />
Most <strong>of</strong> the above programs <strong>of</strong>fer a choice <strong>of</strong> crust colour:<br />
Light<br />
Medium<br />
Dark<br />
Tips for using your bread maker:<br />
Even experienced cooks consider bread making to be an art. You may<br />
have to experiment with recipes until you find the result that satisfies<br />
you! Even the ingredients used can vary considerably between brands,<br />
so do persevere. Always check the packets <strong>of</strong> any ingredients you use<br />
for any specific instructions.<br />
Use exact amounts.<br />
Use fresh ingredients at room temperature<br />
Add the ingredients in the correct order according to the recipe.<br />
Always add in this order:<br />
Liquids (water, milk etc)<br />
flour<br />
fat (butter, oils etc)<br />
salt and sugar around the edge <strong>of</strong> the mixture<br />
lastly add the yeast to a dry area in the mix.<br />
Flour – always use fresh bread flour, no other flour will work.<br />
Yeast - yeast is probably the most important ingredient. If the yeast is<br />
not fresh your bread will not rise. All the recipes for bread makers use<br />
dried yeast packed in sachets. Look for Easy Blend, Easy Bake, Quick,<br />
Fast Action labels.<br />
Water – it is very important that the water used is room temperature,<br />
not too hot and not too cold.<br />
Do not open the lid whilst the bread maker is in use.<br />
Select the correct program.<br />
Select your crust colour.<br />
Work out the difference between the time now and the time when<br />
you want the bread to be cooked and press the timer button until the<br />
setting is reached. E.g., time now 9am, bread wanted for 4pm, timer<br />
would be set for 7 hours. The cooking time is included in the 7 hours.<br />
Press the start/stop button.<br />
Caution – do not use recipes with ingredients that could spoil e.g.<br />
fresh eggs, fresh milk.<br />
Add all your ingredients according to the recipe.<br />
Using the delay timer
6<br />
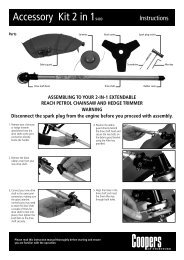
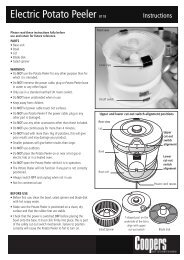
3 French<br />
2<br />
Whole<br />
Wheat<br />
100°C,<br />
temp. °C for each step 32°C 32°C 32°C<br />
80°C<br />
1.0lb 50’ 2:50 Yes 60’ 15:00<br />
Light 115°C 1.5lb 60’ 3:00 Yes 60’ 15:00<br />
2.0lb 70’ 3:10 Yes 60’ 15:00<br />
1.0lb 50’ 2:50 Yes 60’ 15:00<br />
Medium 125°C 1.5lb 10’ 20’ 15’ 20’ 60’ 3:00 Yes 60’ 15:00<br />
2.0lb 70’ 3:10 Yes 60’ 15:00<br />
1.0lb 50’ 2:50 Yes 60’ 15:00<br />
Dark 135°C 1.5lb 60’ 3:00 Yes 60’ 15:00<br />
2.0lb<br />
30sec<br />
55’<br />
s<br />
70’ 3:10 Yes 60’ 15:00<br />
100°C,<br />
Temp. °C for each step 32°C 32°C 32°C<br />
80°C<br />
1.0lb 55’ 4:00 Yes 60’ 15:00<br />
Light 115°C 1.5lb 65’ 4:10 Yes 60’ 15:00<br />
2.0lb 75’ 4:20 Yes 60’ 15:00<br />
1.0lb 55’ 4:00 Yes 60’ 15:00<br />
Medium 125°C 1.5lb 30’ 10’ 20’ 30’ 65’ 4:10 Yes 60’ 15:00<br />
2.0lb 75’ 4:20 Yes 60’ 15:00<br />
1.0lb 55’ 4:00 Yes 60’ 15:00<br />
Dark 135°C 1.5lb 65’ 4:10 Yes 60’ 15:00<br />
2.0lb<br />
30<br />
70’<br />
secs<br />
75’ 4:20 Yes 60’ 15:00<br />
100°C,<br />
temp. °C for each step 32°C 32°C 32°C<br />
80°C<br />
1.0lb 60’ 3:40 Yes 60’ 15:00<br />
Light 125°C 1.5lb 70’ 3:50 Yes 60’ 15:00<br />
2.0lb 80’ 4:00 Yes 60’ 15:00<br />
1.0lb 60’ 3:40 Yes 60’ 15:00<br />
Medium 135°C 1.5lb 18’ 40’ 22’ 20’ 70’ 3:50 Yes 60’ 15:00<br />
2.0lb 80’ 4:00 Yes 60’ 15:00<br />
1.0lb 60’ 3:40 Yes 60’ 15:00<br />
Dark 145°C 1.5lb 70’ 3:50 Yes 60’ 15:00<br />
2.0lb<br />
30<br />
60’<br />
secs<br />
80’ 4:00 Yes 60’ 15:00<br />
1 Basic<br />
Prog Type Crust Baking<br />
temp. °C<br />
Size PREH KND1 REST KND2 RISE1 KND3 RISE2 KND4 RISE3 BAKE Total Extras Warm Delay<br />
Crust <strong>Bread</strong> Maker Time & Temperature Setting Table<br />
CRUST BREADMAKER TIME & TEMPERATURE SETTING (TABLE 1)
7<br />
Medium 115°C N/A 5’ 5’ 20’ 60’ 54’ 2:24 NO 60’ N/A<br />
temp. °C for each step N/A N/A N/A N/A<br />
11 Jam<br />
N/A 105°C N/A 15’ 50’ 1:05 NO N/A N/A<br />
100°C,<br />
temp. °C for each step N/A N/A N/A<br />
12 Bake<br />
80°C<br />
Medium 125°C N/A 60’ 1:00 NO 60’ N/A<br />
9 European 30sec<br />
Medium 125°C N/A 10’ 10’ 26’ 40’ 64’ 60’ 3:30 yes 60’ 15:00<br />
s<br />
100°C,<br />
Gluten temp. °C for each step N/A N/A N/A<br />
10<br />
80°C<br />
Free<br />
100°C,<br />
temp. °C for each step 32°C 32°C 32°C<br />
80°C<br />
1.0lb 40’ 2:40 Yes 60’ 15:00<br />
Light 110°C 1.5lb 50’ 2:50 Yes 60’ 15:00<br />
2.0lb 60’ 3:00 Yes 60’ 15:00<br />
4 Sweet<br />
1.0lb 40’ 2:40 Yes 60’ 15:00<br />
Medium 120°C 1.5lb 10’ 5’ 20’ 30’ 50’ 2:50 Yes 60’ 15:00<br />
2.0lb 60’ 3:00 Yes 60’ 15:00<br />
1.0lb 40’ 2:40 Yes 60’ 15:00<br />
Dark 130°C 1.5lb 50’ 2:50 Yes 60’ 15:00<br />
2.0lb<br />
30sec<br />
55’<br />
s<br />
60’ 3:00 Yes 60’ 15:00<br />
100°C,<br />
temp. °C for each step 32°C 32°C N/A<br />
5 Fast bake<br />
80°C<br />
Medium 130°C N/A 13’ 10’ 35’ 0:58 yes 60’ N/A<br />
100°C,<br />
temp. °C for each step 32°C N/A N/A<br />
6 Quick<br />
80°C<br />
Medium 130°C 1.5lb 3’ 5’ 5’ 90’ 1:43 NO 60’ N/A<br />
temp. °C for each step 32°C N/A N/A N/A<br />
7 Dough<br />
N/A N/A N/A 5’ 5’ 20’ 60’ 1:30 yes N/A 15:00<br />
temp. °C for each step N/A N/A N/A N/A<br />
Bagel<br />
8<br />
Dough N/A N/A N/A 10’ 10’ 89’ 60<br />
1:50 yes N/A 15:00<br />
secs<br />
temp. °C for each step N/A N/A N/A N/A<br />
Prog Type Crust Baking<br />
temp. °C<br />
Size PREH KND1 REST KND2 RISE1 KND3 RISE2 KND4 RISE3 BAKE Total Extras Warm Delay<br />
Crust <strong>Bread</strong> Maker Time & Temperature Setting Table<br />
CRUST BREADMAKER TIME & TEMPERATURE SETTING (TABLE 1) continued
8<br />
NB: this program does not have a rise function and no yeast has been included in the recipe.<br />
Yeast 1 Tsp 1 Tsp 1 Tsp<br />
Water 360ml<br />
Water 190ml 260ml 330ml<br />
Flour 4<br />
measuring cup<br />
Flour 2 1 /4 measuring cup 3 measuring cup 4<br />
measuring cup<br />
Skimmed Milk powder 2 Tbsp<br />
Sugar 1 Tbsp 1 Tbsp 1 Tbsp<br />
Sugar 2 Tbsp<br />
Salt 1 Tsp 1.5 Tsp 2 Tsp<br />
Salt 1 Tsp<br />
Oil 1 Tbsp 1 Tbsp 2 Tbsp<br />
Oil 2 Tbsp<br />
3. French 1.0lb 1.5lb 2.0lb<br />
6. Quick 1.5lb<br />
You can replace 50% <strong>of</strong> the wholemeal flour with Strong white bread flour if preferred.<br />
Yeast 1 Tsp 1 Tsp 1 Tsp<br />
Yeast 4 Tsp<br />
Water 210ml 260ml 340ml<br />
Water 300ml<br />
Whole Wheat Flour 2 measuring cup 3 measuring cup 4 1 /4<br />
measuring cup<br />
Flour 3<br />
measuring cup<br />
Skimmed Milk powder 1 Tbsp 2 Tbsp 2 Tbsp<br />
Skimmed Milk powder 2 Tbsp<br />
Sugar 1 Tbsp 1.5 Tbsp 2 Tbsp<br />
Sugar 2 Tbsp<br />
Salt 1 Tsp 1 Tsp 1 Tsp<br />
Salt 1 Tsp<br />
Oil 1 Tbsp 1.5 Tbsp 2 Tbsp<br />
Oil 2 Tbsp<br />
2. Whole Wheat 1.0lb 1.5lb 2.0lb<br />
5. Fast Bake 1.5lb<br />
Yeast 1 Tsp 1 Tsp 1 Tsp<br />
Yeast 1 Tsp 1 Tsp 1 Tsp<br />
Water 190ml 260ml 330ml<br />
Water 190ml 260ml 330ml<br />
Flour 2 1 /4 measuring cup 3 measuring cup 4<br />
measuring cup<br />
Flour 2 1 /4 measuring cup 3 measuring cup 4<br />
measuring cup<br />
Skimmed Milk powder 1 Tbsp 1 Tbsp 1 Tbsp<br />
Skimmed Milk powder 1 Tbsp 1.5 Tbsp 2 Tbsp<br />
Sugar 1 Tbsp 1 Tbsp 1 Tbsp<br />
Sugar 3.5 Tbsp 4 Tbsp 5 Tbsp<br />
Salt 1 Tsp 1 Tsp 1 Tsp<br />
Salt 1 Tsp 1 Tsp 2 Tsp<br />
Oil 1 Tbsp 1.5 Tbsp 2 Tbsp<br />
Oil 1 Tbsp 1.5 Tbsp 2 Tbsp<br />
1. Basic 1.0lb 1.5lb 2.0lb<br />
4. Sweet 1.0lb 1.5lb 2.0lb<br />
1 lb = 0.45kg tsp=teaspoon tbsp=tablespoon<br />
1 lb = 0.45kg tsp=teaspoon tbsp=tablespoon<br />
RECIPES<br />
RECIPES
9<br />
Yeast 1 Tsp<br />
Water 330ml<br />
Flour 4<br />
measuring cup<br />
Skimmed Milk powder 2 Tbsp<br />
Sugar 2 Tbsp<br />
Salt 1 Tsp<br />
Oil 2 Tbsp<br />
9. European 2lb<br />
Yeast 1 Tsp<br />
Water 410ml<br />
Flour 4.5<br />
measuring cup<br />
Skimmed Milk powder 2 Tbsp<br />
Sugar 1 Tbsp<br />
This is for baking any recipe you wish such as cakes.<br />
12. Bake<br />
Salt 1 Tsp<br />
Oil 2 Tbsp<br />
8. Bagel Dough 2lb<br />
Warm jars before filling<br />
Do not lift lid while mixing<br />
Do not overfill<br />
You may need extra bake time according to the set required.<br />
Yeast 1 Tsp<br />
Preserving Sugar 3 Tbsp<br />
Water 410ml<br />
Water (27°C) 3 Tbsp<br />
Flour 4.5<br />
measuring cup<br />
Fresh or frozen (thawed) fruit2 Cups<br />
Skimmed Milk powder 2 Tbsp<br />
11. Jam<br />
Sugar 1 Tbsp<br />
Salt 1 Tsp<br />
Oil 2 Tbsp<br />
As ingredients vary greatly depending on which brand <strong>of</strong> gluten free flour mix is used, we<br />
have not included a recipe here. Please consult the instructions on your packet. This setting<br />
will make a 2.0lb loaf.<br />
7. Dough 2lb<br />
10. Gluten Free
10<br />
Do not worry if the colour <strong>of</strong> the bread pan changes colour over time.<br />
This is normal and does not affect the machine’s performance.<br />
Never immerse the appliance into water or any liquid<br />
Do not let water or any other liquid get into the air vents to avoid<br />
damage to the inner parts <strong>of</strong> the appliance.<br />
Do not use any abrasive cleaner or detergent for cleaning the<br />
appliance or accessories.<br />
Clean the appliance with a damp cloth with a few drops <strong>of</strong> washingup<br />
liquid and then dry.<br />
Do not wash any part in a dishwasher – hand wash only.<br />
If the mixing blade gets trapped in the bread pan, leave it to soak<br />
before removing it<br />
Disconnect the appliance from the power supply and allow it to cool<br />
down before undertaking any cleaning task.<br />
Cleaning<br />
Dispose <strong>of</strong> the appliance at the end <strong>of</strong> its lifespan at your local<br />
authorised household waste recycling centre.<br />
There are various ready to use bread mixes available to buy. These are<br />
usually best cooked on the Fast Bake setting. Follow the instructions on<br />
the packet.<br />
Dispose <strong>of</strong> paper and carton separately from plastic bags at your local<br />
recycling centre.<br />
Dispose <strong>of</strong> the packaging at your local recycling centre.<br />
Using <strong>Bread</strong> mixes<br />
DISPOSAL<br />
There is a 12 beep signal that will sound when you can add extra<br />
ingredients such as dried fruit during the second kneading stage <strong>of</strong><br />
programs (excluding programs 6, 10, 11, 12).<br />
No user serviceable parts, return to your retailer if a fault develops.<br />
Adding ingredients to recipes<br />
Repair
11<br />
The dough does not mix Incorrectly fitted bread pan or mixing blade Remove and check for correct fit.<br />
You see smoke or smell burning from the back Ingredients have spilled out <strong>of</strong> the bread pan Stop the bread maker, allow to cool, clean.<br />
<strong>of</strong> the machine and into the machine itself<br />
The bread is not baked in the centre Lifting up the lid, too much liquid Try using more flour (a tsp at a time) or less liquid (a tsp at a<br />
time). Do not lift the lid whilst in use.<br />
The bread is small, heavy, dense or wet Too dry Add liquid during the first cycle.<br />
<strong>Bread</strong> has a heavy thick texture Too much flour, old flour, or wrong type <strong>of</strong> flour Try using less flour or more yeast.<br />
The bread sinks whilst cooking Too much liquid Reduce the liquid 1 to 2 desert spoons<br />
The bread hasn’t risen enough Too much flour or not enough yeast There are several solutions:<br />
Try using less flour, more yeast, or less water. It could also be a<br />
result <strong>of</strong> using old yeast, wrong kind <strong>of</strong> flour, forgetting the salt,<br />
water that was too hot.<br />
The bread has risen too much Too much yeast Check the recipe and use less yeast ( 1 /4 tsp at a time). This could<br />
also be not enough salt or forgetting to put in the mixing blade.<br />
The bread is not brown enough Lifting up the lid Check that the lid is well closed while the bread is cooking or<br />
select another browning level.<br />
The bread is too brown Too much sugar Try again using less sugar and reducing the browning level.<br />
The bread has flour on top. Too much flour and a lack <strong>of</strong> water Try again using 1 teaspoon less <strong>of</strong> flour and 1 /4 <strong>of</strong><br />
a teaspoon more <strong>of</strong> water.<br />
It does not knead The bowl or the mixing blade are not in place Ensure that the bread pan and the mixing blade are correctly<br />
fitted.<br />
Problem Cause Solution<br />
The machine does not start when the on/<strong>of</strong>f button The machine is too hot E01 appears Wait for the machine to cool, for approximately<br />
1 hour.<br />
TROUBLE SHOOTING
Head Office, 11 Bridge Street, Bishop’s <strong>Stortford</strong> CM23 2JU Tel: 0844 482 4400 Fax: 01279 713695<br />
WARNING: THIS APPLIANCE MUST BE EARTHED<br />
• The wire which is coloured GREEN/YELLOW must be connected to the terminal<br />
which is marked with the letter E or (earth symbol) and is coloured GREEN or<br />
GREEN/YELLOW.<br />
• The wire which is coloured BROWN must be connected to the terminal which is<br />
marked with the letter L or coloured red.<br />
• The wire which is coloured BLUE must be connected to the terminal which is marked<br />
with the letter N or coloured black.<br />
As the colours <strong>of</strong> the wire in the mains lead <strong>of</strong> this appliance may not correspond with the<br />
colour markings identifying the terminals on your plug, proceed as follows:<br />
BLUE NEUTRAL<br />
BROWN LIVE<br />
GREEN/YELLOW EARTH<br />
The wires in the mains lead are coloured in accordance with the following code:<br />
U.K. WIRING INSTRUCTIONS