Industrial Dovetail Jig - Vermont American
Industrial Dovetail Jig - Vermont American
Industrial Dovetail Jig - Vermont American

Create successful ePaper yourself
Turn your PDF publications into a flip-book with our unique Google optimized e-Paper software.
6. Place an 11/32" I.D. X 7/8" O.D. washer and then a<br />
5/16" I.D. X 7/8" O.D. thick nylon washer over the bolt. It<br />
will be necessary to hold the bolt in place when performing<br />
this and the following steps.<br />
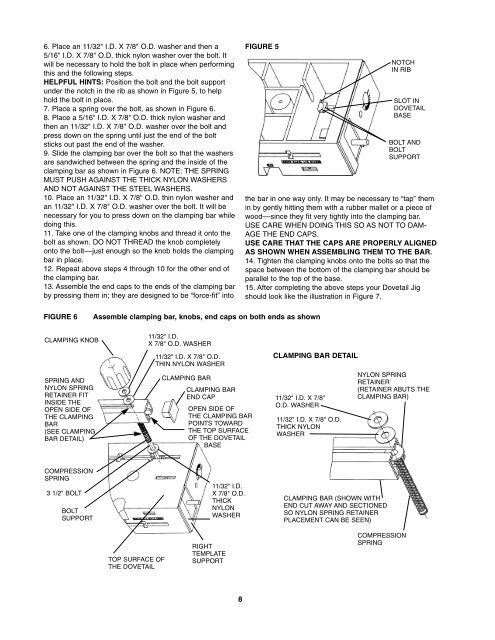
HELPFUL HINTS: Position the bolt and the bolt support<br />
under the notch in the rib as shown in Figure 5, to help<br />
hold the bolt in place.<br />
7. Place a spring over the bolt, as shown in Figure 6.<br />
8. Place a 5/16" I.D. X 7/8" O.D. thick nylon washer and<br />
then an 11/32" I.D. X 7/8" O.D. washer over the bolt and<br />
press down on the spring until just the end of the bolt<br />
sticks out past the end of the washer.<br />
9. Slide the clamping bar over the bolt so that the washers<br />
are sandwiched between the spring and the inside of the<br />
clamping bar as shown in Figure 6. NOTE: THE SPRING<br />
MUST PUSH AGAINST THE THICK NYLON WASHERS<br />
AND NOT AGAINST THE STEEL WASHERS.<br />
10. Place an 11/32" I.D. X 7/8" O.D. thin nylon washer and<br />
an 11/32" I.D. X 7/8" O.D. washer over the bolt. It will be<br />
necessary for you to press down on the clamping bar while<br />
doing this.<br />
11. Take one of the clamping knobs and thread it onto the<br />
bolt as shown. DO NOT THREAD the knob completely<br />
onto the bolt––just enough so the knob holds the clamping<br />
bar in place.<br />
12. Repeat above steps 4 through 10 for the other end of<br />
the clamping bar.<br />
13. Assemble the end caps to the ends of the clamping bar<br />
by pressing them in; they are designed to be “force-fit” into<br />
8<br />
FIGURE 5<br />
FIGURE 6 Assemble clamping bar, knobs, end caps on both ends as shown<br />
CLAMPING KNOB<br />
SPRING AND<br />
NYLON SPRING<br />
RETAINER FIT<br />
INSIDE THE<br />
OPEN SIDE OF<br />
THE CLAMPING<br />
BAR<br />
(SEE CLAMPING<br />
BAR DETAIL)<br />
COMPRESSION<br />
SPRING<br />
3 1/2" BOLT<br />
BOLT<br />
SUPPORT<br />
TOP SURFACE OF<br />
THE DOVETAIL<br />
11/32" I.D.<br />
X 7/8" O.D. WASHER<br />
11/32" I.D. X 7/8" O.D.<br />
THIN NYLON WASHER<br />
CLAMPING BAR<br />
CLAMPING BAR<br />
END CAP<br />
OPEN SIDE OF<br />
THE CLAMPING BAR<br />
POINTS TOWARD<br />
THE TOP SURFACE<br />
OF THE DOVETAIL<br />
BASE<br />
RIGHT<br />
TEMPLATE<br />
SUPPORT<br />
11/32" I.D.<br />
X 7/8" O.D.<br />
THICK<br />
NYLON<br />
WASHER<br />
CLAMPING BAR DETAIL<br />
NOTCH<br />
IN RIB<br />
SLOT IN<br />
DOVETAIL<br />
BASE<br />
BOLT AND<br />
BOLT<br />
SUPPORT<br />
the bar in one way only. It may be necessary to “tap” them<br />
in by gently hitting them with a rubber mallet or a piece of<br />
wood––since they fit very tightly into the clamping bar.<br />
USE CARE WHEN DOING THIS SO AS NOT TO DAM-<br />
AGE THE END CAPS.<br />
USE CARE THAT THE CAPS ARE PROPERLY ALIGNED<br />
AS SHOWN WHEN ASSEMBLING THEM TO THE BAR.<br />
14. Tighten the clamping knobs onto the bolts so that the<br />
space between the bottom of the clamping bar should be<br />
parallel to the top of the base.<br />
15. After completing the above steps your <strong>Dovetail</strong> <strong>Jig</strong><br />
should look like the illustration in Figure 7.<br />
11/32" I.D. X 7/8"<br />
O.D. WASHER<br />
11/32" I.D. X 7/8" O.D.<br />
THICK NYLON<br />
WASHER<br />
CLAMPING BAR (SHOWN WITH<br />
END CUT AWAY AND SECTIONED<br />
SO NYLON SPRING RETAINER<br />
PLACEMENT CAN BE SEEN)<br />
NYLON SPRING<br />
RETAINER<br />
(RETAINER ABUTS THE<br />
CLAMPING BAR)<br />
COMPRESSION<br />
SPRING