Installing The Heavy Duty Roll-Out Tray - Lista
Installing The Heavy Duty Roll-Out Tray - Lista
Installing The Heavy Duty Roll-Out Tray - Lista
Create successful ePaper yourself
Turn your PDF publications into a flip-book with our unique Google optimized e-Paper software.
(continued)<br />
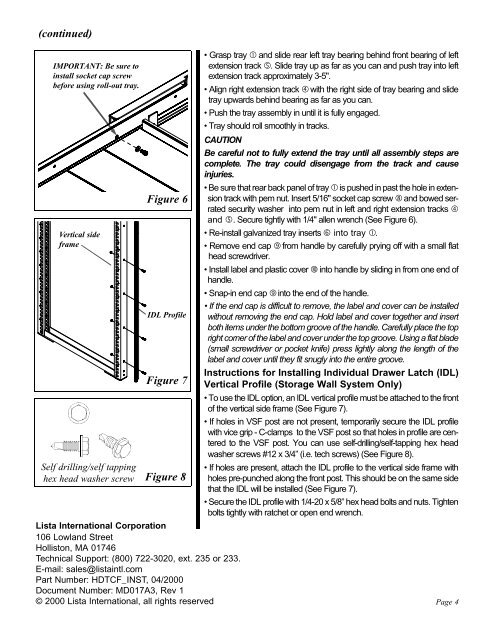
IMPORTANT: Be sure to<br />
install socket cap screw<br />
before using roll-out tray.<br />
Vertical side<br />
frame<br />
Self drilling/self tapping<br />
hex head washer screw<br />
Figure 6<br />
IDLProfile<br />
Figure 7<br />
Figure 8<br />
• Grasp tray and slide rear left tray bearing behind front bearing of left<br />
extension track . Slide tray up as far as you can and push tray into left<br />
extension track approximately 3-5".<br />
• Align right extension track with the right side of tray bearing and slide<br />
tray upwards behind bearing as far as you can.<br />
• Push the tray assembly in until it is fully engaged.<br />
• <strong>Tray</strong> should roll smoothly in tracks.<br />
CAUTION<br />
<strong>Lista</strong> International Corporation<br />
106 Lowland Street<br />
Holliston, MA 01746<br />
Technical Support: (800) 722-3020, ext. 235 or 233.<br />
E-mail: sales@listaintl.com<br />
Part Number: HDTCF_INST, 04/2000<br />
Document Number: MD017A3, Rev 1<br />
© 2000 <strong>Lista</strong> International, all rights reserved<br />
Be careful not to fully extend the tray until all assembly steps are<br />
complete. <strong>The</strong> tray could disengage from the track and cause<br />
injuries.<br />
• Be sure that rear back panel of tray is pushed in past the hole in extension<br />
track with pem nut. Insert 5/16" socket cap screw and bowed serrated<br />
security washer into pem nut in left and right extension tracks <br />
and . Secure tightly with 1/4" allen wrench (See Figure 6).<br />
• Re-install galvanized tray inserts into tray .<br />
• Remove end cap from handle by carefully prying off with a small flat<br />
head screwdriver.<br />
• Install label and plastic cover into handle by sliding in from one end of<br />
handle.<br />
• Snap-in end cap into the end of the handle.<br />
• If the end cap is difficult to remove, the label and cover can be installed<br />
without removing the end cap. Hold label and cover together and insert<br />
both items under the bottom groove of the handle. Carefully place the top<br />
right corner of the label and cover under the top groove. Using a flat blade<br />
(small screwdriver or pocket knife) press lightly along the length of the<br />
label and cover until they fit snugly into the entire groove.<br />
Instructions for <strong>Installing</strong> Individual Drawer Latch (IDL)<br />
Vertical Profile (Storage Wall System Only)<br />
• To use the IDL option, an IDLvertical profile must be attached to the front<br />
of the vertical side frame (See Figure 7).<br />
• If holes in VSF post are not present, temporarily secure the IDL profile<br />
with vice grip - C-clamps to the VSF post so that holes in profile are centered<br />
to the VSF post. You can use self-drilling/self-tapping hex head<br />
washer screws #12 x 3/4” (i.e. tech screws) (See Figure 8).<br />
• If holes are present, attach the IDL profile to the vertical side frame with<br />
holes pre-punched along the front post. This should be on the same side<br />
that the IDL will be installed (See Figure 7).<br />
• Secure the IDLprofile with 1/4-20 x 5/8” hex head bolts and nuts. Tighten<br />
bolts tightly with ratchet or open end wrench.<br />
Page 4


