Lista Drawer Suspension Installation & Removal
Lista Drawer Suspension Installation & Removal
Lista Drawer Suspension Installation & Removal

Create successful ePaper yourself
Turn your PDF publications into a flip-book with our unique Google optimized e-Paper software.
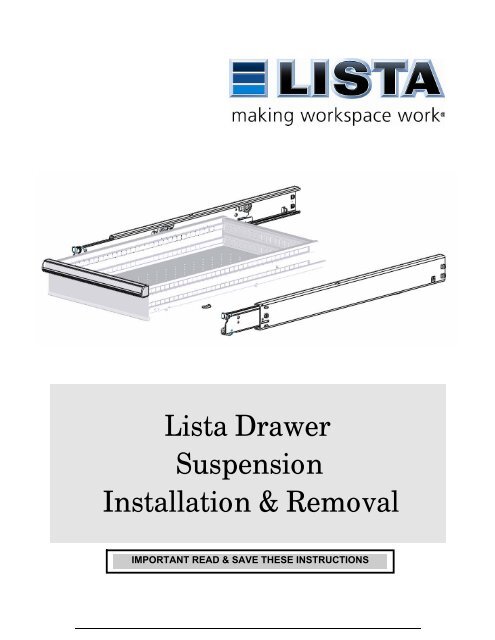
<strong>Lista</strong> <strong>Drawer</strong><br />
<strong>Suspension</strong><br />
<strong>Installation</strong> & <strong>Removal</strong><br />
IMPORTANT READ & SAVE THESE INSTRUCTIONS
Table of Contents:<br />
<strong>Lista</strong> <strong>Suspension</strong> Safety page 1<br />
Tools required page 2<br />
Parts included page 2<br />
Post Track <strong>Installation</strong> page 3 - 4<br />
Locating Post Tracks page 4<br />
Middle Track <strong>Installation</strong> page 5<br />
<strong>Drawer</strong> Tray <strong>Installation</strong> page 6<br />
<strong>Drawer</strong>/Tray <strong>Removal</strong> page 7<br />
Post & Middle Track <strong>Removal</strong> page 7<br />
LISTA<br />
SUSPENSION SAFETY<br />
IMPORTANT SAFETY INFORMATION<br />
READ ALL INSTRUCTIONS BEFORE USING<br />
This is the safety alert symbol<br />
This symbol alerts you to potential hazards that can injure<br />
you & others<br />
All safety messages will follow the safety alert symbol and the word<br />
“CAUTION” or “NOTICE” which means:<br />
You may be seriously injured if you don’t<br />
follow instructions.<br />
Property damage or failure may occur if<br />
you don’t follow instructions.<br />
All safety messages will tell you what the potential hazard is, tell you how to<br />
reduce the chance of injury, and tell you what can happen if the instructions<br />
are not followed.<br />
1
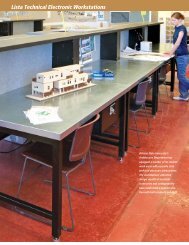
Always refer to application specific material supplied with product where suspension<br />
components will be used.<br />
• For cabinet applications refer to safe-use documents: Proper Usage of <strong>Lista</strong><br />
Cabinets, Mounting <strong>Installation</strong> Instructions of <strong>Lista</strong> Cabinets or Important<br />
Loading Instructions for Mobile Cabinets<br />
• For shelving applications refer to installation manuals: <strong>Lista</strong> Storage-Wall<br />
instructions or <strong>Lista</strong> Control Station instructions<br />
Read and follow the instructions provided with any tools listed below. Use personal<br />
protective equipment as required.<br />
Tools:<br />
• Small Needle-nosed pliers or Slotted/Common Screwdriver<br />
• Mallet or Hammer<br />
Personal Protection:<br />
• Work Gloves<br />
• Eye protection<br />
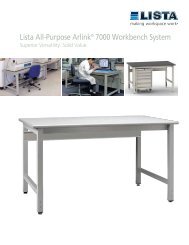
Included Parts:<br />
• <strong>Drawer</strong> – includes left & right drawer tracks<br />
• Middle Tracks (left & right) – includes latch<br />
• Post Tracks (left & right)<br />
• Retaining Clips – one per post track<br />
Retaining Clips<br />
<strong>Drawer</strong><br />
3<br />
Middle<br />
Tracks<br />
Post Tracks
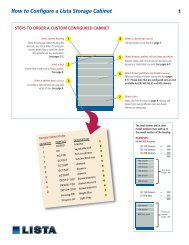
Post Track <strong>Installation</strong>:<br />
Sharp Edge Hazard<br />
Use work gloves and exercise caution when<br />
handling any unfinished steel<br />
Failure to do so may result in injury!<br />
1) Install Left & Right Post Tracks onto cabinet or storage wall so tracks are level &<br />
at the same height. If installing more than one drawer start with the top drawer & work<br />
down.<br />
Note: Tracks are marked near the front with an “L” for left & “R” for right (“L” for Left<br />
shown). The front of the Tracks can be identified by a 3/16 x 1-1/8 slot as shown below.<br />
Tracks level & at same height<br />
Slot at front<br />
of Post Track<br />
“L” stamp for Left
Post Track <strong>Installation</strong> Continued:<br />
Unsecured Component Hazard<br />
Be sure retaining clips are properly installed<br />
Failure to do so may allow drawers/tracks to<br />
dislodge resulting in injury or damage!<br />
2) Insert retaining clips into rectangular slots on each Post Track as shown.<br />
Note: If retaining clips cannot be installed then the Post Track may not be fully<br />
seated or Post track may not be installed level. Reinstall Track if not level. To seat a<br />
level Post Track tap down with a mallet or hammer.<br />
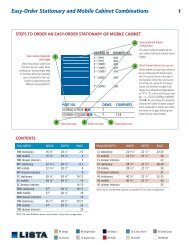
Locating Post tracks:<br />
Push retaining clip into slot -<br />
making sure it snaps into place as<br />
shown to the right<br />
Refer to the table below to determine proper location of the bottom of next Post Track.<br />
When installing multiple drawers start at the top & work down.<br />
Note: <strong>Drawer</strong>s mounted at the very bottom of the cabinet<br />
or Storage Wall requires the tracks to be mounted into the lowest<br />
post slots available.<br />
1<br />
Counting Post Slots<br />
2<br />
<strong>Drawer</strong> type<br />
Count down<br />
Slots<br />
(2”) 50 2<br />
(3”) 75 3<br />
(4”) 100 4<br />
(5”) 125 5<br />
(6”) 150 6<br />
(7”) 175 7<br />
(8”) 200 8<br />
(9”) 225 9<br />
(12”) 300 12<br />
(14”) 350 14
Middle Track <strong>Installation</strong>:<br />
Each Post Track will require a Middle Track before any drawer or tray can be installed.<br />
1) Pull latch open on left & right middle tracks (if not already open). Latch will pivot<br />
freely when open.<br />
Latch<br />
Pull open<br />
440 lb. shown<br />
Parts are marked “L” or<br />
“R” on the outside<br />
2) Insert Middle Tracks into Post Tracks, as shown. Be sure to keep the left Middle<br />
Track with the left post Track and likewise on the right.<br />
Note: Lift the front of the Middle Track while inserting if resistance is encountered.
<strong>Drawer</strong>/Tray <strong>Installation</strong>:<br />
Always refer to cabinet instructions regarding loading & use before loading drawers<br />
1) Insert drawer/tray into the Middle tracks so that the drawer tracks ride on top of<br />
the Middle Track wheels as shown below.<br />
Note: Lift the front of the drawer while inserting once resistance is encountered.<br />
Lift <strong>Drawer</strong><br />
Unsecured Component Hazard<br />
Be sure Middle track Latches are properly closed<br />
Failure to do so could allow drawers to become<br />
dislodged resulting in injury or damage!<br />
2) Push drawer/tray almost fully closed then push each Middle track latch closed.<br />
Latch<br />
Push closed<br />
440 lb shown<br />
3) Close drawer completely. Repeat steps 1 – 3 as needed for other drawer(s).
<strong>Drawer</strong>/Tray <strong>Removal</strong>:<br />
Reverse installation steps above or See “<strong>Drawer</strong> <strong>Removal</strong> Instructions” (Document<br />
MD052A3)<br />
Post & Middle Track <strong>Removal</strong>:<br />
Projectile Hazard<br />
Be sure proper eye protection is worn when removing<br />
retaining clips<br />
Failure to do so may resulting in eye injury<br />
Reverse steps outlined in Track <strong>Installation</strong>s…use needle-nose pliers or a small<br />
slotted screwdriver to remove retaining clips from Post Tracks<br />
Note: Once drawer/tray is removed pull Middle Tracks out to stopping point then lift the front of<br />
the Middle Track while simultaneously pushing down on the lower rear to bypass stops.<br />
Making Workspace Work® is a trademark of <strong>Lista</strong> International Corp.<br />
Creation Date Document Number<br />
09-04-2008 MD053A3 Rev. 1<br />
This document is proprietary information of <strong>Lista</strong> International Corporation. Unauthorized reproduction<br />
of any portion of this document is prohibited without written consent of <strong>Lista</strong> International Corporation.<br />
The material in this document is for informational purposes only.<br />
It is subject to change without notice.<br />
© 2008 <strong>Lista</strong> International Corporation<br />
106 Lowland Street<br />
Holliston, MA 01746-2094<br />
E-mail: sales@listaintl.com<br />
All rights reserved<br />
For questions or technical support call 1-800-722-3020