
Create successful ePaper yourself
Turn your PDF publications into a flip-book with our unique Google optimized e-Paper software.
HANDS-ONTechnique<br />
simple & strong<br />
<strong>Draw</strong>-<strong>Bolt</strong><br />
<strong>Joinery</strong><br />
This rugged<br />
system is easy to<br />
make, knocks down<br />
in a jiffy, and is perfect<br />
for big projects.<br />
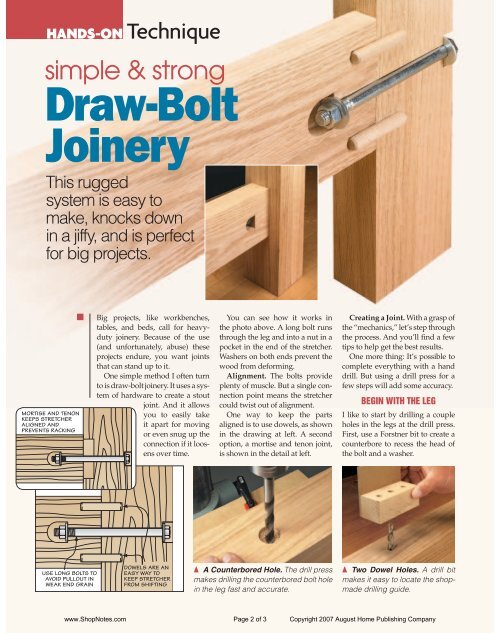
MORTISE AND TENON<br />
KEEPS STRETCHER<br />
ALIGNED AND<br />
PREVENTS RACKING<br />
USE LONG BOLTS TO<br />
AVOID PULLOUT IN<br />
WEAK END GRAIN<br />
Big projects, like workbenches,<br />
tables, and beds, call for heavyduty<br />
joinery. Because of the use<br />
(and unfortunately, abuse) these<br />
projects endure, you want joints<br />
that can stand up to it.<br />
One simple method I often turn<br />
to is draw-bolt joinery. It uses a system<br />
of hardware to create a stout<br />
joint. And it allows<br />
you to easily take<br />
it apart for moving<br />
or even snug up the<br />
connection if it loosens<br />
over time.<br />
DOWELS ARE AN<br />
EASY WAY TO<br />
KEEP STRETCHER<br />
FROM SHIFTING<br />
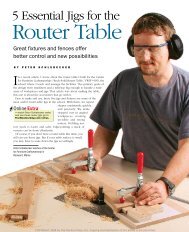
You can see how it works in<br />
the photo above. A long bolt runs<br />
through the leg and into a nut in a<br />
pocket in the end of the stretcher.<br />
Washers on both ends prevent the<br />
wood from deforming.<br />
Alignment. The bolts provide<br />
plenty of muscle. But a single connection<br />
point means the stretcher<br />
could twist out of alignment.<br />
One way to keep the parts<br />
aligned is to use dowels, as shown<br />
in the drawing at left. A second<br />
option, a mortise and tenon joint,<br />
is shown in the detail at left.<br />
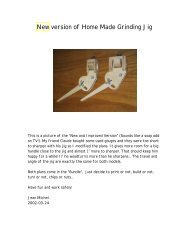
{ A Counterbored Hole. The drill press<br />
makes drilling the counterbored bolt hole<br />
in the leg fast and accurate.<br />
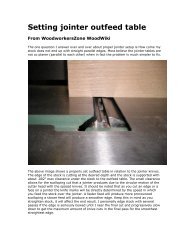
Creating a Joint. With a grasp of<br />
the “mechanics,” let’s step through<br />
the process. And you’ll fi nd a few<br />
tips to help get the best results.<br />
One more thing: It’s possible to<br />
complete everything with a hand<br />
drill. But using a drill press for a<br />
few steps will add some accuracy.<br />
BEGIN WITH THE LEG<br />
I like to start by drilling a couple<br />
holes in the legs at the drill press.<br />
First, use a Forstner bit to create a<br />
counterbore to recess the head of<br />
the bolt and a washer.<br />
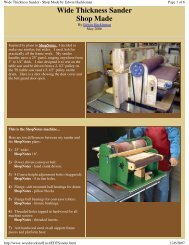
{ Two Dowel Holes. A drill bit<br />
makes it easy to locate the shopmade<br />
drilling guide.<br />
www.ShopNotes.com Page 2 of 3 Copyright 2007 August Home Publishing Company
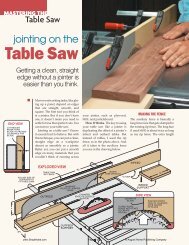
{ Drilling the Stretcher. A fence on the drilling<br />
guide positions the holes properly and allows you to<br />
clamp it in place on the stretcher.<br />
For the through hole, simply<br />
replace the Forstner bit with a<br />
brad point bit. This allows you<br />
to drill the through hole without<br />
changing the setup (fi rst photo at<br />
the bottom of the opposite page).<br />
Drilling the Dowel Holes.<br />
There are just two more holes<br />
to drill on the leg before you can<br />
move on. And those are the holes<br />
to accept the alignment dowels.<br />
These two holes will need to<br />
match the holes that you’ll drill<br />
in the stretchers later on. To get it<br />
right the fi rst time, I made a simple<br />
drilling guide. It’s sized to match<br />
the end of the stretcher so you can<br />
locate the holes in each piece consistently.<br />
The drilling guide is positioned<br />
on the inside face of the leg<br />
(lower right photo on the opposite<br />
page) and clamped in place. Then<br />
you can drill the dowel holes.<br />
Using ordinary hex bolts and nuts<br />
to secure a draw-bolt joint is a<br />
common and inexpensive way to<br />
go. But there are two other hardware<br />
alternatives to consider. (To<br />
fi nd out where to fi nd these, turn<br />
to Sources on page 51.)<br />
Bed <strong>Bolt</strong>s. One option you may<br />
want to consider is old-fashioned<br />
bed bolts. The black bolts and nuts<br />
have square heads that give them<br />
a traditional look. The head of the<br />
bolt is fl ared to provide a wider<br />
THE STRETCHERS<br />
Now you can get to work on the<br />
stretchers. You’ll use the drilling<br />
guide to drill holes in the ends of<br />
the stretchers (left photo above).<br />
Drilling the two dowel holes isn’t<br />
a big deal. But depending on the<br />
length of your bit, you may need<br />
to remove the guide to complete<br />
the bolt hole to its fi nal depth.<br />
Cross Hole. The last task is to<br />
drill a hole that allows the nut<br />
and washer to thread onto the bolt<br />
inside the stretcher. This is a twostep<br />
process. Note: It’s best to drill<br />
this hole on a hidden side of the<br />
stretcher — especially furniture<br />
projects like beds and tables.<br />
To locate this hole, you’ll need<br />
to fi rst determine just how far<br />
the bolt extends into the stretcher.<br />
Then you can use a square to align<br />
the cross hole with the bolt hole.<br />
Specialty Hardware:<br />
Bed <strong>Bolt</strong>s & Bench <strong>Bolt</strong>s<br />
bearing surface, eliminating the<br />
need for another washer.<br />
To tighten them, you can use<br />
either an ordinary wrench or a bed<br />
bolt “key” (photo at right).<br />
Bench <strong>Bolt</strong>s. Instead of a hex<br />
nut, Veritas’ bench bolts use a<br />
round barrel nut. This simplifi es<br />
the process because you only need<br />
to drill a 1"-dia. hole for the nut<br />
to fi t into. And you don’t need to<br />
worry about holding onto the nut<br />
while tightening the bolt.<br />
{ The Cross Hole. Drill the<br />
cross hole on the inside face of<br />
the stretcher with a Forstner bit.<br />
Here again, the fi rst step takes<br />
place at the drill press (center<br />
photo). You want to make sure to<br />
drill this hole deep enough so the<br />
nut will engage the bolt.<br />
Back at the workbench, your next<br />
task is to fl atten the “leg” end of the<br />
cross hole. This provides a wide<br />
bearing surface for the washer and<br />
nut. To do this, I draw a couple of<br />
layout lines and use a chisel and a<br />
mallet to trim everything up.<br />
Assembly. Completing the<br />
cross hole means you’re ready for<br />
assembly. After inserting a couple<br />
of dowels (you don’t need to glue<br />
them), it’s just a matter of threading<br />
the bolt into the nut.<br />
With a few turns of a socket<br />
wrench, the joint is rock-solid<br />
and secure. And when it comes to<br />
heavy-duty joinery, there’s nothing<br />
more you could ask for.<br />
Square-head bed<br />
bolts provide a<br />
traditional look<br />
{ Square it Up. With a chisel,<br />
create a fl at bearing surface for<br />
the washer and nut.<br />
T-handle key fi ts snugly<br />
over square-head<br />
bed bolts<br />
www.ShopNotes.com Page 3 of 3 Copyright 2007 August Home Publishing Company<br />
Stout 1 ⁄2" x 6"<br />
bolt handles<br />
heavy loads<br />
Round barrel<br />
nut simplifi es<br />
installation