Ultimate Crosscut Sled - gerald@eberhardt.bz
Ultimate Crosscut Sled - gerald@eberhardt.bz
Ultimate Crosscut Sled - gerald@eberhardt.bz

You also want an ePaper? Increase the reach of your titles
YUMPU automatically turns print PDFs into web optimized ePapers that Google loves.
<strong>Ultimate</strong> <strong>Crosscut</strong> sled<br />
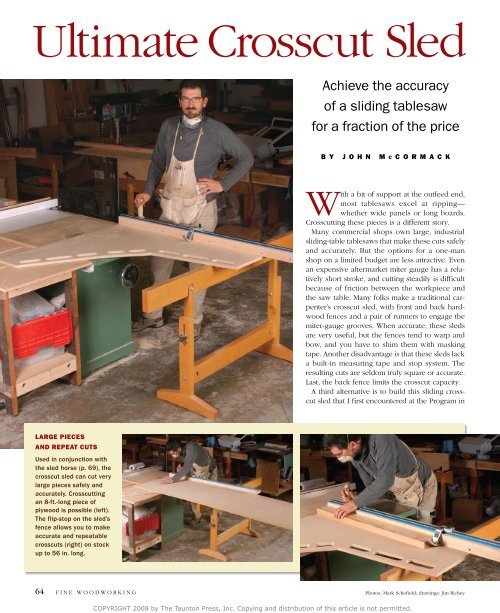
LARGE PIECES<br />
AND REPEAT CUTS<br />
Used in conjunction with<br />
the sled horse (p. 69), the<br />
crosscut sled can cut very<br />
large pieces safely and<br />
accurately. crosscutting<br />
an 8-ft.-long piece of<br />
plywood is possible (left).<br />
The flip-stop on the sled’s<br />
fence allows you to make<br />
accurate and repeatable<br />
crosscuts (right) on stock<br />
up to 56 in. long.<br />
Achieve the accuracy<br />
of a sliding tablesaw<br />
for a fraction of the price<br />
BY JOHN M C CORMACK<br />
with a bit of support at the outfeed end,<br />
most tablesaws excel at ripping—<br />
whether wide panels or long boards.<br />
<strong>Crosscut</strong>ting these pieces is a different story.<br />
Many commercial shops own large, industrial<br />
sliding-table tablesaws that make these cuts safely<br />
and accurately. But the options for a one-man<br />
shop on a limited budget are less attractive. Even<br />
an expensive aftermarket miter gauge has a relatively<br />
short stroke, and cutting steadily is difficult<br />
because of friction between the workpiece and<br />
the saw table. Many folks make a traditional carpenter’s<br />
crosscut sled, with front and back hardwood<br />
fences and a pair of runners to engage the<br />
miter-gauge grooves. when accurate, these sleds<br />
are very useful, but the fences tend to warp and<br />
bow, and you have to shim them with masking<br />
tape. Another disadvantage is that these sleds lack<br />
a built-in measuring tape and stop system. The<br />
resulting cuts are seldom truly square or accurate.<br />
last, the back fence limits the crosscut capacity.<br />
A third alternative is to build this sliding crosscut<br />
sled that I first encountered at the Program in<br />
64 FINE wOODwORKINg<br />
Photos: Mark schofield; drawings: Jim Richey<br />
COPYRIGHT 2008 by The Taunton Press, Inc. Copying and distribution of this article is not permitted.
A new ApproAch<br />
The triangular shape is designed to support<br />
large pieces yet minimize the weight of the<br />
sled, while the handholds make the sled easier<br />
to carry on and off the saw. The 36-in. miter bar<br />
gives the sled a similar crosscut capacity. The<br />
single bar rides in the left-hand miter-gauge<br />
slot, so with your right hand on the dedicated<br />
handle, your body is safely to the left of the<br />
blade, unlike with a carpenter’s sled. The twopart<br />
fence is designed not to bow and has a<br />
flat face that can be adjusted if necessary. it<br />
is perfectly square to the blade. The sawkerf<br />
marks the edge of the sled, making for easy<br />
layout and splinter-free cuts. Finally, a trackmounted<br />
stop, keyed to a self-adhesive ruler,<br />
ensures precise, repeatable crosscuts.<br />
Fence face,<br />
hard maple, 11/2 in.<br />
thick by 2 3 ⁄8 in. wide<br />
by 581/4 in. long<br />
2-in.-long<br />
drywall screw<br />
1/4-20 bolt<br />
A 3 ⁄32-in.-sq.<br />
rabbet catches<br />
dust.<br />
Fence, side view<br />
Guide bar<br />
Paper<br />
shims<br />
81/4 in.<br />
Artisanry at Boston University. Carefully made, it<br />
will crosscut large panels and long boards accurately,<br />
squarely, repeatably, and safely. This wide<br />
sled relies on extra support at its outboard end.<br />
On p. 69, I’ve included plans for a versatile sawhorse<br />
that will handle this job and many others.<br />
Construct the bed and an adjustable fence<br />
The bed of the sled is made from 3 ⁄4-in.-thick<br />
medium-density fiberboard (MDF), which is flat<br />
and durable. Cut the initial square on the tablesaw,<br />
and then use a jigsaw to remove the triangular<br />
waste piece and make the cutouts. Round<br />
over the edges of the cutouts and just the upper<br />
edges around the perimeter. Keep the lower edges<br />
square to reduce dust getting under the sled.<br />
Mark the location of the miter-slot bar so that<br />
the sled overhangs the sawblade position by 1 ⁄4 in.<br />
This will be cut flush once the sled is finished.<br />
A plywood fence is screwed to the bed—To<br />
get perfectly square crosscuts on any length of<br />
wood, the fence must be absolutely straight over<br />
Kreg Top Trak<br />
Guide bar, 3 ⁄8 in. thick by<br />
3/4 in. wide by 36 in. long<br />
11/2 in.<br />
Washer<br />
2 in.<br />
19 in.<br />
Hex head 1/4-20 bolt,<br />
2 in. long, with T-nut<br />
183/4 in.<br />
1 in.<br />
Top view<br />
481/2 in.<br />
Rear fence, two layers<br />
of 3/4-in.-thick by 41/4-in.wide<br />
by 581/4-in.-long<br />
Baltic-birch plywood,<br />
glued together<br />
1/4-in. setback<br />
1 5 ⁄8-in.-long<br />
drywall screw<br />
Locate the guide so that a bit of the<br />
edge will be trimmed by the sawblade.<br />
23 in.<br />
Handle,<br />
1 5 ⁄8 in. dia. by 7 in.<br />
long, including 1 3 ⁄8-in.long<br />
double tenons<br />
13/4 in.<br />
203/4 in.<br />
Kreg Top Trak<br />
163/4 in.<br />
481/2 in.*<br />
*Standard MDF<br />
sheet is 49 in. wide.<br />
Make the bed<br />
Start with a square of MDF.<br />
Clamp it to a pair of sawhorses<br />
and cut away the waste section.<br />
Cut out the handholds. Multiple<br />
handholds make it easier<br />
to maneuver the bulky sled<br />
on and off the saw, and also<br />
slightly reduce the weight.<br />
www.finewoodworking.com JUly/AUgUsT 2008<br />
COPYRIGHT 2008 by The Taunton Press, Inc. Copying and distribution of this article is not permitted.<br />
581/4 in.<br />
65
its length. To achieve this, the fence has two<br />
parts: a plywood rear section that is screwed<br />
to the bed of the sled, and a hardwood face<br />
that is added later. The rear piece gives the<br />
fence its stiffness. It consists of two layers of<br />
3 ⁄4-in.-thick Baltic-birch plywood laminated<br />
into a 1 1 ⁄2-in.-thick by 4 1 ⁄4-in.-wide bar. True<br />
this up after lamination.<br />
lay out the fence-attachment holes so<br />
they miss the location of the miter-gauge<br />
bar. Using a Forstner bit, counterbore<br />
7 ⁄8-in.-dia. holes, 5 ⁄16 in. deep, into the top<br />
of the fence. Then use a brad-point bit<br />
to bore 5 ⁄16-in.-dia. holes through these<br />
counter bores and through the fence.<br />
lay the fence on the sled table 1 ⁄4 in. from<br />
the edge nearest the operator. That way, if<br />
the sled is knocked, the blow is absorbed<br />
by the bed and won’t knock the fence out<br />
of alignment. square the fence to the line<br />
marking the location of the guide bar, and<br />
clamp the fence to the sled table. Place the<br />
5 ⁄16-in.-dia. brad-point bit in the fence holes<br />
and tap the bit with a hammer to transfer<br />
the location to the MDF. On a drill press<br />
with a fence, use a 1 ⁄16-in.-dia. bit to transfer<br />
the hole location to the underside of the<br />
sled. Turn over the bed and use a 1-in.-dia.<br />
Forstner bit to counterbore 3 ⁄32-in.-deep<br />
holes for T-nuts. Finally, bore all the way<br />
through the MDF with the 5 ⁄16-in.-dia. bit.<br />
Before you attach the fence to the bed,<br />
you need to add a handle located right<br />
66<br />
FINE wOODwORKINg<br />
1<br />
Add the fence and guide bar<br />
AttAch the reAr pArt of the fence<br />
Locate the fence. After drilling<br />
holes in the rear section of the<br />
fence, square it to the bed, clamp it,<br />
and tap a drill bit with a hammer to<br />
mark the location of the holes.<br />
Customize the nuts for MDF. Designed<br />
to penetrate wood, the long<br />
spurs on the T-nuts need to be shortened<br />
to go into MDF. Attach a nut and<br />
a T-nut to one of the bolts used to<br />
secure the plywood fence to the<br />
bed of the sled. Working on the<br />
left-hand side of the T-nut so<br />
that the force pushes the nut<br />
onto the bolt, gently grind<br />
away about half of each spur.<br />
over the miter-gauge bar. I turn my handle<br />
on a lathe and double-tenon it into the<br />
fence, but you also can use a thick dowel<br />
glued into a drilled hole. Make sure the<br />
handle is far enough back on the fence so<br />
the flip-stop (added later) will slide by.<br />
The fence is attached to the bed with 1 ⁄4-20<br />
bolts screwed into T-nuts sunk into the recesses<br />
in the bottom of the bed. Because<br />
the spurs on the T-nuts are designed to bite<br />
into wood, shorten them on a grinder so<br />
they’ll work on MDF (see photos, above).<br />
Add the guide bar—Turn the sled over<br />
so that both the fence and the location of the<br />
guide bar overhang the bench. The guide<br />
bar is attached to the bed with machine<br />
screws, but this involves drilling and tapping<br />
holes in the bar. If you’ve never done<br />
this, I suggest using a piece of extruded<br />
aluminum for the bar. Relatively soft, it<br />
drills and taps easily, but because the tolerances<br />
are less than for steel, you will have<br />
to dimple one side to create a tight fit in<br />
the miter slot. Mild steel is harder to drill<br />
Bolt the reAr<br />
fence to the Bed<br />
Rear<br />
fence<br />
Bed<br />
Washer<br />
T-nut<br />
Bolt<br />
Attach the fence. Tap the T-nuts into the<br />
underside of the sled, slide 1/4-in.-dia. bolts<br />
through the fence, and then use a socket<br />
wrench to drive the bolts into the T-nuts.<br />
COPYRIGHT 2008 by The Taunton Press, Inc. Copying and distribution of this article is not permitted.
Drill and tap<br />
the guide bar. Mc-<br />
Cormack uses a #7<br />
drill and then taps<br />
the bar to take<br />
1/4 -20 machine<br />
bolts.<br />
and tap but will wear better. Both bars are<br />
available at www.onlinemetals.com (aluminum,<br />
part No. 6061 T6; steel, part No.<br />
1018 CF).Clamp the bar at the location you<br />
marked earlier, drill through both bar and<br />
sled, and then tap them with a 1 ⁄4-20 tap.<br />
with the bar still clamped, working from<br />
the underside, countersink the holes on the<br />
top of the sled and screw flat-head machine<br />
screws through the sled into the bar.<br />
The second part of the fence, the hardwood<br />
face, gets a 3 ⁄32-in.-sq. rabbet on its<br />
bottom front edge so dust can collect there<br />
instead of pushing the workpiece out of<br />
alignment during multiple cuts. you also<br />
3<br />
2<br />
AttAch the GUIDe BAr<br />
ADD the fAce of the fence<br />
A straight fence. Clamp the two sections of fence together,<br />
and use pieces of paper as shims until a straightedge verifies<br />
that the front of the fence is perfectly straight.<br />
www.finewoodworking.com<br />
need to drill and countersink holes in the<br />
face to attach it to the plywood back.<br />
The top of the fence face receives a Kreg<br />
Top Trak, which comes in 4-ft. and 2-ft.<br />
lengths. you’ll need two sections of track<br />
to extend the length of the 5-ft. fence. Drill<br />
and countersink holes along the track and<br />
attach it to the fence face with wood screws.<br />
Clamp the two sections of fence together,<br />
place shims between them to ensure that the<br />
face is dead flat, then screw them together.<br />
Adjust the fence to cut square<br />
Make the first cut on the sled to trim away<br />
the 1 ⁄4-in. overhang on the bed and the<br />
A machinist’s trick<br />
To create a tight fit in the miter<br />
slot, use a center punch to create<br />
dimples on the side of the guide<br />
bar nearest the blade. place<br />
dimples 1 ⁄8 in. from the top of the<br />
bar, starting ¼ in. from the ends<br />
and spaced every 3 in. File the<br />
dimples to fine-tune the fit.<br />
fence. Then, to square the fence, make test<br />
cuts on a 2-ft.-wide by about 20-in.-long<br />
plywood panel. The panel needs a true<br />
edge to ride against the fence face, so handplane<br />
or edge-joint it dead straight. Make<br />
the first crosscut, flip the panel 180º, and<br />
cut the opposite side with the true edge of<br />
the board still against the sled. Measure the<br />
board’s width near the sled fence and then<br />
at the far end of the board. If the fence is<br />
not at 90º to the sawblade, this test cut will<br />
double the observable error.<br />
If the second measurement is greater than<br />
the first, you are cutting at more than 90º.<br />
Put a fine pencil mark on the sled’s bed in<br />
COPYRIGHT 2008 by The Taunton Press, Inc. Copying and distribution of this article is not permitted.<br />
Join the two<br />
fences. Once<br />
you’re certain<br />
the face of the<br />
fence is straight,<br />
use 2-in. drywall<br />
screws to attach<br />
it to the back<br />
section of the<br />
fence.<br />
67
The first cut. With<br />
the fence and miter<br />
bar attached,<br />
you can trim the<br />
bed flush with the<br />
blade. If you push<br />
the sled into the<br />
blade, very little of<br />
the miter bar is engaged<br />
in the slot at<br />
the start of the cut.<br />
It is safer to raise<br />
the blade through<br />
the first few inches<br />
of the sled.<br />
TEST CUTS ENSURE THE FENCE IS SQUARE<br />
The first cut. Take a piece of plywood, about 20 in.<br />
sq., with one side perfectly straight. Place this side<br />
against the fence, mark the opposite side with a triangle,<br />
and cut one of the adjacent sides using the sled.<br />
Adjust the fence.<br />
There is a small<br />
amount of play<br />
in the bolt holes.<br />
Place a pencil<br />
mark on the bed<br />
of the sled next to<br />
the fence, loosen<br />
all but the righthand<br />
fence bolt,<br />
and pivot the lefthand<br />
end of the<br />
fence forward or<br />
backward. Tighten<br />
all the bolts and<br />
make another pair<br />
of test cuts.<br />
68<br />
Square the fence<br />
The second cut. Flip the test board 180º,<br />
keeping the same side against the fence,<br />
and cut the side opposite the first cut.<br />
front of the face, unlock all but the righthand<br />
attachment bolt, and rotate the fence<br />
slightly clockwise. The 1 ⁄4-in. bolts in the<br />
5 ⁄16-in.-dia. holes give you enough play. If<br />
the second measurement is less than the<br />
first, rotate the fence counterclockwise.<br />
Relock the fence and make two new test<br />
cuts. Keep adjusting until you are cutting<br />
a true rectangle. Then drive countersunk<br />
drywall screws through the underside of<br />
the bed into the plywood fence.<br />
Apply a strip of right-to-left self-adhesive<br />
rule to the Top Trak, and then calibrate the<br />
cursor on the Kreg flip-stop.<br />
Safe operations while using the sled<br />
you are now ready to make perfect, square<br />
crosscuts and cut boards to the same length<br />
time after time. However, you should take<br />
precautions if you work near the capacity<br />
Measure the difference. Measure the<br />
width of the board adjacent to the fence and<br />
at the opposite end. If there is a difference,<br />
the fence isn’t perfectly square to the blade.<br />
limits of the sled. when making a wide<br />
offcut, use a catcher keyed into the righthand<br />
miter gauge and sitting level with<br />
the sled. This will support the offcut and<br />
prevent tearout near the end of the cut.<br />
If you crosscut at the maximum width,<br />
be very careful that the sled does not seesaw<br />
out of the miter-gauge groove at the<br />
start of the cut, causing the sled and the<br />
workpiece to kick back. you’ll also find it<br />
helpful to have an outfeed table for your<br />
saw; otherwise the sled could fall off at<br />
the end of the crosscut. It’s a good idea to<br />
hang the sled on the wall when not in use<br />
so that it doesn’t get damaged. •<br />
John McCormack is a furniture maker and<br />
woodworking teacher in San Francisco, Calif.<br />
COPYRIGHT 2008 by The Taunton Press, Inc. Copying and distribution of this article is not permitted.
Notch,<br />
1-in. radius, 11/2 in.<br />
from bottom edge<br />
Upper posts,<br />
13/4 in. thick by 13/4 in.<br />
wide by 163/4 in. long.<br />
Handplane width to fit<br />
lower post groove.<br />
1/2-in. carriage bolt<br />
with adjustment knob<br />
3 ⁄8-in. bolts in<br />
13 ⁄32-in.-dia. holes<br />
Mortise,<br />
1/2 in. thick by 23/4 in.<br />
wide by 1 7 ⁄8 in. deep<br />
Set up the<br />
sled horse.<br />
Use a level to<br />
ensure that the<br />
top rail of the<br />
horse is even<br />
and parallel<br />
with the top<br />
of the tablesaw.<br />
The coped<br />
bridle joints<br />
allow the horse<br />
to be used on<br />
uneven floors.<br />
Tenons,<br />
1/2 in. thick by 23/4 in.<br />
wide by 13/4 in. long<br />
www.finewoodworking.com<br />
Build an adjustable sawhorse<br />
Top rail, 13/4 in.<br />
thick by 5 in. wide<br />
by 66 in. long<br />
Coped bridle joint,<br />
7 ⁄8-in. radius from<br />
bolt-hole center<br />
Slot,<br />
3/4 in. wide by<br />
2 7 ⁄16 in. deep<br />
Carriage bolt with<br />
aircraft nut and washer<br />
Stretcher,<br />
13/4 in. thick by 41/2 in.<br />
wide by 371/2 in. long<br />
Trapped<br />
square nut<br />
Lower post,<br />
11/2 in. thick by 31/4 in.<br />
wide by 213/4 in. long<br />
Tenons,<br />
3/4 in. thick by 4 in.<br />
wide by 1/2 in. long<br />
Foot,<br />
13/4 in. thick by 31/2 in.<br />
wide by 18 in. long<br />
Mark its position. Once you have the sawhorse<br />
set, mark the point where the stiles<br />
meet, and where the feet are located on the<br />
floor. Now you can use the horse elsewhere<br />
and reset it quickly.<br />
Although designed to be used with the crosscut<br />
sled, this sawhorse, or a pair of them, finds numerous<br />
uses in my shop. finish-mill the parts to the<br />
correct dimensions, but leave the upper posts<br />
1<br />
⁄32 in. extra thick to be fit to the lower post<br />
grooves later. lay out and cut the trestle-foot<br />
mortises, using either a hollow-chisel mortiser or a<br />
plunge router, and then cut and fit the tenons on the<br />
lower trestle posts. Bandsaw the reliefs and tapers<br />
on the feet. lay out the height-adjustment slots in the<br />
top outside faces of the lower posts, and the stopped<br />
grooves on the top inside faces. plunge-rout the slots<br />
first, only just deeper than needed. then dado the<br />
grooves and chop them square. clean up the surfaces<br />
of the lower posts and feet, and glue them together.<br />
Assemble them to the stretcher and clamp them in<br />
place. Bore the holes for the bolts in the lower stretcher<br />
using the hole in the post as a guide, aiming for the<br />
center of the nut mortise.<br />
with the base assembled, you can work on the top<br />
half. handplane, scrape, or sand the upper posts to<br />
fit the stopped grooves in the lower posts. Bore<br />
holes for the 1/2-in.-dia. carriage bolts and chop<br />
the square relief for the bolt shank. the coped<br />
bridle joints allow the upper rail to pivot if the height of<br />
each leg needs to be different. lay out the female part<br />
of the coped bridle joint on the upper post and bore<br />
the top ends for the 5 ⁄16-in.-dia. bolt. cut the bridle joint<br />
on the table saw and round the ends. Attach the upper<br />
posts to the lower base with 1/2-in.-dia. knobs and bolts.<br />
Use the tight structure to lay out the location of the<br />
centers of the two male parts of the coped bridle joint<br />
on the lower edges of the upper rail. Bore the 5 ⁄16-in.-dia.<br />
bolt holes first, and then plunge-rout away the waste on<br />
either side of the male part of the bridle joint. wax the<br />
top rail, assemble the horse, and put it to use.<br />
Locking blocks. If you are worried<br />
about the combined weight of the sled<br />
and a heavy workpiece causing the<br />
horse to shift, clamp a custom-size<br />
block into the gap below the upper stile.<br />
COPYRIGHT 2008 by The Taunton Press, Inc. Copying and distribution of this article is not permitted.<br />
JUly/AUgUsT 2008 69