Maxon: OvenPak II: Installation Instructions - Westmill Industries
Maxon: OvenPak II: Installation Instructions - Westmill Industries
Maxon: OvenPak II: Installation Instructions - Westmill Industries

Create successful ePaper yourself
Turn your PDF publications into a flip-book with our unique Google optimized e-Paper software.
Page 2150-S-4 OVENPAK ® –<strong>II</strong> Burners<br />
<strong>Installation</strong> <strong>Instructions</strong><br />
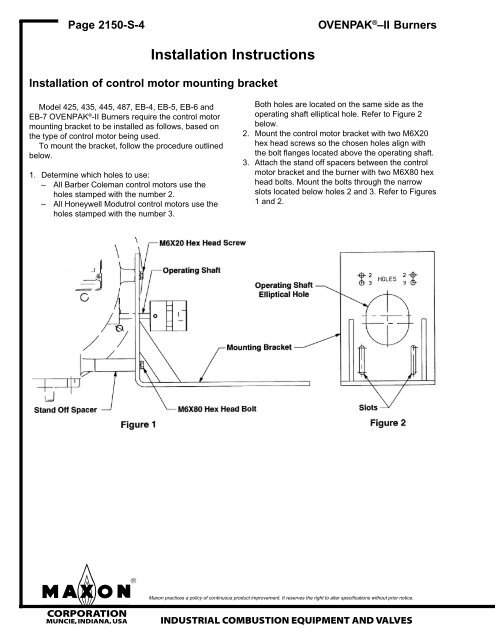
<strong>Installation</strong> of control motor mounting bracket<br />
Model 425, 435, 445, 487, EB-4, EB-5, EB-6 and<br />
EB-7 OVENPAK ® -<strong>II</strong> Burners require the control motor<br />
mounting bracket to be installed as follows, based on<br />
the type of control motor being used.<br />
To mount the bracket, follow the procedure outlined<br />
below.<br />
1. Determine which holes to use:<br />
– All Barber Coleman control motors use the<br />
holes stamped with the number 2.<br />
– All Honeywell Modutrol control motors use the<br />
holes stamped with the number 3.<br />
Both holes are located on the same side as the<br />
operating shaft elliptical hole. Refer to Figure 2<br />
below.<br />
2. Mount the control motor bracket with two M6X20<br />
hex head screws so the chosen holes align with<br />
the bolt flanges located above the operating shaft.<br />
3. Attach the stand off spacers between the control<br />
motor bracket and the burner with two M6X80 hex<br />
head bolts. Mount the bolts through the narrow<br />
slots located below holes 2 and 3. Refer to Figures<br />
1 and 2.<br />
<strong>Maxon</strong> practices a policy of continuous product improvement. It reserves the right to alter specifications without prior notice.<br />
mCORPORATION<br />
MUNCIE, INDIANA, USA INDUSTRIAL COMBUSTION EQUIPMENT AND VALVES