Conveyor chain
Conveyor chain
Conveyor chain

You also want an ePaper? Increase the reach of your titles
YUMPU automatically turns print PDFs into web optimized ePapers that Google loves.
Chain Installation and Maintenance<br />
Introduction<br />
Renold has, for many years, been a leader and<br />
innovator involved in the design and<br />
manufacture of standard conveyor <strong>chain</strong> and<br />
the development of engineered products for<br />
such applications as escalators, travelators,<br />
sterilizers, cement conveyors, leisure rides and<br />
numerous other specialised systems for the<br />
mechanical handling industry. We have a<br />
detailed understanding of the maintenance<br />
needs on such applications and can now offer<br />
the manufacturers and operators of conveyor<br />
systems the benefits of this knowledge.<br />
Chain is one of the most widely used moving<br />
mediums in mechanical handling systems,<br />
being robust and very adaptable, but it is also<br />
one of the most neglected components within<br />
such equipment when general or routine<br />
maintenance is carried out. In many cases this<br />
product is attended to when problems occur,<br />
normally when the <strong>chain</strong> is already damaged<br />
and the only real option is to fit a replacement<br />
to the system.<br />
This section has been designed with the<br />
manufacturer and operator in mind. It covers<br />
the functional aspects of using Renold conveyor<br />
<strong>chain</strong> and emphasizes the correct use of<br />
preventative maintenance procedures, which<br />
will ensure better machine performance, less<br />
down time, lower overall maintenance costs<br />
and extended <strong>chain</strong> life.<br />
Installation of New Chain<br />
When installing a complete set of new <strong>chain</strong>s<br />
the method of installation depends on the<br />
state of the conveyor, i.e. if the old <strong>chain</strong> is still<br />
in place, or the <strong>chain</strong> has been removed to<br />
allow refurbishing of the sprockets, tracks etc.<br />
Old Chain Still In Place<br />
On some installations where sprocket and track<br />
wear are minimal e.g. escalators, it is possible<br />
to replace the <strong>chain</strong> as the old <strong>chain</strong> is<br />
removed.<br />
Any fixtures, slats, steps, buckets etc., which<br />
join two or more <strong>chain</strong>s should be removed,<br />
except for enough to keep the <strong>chain</strong>s at the<br />
correct spacing. The <strong>chain</strong>s should then be<br />
broken at the tension end by removing an<br />
outer link or connecting link as necessary.<br />
Handling lengths of the new <strong>chain</strong>s can then<br />
be attached to the old <strong>chain</strong>s using old<br />
connecting links if possible. Care should be<br />
taken to ensure that the <strong>chain</strong>s are in the<br />
correct orientation. New fixtures should be<br />
connected to the new <strong>chain</strong> or old fixtures<br />
should be reconnected to maintain <strong>chain</strong> cross<br />
centres.<br />
The drive can then be used to inch the new<br />
<strong>chain</strong>s on and the old <strong>chain</strong>s off.<br />
When the new <strong>chain</strong>s have been fed onto the<br />
conveyor the next new handling lengths can be<br />
attached, this time using new connecting links.<br />
At the same time, the old <strong>chain</strong> can be<br />
disconnected from the lower strands. Repeat<br />
until all the <strong>chain</strong> has been replaced.<br />
No Chain in Place<br />
Where the conveyor has no <strong>chain</strong> in situ, (i.e.<br />
after refurbishing tracks etc., or a new<br />
conveyor), the method of installing <strong>chain</strong><br />
should be decided according to conveyor layout,<br />
access available and equipment available. The<br />
following notes are intended as a guide only.<br />
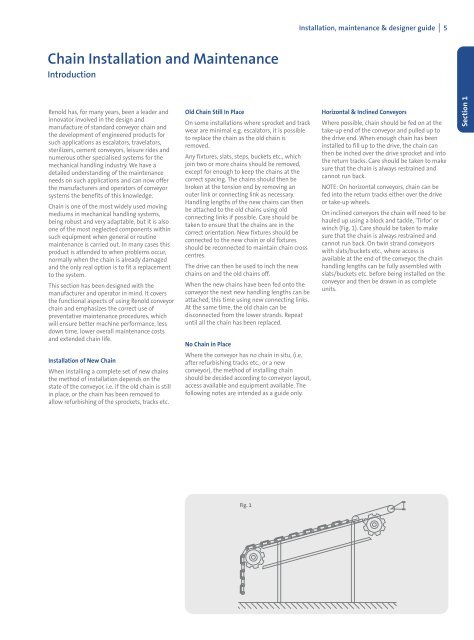
Fig. 1<br />
Installation, maintenance & designer guide I 5<br />
Horizontal & Inclined <strong>Conveyor</strong>s<br />
Where possible, <strong>chain</strong> should be fed on at the<br />
take-up end of the conveyor and pulled up to<br />
the drive end. When enough <strong>chain</strong> has been<br />
installed to fill up to the drive, the <strong>chain</strong> can<br />
then be inched over the drive sprocket and into<br />
the return tracks. Care should be taken to make<br />
sure that the <strong>chain</strong> is always restrained and<br />
cannot run back.<br />
NOTE: On horizontal conveyors, <strong>chain</strong> can be<br />
fed into the return tracks either over the drive<br />
or take-up wheels.<br />
On inclined conveyors the <strong>chain</strong> will need to be<br />
hauled up using a block and tackle, 'Tirfor' or<br />
winch (Fig. 1). Care should be taken to make<br />
sure that the <strong>chain</strong> is always restrained and<br />
cannot run back. On twin strand conveyors<br />
with slats/buckets etc., where access is<br />
available at the end of the conveyor, the <strong>chain</strong><br />
handling lengths can be fully assembled with<br />
slats/buckets etc. before being installed on the<br />
conveyor and then be drawn in as complete<br />
units.<br />
Section 1