Conveyor chain
Conveyor chain
Conveyor chain

You also want an ePaper? Increase the reach of your titles
YUMPU automatically turns print PDFs into web optimized ePapers that Google loves.
Section 1<br />
6 I Installation, maintenance & designer guide<br />
Chain Installation and Maintenance<br />
Bucket Elevators<br />
On light duty elevators it may be possible, if<br />
access and space are available, to install the<br />
<strong>chain</strong> from the top of the elevator and join the<br />
<strong>chain</strong> at the drive sprocket.<br />
On heavy duty elevators (usually twin strand) it<br />
may be necessary to fully or partially assemble<br />
the <strong>chain</strong>s and buckets in handling lengths and<br />
lift them up through the bottom of the casing<br />
(Fig. 2). When enough <strong>chain</strong> has been<br />
assembled to reach the drive sprockets it can<br />
either be fed over the sprockets and driven<br />
down as more <strong>chain</strong> is installed and then<br />
joined at the bottom, or it can be secured at<br />
the top and the opposite side hauled up and<br />
joined at the top and the bottom.<br />
Assembly & Installation<br />
When assembling new <strong>chain</strong> or repairing<br />
existing <strong>chain</strong>, the following precautions are<br />
necessary.<br />
a) All power to the conveyor should be<br />
isolated before any work is started on the<br />
<strong>chain</strong>.<br />
b) Care should be taken to identify the <strong>chain</strong><br />
and to ensure that correct replacement<br />
links are at hand before breaking the <strong>chain</strong>.<br />
c) The <strong>chain</strong> tension should be slackened off<br />
completely so that joints are loose.<br />
d) The sprockets should be prevented from<br />
rotating whilst working on the <strong>chain</strong>,<br />
especially on inclined conveyors or<br />
elevators.<br />
e) The <strong>chain</strong> should be suitably restrained on<br />
both sides of the link to be broken, or<br />
connecting link to be removed.<br />
f) The correct working practices should be<br />
employed at all times.<br />
NOTE: Great care should be taken to secure<br />
<strong>chain</strong> properly in elevators to prevent it falling<br />
down inside the casing.<br />
Fig. 2<br />
The following points are also important and<br />
should be adhered to:i)<br />
The necks of connecting pins should not be<br />
ground or filed to ease insertion into the<br />
<strong>chain</strong> plates, nor should the plate holes be<br />
relieved. The press fit is an essential part of<br />
the <strong>chain</strong> construction and should not be<br />
destroyed.<br />
ii) Do not apply heat to the connecting plates<br />
to ease insertion of the connecting pins.<br />
This could seriously damage the material<br />
properties.<br />
Reconnecting Chain<br />
The method of <strong>chain</strong> connection depends upon<br />
the type of connecting link used. The main ones<br />
are either solid pin (i.e. No. 107, 58, 69, 86), or<br />
hollow pin (No. 107).<br />
Whichever type is used, the following steps are<br />
recommended:-<br />
Solid Pin Connectors<br />
a) Secure the <strong>chain</strong> on both sides of the<br />
assembly point.<br />
b) Unless the <strong>chain</strong> has to run unlubricated,<br />
coat the connecting pins with grease or oil<br />
and insert the pins into the two ends of the<br />
<strong>chain</strong>.<br />
c) Place the loose plate over the ends of the<br />
connecting pins and support the fixed plate<br />
side of the <strong>chain</strong> against the assembly<br />
force.<br />
d) Progressively force the loose plate onto the<br />
connecting pin necks equally and<br />
alternately, using a hollow punch and<br />
hammer or a hydraulic press or jack.<br />
(See Fig. 3).<br />
e) When the plate is fully seated, apply the<br />
connector e.g. nut, split pin or circlip, or<br />
rivet the pin end. (See following notes on<br />
riveting).<br />
Fig. 4<br />
f) Check that the assembled joint flexes<br />
freely. If it is tight, a light blow on the<br />
opposite end of the connecting pins should<br />
free the joint.<br />
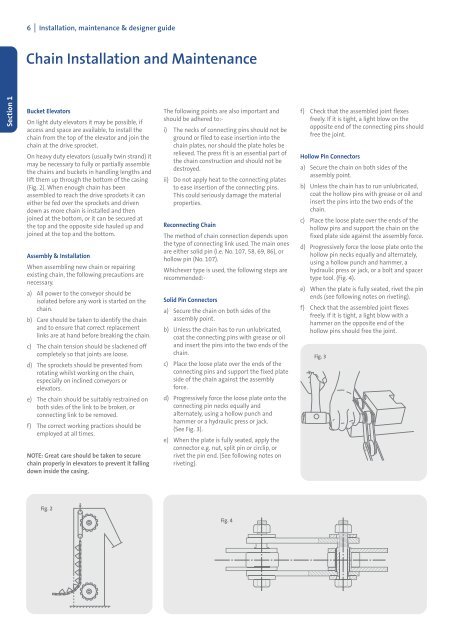
Hollow Pin Connectors<br />
a) Secure the <strong>chain</strong> on both sides of the<br />
assembly point.<br />
b) Unless the <strong>chain</strong> has to run unlubricated,<br />
coat the hollow pins with grease or oil and<br />
insert the pins into the two ends of the<br />
<strong>chain</strong>.<br />
c) Place the loose plate over the ends of the<br />
hollow pins and support the <strong>chain</strong> on the<br />
fixed plate side against the assembly force.<br />
d) Progressively force the loose plate onto the<br />
hollow pin necks equally and alternately,<br />
using a hollow punch and hammer, a<br />
hydraulic press or jack, or a bolt and spacer<br />
type tool. (Fig. 4).<br />
e) When the plate is fully seated, rivet the pin<br />
ends (see following notes on riveting).<br />
f) Check that the assembled joint flexes<br />
freely. If it is tight, a light blow with a<br />
hammer on the opposite end of the<br />
hollow pins should free the joint.<br />
Fig. 3