A Solid Deck Begins with Concrete Piers - Fine Homebuilding
A Solid Deck Begins with Concrete Piers - Fine Homebuilding
A Solid Deck Begins with Concrete Piers - Fine Homebuilding

You also want an ePaper? Increase the reach of your titles
YUMPU automatically turns print PDFs into web optimized ePapers that Google loves.
<strong>Fine</strong> <strong>Homebuilding</strong><br />
A <strong>Solid</strong> <strong>Deck</strong><br />
<strong>Begins</strong> With<br />
<strong>Concrete</strong> <strong>Piers</strong><br />
Get this simple<br />
foundation out of<br />
the ground <strong>with</strong><br />
basic tools and a<br />
few ingredients<br />
BY RICK ARNOLD<br />
44<br />
FINE HOMEBUILDING<br />
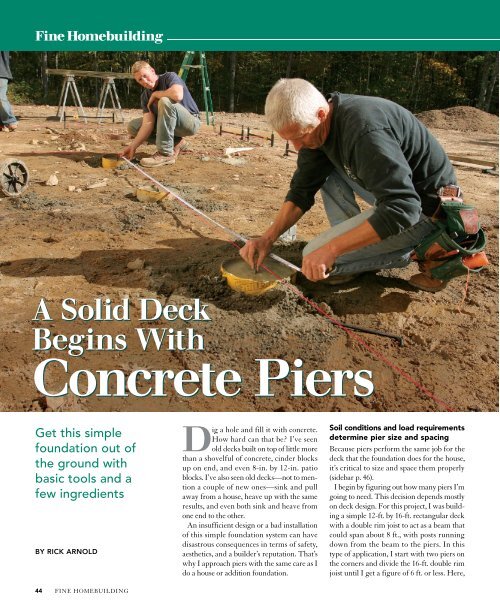
Dig a hole and fill it <strong>with</strong> concrete.<br />
How hard can that be? I’ve seen<br />
old decks built on top of little more<br />
than a shovelful of concrete, cinder blocks<br />
up on end, and even 8-in. by 12-in. patio<br />
blocks. I’ve also seen old decks—not to mention<br />
a couple of new ones—sink and pull<br />
away from a house, heave up <strong>with</strong> the same<br />
results, and even both sink and heave from<br />
one end to the other.<br />
An insufficient design or a bad installation<br />
of this simple foundation system can have<br />
disastrous consequences in terms of safety,<br />
aesthetics, and a builder’s reputation. That’s<br />
why I approach piers <strong>with</strong> the same care as I<br />
do a house or addition foundation.<br />
soil conditions and load requirements<br />
determine pier size and spacing<br />
Because piers perform the same job for the<br />
deck that the foundation does for the house,<br />
it’s critical to size and space them properly<br />
(sidebar p. 46).<br />
I begin by figuring out how many piers I’m<br />
going to need. This decision depends mostly<br />
on deck design. For this project, I was building<br />
a simple 12-ft. by 16-ft. rectangular deck<br />
<strong>with</strong> a double rim joist to act as a beam that<br />
could span about 8 ft., <strong>with</strong> posts running<br />
down from the beam to the piers. In this<br />
type of application, I start <strong>with</strong> two piers on<br />
the corners and divide the 16-ft. double rim<br />
joist until I get a figure of 6 ft. or less. Here,
12-in.<br />
builder’s<br />
tube<br />
When using<br />
a spread<br />
footing, the<br />
load is distributed<br />
over a<br />
larger surface<br />
area than a<br />
builder’s tube<br />
alone can<br />
cover.<br />
24-in.-wide<br />
spread footing<br />
Drawings: Dan Thornton<br />
Load path<br />
from deck<br />
1 ⁄2-in. by 8-in.<br />
galvanized anchor bolt<br />
embedded in concrete<br />
<strong>Concrete</strong><br />
<strong>Piers</strong> must<br />
sit on<br />
undisturbed<br />
soil below<br />
the frost line.<br />
Finished grade<br />
p i e R s t R a n s F e R<br />
t H e d e C K ’ s w e i G H t<br />
t o t H e s o i l<br />
To do so effectively, they need to<br />
be sized and spaced according to<br />
the deck’s design load and the soil’s<br />
bearing capacity (sidebar p. 46). In<br />
cold climates, piers always should<br />
sit below the frost line to prevent<br />
frost heaves. Check your local code<br />
for pier-depth requirements.<br />
Footings spread the weight over a larger area<br />
If the piers will be used in soil <strong>with</strong> poor bearing<br />
capacity or if the deck has a heavy design load, use a<br />
spread footing to distribute the load over a greater<br />
surface area. The more expensive, labor-intensive way<br />
to do this requires a relatively large excavation for<br />
each pier. After forming and pouring the footings, you<br />
have to install the tubes and backfill around them, then<br />
complete a second pour for the piers. But plastic footing<br />
forms bring this process down to just one pour.<br />
For most of these systems, a builder’s tube<br />
is fastened to the top of the form; then the<br />
assembly is lowered into the hole, backfilled,<br />
and poured in one shot. See the manufacturer’s<br />
Web site for sizing and load requirements.<br />
square Foot<br />
www.sqfoot.com<br />
Available from 22 in. to<br />
32 in. dia.<br />
Cost: $16 to $30 per form<br />
BigFoot systems<br />
www.bigfootsystems.com<br />
Available from 20 in. to<br />
36 in. dia.<br />
Cost: $18 to $75 per form<br />
the Footing tube<br />
www.footingtube.<br />
com<br />
A builder’s tube and<br />
spread footing in<br />
one. Top diameter<br />
sizes range from<br />
6 in. to 12 in.<br />
Cost: $33 to $47 per form<br />
Redibase<br />
www.redibase-form.com<br />
Available in 24 in. dia.<br />
Cost: $9 to $12 per form<br />
JUNE/JULY 2006<br />
eVeRytHinG<br />
yoU need<br />
A few tools, even<br />
fewer materials,<br />
and a little sweat<br />
will get most deck<br />
foundations out of<br />
the ground in less<br />
than a day.<br />
• Builder’s tubes<br />
• 80-lb. bags<br />
of ready-mix<br />
concrete<br />
• Garden hose<br />
• Foundation spikes<br />
• Batterboards<br />
• 1 ⁄2-in. by 8-in.<br />
anchor bolts,<br />
nuts, and washers<br />
• Adjustable post<br />
bases<br />
• post-hole digger<br />
• Digging bar<br />
• electric concrete<br />
mixer<br />
• Stabila plate level<br />
JUNE/JULy 2006 45
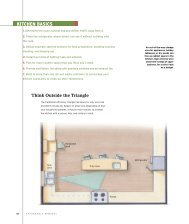
H o w m a n y a n d w H at s i z e ?<br />
Three things affect the number and the size of piers you use: the way you frame<br />
the deck, the weight the deck is designed for, and the load-bearing capacity of the<br />
soil. For the deck I’m building, I chose to support the double rim joist <strong>with</strong> piers<br />
instead of a cantilevered approach that uses piers beneath a beam. I use the<br />
International Residential Code’s design load for decks, which is 50 lb. per sq. ft.<br />
(psf) (40 psf live load, 10 psf dead load). Different soils have different bearing<br />
capacities (measured in psf); consult table 401.4.1 of the IRC for the bearing<br />
capacities of different soil types.<br />
12 ft.<br />
This half supported<br />
This half supported<br />
by the ledger. by the rim joist.<br />
Double<br />
rim joist<br />
Ledger<br />
(attached to<br />
house)<br />
This area supported<br />
by this outside pier.<br />
This area supported<br />
by this inside pier.<br />
This area supported<br />
by this inside pier.<br />
This area supported<br />
by this outside pier.<br />
5 ft. 4 in.<br />
5 ft. 4 in.<br />
5 ft. 4 in.<br />
step 1. space piers evenly beneath the double rim joist<br />
Because I’m using a double rim joist to support the floor joists, I support this<br />
16-ft. deck <strong>with</strong> four piers.<br />
step 2. distribute the deck’s weight onto the piers<br />
A 12-ft. by 16-ft. deck is 192 sq. ft. Multiply by 50 psf to determine the design<br />
load, 9600 lb. Half of that weight (4800) is carried by the ledger; the other half is<br />
carried by the piers. Because the corner piers carry only half the weight that the<br />
inside piers carry, dividing 4800 lb. by three tells me the two inside piers must<br />
each bear 1600 lb.<br />
step 3. transfer the weight to the soil<br />
For this project, I was working in hard-packed gravel, which I estimate to have<br />
a bearing capacity of 3000 psf. Using the table below, I multiply the square-foot<br />
equivalent of each tube by 3000 psf to find one that will work in this soil. A 10-in.<br />
tube will bear 1650 psf, which is close, but I chose to bump up to 12-in. piers for<br />
peace of mind. To keep things simple, I made the corner piers the same size.<br />
Tube dia. 8 in. 10 in. 12 in. 14 in.<br />
Sq. ft. 0.35 0.55 0.79 1.1<br />
46<br />
FINE HOMEBUILDING<br />
16 ft.<br />
I found that dividing the rim joist into three<br />
sections gave me a span of roughly 5 ft. 4 in.,<br />
which came out to four piers. Even though<br />
my double rim joist could span 8 ft., I chose<br />
to use a 5-ft. 4-in. pier spacing to minimize<br />
the pier diameter.<br />
After calculating the number of piers I need,<br />
I determine the size they need to be. The size<br />
of builder’s tube dictates the size of the bottom<br />
of the pier, which is the area that will be in<br />
contact <strong>with</strong> soil at the bottom of the excavation.<br />
To figure this out, I calculate the maximum<br />
weight each pier must be designed to<br />
bear (by code). For the deck in this article,<br />
I figured a 1600-lb. load on each of the two<br />
inside piers (sidebar left). Then I compared<br />
that to the bearing capacity of the soil at the<br />
bottom of the hole. I was building on hardpacked<br />
gravel, which easily has a bearing capacity<br />
of more than 3000 lb. per sq. ft. (psf).<br />
The bearing capacity of a 10-in.-dia. tube<br />
in 3000 psf soil is 1650 psf (0.55 x 3000). The<br />
design load of each inside pier is 1600 lb., so<br />
a 10-in. tube will work. However, by jumping<br />
up to a 12-in. tube, the bearing capacity<br />
becomes 2370 psf (0.79 x 3000), which can<br />
carry the 1600-lb. load more easily. For just<br />
a bit more concrete, I ensure the pier is well<br />
designed. I typically ignore the pier weight<br />
because there is enough fat in these calculations<br />
to justify this simplification.<br />
The two outside-corner piers are required<br />
to bear only half the weight, but to simplify
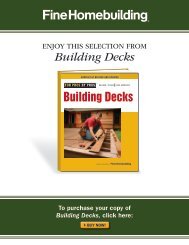
Plumb down from a high<br />
1<br />
ledger. With a Stabila<br />
plate level (www.stabila.com),<br />
I carry one end of the ledger<br />
down to the grade. I drive a<br />
stake into the ground here to<br />
anchor a line that will run perpendicular<br />
to the house.<br />
USe TWo LIneS For A DeAD-on LAyoUT<br />
With the ledger location transferred to grade level, I can measure out from<br />
the house foundation and run a stringline to represent the centerpoint of<br />
the piers. A single line parallel to the house intersecting a line perpendicular<br />
to the house locates the center of the far-corner pier. Measurements for the<br />
rest of the piers are taken from this intersecting point. Batterboards help to<br />
set the lines accurately (“Tool Tip,” right).<br />
5 The best holes<br />
have no rocks.<br />
But just in case you<br />
encounter a few, make<br />
sure to have a long digging<br />
bar in addition to<br />
a post-hole digger. Take<br />
care not to disturb the<br />
batterboards or their<br />
settings because you’ll<br />
have to reattach the<br />
strings later. Dig down<br />
deep enough so that<br />
the bottom of the pier<br />
rests on undisturbed<br />
soil below the frost line.<br />
Photo bottom right: Courtesy of Ardisam Inc.<br />
A2 + B2 = C2 .<br />
Pulled diagonally<br />
from the<br />
foundation, my<br />
tape forms the hypotenuse<br />
of a right<br />
triangle. A helper<br />
shifts the line that<br />
extends from the<br />
house to intersect<br />
<strong>with</strong> the right measurement,identifying<br />
the center of<br />
the far-corner pier.<br />
2 The pier centerline runs parallel to the<br />
house. The batterboards I use make it easy<br />
to adjust the string until it’s exactly the right<br />
distance from the house foundation. I set the<br />
batterboards a couple of feet beyond the cornerpier<br />
locations so that the boards won’t<br />
be disturbed when holes are dug.<br />
3 4<br />
tool tip<br />
If excavating multiple<br />
holes, consider renting<br />
a gas-powered auger.<br />
A one-person auger,<br />
shown here, costs about<br />
$50 a day. The twoperson<br />
version rents for<br />
about $70.<br />
tool tip<br />
rousseau makes a reusable<br />
batterboard system that is<br />
easy to install <strong>with</strong> foundation<br />
spikes, and allows for<br />
horizontal, vertical, rough,<br />
and precision adjustments<br />
of the string <strong>with</strong> a couple<br />
of thumbscrews. Cost for a<br />
set of four: $64. www<br />
.rousseauco.com<br />
Mark piers<br />
<strong>with</strong> paint.<br />
Measure the remaining<br />
piers from<br />
the far-corner pier.<br />
A dot marks the<br />
centerpoint, and a<br />
rough circle highlights<br />
where to dig.<br />
Pull the stringlines<br />
and prepare to dig,<br />
but keep the batterboards<br />
in place.<br />
JUNE/JULy 2006 47
1 Backfill <strong>with</strong> measuring<br />
tape and shovel. I cut<br />
the builder’s tubes so that<br />
they stick out a few inches<br />
above grade when placed in<br />
the hole. To make sure a tube<br />
is placed precisely, I hold it on<br />
its layout while a helper backfills.<br />
Pack the soil around the<br />
tube every so often as you go.<br />
FIne-TUne THe LAyoUT BeFore<br />
AnD AFTer THe poUr<br />
once the holes are dug, put the stringlines back on the batterboards.<br />
When setting each builder’s tube, use the lines<br />
and a tape measure to center them according to layout,<br />
adjusting the hole locations as needed. Take the time to<br />
check the tube locations often as you backfill to keep them<br />
on layout. After all the fill is in place and the final layout<br />
check is made, fill the tubes <strong>with</strong> concrete, and insert the<br />
anchor bolts.<br />
the work process, I use the same-size tubes<br />
for all four of the piers.<br />
The depth you set the piers at depends a<br />
lot on the region of the country you’re working<br />
in. In climates where frost is an issue, the<br />
minimum depth is established by code. For<br />
this project, the bottoms of the piers have to<br />
be 36 in. below finished grade.<br />
Wherever you live, it is important to dig<br />
past soil that contains organic matter (topsoil)<br />
and any uncompacted fill. Organic matter<br />
decomposes over time and settles; loose fill<br />
48<br />
FINE HOMEBUILDING<br />
2 Double-check the corners.<br />
I spend a little extra<br />
time checking the location of<br />
the final corner pier to make<br />
sure that it’s in the right spot,<br />
because I won’t get a chance<br />
to move it once the concrete<br />
is poured. Use a nail to mark<br />
the finished height of the piers,<br />
keeping it a couple of inches<br />
above the finished grade. If you<br />
need to have piers all at the<br />
same height, use a long level<br />
or a transit to locate their finished<br />
height.<br />
also settles over time. In most cases, the depth<br />
of undisturbed soil is not known until the excavation<br />
is well under way.<br />
Begin layout <strong>with</strong> deck dimensions<br />
Once I know the size and the number of piers<br />
I’m going to use, the next step is to lay them<br />
out on site. If the deck details aren’t drawn on<br />
the plans, I sketch the outside deck framing to<br />
determine exactly where the center of the sup-<br />
porting posts are in relation to the outside di-<br />
mensions of the deck. Then I use those locations<br />
to form a layout rectangle. I use batterboards<br />
and string to locate the exact center of the<br />
post, which is also the location for the anchor<br />
bolts that hold the post hardware in place.<br />
Once the post locations are identified and<br />
marked <strong>with</strong> surveyor’s paint, I remove the<br />
strings and dig the pier holes. When the holes<br />
are deep enough, I rough-cut the builder’s<br />
tubes, drop them in, and replace the stringlines.<br />
I keep the tubes centered on the strings<br />
while they are backfilled, and I double-check<br />
the measurements <strong>with</strong> a tape measure.
3 A shovel<br />
makes up<br />
for bad aim.<br />
Fill the tubes<br />
<strong>with</strong> concrete<br />
until it reaches<br />
the nail. The<br />
concrete should<br />
be just slightly<br />
on the wet side,<br />
about the consistency<br />
of thick<br />
oatmeal. As<br />
the concrete is<br />
poured into the<br />
tube, a helper<br />
uses a shovel to<br />
agitate the mix<br />
every 8 in. to<br />
10 in. to work<br />
out air pockets.<br />
Rather than try to cut tubes to exact height,<br />
I leave them long and pour concrete to the<br />
desired height inside the tube. In most cases,<br />
I like the pour to come a couple of inches<br />
above the finished grade. If the piers are on a<br />
pitched elevation, the tops of the piers won’t<br />
be level <strong>with</strong> each other. On this job, the finished<br />
grade was level, so I used a long level to<br />
carry the elevation across the piers.<br />
After marking each pier <strong>with</strong> a small nail<br />
pushed through at the right height, I again<br />
remove the strings so that I can pour the<br />
tool tip<br />
A mixer does the most difficult<br />
work of mixing the concrete. Just<br />
dump in the mix, turn it on, then<br />
add water.<br />
4 Place anchor<br />
bolts accurately.<br />
Once all the<br />
piers are poured, I<br />
go back and insert<br />
anchor bolts in the<br />
center of the piers.<br />
I measure from the<br />
line running perpendicular<br />
to the house<br />
to set anchor bolts<br />
accurately. Be sure<br />
to leave the threads<br />
high enough so that<br />
a post base, washer,<br />
and nut can be<br />
added later.<br />
concrete into the tubes. Once they’re filled<br />
to the right height, I float the concrete<br />
smooth <strong>with</strong> a scrap of wood. Then I<br />
replace the string, and using a slight up-anddown<br />
motion to prevent air from becoming<br />
trapped, I insert the anchor bolts in their<br />
proper locations. M<br />
Rick Arnold is a builder in North Kingstown,<br />
R.I. Photos by Christopher Ermides,<br />
except where noted. Technical<br />
assistance by Rob Munach, P.E.<br />
How much<br />
concrete do i need?<br />
To pour the piers for an average-size deck,<br />
I use 80-lb. bags of concrete and an electric<br />
mixer, which rents for about $45 a day or<br />
sells for $250 or so.<br />
For major pours, I have a concrete truck<br />
deliver a 2500-lb. mix. Either way, the<br />
basic formulas below will help you to<br />
estimate the number of bags or cubic<br />
yards of concrete required based on<br />
pier size and depth.<br />
example Size of tubes: 8 in.<br />
Number of tubes: 8<br />
Average depth per tube: 4 ft.<br />
0.53 (8 x 4) = 17 bags<br />
Tube<br />
size<br />
Number of 80-lb.<br />
bags per foot<br />
Cubic yards<br />
per foot<br />
8 in. 0.53 bag 0.013 cu. yd.<br />
10 in. 0.8 bag 0.02 cu. yd.<br />
12 in. 1.2 bags 0.03 cu. yd.<br />
14 in. 1.6 bags 0.04 cu. yd.<br />
5 Adjustable post bases allow for<br />
final tweaks. After the concrete<br />
is cured completely, I attach adjustable<br />
post bases. I like to use Simpson<br />
ABA-style bases because they allow<br />
me to fine-tune the post location<br />
after the post is attached.<br />
JUNE/JULy 2006 49