Automated Instrument Washer Cleaning Monitoring - Support
Automated Instrument Washer Cleaning Monitoring - Support
Automated Instrument Washer Cleaning Monitoring - Support

You also want an ePaper? Increase the reach of your titles
YUMPU automatically turns print PDFs into web optimized ePapers that Google loves.
SUGGESTED POLICY FOR MONITORING THE CLEANING<br />
EFFICIENCY OF AN AUTOMATED INSTRUMENT<br />
WASHER/DISINFECTOR PROCESS USING THE<br />
T.O.S.I. Blood Soil Test( Daily & weekly Testing)<br />
SUBJECT: Medical <strong>Automated</strong> <strong>Instrument</strong> <strong>Washer</strong>/Disinfector <strong>Cleaning</strong><br />
<strong>Monitoring</strong><br />
DEPARTMENT: Central Service<br />
APPROVED BY:<br />
EFFECTIVE:<br />
REVISED: 11/2010<br />
PURPOSE:<br />
To monitor the automated instrument washer/disinfector process to ensure<br />
proper cleaning and reduce risk to personnel or patients. (1, 10, 12, 13)<br />
POLICY:<br />
This policy is for inspection and testing on a daily basis of the medical automatic<br />
washer with the T.O.S.I. blood soil test. The T.O.S.I. blood soil test is to be used<br />
according to the manufacturer's guidelines to ensure that the cleaning process is<br />
occurring and the automated instrument washer is functioning properly. (1, 6, 7,<br />
8, 9, 10, 12, 13)<br />
RATIONALE:<br />
"A problem analysis should be completed for any problem with any aspect<br />
of decontamination that can pose a risk to personnel or patients. The<br />
problem analysis should define and resolve the problem and the system<br />
should be monitored to ensure that the problem has been corrected"(1).<br />
ST 79; 2009A section 7.5.3.3 states this on weekly testing “…Mechanical<br />
cleaning equipment should be tested upon installation, weekly (preferably<br />
daily) during routine use, and after major repairs. A major repair is a repair<br />
that is outside the scope of routine preventive maintenance and that<br />
significantly affects the performance of the equipment. Examples include<br />
replacement of the water pump(s), detergent delivery system, heating<br />
system, water delivery system, water treatment system, or computer<br />
control or an upgrade to software…”<br />
1
The 2006 JCAHO standard E.C.6.20 states that all medical equipment is<br />
maintained, tested and inspected.<br />
The 2008 AORN RP for <strong>Cleaning</strong> and Care of Surgical <strong>Instrument</strong>s and Powered<br />
Equipment Recommendation XXII – Quality section is now supporting the testing<br />
of mechanical instrument washers before initial use, weekly during service, and<br />
after major maintenance. (1, 12)<br />
The medical automatic washer is considered a piece of medical equipment.<br />
Medical washers need to be properly functioning to provide the best patient care<br />
possible and to help reduce the incidence of hospital-acquired infections<br />
"<strong>Cleaning</strong>, not sterilization (or disinfection), is the first and most important step in<br />
any instrument processing protocol. Without first subjecting the instrument to a<br />
thorough, validated and standardized (and ideally automated) cleaning process,<br />
the likelihood that any disinfection or sterilization process will be effective is<br />
significantly reduced." (11,13)<br />
An automated washer/disinfector cleans and decontaminates dirty surgical<br />
instruments so they can be handled safely, repackaged, and sterilized for a<br />
future surgery. The danger of handling instruments contaminated with blood is<br />
obvious in this age of hepatitis, CJD and HIV. The procedures for sterilizing<br />
instruments are based on years of scientific testing of cleaning instruments. If<br />
surgical instruments are not clean, the procedures are ineffective. Dried blood<br />
on instruments is hazardous to the employees of the hospital and to the next<br />
surgical patient upon which the instruments are used. (1, 2, 3, 4, 8, 13)<br />
<strong>Cleaning</strong> dried blood is much more difficult than cleaning dirt. Blood coagulates,<br />
which means it goes from a free-flowing liquid to a solid that contains tough,<br />
microscopic fibers called fibrin. These fibers form as the blood coagulates and<br />
jam themselves into microscopic irregularities in the surface of the stainless steel<br />
instrument. This is a physical attachment to the surface through mechanical<br />
means, not chemical means as with traditional adhesives. The action is similar<br />
to the roots of plants growing into cracks in rocks, anchoring themselves to the<br />
surface.<br />
The blood cells colored with hemoglobin are fairly easy to wash off instruments,<br />
but the clear fibrin material is much more difficult to remove. Thick droplets of<br />
dried blood have so much fibrin; even the colored hemoglobin can be trapped<br />
and held in place. (3, 4, 13)<br />
Another factor that makes blood difficult to clean is its ability to become insoluble<br />
when heated. Heating causes blood to “denature.". Denaturing is similar to what<br />
happens to eggs cooked in a frying pan. Transparent uncooked egg whites are<br />
fairly easy to wash away, but opaque, cooked egg whites are much more difficult.<br />
2
Dried, uncooked egg is even more difficult to wash away, as is dried blood. The<br />
proteins in blood are similar to albumin proteins in eggs.<br />
<strong>Washer</strong>s fail to clean for many reasons. Tests should provide a means of<br />
monitoring the variables that influence the effectiveness of a washer. Some of<br />
these variables are water quality, time, detergent, enzyme, temperature, pH<br />
level, agitation, speed, initial temperature, drying time, obstructions, and<br />
insufficient amount of chemicals. (7, 13)<br />
Proper cleaning is critical. The T.O.S.I. blood soil provides an independent<br />
objective test of clean and allows the Healthcare professional to monitor and<br />
ensure proper cleaning in the automated instrument washer/disinfector process.<br />
(1)<br />
JCAHO, AAMI, AORN, IAHCSMM recommend that Sterile Processing<br />
departments have process performance in place (1, 5, 12, 13).<br />
The FDA, AAMI and other regulatory bodies recommend that any simulated-use<br />
testing be done with a surrogate device that closely approximates the actual<br />
types of soils the instrument is to be exposed to in clinical use. Further, the<br />
surrogate device should be made of the same type of material as the instrument<br />
it represents<br />
Using the T.O.S.I. blood soil test according to the manufacturer's guidelines<br />
helps ensure adherence to all guidelines and standards and thus a properly<br />
functioning cleaning process<br />
PROCEDURE:<br />
"A problem analysis should be completed for any problem with any aspect<br />
of decontamination that can pose a risk to personnel or patients. The<br />
problem analysis should define and resolve the problem and the system<br />
should be monitored to ensure that the problem has been corrected."(21)<br />
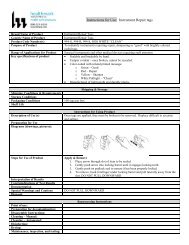
Begin with performing an equipment inspection as specified on the log<br />
sheet. Start with the spray nozzles/arms and proceed with all items listed on the<br />
work sheet. After observations and equipment check are completed, proceed<br />
with the first test and record all results.<br />
Daily Inspection & Testing<br />
Follow manufacturer guidelines concerning the daily inspection of equipment<br />
(spray arms, screens, etc.)<br />
Inspect the level of the detergent daily. (Mark the container of the solution<br />
daily with the date at the level of the solution in the container.) This will allow<br />
visual verification that the solution is actually being used.<br />
3
At the beginning of each day pick a washer to test. Test a different washer<br />
each day if there is more than one.<br />
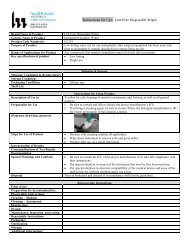
Secure one T.O.S.I. to a rack and place it in an empty instrument tray (in<br />
bottom of the tray).<br />
Select the middle shelf of the rack.<br />
Run in an empty machine.<br />
Record all results.<br />
Examine the T.O.S.I. for visual cleanliness. Compare the test to the 0-5<br />
T.O.S.I. Test chart.<br />
Make any necessary adjustments to the washer as indicated by comparing<br />
the results found on the test object and the T.O.S.I. chart.<br />
The next day, test another machine. If there is only one machine, rotate the<br />
test to a different shelf.<br />
Over time, continue to vary the shelf and position the tray to test all possible<br />
configurations.<br />
A daily test of at least one machine in a multi-machine department will help<br />
identify any general issues that may arise with the equipment.<br />
Weekly Inspection and Testing<br />
Do a complete test of all of the inputs of the automatic washer (temperature, pH,<br />
hardness, etc.)<br />
Equipment Inspection<br />
Inspect all washer equipment (spray arms, screens, etc.)<br />
according to the log sheet.<br />
Water Quality<br />
Follow these steps first for cold water, then hot water:<br />
Use an Aqua Test (WTS-101) test strip.<br />
Dip entire strip into water for 5 seconds, then remove.<br />
Shake once briskly to remove excess water from the test strip.<br />
Wait 20 seconds.<br />
Compare color within 10 seconds to pH, Total Alkalinity, Total<br />
hardness on the interpretation chart.<br />
Report any deviations from expected values.<br />
Note that water conditions do change seasonally. It is important to<br />
establish a base line (target values) for your water and to compare<br />
your results to that base line/value.<br />
Pre Rinse – Water Temperature<br />
Use a Tempachek-90 for this test.<br />
Use one (1) Tempachek-90 per washer.<br />
4
Peel thermometer from release paper.<br />
Apply to any clean, dry surface, ensuring that the indicator has<br />
adhered to the surface (i.e., apply to the smooth surface on the<br />
T.O.S.I. rack)<br />
Tempachek-90 should be removed and read immediately after the<br />
COLD WATER RINSE stage. If the machine has a window, the<br />
result can be read through the window; if not, the cycle must be<br />
stopped. Belimed, Getinge, & Hamo machines cannot be stopped;<br />
results must be read through the window.<br />
Record results on log sheet.<br />
Temperature should not exceed 110 degrees F. Immediately report<br />
any result that exceeds this temperature.<br />
Thermal Disinfection stage<br />
Use one Tempachk-170 on each level of the instrument rack.<br />
Peel thermometer from release paper.<br />
Apply to any clean, dry surface, ensuring that the indicator has<br />
adhered to the surface (i.e., apply to the smooth surface on the<br />
T.O.S.I. rack).<br />
Tempachek-170 should be removed and read after the THERMAL<br />
DISINFECTION STAGE and before the drying stage.<br />
Record results on log sheet.<br />
Report any deviation from targeted temperature.<br />
TESTING IS COMPLETED AFTER THIS CYCLE COMPLETES<br />
Abort cycle if possible<br />
Blood Soil Test<br />
A batch-type washer (Belimed / Steris 444 / Getinge 8666) uses one<br />
rack with multiple levels. Each level should be tested at the same time.<br />
If the rack has two levels, then two tests are used; if the rack has three<br />
levels, three tests are used. One test per level on each rack is the<br />
standard.<br />
Once a week on a designated day, secure one T.O.S.I. in the center of<br />
an empty tray in each washer/disinfector. Do this as many times as<br />
you have shelves.<br />
If multiple shelves are present, place a tray with a T.O.S.I. on each<br />
shelf.<br />
Load a rack with its T.O.S.I in each washer/disinfector to be tested.<br />
The T.O.S.I. should be placed in an empty tray in an empty chamber<br />
(bottom of the tray).<br />
Process using the normal procedure/cycle (usually the instrument<br />
cycle).<br />
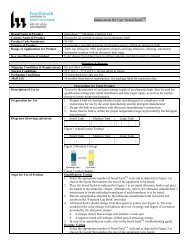
Examine the T.O.S.I. for visual cleanliness. Compare the test to the 0-<br />
5 T.O.S.I. chart scale.<br />
5
Record results.<br />
Immediately report any test failure to department management.<br />
Use the results found when comparing the test object and to the<br />
T.O.S.I. chart to determine what, if any, adjustments need to be made.<br />
Make necessary adjustments.<br />
The next week, repeat the process.<br />
Record all results.<br />
Testing to Challenge Staff Practice(15,19):<br />
Follow this protocol to challenge the loading practices of Sterile<br />
Processing Personnel.<br />
The frequency of testing is set by the department (daily, weekly…) in each<br />
washer/disinfector, secure one ProFormance <strong>Washer</strong> Test, in the center of a<br />
tray of dirty instruments.<br />
The larger the set, the greater the cleaning challenge for the <strong>Washer</strong> (use<br />
a non-mesh style mini basket).<br />
Place the tray on only one of the shelves if multiple shelves are present.<br />
Load the washer/disinfector with a normal load of dirty instruments.<br />
Process using your normal procedure.<br />
Examine the ProFormance <strong>Washer</strong> Test for visual cleanliness.<br />
Compare the test to the 0-5 ProFormance <strong>Washer</strong> Test chart scale.<br />
Record results.<br />
Make any adjustments to the washer/disinfector, loading practices, etc., as<br />
needed according to the results found from the test object and comparing them<br />
to the ProFormance <strong>Washer</strong> Test chart.<br />
The next testing day, place the tray on a different shelf.<br />
Over time, continue to vary the shelf and position the tray to test all<br />
possible configurations.<br />
Record all results.<br />
Make any adjustments to the washer/disinfector as needed according to<br />
the results found from the test object and comparing them to the ProFormance<br />
<strong>Washer</strong> Test chart.<br />
Maintenance on Equipment (1,5,12,13):<br />
After any maintenance on the equipment, perform a test using the T.O.S.I.<br />
<strong>Washer</strong> Test to ensure that the equipment is cleaning properly.<br />
Follow the weekly test process.<br />
Have the maintenance person wait until the test results are complete before<br />
leaving.<br />
6
Possible False Positive Results with the TOSI<br />
Tiny Red Spot on TOSI Plate: Very rarely, but nonetheless possible, is a<br />
slight imperfection in the stainless steel plate which leads to oxidation of<br />
the metal. The result is a little red spec which could be confused with the<br />
hemoglobin soil on the TOSI. The easiest way to double check for such a<br />
thing is to directly employ mechanical action (with a gloved hand,<br />
preferably with the aid of an instrument cleaning brush) under water. If the<br />
spec remains, then it is definitely not the TOSI blood soil that remains.<br />
Ghosting on the TOSI Plate: A whitish staining is observed on the TOSI<br />
plate, which can be confused with fibrin protein remaining on the TOSI.<br />
This usually happens at a facility that has hard water. If allowed to dry and<br />
the TOSI is read at that point, hard water staining may be observed on the<br />
TOSI plate. The simplest method is to submerge gently the TOSI plate in<br />
a bath of water. If the “disappears” when wetted, this indicates a non-test<br />
soil residue (likely hard water minerals or detergent) and not the blood test<br />
soil.<br />
RESPONSIBILITY:<br />
Central Service personnel are responsible for the proper use, result<br />
interpretation, and documentation of the T.O.S.I. indicator when used on an<br />
automated instrument washer (1,5,12,13)<br />
Staff in-service and training on the equipment and proper T.O.S.I use should be<br />
done at least once each year.<br />
REFERENCES:<br />
1. ANSI/AAMI-ST 79;2009<br />
2. Blood as a Soil on Surgical <strong>Instrument</strong>s; <strong>Cleaning</strong> Profile, <strong>Cleaning</strong>,<br />
Detection; M.Pfeifer, Zentr Steril 1998;6 (6);381-385<br />
3. Standardized Test Soil Blood 1: Composition, Preparation, Application;<br />
M.Pfeifer, Zentr Steril 1998;6 (6);304-310<br />
4. OSAKA REPORT; Importance of the cleaning test; University of Osaka,<br />
Department of Medicine, Ryo Fushimi, 2000<br />
5. www.jcaho.org<br />
6. http://www.proformance-test.com/WallChart/WallChart.html<br />
7. http://www.proformance-test.com/<strong>Support</strong>Material/TechnicalBulletin1.html<br />
8. http://www.proformance-test.com/<strong>Support</strong>Material/BloodAsASoilonSurgical<strong>Instrument</strong>s.htm<br />
9. http://www.proformance-test.com/<strong>Support</strong>Material/StandardisedTestSoilBlood1.htm<br />
10. http://www.proformance-test.com/index.html<br />
7
11. 510(k) Summary and Overview; Safety, Efficacy and Microbiological<br />
Considerations,. The System 83 plus <strong>Washer</strong> -Disinfector; Custom<br />
Ultrasonics, Inc,1998, page 7.<br />
12. www.aorn.org<br />
13. http://www.healthmark.info/MktingPieces/ProductBrochures/2006/Proformanc<br />
eJournal.pdf<br />
8