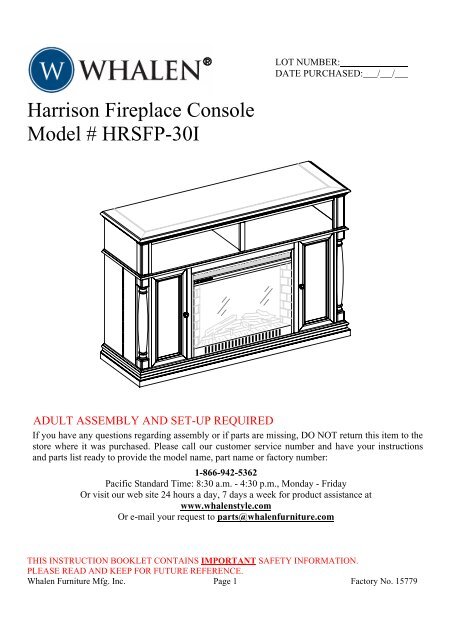
Harrison Fireplace Console Model # HRSFP-30I - Whalen Style
Harrison Fireplace Console Model # HRSFP-30I - Whalen Style
Harrison Fireplace Console Model # HRSFP-30I - Whalen Style

Create successful ePaper yourself
Turn your PDF publications into a flip-book with our unique Google optimized e-Paper software.
<strong>Harrison</strong> <strong>Fireplace</strong> <strong>Console</strong><br />
<strong>Model</strong> # <strong>HRSFP</strong>-<strong>30I</strong><br />
LOT NUMBER:<br />
DATE PURCHASED: / /<br />
ADULT ASSEMBLY AND SET-UP REQUIRED<br />
If you have any questions regarding assembly or if parts are missing, DO NOT return this item to the<br />
store where it was purchased. Please call our customer service number and have your instructions<br />
and parts list ready to provide the model name, part name or factory number:<br />
1-866-942-5362<br />
Pacific Standard Time: 8:30 a.m. - 4:30 p.m., Monday - Friday<br />
Or visit our web site 24 hours a day, 7 days a week for product assistance at<br />
www.whalenstyle.com<br />
Or e-mail your request to parts@whalenfurniture.com<br />
THIS INSTRUCTION BOOKLET CONTAINS IMPORTANT SAFETY INFORMATION.<br />
PLEASE READ AND KEEP FOR FUTURE REFERENCE.<br />
<strong>Whalen</strong> Furniture Mfg. Inc. Page 1 Factory No. 15779
QUALITY GUARANTEE<br />
We are confident that you will be delighted with your <strong>Whalen</strong> Furniture purchase.<br />
<strong>Model</strong> # <strong>HRSFP</strong>-<strong>30I</strong><br />
Should this product be defective in workmanship or materials or fail under normal use, we will<br />
repair or replace it for up to one (1) year from date of purchase. Every <strong>Whalen</strong> Furniture product<br />
is designed to meet your highest expectations. We guarantee that you will immediately see the<br />
value of our fine furniture.<br />
This warranty gives you specific legal rights and you may also have other rights which vary<br />
from State to State.<br />
Customer Service: 1-866-942-5362<br />
8:30 a.m. - 4:30 p.m., PST, Monday to Friday<br />
www.whalenstyle.com<br />
MAXIMUM RECOMMENDED WEIGHT LOADS<br />
MANUFACTURER: <strong>Whalen</strong> Furniture<br />
CATALOG: <strong>Harrison</strong> <strong>Fireplace</strong> <strong>Console</strong> (<strong>HRSFP</strong>-<strong>30I</strong>)<br />
DATE OF MANUFACTURE: June 2012<br />
MADE IN CHINA<br />
MAXIMUM LOAD 10 lb. (4.54 kg)<br />
FITS UP TO MOST 70” FLAT PANEL TVs<br />
MAXIMUM LOAD 165 lb. (74.8 kg)<br />
PLACE TV BEHIND THE STOPPER<br />
MAXIMUM LOAD 10 lb. (4.54 kg)<br />
MAXIMUM LOAD 50 lb. (22.7 kg)<br />
THIS UNIT IS NOT INTENDED FOR USE WITH CRT TVS. USE ONLY WITH<br />
FLAT PANEL TVS AND AUDIO/VIDEO EQUIPMENT MEETING RECOMMENDED SIZE AND<br />
WEIGHT LIMITS. NEVER USE WITH LARGER/HEAVIER THAN RECOMMENDED FLAT<br />
PANEL TVS OR EQUIPMENT. TO AVOID INSTABILITY, PLACE FLAT PANEL TV IN CENTRE<br />
OF UNIT; CRT TVS, IMPROPERLY POSITIONED FLAT PANEL TVS, OR FLAT PANEL TVS OR<br />
OTHER EQUIPMENT THAT EXCEED RECOMMENDED SIZE AND WEIGHT LIMITS COULD<br />
FALL OFF OR BREAK THE UNIT, CAUSING POSSIBLE SERIOUS INJURY.<br />
Please call for replacement parts or assistance: 1-866-942-5362<br />
<strong>Whalen</strong> Furniture Mfg. Inc. Page 2 Factory No. 15779
IMPORTANT SAFETY INSTRUCTIONS<br />
<strong>Model</strong> # <strong>HRSFP</strong>-<strong>30I</strong><br />
When using electrical appliances, basic precautions should always be followed to reduce the risk of fire,<br />
electrical shock and injury to persons, including the following:<br />
1. Read all instructions before using this heater.<br />
2. This heater is hot when in use. To avoid burns, do not let bare skin touch hot surfaces. If provided, use<br />
handles when moving this heater. Keep combustible material, such as furniture, pillows, bedding, papers,<br />
clothes and curtains at least 3 feet (0.9 meters) from the front of the heater and keep them away from the<br />
sides and rear.<br />
3. Extreme caution is necessary when any heater is used by or near children or invalids and whenever the<br />
heater is left operating and unattended.<br />
4. Always unplug heater when not in use.<br />
5. Do not operate any heater with a damaged cord or plug or after the heater malfunctions, has been dropped<br />
or damaged in any manner. Return heater to authorized service facility for examination, electrical or<br />
mechanical adjustment, or repair.<br />
6. Do not use outdoors.<br />
7. This heater is not intended for use in bathrooms, laundry areas and similar indoor locations. Never locate<br />
heater where it may fall into a bathtub or other water container.<br />
8. Do not run power cord under carpeting. Do not cover power cord with throw rugs, runners, or the like.<br />
Arrange power cord away from traffic area and where it will not be tripped over.<br />
9. To disconnect heater, turn controls to off, then remove plug from outlet.<br />
10. Connect to properly grounded outlets only.<br />
11. Do not insert or allow foreign objects to enter any ventilation or exhaust openings as this may cause an<br />
electric shock or fire, or damage the heater.<br />
12. To prevent a possible fire, do not block firebox air intakes or exhaust in any manner. Do not operate<br />
firebox on soft surfaces, like a bed, where openings may become blocked.<br />
13. A heater has hot and arching or sparking parts inside. Do not use in areas where gasoline, paint, or<br />
flammable liquids are used or stored.<br />
14. There is a thermostat limiter inside the heater. When the inner temperature over heating or occur abnormal<br />
heating, the thermostat protective device would cut off power supply to avoid the fireplace damaged or risk<br />
of fire.<br />
15. Use this heater only as described in this manual. Any other use not recommended by the manufacturer may<br />
cause fire, electrical shock, or injury to persons.<br />
16. Avoid the use of an extension cord because the extension cord may overheat and cause a risk of fire.<br />
However, if you have to use an extension cord, the cord shall be No.14ga minimum size and rated not less<br />
than 1875 watts, and the extension cord shall be a three–wire cord with grounding type plug and cord<br />
connector.<br />
SAVE THESE INSTRUCTIONS<br />
Please call for replacement parts or assistance: 1-866-942-5362<br />
<strong>Whalen</strong> Furniture Mfg. Inc. Page 3 Factory No. 15779
GROUNDING INSTRUCTIONS<br />
<strong>Model</strong> # <strong>HRSFP</strong>-<strong>30I</strong><br />
This product must be grounded. If it should malfunction or breakdown, grounding provides a path of least<br />
resistance for electric current to reduce the risk of electric shock. This product is equipped with a cord having<br />
an equipment-grounding conductor and a grounding plug. The plug must be plugged into an appropriate outlet<br />
that is properly installed and grounded in accordance with all local codes and ordinances.<br />
This heater is for use on 120 volts circuit and has a<br />
grounded plug that looks like the one illustrated on Figure 1.<br />
See Figure 1 for grounding instruction. An adapter as shown<br />
at C is available for connecting three-blade grounding type<br />
plugs to two-slot receptacles. The green grounding plug<br />
extending from the adapter must be connected to a<br />
permanent ground such as a properly grounded outlet box.<br />
The adapter should not be used if a three-slot grounded<br />
receptacle is available.<br />
Figure 1<br />
Improper connection of the equipment-grounding conductor can result in a risk of<br />
electric shock. Check with qualified electrician or serviceman if you are in doubt as to whether the product<br />
is properly grounded. Do not modify the plug provided with the product – If it will not fit the outlet; have a<br />
proper outlet installed by qualified electrician.<br />
FCC STATEMENT<br />
NOTE: This equipment has been tested and found to comply with the limits for Class B digital device,<br />
pursuant to Part 15 of the FCC Rules. These limits are designed to provide reasonable protection against<br />
harmful interference in a residential installation. This equipment generates, uses, and can radiate radio<br />
frequency energy and, if not installed and used in accordance with the instructions, may cause harmful<br />
interference to radio or television reception. However, there is no guarantee that interference will not occur in a<br />
particular installation. If this equipment does cause harmful interference to radio or television reception, which<br />
can be determined by turning the equipment off and on, the user is encouraged to try to correct the interference<br />
by one or more of the following measures:<br />
Reorient or relocate the receiving antenna.<br />
Increase the separation between the equipment and the receiver.<br />
Connect the equipment into an outlet on a circuit different from that to which the receiver is connected.<br />
Consult the dealer or an experienced radio/TV technician for help.<br />
This device complies with Part 15 of the FCC Rules. Operation is subject to the following two conditions:<br />
1) This device may not cause harmful interference, and<br />
2) This device must accept any interference received, including interference that may cause undesired<br />
operation.<br />
Modifications not approved by the party responsible for<br />
compliance could void user’s authority to operate the equipment.<br />
This Class B digital apparatus complies with Canadian ICES-003.<br />
Please call for replacement parts or assistance: 1-866-942-5362<br />
<strong>Whalen</strong> Furniture Mfg. Inc. Page 4 Factory No. 15779
Parts and Hardware List<br />
<strong>Model</strong> # <strong>HRSFP</strong>-<strong>30I</strong><br />
Please read completely through the instructions and verify that all parts listed are present before<br />
beginning assembly.<br />
A- MANTEL WITH FIREPLACE (1) B- ADJUSTABLE SHELF (4)<br />
(Pre-attached)<br />
(1) SHELF PIN w/HOLE (16) (2) 1/2” WOOD SCREW (16)<br />
(Pre-attached) (Pre-attached)<br />
(3) ACRYLIC STOPPER (1) (4) REMOTE CONTROL WITH BATTERY (1)<br />
TOUCH-UP PEN (1) ALLEN WRENCH (1) TIPPING RESTRAINT HARDWARE KIT (2)<br />
(Included in plastic bag)<br />
Tools required: Allen Wrench (provided) and Phillips screwdriver (not provided).<br />
Please call for replacement parts or assistance: 1-866-942-5362<br />
<strong>Whalen</strong> Furniture Mfg. Inc. Page 5 Factory No. 15779
Assembly Instructions<br />
1. Unpack the unit and confirm that you have all the hardware and required parts listed.<br />
A<br />
<strong>Model</strong> # <strong>HRSFP</strong>-<strong>30I</strong><br />
2. Position MANTEL (A) on your desired location against a wall to place your TV on top when you finish<br />
assembly.<br />
NOTE: The <strong>Fireplace</strong> <strong>Console</strong> is fully assembled from the factory. There are, however, a few final set-up<br />
and adjustment procedures that need to be completed before your <strong>Whalen</strong> product is completely installed.<br />
3. The ADJUSTABLE SHELVES (B) are pre-installed for shipping. If the SHELF position is not to your<br />
liking, you will need to reposition the SHELF by following the steps below.<br />
a. Look under each SHELF (B), and locate the 1/2” WOOD SCREWS (2) holding the SHELF to the SHELF<br />
PINS (1).<br />
b. Remove the 1/2” WOOD SCREWS (2) from each SHELF PIN (1) with a Phillips screwdriver.<br />
c. Remove the ADJUSTABLE SHELF (B) from the MANTEL.<br />
d. Remove the SHELF PINS (1) from the MANTEL and re-position them in the desired location. Make<br />
sure you place the SHELF PINS in the same level so the SHELF is not tilted.<br />
e. Place the ADJUSTABLE SHELF (B) back onto the newly relocated SHELF PINS (1).<br />
f. Using the Phillips screwdriver, reinstall the 1/2” SCREWS (2) through the SHELF PINS (1) and into<br />
the ADJUSTABLE SHELF (B).<br />
Please call for replacement parts or assistance: 1-866-942-5362<br />
<strong>Whalen</strong> Furniture Mfg. Inc. Page 6 Factory No. 15779<br />
1<br />
B<br />
1<br />
2
Assembly Instructions<br />
<strong>Model</strong> # <strong>HRSFP</strong>-<strong>30I</strong><br />
NOTE: You must install the Acrylic TV Stopper to prevent TV from tipping when placing your flat panel<br />
television on the table-top.<br />
4. Remove the tape of ACRYLIC STOPPER (3) and place it on the cut-out of the warning label on the front<br />
of MANTEL. Make sure it is aligned before applying pressure.<br />
5. Remove the warning label for ACRYLIC STOPPER carefully.<br />
6. In case of uneven floor, the Floor Levelers are provided at the front of base. Open the library and you will<br />
see a hole at the base of the unit, use enclosed ALLEN WRENCH to turn the leveler and adjust the height<br />
of the unit, until unit is level.<br />
Please call for replacement parts or assistance: 1-866-942-5362<br />
<strong>Whalen</strong> Furniture Mfg. Inc. Page 7 Factory No. 15779
Assembly Instructions<br />
7. The vented rear panels are removable for easy access to audio and video component hook-up.<br />
A<br />
<strong>Model</strong> # <strong>HRSFP</strong>-<strong>30I</strong><br />
Please call for replacement parts or assistance: 1-866-942-5362<br />
<strong>Whalen</strong> Furniture Mfg. Inc. Page 8 Factory No. 15779
Assembly Instructions<br />
Tools required: Phillips Screwdriver, Power Drill, 3/8” Drill Bit and Rubber Mallet.<br />
<strong>Model</strong> # <strong>HRSFP</strong>-<strong>30I</strong><br />
8. Position the MANTEL (A) in your desired location against a wall. Now follow the instructions printed on<br />
the plastic bag containing the TIPPING RESTRAINT HARDWARE to mount the tipping restraint to the<br />
unit and the wall.<br />
NOTE: Young children can be seriously injured by tipping furniture. You must install the<br />
Tipping Restraint Hardware with the unit in use to prevent any accidents or damage to the unit.<br />
The tipping restraints are intended only as a deterrent, they are not a substitute for proper adult<br />
supervision. The tipping restraints are not earthquake restraints. If you wish to add the extra<br />
security of earthquake restraints, they must be purchased and installed separately.<br />
Please call for replacement parts or assistance: 1-866-942-5362<br />
<strong>Whalen</strong> Furniture Mfg. Inc. Page 9 Factory No. 15779
Battery Bracket<br />
OPERATION INSTRUCTIONS WITH REMOTE<br />
2<br />
OPEN<br />
1<br />
PUSH<br />
LITHIUM BATTERY<br />
CR2025<br />
3V<br />
RELEASE<br />
RELEASE<br />
OPEN<br />
PUSH<br />
OPEN<br />
PUSH<br />
Figure a<br />
Heater Control<br />
<strong>Model</strong> # <strong>HRSFP</strong>-<strong>30I</strong><br />
9. The fireplace/heater features small REMOTE CONTROL (4). This remote combines all the functions of the<br />
front panel controls of the fireplace/heater with the convenience of not having to leave the comfort of your<br />
seat to change the settings of the fireplace/heater. The first thing to do with the REMOTE CONTROL (4) is<br />
to remove the plastic sheet insulated the battery.<br />
10. The battery is supplied with the REMOTE CONTROL. Replacement batteries can be purchased at any<br />
electronics store. The part number for the battery is CR2025. Please follow the sequence below to replace<br />
the battery.<br />
a. Take out battery bracket, and locate the battery bracket. (Figure a)<br />
b. The battery has two sides, one with a button feature, and the other is flat. (Figure b)<br />
c. Insert the battery with the button side into the battery bracket, making sure the battery is firmly seated.<br />
(Figure c)<br />
d. Press the battery bracket into the remote control, making sure it snaps into position. (Figure d)<br />
NOTE: Never dispose of batteries in fire, except under conditions of controlled incineration. Failure to<br />
observe this precaution may result in an explosion.<br />
11. Connect the <strong>Fireplace</strong> to the power transformer. Follow the separated operating manual of electric fireplace<br />
to control your fireplace.<br />
Please call for replacement parts or assistance: 1-866-942-5362<br />
<strong>Whalen</strong> Furniture Mfg. Inc. Page 10 Factory No. 15779<br />
CR2025<br />
LITHIUM BATTERY<br />
CR2025<br />
3V<br />
RELEASE<br />
OPEN<br />
PUSH<br />
RELEASE<br />
OPEN<br />
PUSH<br />
Figure b<br />
Figure c Figure d<br />
Main Power<br />
Flames Control<br />
Timer Function
1. No power or function.<br />
PROBLEM SOLUTION<br />
2. Main power switch lights up, but no flame effect.<br />
3. Have flame effect, but heater does not blow warm<br />
air.<br />
4. Heater does not work, but Power and Heater<br />
switches are in the “ON” position and thermostat is<br />
set on “HI”.<br />
TROUBLE SHOOTING GUIDE<br />
<strong>Model</strong> # <strong>HRSFP</strong>-<strong>30I</strong><br />
1a. Check that unit is plugged into a standard 120V<br />
outlet.<br />
1b. Press power button on the control panel.<br />
2a. Open the top and back panel to check if the flame<br />
spindle has fallen off from spindle motor.<br />
3a. Confirm temperature setting exceeds room<br />
temperature.<br />
3b. Try to turn on/off HEATER button several times<br />
to make sure it is in the “ON” position.<br />
4a. Turn all switches to the “OFF” position and<br />
unplug the unit from the wall outlet for 5 minutes.<br />
After 5 minutes plug the unit back into wall outlet,<br />
and operate as normal.<br />
Please call for replacement parts or assistance: 1-866-942-5362<br />
<strong>Whalen</strong> Furniture Mfg. Inc. Page 11 Factory No. 15779
Care and Maintenance<br />
<strong>Model</strong> # <strong>HRSFP</strong>-<strong>30I</strong><br />
Use a soft, clean cloth that will not scratch the surface when dusting.<br />
Use of furniture polishes is not necessary. Should you choose to use polishes, test first in an<br />
inconspicuous area.<br />
Using solvents of any kind on your furniture may damage the finish.<br />
Never use water to clean your furniture as it may cause damage to the finish.<br />
Always use coasters under beverage glasses and flowerpots.<br />
Liquid spills should be removed immediately. Using a soft clean cloth, blot the spill gently. Avoid<br />
rubbing.<br />
Always use protective pads under hot dishes and plates. Heat can cause chemical changes that may<br />
create spotting within the furniture finish.<br />
Stains or marks from crayons or ink markers will be difficult to remove.<br />
In the event that your furniture is stained or otherwise damaged during use, we recommend that<br />
you call a professional to repair your furniture.<br />
Check bolts/screws periodically and tighten them if necessary.<br />
Further advice about wood furniture care<br />
It is best to keep your furniture in a climate-controlled environment. Extreme temperature and<br />
humidity changes can cause fading, warping, shrinking and splitting of wood. It is advised to keep<br />
furniture away from direct sunlight as sun may damage the finish.<br />
Proper care and cleaning at home will extend the life of your purchase. Following these important and<br />
helpful tips will enhance your furniture as it ages.<br />
Cleaning trim for fireplace<br />
Clean the metal trim using a soft cloth, slightly dampened with citrus oil based product and buff with a<br />
clean soft cloth. DO NOT use brass polish or household cleaners as these products will damage the<br />
metal trim. Citrus oil based products can be obtained at supermarkets or hardware stores.<br />
A Touch-up Pen has been provided to repair any small nicks or scratches that may occur during<br />
assembly or shipping.<br />
We hope you enjoy your purchase for many years.<br />
Thank you for choosing <strong>Whalen</strong> Furniture!<br />
Please call for replacement parts or assistance: 1-866-942-5362<br />
<strong>Whalen</strong> Furniture Mfg. Inc. Page 12 Factory No. 15779
IF YOU NEED TO ORDER PARTS PLEASE USE THE LIST BELOW<br />
<strong>Harrison</strong> <strong>Fireplace</strong> <strong>Console</strong> (<strong>HRSFP</strong>-<strong>30I</strong>)<br />
*<strong>HRSFP</strong>-<strong>30I</strong>-1-AS Adjustable Shelf *<strong>HRSFP</strong>-<strong>30I</strong>-14-AS Acrylic Stopper<br />
*<strong>HRSFP</strong>-<strong>30I</strong>-2-LL Left Library *<strong>HRSFP</strong>-<strong>30I</strong>-15-RC Remote Control-4 Buttons (FP30-2A-RC)<br />
*<strong>HRSFP</strong>-<strong>30I</strong>-3-RL Right Library *<strong>HRSFP</strong>-<strong>30I</strong>-16-HIHT Housing with Infrared Heating Tubes (FP30-2A-HIHT)<br />
*<strong>HRSFP</strong>-<strong>30I</strong>-4-PHS Piano Hinge w/Screws *<strong>HRSFP</strong>-<strong>30I</strong>-17-B Blower (FP30-2A-B)<br />
*<strong>HRSFP</strong>-<strong>30I</strong>-5-KB Knob w/Bolt *<strong>HRSFP</strong>-<strong>30I</strong>-18-MPCB MAIN PCB (FP30-2A-MPCB)<br />
*<strong>HRSFP</strong>-<strong>30I</strong>-6-RRP Removeable Rear Panel *<strong>HRSFP</strong>-<strong>30I</strong>-19-CPPCB Control Panel PCB (FP30-2A-CPPCB)<br />
*<strong>HRSFP</strong>-<strong>30I</strong>-7-FL Floor Leveler *<strong>HRSFP</strong>-<strong>30I</strong>-20-FGDM Flame Generator Drive Motor (FP30-2A-FGDM)<br />
*<strong>HRSFP</strong>-<strong>30I</strong>-8-HDMC Heavy-duty Magnetic Catch *<strong>HRSFP</strong>-<strong>30I</strong>-21-LLPCB Logs Light PCB (FP30-2A-LLPCB)<br />
*<strong>HRSFP</strong>-<strong>30I</strong>-9-SPH Shelf Pin w/Hole *<strong>HRSFP</strong>-<strong>30I</strong>-22-DL Down Light (FP30-2A-DL)<br />
*<strong>HRSFP</strong>-<strong>30I</strong>-10-1/2WS 1/2" Wood Screw *<strong>HRSFP</strong>-<strong>30I</strong>-23-EBLPCB Ember Bed Light PCB (FP30-2A-EBLPCB)<br />
*<strong>HRSFP</strong>-<strong>30I</strong>-11-TUP Touch-up Pen *<strong>HRSFP</strong>-<strong>30I</strong>-24-FLPCB Flame Light PCB (FP30-2A-FLPCB)<br />
*<strong>HRSFP</strong>-<strong>30I</strong>-12-TRHK Tipping Restraint Hardware Kit *<strong>HRSFP</strong>-<strong>30I</strong>-25-FIGF <strong>Fireplace</strong> Insert Glass with Frame (FP30-2A-FIGF)<br />
*<strong>HRSFP</strong>-<strong>30I</strong>-13-AW <strong>HRSFP</strong> <strong>30I</strong> 13 AW Allen Wrench Wrench *<strong>HRSFP</strong>-<strong>30I</strong>-CH <strong>HRSFP</strong> <strong>30I</strong> CH Complete Hardware<br />
*<strong>HRSFP</strong>-<strong>30I</strong>-CFI Complete <strong>Fireplace</strong> Insert (FP30-2A)