2 ADULTS REQUIRED FOR ASSEMBLING If you ... - Whalen Style
2 ADULTS REQUIRED FOR ASSEMBLING If you ... - Whalen Style
2 ADULTS REQUIRED FOR ASSEMBLING If you ... - Whalen Style

Create successful ePaper yourself
Turn your PDF publications into a flip-book with our unique Google optimized e-Paper software.
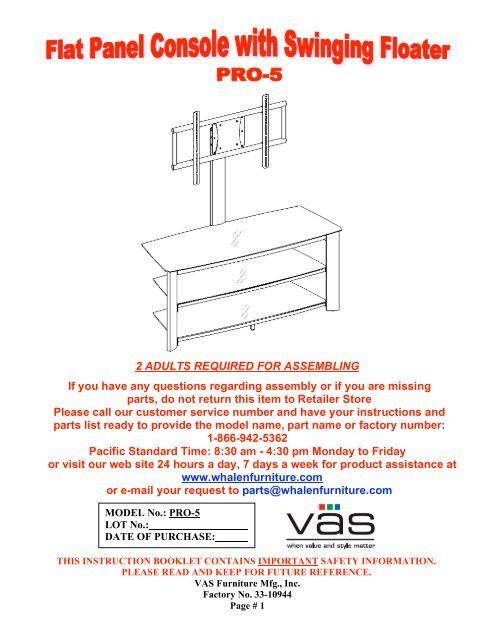
2 <strong>ADULTS</strong> <strong>REQUIRED</strong> <strong>FOR</strong> <strong>ASSEMBLING</strong><br />
<strong>If</strong> <strong>you</strong> have any questions regarding assembly or if <strong>you</strong> are missing<br />
parts, do not return this item to Retailer Store<br />
Please call our customer service number and have <strong>you</strong>r instructions and<br />
parts list ready to provide the model name, part name or factory number:<br />
1-866-942-5362<br />
Pacific Standard Time: 8:30 am - 4:30 pm Monday to Friday<br />
or visit our web site 24 hours a day, 7 days a week for product assistance at<br />
www.whalenfurniture.com<br />
or e-mail <strong>you</strong>r request to parts@whalenfurniture.com<br />
MODEL No.: PRO-5<br />
LOT No.:<br />
DATE OF PURCHASE:<br />
THIS INSTRUCTION BOOKLET CONTAINS IMPORTANT SAFETY IN<strong>FOR</strong>MATION.<br />
PLEASE READ AND KEEP <strong>FOR</strong> FUTURE REFERENCE.<br />
VAS Furniture Mfg., Inc.<br />
Factory No. 33-10944<br />
Page # 1
QUALITY GUARANTEE<br />
We are confident that <strong>you</strong> will be delighted with <strong>you</strong>r VAS Furniture purchase.<br />
Should this product be defective in workmanship or materials or fail under normal<br />
use, we will repair or replace it for up to 1 year from date of purchase. Every VAS<br />
Furniture product is designed to meet <strong>you</strong>r highest expectations. We guarantee that<br />
<strong>you</strong> will immediately see the value of our fine furniture.<br />
This warranty gives <strong>you</strong> specific legal rights and <strong>you</strong> may also have other rights<br />
which vary from State to State.<br />
Customer Service: 1-866-942-5362<br />
8:30 a.m. - 4:30 p.m. PST Monday to Friday<br />
www.whalenfurniture.com<br />
MANUFACTURER: VAS FURNITURE<br />
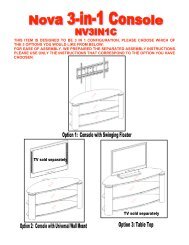
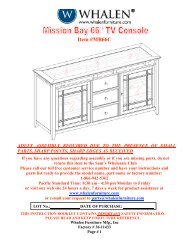
CATALOG: Flat Panel Console with Swinging Floater (PRO-5)<br />
DATE OF MANUFACTURE: April, 2009<br />
MADE IN CHINA<br />
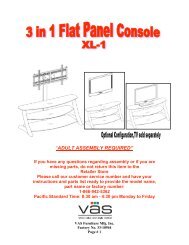
FITS UP TO MOST 56” FLAT PANEL TV’S<br />
MAXIMUM LOAD 135 LBS<br />
MAXIMUM LOAD 95 LBS<br />
MAXIMUM SHELF LOAD 50 LBS<br />
This unit is intended for use only with the products and<br />
maximum weights indicated. Use with other products or products heavier than the<br />
maximum weights indicated may result in instability causing possible injury.<br />
Notes: TV sets with base support should be placed squarely in the center of<br />
the stand with no overhanging on either side.<br />
Please call for replacement parts or assistance: 1-866-942-5362<br />
VAS Furniture Mfg., Inc.<br />
Factory No. 33-10944<br />
Page # 2
Parts List<br />
Please read completely through the instructions and verify that all parts listed<br />
are present before beginning assembly.<br />
A-Top Shelf Frame (1) B- Middle Stretcher (1) C- Bottom Shelf Frame (1)<br />
D- Spine (1) E- Left Leg (1) F- Right Leg (1)<br />
G- Top Glass (1) H- Glass Shelf (2)<br />
I- Front Left Support J- Front Right Support K- Back Left Support L- Back Right Support<br />
(1) (1) (1) (1)<br />
M- Deluxe Bracket with VESA Plate (1) N- XYZ Mounting Frame (1) O- Monitor Bracket (2)<br />
Please call for replacement parts or assistance: 1-866-942-5362<br />
VAS Furniture Mfg., Inc.<br />
Factory No. 33-10944<br />
Page # 3
Hardware List<br />
Please read completely through the instructions and verify that all parts listed<br />
are present before beginning assembly.<br />
(1)- 5/8” Bolt (48+2 extra) (2)- 3/4” Bolt (4+1 extra) (3)- Lock Washer (50+2 extra)<br />
(4)- Flat Washer (5)-Suction Cup (6)- Large Flat Washer<br />
(46+2 extra) (22+1 extra) (8+1 extra)<br />
(7)- Nut (4+1 extra) (8)- Set Screw (2pcs) Open Wrench (1pcs)<br />
Allen Wrench (1) Touch Up Pen (1) Tipping Restraint Hardware Kit (1)<br />
(Inside Plastic White Bag)<br />
TV Mounting Kit<br />
M4 x 12 Bolt (4) M4 x 30 Bolt (4) M5 X 12 Bolt (4) M5 x 30 Bolt (4)<br />
M6 x12 Bolt (4) M6 x 35 Bolt (4) M8x16 Bolt (4) M8 x40 Bolt (4)<br />
M4 Lock Washer M5 Lock Washer M6 Lock Washer M8 Lock Washer<br />
(4) (4) (4) (4)<br />
Large Spacer (4) Small Spacer (4) M4/M5 Flat Washer (8) M6/M8 Flat Washer (4)<br />
Please call for replacement parts or assistance: 1-866-942-5362<br />
VAS Furniture Mfg., Inc.<br />
Factory No. 33-10944<br />
Page # 4
Tools Required: Allen Wrench (provided), Open Wrench (provided) and Phillips<br />
Screwdriver.<br />
Assembly Instructions<br />
Note: Please do not fully tighten all bolts until <strong>you</strong> finish assembling all parts, then go<br />
back and fully tighten all bolts, this will make it easier during assembly of unit.<br />
1. Unpack the unit and confirm that <strong>you</strong> have all the hardware and required parts listed.<br />
2. Locate the Spine (D) and set back face down on a scratch free surface as shown in<br />
detail #1.<br />
3. Align the “U” shape plate holes of Top and Bottom Shelf Frames (A & C) with the<br />
threaded inserts on the Spine (D) in place, attach with 5/8" Bolts (1) and Lock<br />
Washers & Flat Washers (3 & 4), six bolts per shelf frame. See detail #1.<br />
Parts Provided Qty Tools Required<br />
A- Top Shelf Frame (1) Allen Wrench<br />
C- Bottom Shelf Frame (1)<br />
D- Spine (1)<br />
(1) - 5/8” Bolt (12)<br />
(3) - Lock Washer (12)<br />
(4) – Flat Washer (12)<br />
Please call for replacement parts or assistance: 1-866-942-5362<br />
VAS Furniture Mfg., Inc.<br />
Factory No. 33-10944<br />
Page # 5
Assembly Instructions<br />
4. Attach Left Leg and Right Leg (E & F) to the Shelf Frames (A & C) using 5/8” Bolts (1)<br />
with Washers (3 & 4) through the end bracket holes as shown in detail #2. DO NOT<br />
tighten the bolts. Make sure the gap and offsets between the wooden front rail of Top<br />
Shlef Frame (A) and the Legs are the same. Loosen the bolts on the wooden front rail<br />
and adjust if necessary.<br />
5. Now align and attach the Middle Stretcher (B) between the Left and Right Leg (E & F)<br />
in place using six 5/8” Bolts (1) and Washers (3 & 4). See detail #2.<br />
Parts Provided Qty Tools Required<br />
B – Middle Stretcher (1) Allen Wrench<br />
E –Left Leg (1)<br />
F –Right Leg (1)<br />
(1) - 5/8” Bolt (16)<br />
(3) - Lock Washer (16)<br />
(4) – Flat Washer (16)<br />
Please call for replacement parts or assistance: 1-866-942-5362<br />
VAS Furniture Mfg., Inc.<br />
Factory No. 33-10944<br />
Page # 6
6. Stand the unit upright.<br />
Assembly Instructions<br />
7. For a stable structure, align and attach the Front Left & Right Support (I & J) in place<br />
to connect the Top Shelf Frame (A) with both Legs (E & F) using 5/8” Bolts (1) with<br />
Washers (3 & 4), as shown in detail #3.<br />
8. Align and attach the Back Left and Back Right Support (K & L) to the Top Shelf Frame<br />
(A) and Spine (D) with the 5/8” Bolts (1) with Washers (3 & 4), as shown in detail #3.<br />
Parts Required Qty Tools Required<br />
I- Front Left Support (1) Allen Wrench<br />
J - Front Right Support (1)<br />
K –Back Left Support (1)<br />
L –Back Right Support (1)<br />
(1) - 5/8” Bolt (12)<br />
(3) -Lock Washer (12)<br />
(4) -Flat Washer (12)<br />
Please call for replacement parts or assistance: 1-866-942-5362<br />
VAS Furniture Mfg., Inc.<br />
Factory No. 33-10944<br />
Page # 7
Assembly Instructions<br />
9. Go back and securely tighten all the bolts with Allen Wrench provided.<br />
10. In case of uneven floor, Floor Levelers are provided at the bottom of Legs (E & F) and<br />
front rail of Bottom Shelf Frame (C). Simply tilt the unit back and raise or lower floor<br />
leveler by hand to correct tilting. As shown in detail #4.<br />
Parts Required Tools Required<br />
Pre-attached Floor Leveler No tool required<br />
Please call for replacement parts or assistance: 1-866-942-5362<br />
VAS Furniture Mfg., Inc.<br />
Factory No. 33-10944<br />
Page # 8
Assembly Instructions to attach Deluxe Bracket w/ VESA Plate<br />
11. Attach Deluxe Bracket with VESA Plate (M) to the top of Spine (D) using six 5/8” Bolts<br />
(1) with Lock Washers & Flat Washers (3 & 4) as shown in detail #5.<br />
Parts Required Qty Tools Required<br />
M – Deluxe Bracket with VESA Plate (1) Allen Wrench<br />
(1) – 5/8” Bolt (6)<br />
(3) - Lock Washer (6)<br />
(4) – Flat Washer (6)<br />
Please call for replacement parts or assistance: 1-866-942-5362<br />
VAS Furniture Mfg., Inc.<br />
Factory No. 33-10944<br />
Page # 9
Assembly Instructions<br />
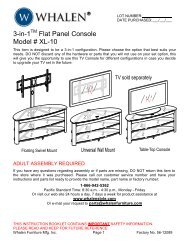
Note: There are two mounting options included in this swinging floater TV console:<br />
1. VESA Plate;<br />
2. XYZ Mounting Frame to accommodate random hole patterns.<br />
12. For LCD 32” or smaller <strong>you</strong> can mount <strong>you</strong>r LCD directly to the Deluxe Bracket with<br />
VESA Plate (M), using the appropriate Bolts through the Lock Washers and Flat<br />
Washers through the proper holes of VESA Plate and then into the TV. See detail #6.<br />
Note: Hand threading the bolt in the TV Mounting Kit included into the threaded insert on<br />
the back of the TV to determine correct size bolt <strong>you</strong> will require. <strong>If</strong> <strong>you</strong> are unable to find<br />
the correct one, consult a local hardware store.<br />
Parts Required Tools Required<br />
See TV Mounting Kit Phillips Screwdriver<br />
Please call for replacement parts or assistance: 1-866-942-5362<br />
VAS Furniture Mfg., Inc.<br />
Factory No. 33-10944<br />
Page # 10
Assembly Instructions<br />
Note: For Plasma and LCD TVs larger than 32”, <strong>you</strong> must use the XYZ Mounting Frame (N)<br />
provided. The XYZ Mounting Frame will accommodate large LCD without VESA Hole<br />
Patterns and Plasma TV’s with Random Hole Patterns.<br />
13. Attach XYZ Mounting Frame (N) to the Deluxe Bracket with VESA Plate (M), using 3/4”<br />
Bolts (2) with Large Flat Washers (6) through the mounting plate and appropriate hole<br />
set on VESA Plate, through the other Large Flat Washers (6) and Lock Washers (3)<br />
then secure with Nut (7), as shown in detail #7.<br />
Parts Provided Qty Tools Required<br />
N – XYZ Mounting Frame (1) Allen Wrench<br />
(2) – 3/4” Bolt (4) Open Wrench<br />
(3)– Lock Washer (4)<br />
(6) – Flat Washer (8)<br />
(7) – Nut (4)<br />
Please call for replacement parts or assistance: 1-866-942-5362<br />
VAS Furniture Mfg., Inc.<br />
Factory No. 33-10944<br />
Page # 11
Mounting Monitor Bracket to a television with a flat back<br />
Note: For televisions with a curved back or recessed back proceed directly to step #17.<br />
14. Please refer to detail #8 & 8A to determine the correct size bolt <strong>you</strong>r TV requires by<br />
several try. <strong>If</strong> <strong>you</strong> are unable to find the correct bolt, consult a local hardware store.<br />
15. Once <strong>you</strong> have determined the correct diameter Bolt, please follow the appropriate<br />
Diagram below; Insert the selected short Bolt with Washers into the upper holes of<br />
TV. As shown in detail #8A.<br />
Note: Lean the TV up against a wall or other solid surface when attaching with the<br />
Monitor Brackets (O). DO NOT place the TV face down on the glass this may cause<br />
permanent damage.<br />
16. Proceed to insert the selected longer Bolt with Washers and Spacer into the bottom<br />
holes of TV as shown in detail #8. Make sure the Monitor Brackets (O) are centered<br />
and level with each other. Tighten the bolts securing the Monitor Brackets (O) to the<br />
TV.<br />
Please call for replacement parts or assistance: 1-866-942-5362<br />
VAS Furniture Mfg., Inc.<br />
Factory No. 33-10944<br />
Page # 12
Mounting Monitor Bracket to a television with a curved / recess back<br />
17. Please refer to detail #9 to determine the correct size bolt <strong>you</strong>r TV requires by several<br />
try. <strong>If</strong> <strong>you</strong> are unable to find the correct bolt consult a local hardware store.<br />
18. Once <strong>you</strong> have determined the correct size of Bolt, please follow the appropriate<br />
Diagram below, and insert the longer bolt with appropriate Washers & Spacer as<br />
shown in detail #9.<br />
19. Make sure the Monitor Brackets (O) are vertically centered and level with each other.<br />
Tighten the bolts securing the Monitor Brackets (O) to the TV.<br />
Parts Provided Qty Tools Required<br />
O – Monitor Bracket (2) Phillips Screwdriver<br />
TV Mounting Kit<br />
Please call for replacement parts or assistance: 1-866-942-5362<br />
VAS Furniture Mfg., Inc.<br />
Factory No. 33-10944<br />
Page # 13
Assembly Instructions<br />
20. Now <strong>you</strong> can hang <strong>you</strong>r Plasma onto the XYZ Mounting Frame (N). For additional<br />
safety please screw two 5/8” Bolts (1) into the upper hooks of Monitor Brackets (O) to<br />
prevent TV from falling. See detail #10.<br />
Parts Provided Qty Tools Required<br />
(1) – 5/8” Bolt (2) Allen Wrench<br />
Please call for replacement parts or assistance: 1-866-942-5362<br />
VAS Furniture Mfg., Inc.<br />
Factory No. 33-10944<br />
Page # 14
Assembly Instructions<br />
21. Insert the Suction Cups (5) into the top holes of Top & Bottom Shelf Frames (A & C)<br />
and Middle Stretcher (B). Make sure they go all the way in. See detail #11.<br />
22. Insert the Top Glass & Glass Shelves (G & H) in place. Make sure the Glass Shelf sits<br />
correctly and goes all the way against the Spine to prevent falling easily and getting damage.<br />
Once the Middle Glass Shelf (with plastic filler over the back curve) is inserted all the way<br />
into the “U” shape Glass Clip on the Spine, screw two Set Screws (8) into the Glass Clip to<br />
secure the shelf in place. See detail #11.<br />
Note: <strong>If</strong> glass is scratched <strong>you</strong> can repair by using a BLACK marker and filling in<br />
scratched area from underneath.<br />
Parts Provided Qty Tools Required<br />
G- Top Glass (1) No Tool Required<br />
H- Glass Shelf (2)<br />
(5)- Suction Cup (22)<br />
(8)- Set Screw (2)<br />
Please call for replacement parts or assistance: 1-866-942-5362<br />
VAS Furniture Mfg., Inc.<br />
Factory No. 33-10944<br />
Page # 15
TIPPING RESTRAINT HARDWARE<br />
Note: We have included one Tipping Restraint Hardware bag for this Unit.<br />
When properly installed, this restraint can provide protection against the unexpected<br />
tipping of the Unit due to small tremors, bumps or climbing. We strongly recommend<br />
mounting this hardware to a wall stud and <strong>you</strong>r Unit when assembling and using<br />
<strong>you</strong>r console.<br />
Please carefully read the instructions printed on the plastic white bag.<br />
Note: You must install the Tipping Restraint Hardware with the unit in use to prevent<br />
any accidents or damage to the unit.<br />
Tools Required: Allen Wrench (provided), Phillips Screwdriver, Mallet,<br />
Power Drill, and 3/8” Drill Bit.<br />
A Touch-Up Pen has been provided to repair any small nicks or scratches that may<br />
occur during assembly or shipping.<br />
Your assembly should now be complete.<br />
Thank <strong>you</strong> for <strong>you</strong>r purchase.<br />
Please call for replacement parts or assistance: 1-866-942-5362<br />
VAS Furniture Mfg., Inc.<br />
Factory No. 33-10944<br />
Page # 16