Harper Bunk Bed Model # HPBB - Whalen Style
Harper Bunk Bed Model # HPBB - Whalen Style
Harper Bunk Bed Model # HPBB - Whalen Style

You also want an ePaper? Increase the reach of your titles
YUMPU automatically turns print PDFs into web optimized ePapers that Google loves.
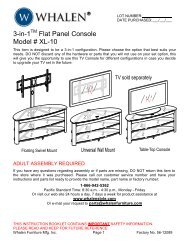
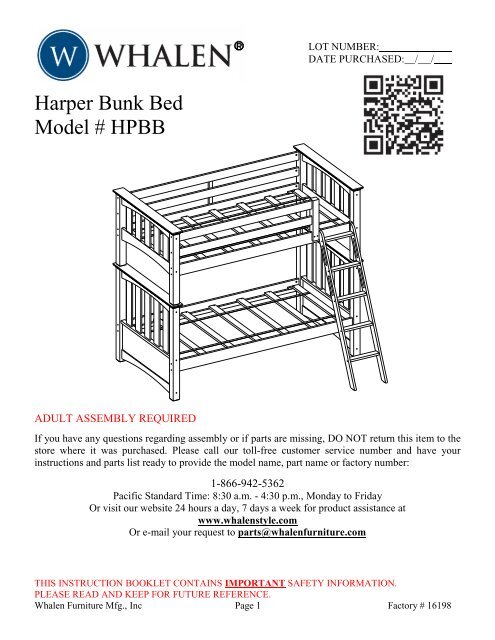
<strong>Harper</strong> <strong>Bunk</strong> <strong>Bed</strong><br />
<strong>Model</strong> # <strong>HPBB</strong><br />
ADULT ASSEMBLY REQUIRED<br />
LOT NUMBER:<br />
DATE PURCHASED: / /<br />
If you have any questions regarding assembly or if parts are missing, DO NOT return this item to the<br />
store where it was purchased. Please call our toll-free customer service number and have your<br />
instructions and parts list ready to provide the model name, part name or factory number:<br />
1-866-942-5362<br />
Pacific Standard Time: 8:30 a.m. - 4:30 p.m., Monday to Friday<br />
Or visit our website 24 hours a day, 7 days a week for product assistance at<br />
www.whalenstyle.com<br />
Or e-mail your request to parts@whalenfurniture.com<br />
THIS INSTRUCTION BOOKLET CONTAINS IMPORTANT SAFETY INFORMATION.<br />
PLEASE READ AND KEEP FOR FUTURE REFERENCE.<br />
<strong>Whalen</strong> Furniture Mfg., Inc Page 1 Factory # 16198
QUALITY GUARANTEE<br />
We are confident that you will be delighted with your <strong>Whalen</strong> Furniture purchase.<br />
<strong>Model</strong> # <strong>HPBB</strong><br />
Should this product be defective in workmanship or materials or fail under normal use, we<br />
will repair or replace it for up to one (1) year from date of purchase. Every <strong>Whalen</strong><br />
Furniture product is designed to meet your highest expectations. We guarantee that you will<br />
immediately see the value of our fine furniture.<br />
This warranty gives you specific legal rights and you may also have other rights which vary<br />
from State to State.<br />
Customer Service: 1-866-942-5362<br />
8:30 a.m. - 4:30 p.m. PST, Monday to Friday<br />
www.whalenstyle.com<br />
ALWAYS USE GUARDRAILS ON BOTH LONG SIDES OF THE UPPER BUNK. IF<br />
THE BUNK BED WILL BE PLACED NEXT TO THE WALL, THE GUARDRAIL<br />
THAT RUNS THE FULL LENGTH OF THE BED SHOULD BE PLACED AGAINST<br />
THE WALL TO PREVENT ENTRAPMENT BETWEEN THE BED AND WALL.<br />
STRANGULATION HAZARD - Never attach or hang items to any part of the bunk<br />
bed that are not designed for use with the bed; for example, but not limited to, hooks,<br />
belts, and jump ropes.<br />
Prohibit more than one person on upper bunk.<br />
Maximum mattress thickness must not exceed 9”. Surface of mattress must be at least<br />
5” below the upper edge of guardrails.<br />
Use only mattress which is 74” - 75” long and 37 ½” - 38 ½” wide on the bunk bed.<br />
Replacement parts, including additional guardrails, may be obtained from any of <strong>Whalen</strong><br />
Furniture dealers.<br />
Please call for replacement parts or assistance: 1-866-942-5362<br />
<strong>Whalen</strong> Furniture Mfg., Inc Page 2 Factory # 16198
<strong>Model</strong> # <strong>HPBB</strong><br />
TO HELP PREVENT SERIOUS OR FATAL INJURIES FROM ENTRAPMENT<br />
OR FALLS<br />
Follow the information on the warnings appearing on the upper bunk end<br />
structure and on the carton. Do not remove warning label from bed.<br />
Always use the recommended size mattress or mattress support, or both, to<br />
help prevent the likelihood of entrapment or falls.<br />
Surface of mattress must be at least 5” (127 mm) below the upper edge of<br />
guardrails.<br />
Do not allow children under 6 years of age to use the upper bunk.<br />
Periodically check and ensure that the guardrail, ladder and other components<br />
are in their proper position, free from damage and that all connectors are tight.<br />
Do not allow horseplay on or under the bed and prohibit jumping on the bed.<br />
Always use the ladder for entering and leaving the upper bunk.<br />
Do not use substitute parts. Contact the manufacturer or dealer for<br />
replacement parts.<br />
Use of a night light may provide added safety precaution for a child using the<br />
upper bunk.<br />
Always use guardrails on both long sides of the upper bunk. If the bunk bed<br />
will be placed next to the wall, the guardrail that runs the full length of the bed<br />
should be placed against the wall to prevent entrapment between the bed and<br />
wall.<br />
The use of water or sleep flotation mattress is prohibited.<br />
STRANGULATION HAZARD – Never attach or hang items to any part of the<br />
bunk bed that are not designed for use with the bed; for example, but not<br />
limited to, hooks, belts, and jump ropes.<br />
Prohibit more than one person on upper bunk.<br />
Keep these instructions for future reference.<br />
This product was manufactured May 2012.<br />
Please call for replacement parts or assistance: 1-866-942-5362<br />
<strong>Whalen</strong> Furniture Mfg., Inc Page 3 Factory # 16198
Parts and Hardware List<br />
<strong>Model</strong> # <strong>HPBB</strong><br />
Please read completely through the instructions and verify that all parts listed are present before<br />
beginning assembly.<br />
A- UPPER POST (2) B- UPPER POST (1)<br />
C- UPPER POST (1) D- LOWER POST (2)<br />
E- UPPER CAP RAIL (2) F- LOWER CAP RAIL (2)<br />
G- UPPER CROSS ASSEMBLY (2) H- LOWER CROSS ASSEMBLY (2)<br />
I- LOWER HEADBOARD PANEL (2) J- LOWER HEADBOARD BOTTOM CROSS (2)<br />
Please call for replacement parts or assistance: 1-866-942-5362<br />
<strong>Whalen</strong> Furniture Mfg., Inc Page 4 Factory # 16198
Parts and Hardware List<br />
<strong>Model</strong> # <strong>HPBB</strong><br />
Please read completely through the instructions and verify that all parts listed are present before<br />
beginning assembly.<br />
K- FRONT GUARDRAIL POST (1) L- MATTRESS SUPPORT SLATS (2)<br />
M- LONG GUARDRAIL (2) N- SHORT GUARDRAIL (2)<br />
O- LADDER SIDE RAIL (1) P- MATTRESS SIDE RAIL (3)<br />
Q- LADDER STEP (5) R- LEFT LADDER SUPPORT (1) S- RIGHT LADDER SUPPORT (1)<br />
T- LOWER POST (2) U- GUARDRAIL SUPPORT (1)<br />
Please call for replacement parts or assistance: 1-866-942-5362<br />
<strong>Whalen</strong> Furniture Mfg., Inc Page 5 Factory # 16198
Parts and Hardware List<br />
<strong>Model</strong> # <strong>HPBB</strong><br />
Please read completely through the instructions and verify that all parts listed are present before<br />
beginning assembly.<br />
(1) Ø1/4” x 110 mm BOLT (2) Ø1/4” x 38 mm BOLT<br />
(24+1 extra) (2+1 extra)<br />
(3) Ø6.5 mm x 100 mm BOLT (4) Ø6.5 mm x 50 mm BOLT<br />
(20+1 extra) (26+1 extra)<br />
(5) WOOD DOWEL (6) Ø4 mm x 30 mm SCREW<br />
(66+2 extra) (31+1 extra)<br />
(7) BED CONNECTOR PIN (4) (8) BARREL NUT (24+1 extra)<br />
(9) Ø3.5 mm x 19 mm SCREW (10) FLOOR PROTECTOR ALLEN WRENCH<br />
(2+1 extra) (4+1 extra) (2)<br />
Tools required: Allen Wrench (provided) and Phillips Screwdriver (not provided).<br />
Please call for replacement parts or assistance: 1-866-942-5362<br />
<strong>Whalen</strong> Furniture Mfg., Inc Page 6 Factory # 16198
ASSEMBLING LOWER HEADBOARD<br />
<strong>Model</strong> # <strong>HPBB</strong><br />
NOTE: Please follow the instructions carefully to insure a safe and sturdy bed. Do not fully<br />
tighten the bolts until all rails and guardrails are attached.<br />
3<br />
3<br />
3<br />
D<br />
3<br />
5<br />
5<br />
5<br />
D<br />
T<br />
1. Unpack the units and confirm that you have all hardware and parts required.<br />
5<br />
I<br />
H<br />
WOOD DOWEL<br />
(12 used in this step) ⑤<br />
Ø6.5 mm x 100 mm BOLT<br />
(6 used in this step) ③<br />
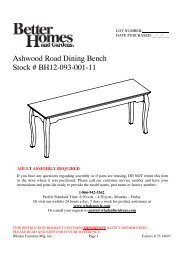
2. Insert WOOD DOWELS (5) into the end large holes of the LOWER CROSS ASSEMBLY (H). Align<br />
and attach one LOWER POST (D) to the LOWER CROSS ASSEMBLY (H) with two 100 mm<br />
TAPPING BOLTS (3) as shown. Proceed to slide LOWER HEADBOARD PANEL (I) into the<br />
grooves on LOWER CROSS ASSEMBLY (H) and the LOWER POST (D).<br />
3. Fit the groove of LOWER HEADBOARD BOTTOM CROSS (J) onto the LOWER HEADBOARD<br />
PANEL (I) and attach to the LOWER POST (D) using two WOOD DOWELS (5) and one 100 mm<br />
TAPPING BOLT (3).<br />
4. Align and attach the other LOWER POST (T) to last assembly using six WOOD DOWELS (5) and<br />
three 100 mm TAPPING BOLTS (3). Tighten the BOLTS with enclosed ALLEN WRENCH.<br />
Please call for replacement parts or assistance: 1-866-942-5362<br />
<strong>Whalen</strong> Furniture Mfg., Inc Page 7 Factory # 16198<br />
I<br />
J<br />
5<br />
5<br />
5<br />
T<br />
3<br />
3<br />
3
D<br />
ASSEMBLING LOWER HEADBOARD<br />
H<br />
F<br />
Ø6.5 mm x 50 mm BOLT<br />
(4 used in this step)<br />
④<br />
<strong>Model</strong> # <strong>HPBB</strong><br />
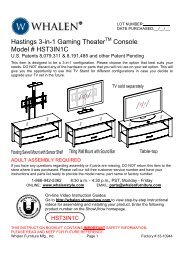
5. Locate one LOWER CAP RAIL (F) on a level and protected surface with the holes facing up. Insert<br />
two WOOD DOWELS (5) into the large holes of the LOWER CAP RAIL (F) as a guide. Position<br />
assembled unit onto the inserted WOOD DOWELS and fasten in place using four 50 mm BOLTS (4).<br />
6. Repeat the process to assemble the other LOWER HEADBOARD.<br />
WOOD DOWEL<br />
(2 used in this step) ⑤<br />
Please call for replacement parts or assistance: 1-866-942-5362<br />
<strong>Whalen</strong> Furniture Mfg., Inc Page 8 Factory # 16198<br />
T<br />
5<br />
H<br />
4
1<br />
D<br />
1<br />
F<br />
T<br />
ASSEMBLING LOWER BUNK<br />
8<br />
8<br />
Ø1/4” x 110 mm BOLT<br />
(8 used in this step) ①<br />
<strong>Model</strong> # <strong>HPBB</strong><br />
BARREL NUT<br />
(8 used in this step)<br />
7. Insert 2 BARREL NUTS (8) into each end of the MATTRESS SIDE RAIL (P). Be sure that the cross<br />
slot on the BARREL NUT is facing out and that the long groove points toward the entry of the BOLT.<br />
8. Bolt 2 MATTRESS SIDE RAILS (P) between the LOWER POSTS (D and T) by using the 110 mm<br />
BOLTS (1) through the holes on the POSTS and into the BARREL NUTS (8) in the MATTRESS<br />
SIDE RAILS (P). Make sure the wood stoppers attached to the MATTRESS SIDE RAIL for<br />
slats are up and face inward. Tighten the BOLTS with enclosed ALLEN WRENCH.<br />
Please call for replacement parts or assistance: 1-866-942-5362<br />
<strong>Whalen</strong> Furniture Mfg., Inc Page 9 Factory # 16198<br />
P<br />
8<br />
8<br />
T<br />
D<br />
⑧<br />
1
D<br />
ASSEMBLING LOWER BUNK<br />
P<br />
T<br />
6<br />
L<br />
Ø4 mm x 30 mm SCREW<br />
(14 used in this step)<br />
<strong>Model</strong> # <strong>HPBB</strong><br />
9. Lay out one MATTRESS SUPPORT SLATS (L) onto the strips on the MATTRESS SIDE RAILS<br />
(P). Make sure the end slats located close to the LOWER POSTS (D). Insert and screw<br />
the 30 mm SCREWS (6) into the countersunk holes in each end of the slats. Tighten the screws using<br />
a Phillips Screwdriver.<br />
Please call for replacement parts or assistance: 1-866-942-5362<br />
<strong>Whalen</strong> Furniture Mfg., Inc Page 10 Factory # 16198<br />
L<br />
⑥<br />
T<br />
D
3<br />
3<br />
ASSEMBLING UPPER HEADBOARD/FOOTBOARD<br />
5<br />
5<br />
C<br />
WOOD DOWEL<br />
(16 used in this step) ⑤<br />
G<br />
<strong>Model</strong> # <strong>HPBB</strong><br />
Ø6.5 mm x 100 mm BOLT<br />
(8 used in this step) ③<br />
10. Insert 8 WOOD DOWELS (5) into the end holes of the UPPER CROSS ASSEMBLY with warning<br />
label (G). Attach UPPER POST (A) and (B) to the UPPER CROSS ASSEMBLY by using four 100<br />
mm BOLTS (3). Tighten the BOLTS with the ALLEN WRENCH provided.<br />
11. Repeat last step to attach UPPER POSTS (A) and (C) to the other UPPER CROSS ASSEMBLY (G).<br />
Please call for replacement parts or assistance: 1-866-942-5362<br />
<strong>Whalen</strong> Furniture Mfg., Inc Page 11 Factory # 16198<br />
5<br />
5<br />
A<br />
3<br />
3
ASSEMBLING UPPER HEADBOARD/FOOTBOARD<br />
E<br />
<strong>Model</strong> # <strong>HPBB</strong><br />
12. Align and attach UPPER CAP RAIL (E) to last assemblies using two WOOD DOWELS (5) and four<br />
50 mm BOLTS (4) in each. Securely tighten the BOLTS with enclosed ALLEN WRENCH.<br />
Please call for replacement parts or assistance: 1-866-942-5362<br />
<strong>Whalen</strong> Furniture Mfg., Inc Page 12 Factory # 16198<br />
5<br />
4<br />
G<br />
Ø6.5 mm x 50 mm BOLT<br />
(8 used in this step)<br />
④<br />
WOOD DOWEL<br />
(4 used in this step) ⑤
1<br />
B<br />
E<br />
A<br />
ASSEMBLING UPPER BUNK<br />
5<br />
Ø1/4” x 110 mm BOLT<br />
(12 used in this step) ①<br />
M<br />
8<br />
8<br />
O<br />
<strong>Model</strong> # <strong>HPBB</strong><br />
13. Insert the WOOD DOWELS (5) into the end large holes of LONG GUARDRAIL (M). Attach 2<br />
LONG GUARDRAILS (M) and the remaining MATTRESS SIDE RAIL (P) between UPPER<br />
POSTS (A) and (B) using eight 110 mm BOLTS (1) and eight BARREL NUTS (8) as shown above.<br />
Make sure the wood stoppers for slat attached on side rail are up and face inward.<br />
14. Attach LADDER SIDE RAIL (O) between the UPPER POSTS (A) and (C) using four 110 mm<br />
BOLTS (1) and four BARREL NUTS (8). Make sure the wood stoppers for slat attached on side rail<br />
are up and face inward.<br />
Please call for replacement parts or assistance: 1-866-942-5362<br />
<strong>Whalen</strong> Furniture Mfg., Inc Page 13 Factory # 16198<br />
P<br />
M<br />
P<br />
M<br />
O<br />
WOOD DOWEL<br />
(4 used in this step) ⑤<br />
BARREL NUT<br />
(12 used in this step)<br />
C<br />
⑧<br />
1
M<br />
M<br />
P<br />
UP<br />
U<br />
6<br />
6<br />
6<br />
ASSEMBLING UPPER BUNK<br />
U<br />
<strong>Model</strong> # <strong>HPBB</strong><br />
15. With the pilot holes as a guide, align and attach the GUARDRAIL SUPPORT (U) to<br />
the center of LONG GUARDRAILS (M) and MATTRESS SIDE RAIL (P) using three 30<br />
mm SCREWS (6) into the countersunk holes.<br />
16. Lay out the other MATTRESS SUPPORT SLATS (L) between the wood stoppers on the LADDER<br />
SIDE RAIL (O) and MATTRESS SIDE RAIL (P). Insert and screw 30 mm SCREWS (6) into the<br />
countersunk holes in each end of the slats. Tighten the screws using a Phillips screwdriver.<br />
Please call for replacement parts or assistance: 1-866-942-5362<br />
<strong>Whalen</strong> Furniture Mfg., Inc Page 14 Factory # 16198<br />
M<br />
L<br />
6<br />
L<br />
Ø4 mm x 30 mm SCREW<br />
(17 used in this step)<br />
⑥
BARREL NUT<br />
(4 used in this step)<br />
⑧<br />
ASSEMBLING UPPER BUNK<br />
A K<br />
5<br />
8<br />
N<br />
Ø1/4” x 110 mm BOLT<br />
(4 used in this step) ①<br />
<strong>Model</strong> # <strong>HPBB</strong><br />
17. Insert the WOOD DOWELS (5) into the end large holes of SHORT GUARDRAIL (N) as a guide.<br />
Attach 2 SHORT GUARDRAILS (N) between FRONT UPPER POST (A) and FRONT<br />
GUARDRAIL POST (K) using four 110 mm BOLTS (1) and four BARREL NUTS (8).<br />
18. Fasten the FRONT GUARDRAIL POST (K) to LADDER SIDE RAIL (O) using two 38 mm BOLTS<br />
(2) and tighten with enclosed ALLEN WRENCH.<br />
Please call for replacement parts or assistance: 1-866-942-5362<br />
<strong>Whalen</strong> Furniture Mfg., Inc Page 15 Factory # 16198<br />
N<br />
N<br />
O<br />
K<br />
O<br />
K<br />
O<br />
2<br />
Ø1/4” x 38 mm BOLT<br />
(2 used in this step) ②<br />
WOOD DOWEL<br />
(4 used in this step) ⑤
ASSEMBLY OF THE BUNK BED<br />
19. Now place the two assembled bunks where you want to place your <strong>Bunk</strong> <strong>Bed</strong>.<br />
20. Insert 4 BED CONNECTOR PINS (7) into top holes of the Lower <strong>Bunk</strong> as shown.<br />
A<br />
BED CONNECTOR PIN<br />
(4 used in this step) ⑦<br />
<strong>Model</strong> # <strong>HPBB</strong><br />
A B C<br />
21. Now ask for assistance to stack the Upper <strong>Bunk</strong> onto the BED CONNECTOR PINS (7) on the Lower<br />
<strong>Bunk</strong>.<br />
NOTE: Make sure that the Upper <strong>Bunk</strong> sits completely on top of the Lower <strong>Bunk</strong> and the pins go all<br />
the way, not leaving any gaps.<br />
Please call for replacement parts or assistance: 1-866-942-5362<br />
<strong>Whalen</strong> Furniture Mfg., Inc Page 16 Factory # 16198<br />
F<br />
7
4<br />
R S<br />
ASSEMBLY OF THE LADDER<br />
5<br />
Ø6.5 mm x 50 mm BOLT<br />
(10 used in this step)<br />
④<br />
Q<br />
WOOD DOWEL<br />
(10 used in this step) ⑤<br />
<strong>Model</strong> # <strong>HPBB</strong><br />
22. Insert the WOOD DOWELS (5) into the end large holes of LADDER STEPS (Q). Attach LEFT and<br />
RIGHT LADDER SUPPORT (R and S) to the LADDER STEPS (Q) using the 50 mm TAPPING<br />
BOLTS (4). Securely tighten all BOLTS with enclosed ALLEN WRENCH.<br />
Please call for replacement parts or assistance: 1-866-942-5362<br />
<strong>Whalen</strong> Furniture Mfg., Inc Page 17 Factory # 16198<br />
R<br />
Q<br />
S
O<br />
ASSEMBLY OF THE LADDER<br />
S<br />
<strong>Model</strong> # <strong>HPBB</strong><br />
Ø3.5 mm x 19 mm SCREW<br />
(2 used in this step)<br />
⑨<br />
23. Hook the LADDER securely over the top of the LADDER SIDE RAIL (O), between the UPPER<br />
POST (C) and FRONT GUARDRAIL POST (K) in the opening provided. Secure the LADDER<br />
HOOKS by using two 19 mm SCREWS (9).<br />
ONLY USE LADDER IN THIS LOCATION AND SECURE WITH 2 SCREWS. PLEASE MAKE<br />
SURE YOU INSTALL THE LADDER AGAINST THE FRONT GUARDRAIL POST.<br />
Please call for replacement parts or assistance: 1-866-942-5362<br />
<strong>Whalen</strong> Furniture Mfg., Inc Page 18 Factory # 16198<br />
9<br />
R<br />
O<br />
Back Side<br />
S<br />
9
B<br />
<strong>Model</strong> # <strong>HPBB</strong><br />
Instructions for converting the bunk bed into two single beds<br />
NOTE: The <strong>Bunk</strong> <strong>Bed</strong> can be divided into two Twin <strong>Bed</strong>s. Be sure that you attach four FLOOR<br />
PROTECTORS (10) onto the bottom of UPPER HEADBOARD & FOOTBOARD POSTS when<br />
forming the single bed. GUARDRAILS are not necessary.<br />
10<br />
A<br />
A B<br />
C<br />
C D<br />
FLOOR PROTECTOR<br />
(4 used in this step)<br />
24. Remove the LADDER and all the GUARDRAILS.<br />
25. With the help of another person, remove the Upper <strong>Bunk</strong> from the Lower <strong>Bunk</strong>.<br />
26. Disassemble the side rails from all headboards (Upper and Lower <strong>Bunk</strong>s).<br />
27. Re-assemble the headboards (Lower) and footboards (Upper) to SIDE RAILS as shown. Attach the<br />
FLOOR PROTECTORS (10) onto the bottom of the UPPER POSTS (A, B and C).<br />
28. Lay out the MATTRESS SUPPORT SLATS (L) in place and secure with the 30 mm SCREWS (6) to<br />
finish the assembly.<br />
Note: Switching the headboards will allow the two single beds to be identical (the headboards will<br />
have taller posts and the footboards will have the shorter posts).<br />
Please call for replacement parts or assistance: 1-866-942-5362<br />
<strong>Whalen</strong> Furniture Mfg., Inc Page 19 Factory # 16198<br />
A<br />
T<br />
⑩
Care and Maintenance<br />
<strong>Model</strong> # <strong>HPBB</strong><br />
Use a soft, clean cloth that will not scratch the surface when dusting.<br />
Use of furniture polish is not necessary. Should you choose to use polish, test first in an inconspicuous<br />
area.<br />
Using solvents of any kind on your furniture may damage the finish.<br />
Never use water to clean your furniture as it may cause damage to the finish.<br />
Always use coasters under beverage glasses and flowerpots.<br />
Liquid spills should be removed immediately. Using a soft clean cloth, blot the spill gently. Avoid<br />
rubbing.<br />
Always use protective pads under hot dishes and plates. Heat can cause chemical changes that may<br />
create spotting within the furniture finish.<br />
Stains or marks from crayons or ink markers will be difficult to remove.<br />
In the event that your furniture is stained or otherwise damaged during use, we recommend that you call<br />
a professional to repair your furniture.<br />
Check bolts/screws periodically and tighten them if necessary.<br />
Further advice about wood furniture care<br />
It is best to keep your furniture in a climate controlled environment. Extreme temperature and humidity<br />
changes can cause warping, shrinking and splitting of wood. It is advised to keep furniture away from direct<br />
sunlight as may damage the finish.<br />
Proper care and cleaning at home will extend the life of your purchase. Following these important and<br />
helpful tips will enhance your furniture as it ages.<br />
We hope you enjoy your purchase for many years.<br />
Thank you for your purchase.<br />
Your assembly should now be complete.<br />
Thank you for your purchase.<br />
Please call for replacement parts or assistance: 1-866-942-5362<br />
<strong>Whalen</strong> Furniture Mfg., Inc Page 20 Factory # 16198
IF YOU NEED TO ORDER PARTS PLEASE USE THE LIST BELOW<br />
<strong>Harper</strong> <strong>Bunk</strong> <strong>Bed</strong> (<strong>HPBB</strong>)<br />
*<strong>HPBB</strong>-1-UPA Upper Post A *<strong>HPBB</strong>-18-LLS Left Ladder Support<br />
*<strong>HPBB</strong>-2-UPB Upper Post B *<strong>HPBB</strong>-19-RLS Right Ladder Support<br />
*<strong>HPBB</strong>-3-UPC Upper Post C *<strong>HPBB</strong>-20-LH Ladder Hook<br />
*<strong>HPBB</strong>-4-LPD Lower Post D *<strong>HPBB</strong>-21-110B Ø1/4” x 110 mm Bolt<br />
*<strong>HPBB</strong>-5-UTP Upper Cap Rail *<strong>HPBB</strong>-22-38B Ø1/4” x 38 mm Bolt<br />
*<strong>HPBB</strong>-6-LTP Lower Cap Rail *<strong>HPBB</strong>-23-50B Ø6.5 mm x 50 mm Bolt<br />
*<strong>HPBB</strong>-7-UCA Upper Cross Assembly *<strong>HPBB</strong>-24-100B Ø6.5 mm x 100 mm Bolt<br />
*<strong>HPBB</strong>-8-LCA Lower Cross Assembly *<strong>HPBB</strong>-25-30S Ø4 mm x 30 mm Screw<br />
*<strong>HPBB</strong>-9-LBP Lower Headboard Panel *<strong>HPBB</strong>-26-19S Ø3.5 mm x 19 mm Screw<br />
*<strong>HPBB</strong>-10-LHBC Lower Headboard Bottom Cross *<strong>HPBB</strong>-27-WD Wood Dowel<br />
*<strong>HPBB</strong>-11-FGP Front Guardrail Post *<strong>HPBB</strong>-28-BCP <strong>Bed</strong> Connector Pin<br />
*<strong>HPBB</strong>-12-SG Short Guardrail *<strong>HPBB</strong>-29-BN Barrel Nut<br />
*<strong>HPBB</strong>-13-LG Long Guardrail *<strong>HPBB</strong>-30-FP Floor Protector<br />
*<strong>HPBB</strong>-14-LSR Ladder Side Rail *<strong>HPBB</strong>-31-AW Allen Wrench<br />
*<strong>HPBB</strong>-15-MSR Mattress Side Rail *<strong>HPBB</strong>-32-LPT Lower Post T<br />
*<strong>HPBB</strong>-16-MSS <strong>HPBB</strong>-16-MSS Mattress Support Slats Slats *<strong>HPBB</strong>-33-GS <strong>HPBB</strong>-33-GS Guardrail Support Support<br />
*<strong>HPBB</strong>-17-LS Ladder Step *<strong>HPBB</strong>-CH Complete Hardware