Odom Hydrographic Systems, Inc. - FTP Directory Listing
Odom Hydrographic Systems, Inc. - FTP Directory Listing
Odom Hydrographic Systems, Inc. - FTP Directory Listing

You also want an ePaper? Increase the reach of your titles
YUMPU automatically turns print PDFs into web optimized ePapers that Google loves.
<strong>Odom</strong> <strong>Hydrographic</strong> <strong>Systems</strong>, <strong>Inc</strong>.<br />
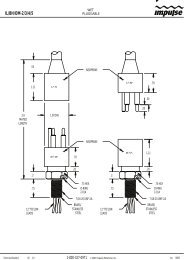
HYDROTRAC HYDROTRAC<br />
ECHOTRAC ECHOTRAC MKIII MKIII-P MKIII<br />
ECHOSCAN<br />
ECHOSCAN<br />
Baton Rouge, LA., USA 225.769.3051<br />
odomhydrographic.com<br />
ECHOTRAC ECHOTRAC CV<br />
CV<br />
DIGIBAR DIGIBAR PRO<br />
PRO<br />
HT100<br />
HT100
odomhydrographic.com, USA, 225.769.3051<br />
ECHOTRAC ETHERNET<br />
INTERFACING WITH HYPACK MAX<br />
Before the user can interface and use the Ethernet interface from Hypack the unit must be<br />
setup with Echotrac CV Control Software. OHSI developed the CV Control software for<br />
the following devices:<br />
MKIII P<br />
Echotrac model CV<br />
The Echotrac model CV must be<br />
controlled by CV software. The control for<br />
the MKIII can be either front panel or via<br />
ethernet control software.<br />
MKIII E<br />
2<br />
Slide 2
odomhydrographic.com, USA, 225.769.3051<br />
ECHOTRAC ETHERNET<br />
INTERFACING WITH HYPACK MAX<br />
3<br />
Slide 3
odomhydrographic.com, USA, 225.769.3051<br />
ECHOTRAC ETHERNET<br />
INTERFACING WITH HYPACK MAX<br />
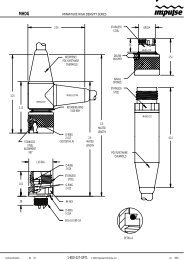
The Echotrac CV is a new hydrographic echo sounder design incorporating the cutting-edge technology,<br />
features and reliability of the Echotrac MKIII, plus the ease and flexibility of operation of a networked<br />
Windows® interface. The transceiver unit is supplied in a compact rack mount package that is ideally<br />
suited to many shipboard installations. The Echotrac CV supports Chart-functionality in two formats, a full<br />
size color LCD “electronic chart” or a high-resolution thermal paper recorder. Both are supplied in flexible<br />
modular enclosures complete with swivel mounting hardware. A third option, that of operating the unit and<br />
collecting data on a networked PC, is also possible. The color LCD module offers internal data storage (in<br />
.XTF format) and playback of the analog return signal digitized to full 16-bit resolution. In addition, the<br />
Echotrac CV offers the possibility of adding a third acoustic channel (X3) to the standard dual frequency (X2)<br />
configuration. All channels feature a robust design and frequency agility enabling the operator to precisely<br />
match the transceiver to almost any existing transducer. Operator selectable TVG curves (10 Log, 20 Log,<br />
30 Log, 40 Log, and Off) serve to optimize the MKIII for both shallow and deepwater bottom detection tasks<br />
and for Sonar imaging. The Echotrac CV features unsurpassed interfacing flexibility, offering 4 serial ports<br />
that can be configured to interface with computers, positioning systems, motion reference units and remote<br />
displays. The Echotrac CV also has an Ethernet port that outputs the 16 bit samples of the acoustic data<br />
for further processing or visualization. The Echotrac CV also supports a number of output formats that are<br />
compatible with most common Echo Sounder strings.<br />
4<br />
Slide 4
BASIC STEPS<br />
odomhydrographic.com, USA, 225.769.3051<br />
ECHOTRAC ETHERNET<br />
INTERFACING WITH HYPACK MAX<br />
1. Setup all hardware and connections<br />
2. Start all hardware and setup the Echotrac CV via Control Software<br />
3. Start Hypack software and select the <strong>Odom</strong>MK_3.dll driver<br />
4. Collect data on project<br />
5. Edit and save data<br />
5<br />
Slide 5
Serial 1 Serial 3 GPS IN<br />
Serial 2 Serial 4 GPS OUT<br />
odomhydrographic.com, USA, 225.769.3051<br />
ECHOTRAC ETHERNET<br />
INTERFACING WITH HYPACK MAX<br />
LAN<br />
GPS<br />
ANT<br />
AUX<br />
EXT.<br />
REC TX 1 TX 2<br />
DC<br />
FUSE<br />
F1<br />
24 VDC<br />
DC<br />
FUSE<br />
F2<br />
115/220<br />
VAC<br />
AC Fuse<br />
compartment<br />
The Echotrac MKIII and Echotrac CV have an Ethernet port that outputs the digitzed<br />
samples to 16 bits of the acoustic signal from the unit's receivers. This data has normally<br />
always been printed on the chart or more recently output to an LCD screen and only the<br />
digitized values have been input into the hydrographic software that is logging and<br />
editing the data. To fully leverage the power of having all this acoustic data available<br />
<strong>Odom</strong> <strong>Hydrographic</strong> <strong>Systems</strong> <strong>Inc</strong>. and Hypack have developed an Ethernet driver that<br />
will read in the acoustic data into Hypack as well as the digitized values. All the normal<br />
fix marks are still printed on the chart or displayed on the LCD screen. The real power of<br />
having the data available in Hypack comes into play when the surveyor goes to review<br />
and edit the data. Instead of only having a digitized line on the screen and then having<br />
to refer back to the chart for reference, all the acoustic data is in the background. The<br />
surveyor can now edit the digitized data with much more precision and confidence. The<br />
raw acoustic data is never altered during the editing process.<br />
6<br />
Slide 6
odomhydrographic.com, USA, 225.769.3051<br />
ECHOTRAC ETHERNET<br />
INTERFACING WITH HYPACK MAX<br />
The Ethernet interface in Hypack will only work with Hypack version 2.12 or later.<br />
Make sure the following three files in Hypack have the same dates or later. If the<br />
files are older then update them with the files in this folder.<br />
Filename Location Date<br />
CoProjHelp.dll Hypack root directory July 21, 2004<br />
Sbmax.exe Hypack root directory July 30, 2004<br />
<strong>Odom</strong>MK_3.dll Hypack\devices directory August 17, 2004<br />
7<br />
Slide 7
TERMS YOU MIGHT NEED TO KNOW<br />
odomhydrographic.com, USA, 225.769.3051<br />
ECHOTRAC ETHERNET<br />
INTERFACING WITH HYPACK MAX<br />
ETHERNET ETHERNET - A standardized way of connecting computers to create a network.<br />
CLIENT CLIENT – A computer that has access to the network but doesn’t share any of its own resources with the network.<br />
I/O I/O PORT PORT ADDRESS ADDRESS – Every I/O device in a computer – including network interface cards – must be assigned a<br />
unique address. In the old days, you had to configure the port address using DIP switches or jumpers. New<br />
network cards automatically configure their own port addresses.<br />
IP IP ADDRESS<br />
ADDRESS ADDRESS – A string of numbers used to address computers on the internet.<br />
PACKETS PACKETS - Data is sent over the network in manageable chunks called packets, or frames. The size and<br />
makeup of a packet is determined by the protocol being used.<br />
PROTOCOL<br />
PROTOCOL PROTOCOL - Protocols define standardized formats for data packets, techniques for detecting and correcting<br />
errors.<br />
SERVER SERVER – A computer that is on a network and shares resources with other network users.<br />
TCP TCP – Transmission Controlled Protocol, the standard for transmitting data over networks.<br />
UDP UDP – User Datagram Protocol, a connectionless protocol that, like TCP, runs on top of IP networks. Unlike<br />
TCP/IP, UDP/IP provides very few error recovery services, offering instead a direct way to send and receive<br />
datagrams over an IP network. It's used primarily for broadcasting messages over a network.<br />
8<br />
Slide 8
odomhydrographic.com, USA, 225.769.3051<br />
ECHOTRAC ETHERNET<br />
INTERFACING WITH HYPACK MAX<br />
Basic information concerning Ethernet cables<br />
•A straight-thru cable has identical ends.<br />
•A crossover cable has different ends.<br />
•A straight-thru is used as a patch cord in Ethernet connections.<br />
•A crossover is used to connect two Ethernet devices without a hub or for connecting two<br />
hubs.<br />
•A crossover has one end with the Orange set of wires switched with the Green set.<br />
•Odd numbered pins are always striped, even numbered pins are always solid colored.<br />
•Looking at the RJ-45 with the clip facing away from you, Brown is always on the right, and<br />
pin 1 is on the left.<br />
•No more than 1/2" of the Ethernet cable should be untwisted otherwise it will be susceptible<br />
to crosstalk.<br />
•Do not deform, do not bend, do not stretch, do not staple, do not run parallel with power<br />
cables, and do not run Ethernet cables near noise inducing components.<br />
9<br />
Slide 9
odomhydrographic.com, USA, 225.769.3051<br />
ECHOTRAC ETHERNET<br />
INTERFACING WITH HYPACK MAX<br />
If you are interfacing straight from your Echotrac to your PC<br />
If the Echotrac is going to be connected directly to the computer then a Cross over Ethernet cable is<br />
required. This is the red Ethernet cable supplied with the Echotrac. If there is a network hub<br />
between the computer and the Echotrac then a straight network cable is required from the Echotrac<br />
and the network hub.<br />
Cross-over cable part # 2300-0053-0000<br />
Supplied with unit.<br />
10<br />
Slide 10
BASIC HARDWARE LAYOUT<br />
odomhydrographic.com, USA, 225.769.3051<br />
ECHOTRAC ETHERNET<br />
INTERFACING WITH HYPACK MAX<br />
ECHOTRAC CV,<br />
CV3 or MKIII<br />
POWER AC OR DC<br />
TRANSDUCER<br />
Connected via<br />
Ethernet cross<br />
over cable<br />
DGPS<br />
Connected via<br />
serial port<br />
COMPUTER<br />
Running Echotrac Control<br />
Software and Hypack MAX<br />
11<br />
Slide 11
odomhydrographic.com, USA, 225.769.3051<br />
ECHOTRAC ETHERNET<br />
INTERFACING WITH HYPACK MAX<br />
If you are interfacing through a network hub<br />
A hub connected straight to a computer (not a server) offers the same setup IP address as a<br />
setup with the Echotrac connected straight to the computer using the cross over cable.<br />
Using a device such as the one below would require a straight cable from the Echotrac to the<br />
hub and a straight cable from the hub to the computer. A computer running on Windows®<br />
2000 or XP operating system first “looks” for the server. If none is detected then it set the<br />
default IP address (amount of time – three minutes).<br />
12<br />
Slide 12
BASIC HARDWARE LAYOUT<br />
POWER AC OR DC<br />
ECHOTRAC CV,<br />
CV3 or MKIII<br />
odomhydrographic.com, USA, 225.769.3051<br />
ECHOTRAC ETHERNET<br />
INTERFACING WITH HYPACK MAX<br />
TRANSDUCER<br />
Network hub<br />
Connected via<br />
Ethernet cable<br />
DGPS<br />
Connected via<br />
serial port<br />
COMPUTER<br />
Running Echotrac Control<br />
Software and Hypack MAX<br />
13<br />
Slide 13
odomhydrographic.com, USA, 225.769.3051<br />
ECHOTRAC ETHERNET<br />
INTERFACING WITH HYPACK MAX<br />
First setup all hardware. Turn On the Echotrac CV, Computer and DGPS receiver. The same Ethernet<br />
cable will be used to establish communications for the CV that is used for the Hypack interface.<br />
Install the CV control software. Upon purchase you will be given the latest version of software. Simply<br />
insert the diskette run the file named setup.exe and follow instructions.<br />
With the hardware connected, the user must wait three to five minutes for the computer to “find” the<br />
correct network settings or an IP change fault will appear.<br />
From the Start button, go to Programs, to Echotrac_CV, then Echotrac_CV.<br />
14<br />
Slide 14
Once the software loads, this “pull<br />
down” screen will appear.<br />
The Target window allows the user to<br />
select the model CV, CV3 or MKIII.<br />
This takes you to the main window.<br />
odomhydrographic.com, USA, 225.769.3051<br />
ECHOTRAC ETHERNET<br />
INTERFACING WITH HYPACK MAX<br />
Software begins<br />
15<br />
Slide 15
From the Main window, check your<br />
connection first. Select Info, then<br />
Connection.<br />
odomhydrographic.com, USA, 225.769.3051<br />
ECHOTRAC ETHERNET<br />
INTERFACING WITH HYPACK MAX<br />
This address is correct!<br />
If your Connection window reads like the<br />
following, then you have established proper<br />
Ethernet address.<br />
16<br />
Slide 16
odomhydrographic.com, USA, 225.769.3051<br />
ECHOTRAC ETHERNET<br />
INTERFACING WITH HYPACK MAX<br />
If you do not have proper IP address, you will see a window similar to below. If this happens,<br />
again exit the software, wait three to five minutes and restart the CV Control software.<br />
Make sure the Ethernet<br />
crossover cable is connected<br />
from the CV to the PC.<br />
This address is incorrect!<br />
17<br />
Slide 17
odomhydrographic.com, USA, 225.769.3051<br />
ECHOTRAC ETHERNET<br />
INTERFACING WITH HYPACK MAX<br />
Once you have the correct address, go to Control, then Open Connection.<br />
Open Connection<br />
18<br />
Slide 18
The software should start to synchronize.<br />
At this point if for some reason the Ethernet<br />
address is not correct.<br />
A screen like this one should appear.<br />
Exit from the software. Then wait three<br />
minutes. Your computer should find the<br />
correct network settings.<br />
odomhydrographic.com, USA, 225.769.3051<br />
ECHOTRAC ETHERNET<br />
INTERFACING WITH HYPACK MAX<br />
Even though this might have taken a little<br />
time, the user should have established<br />
connection. If not, shut everything down,<br />
check the interfaces, start the CV hardware,<br />
restart your computer, wait a few minutes<br />
then start the CV Control Software.<br />
19<br />
Slide 19
odomhydrographic.com, USA, 225.769.3051<br />
ECHOTRAC ETHERNET<br />
INTERFACING WITH HYPACK MAX<br />
At this point connections should be established.<br />
The initial screen will inform the user that the hardware and software are<br />
communicating. Note the depth readings.<br />
Begin setting up and calibrating the Echotrac CV as per instruction manual.<br />
20<br />
Slide 20
odomhydrographic.com, USA, 225.769.3051<br />
ECHOTRAC ETHERNET<br />
INTERFACING WITH HYPACK MAX<br />
NOW THAT YOU HAVE SETUP AND CALIBRATED THE ECHO SOUNDER<br />
1. Make sure that you have properly updated the Hypack files<br />
2. The red cross over cable should already be connected, but check and make sure<br />
that this cable and the DGPS serial interface are connected.<br />
3. Setup your devices in Hypack software<br />
4. Collect the data as normal<br />
5. Edit data<br />
6. Save work.<br />
21<br />
Slide 21
odomhydrographic.com, USA, 225.769.3051<br />
ECHOTRAC ETHERNET<br />
INTERFACING WITH HYPACK MAX<br />
Download the current files from our website.<br />
Drag and drop CoProjHelp.dll and Sbmax.exe into the Hypack root folder<br />
Drag and drop <strong>Odom</strong>MK_3.dll into the Hypack/devices folder<br />
Check to see that Hypack hardlock key is installed<br />
Start Hypack MAX<br />
In the Hypack Max menu select Preparation->Hardware->Hypack Hardware<br />
In the Hardware menu select Devices->Add device<br />
Scroll down the list and select <strong>Odom</strong>MK_3.dll.<br />
Give the device a name like Echotrac CV<br />
In the driver window select Connect and under Connect select Network<br />
22<br />
Slide 22
odomhydrographic.com, USA, 225.769.3051<br />
ECHOTRAC ETHERNET<br />
INTERFACING WITH HYPACK MAX<br />
In the Connect window click on Change setting… and click on UDP and Client.<br />
Set the Read port number to 1600. See the picture below. Click on O.K. to close the<br />
Connect to Network window and the Connect window.<br />
23<br />
Slide 23
odomhydrographic.com, USA, 225.769.3051<br />
ECHOTRAC ETHERNET<br />
INTERFACING WITH HYPACK MAX<br />
Click on the Setup button in the Add Device window and select whether the Echotrac is<br />
going to be in Dual, High or Low frequency modes. Select O.K. to close the window.<br />
From the Hardware menu select Test->Test all and make sure the Ethernet data is<br />
displayed. It should look like the picture below.<br />
Notice the signal strength<br />
The Echogram window can also be viewed while in the Hypack survey mode.<br />
When complete select Test-> Stop All<br />
24<br />
Slide 24
odomhydrographic.com, USA, 225.769.3051<br />
ECHOTRAC ETHERNET<br />
INTERFACING WITH HYPACK MAX<br />
Collect data as normal, however you can now view the Echogram Window<br />
High frequency data<br />
Low frequency data<br />
Vessel tracking<br />
Signal strength<br />
25<br />
Slide 25
odomhydrographic.com, USA, 225.769.3051<br />
ECHOTRAC ETHERNET<br />
INTERFACING WITH HYPACK MAX<br />
Viewing and Editing the Echotrac data in the Single Beam Editor<br />
In the Hypack Max menu select Processing->Single Beam Editor<br />
In the Single Beam Editor Max menu select Open and the log file name you<br />
created in the survey program.<br />
Once you have loaded the lines go to View->Other windows->Echogram in the<br />
Single Beam Max window. The echogram data should show up on the screen<br />
You can select whether the data in the echogram window is the high frequency<br />
data, low frequency data or both combined. To do this select View->Options in<br />
the Single Beam Max menu. To view the high and low frequency data together<br />
check theDepth1 and Depth2 check boxes and click apply. See picture below.<br />
26<br />
Slide 26
View<br />
odomhydrographic.com, USA, 225.769.3051<br />
ECHOTRAC ETHERNET<br />
INTERFACING WITH HYPACK MAX<br />
To view only the high frequency data check Depth1 and uncheck Depth2. To view<br />
only low frequency data check Depth2 and uncheck Depth1.<br />
27<br />
Slide 27
Single beam editor<br />
Digital profile<br />
odomhydrographic.com, USA, 225.769.3051<br />
ECHOTRAC ETHERNET<br />
INTERFACING WITH HYPACK MAX<br />
Spread sheet<br />
Echogram window<br />
28<br />
Slide 28
odomhydrographic.com, USA, 225.769.3051<br />
ECHOTRAC ETHERNET<br />
INTERFACING WITH HYPACK MAX<br />
Echogram window “full screen” view<br />
29<br />
Slide 29
Digitizer Zoom window<br />
odomhydrographic.com, USA, 225.769.3051<br />
ECHOTRAC ETHERNET<br />
INTERFACING WITH HYPACK MAX<br />
Echogram window control buttons<br />
Pan left or right<br />
Zoom extents<br />
30<br />
Slide 30
odomhydrographic.com, USA, 225.769.3051<br />
ECHOTRAC ETHERNET<br />
INTERFACING WITH HYPACK MAX<br />
Zoom of area<br />
31<br />
Slide 31
odomhydrographic.com, USA, 225.769.3051<br />
ECHOTRAC ETHERNET<br />
INTERFACING WITH HYPACK MAX<br />
Below is a screen shot of some high frequency data in the Echogram window. If you look<br />
closely there is a black line on top of the red trace. This is the digitized value from the<br />
Echotrac. You can move the mouse and click along the record to show exactly where the<br />
digitized values are. You can click on the zoom button and then select the area you want to<br />
view better.<br />
Zoom button<br />
Point where digitizer detected the bottom<br />
Signal window<br />
32<br />
Slide 32
odomhydrographic.com, USA, 225.769.3051<br />
ECHOTRAC ETHERNET<br />
INTERFACING WITH HYPACK MAX<br />
This screen is a zoomed in portion of the above screen. You will notice there appears to be<br />
an object on the bottom that we will edit out of the final data.<br />
Digitize button<br />
Object on the bottom we want<br />
to edit out<br />
Digitizer line<br />
33<br />
Slide 33
odomhydrographic.com, USA, 225.769.3051<br />
ECHOTRAC ETHERNET<br />
INTERFACING WITH HYPACK MAX<br />
To edit the data click on the Digitize button and then click with the mouse along where you<br />
want the digitizer to go. Black dots will appear along where you clicked with the mouse.<br />
When you have finished editing and you meet the original digitized line release the digitize<br />
button. The digitizer line will merge with the original line. See the screens below.<br />
Points where mouse was clicked<br />
34<br />
Slide 34
odomhydrographic.com, USA, 225.769.3051<br />
ECHOTRAC ETHERNET<br />
INTERFACING WITH HYPACK MAX<br />
Line re-digitized<br />
35<br />
Slide 35