ITST IM Nail ST (97-22257-102-00).indd
ITST IM Nail ST (97-22257-102-00).indd
ITST IM Nail ST (97-22257-102-00).indd

Create successful ePaper yourself
Turn your PDF publications into a flip-book with our unique Google optimized e-Paper software.
<strong>IT<strong>ST</strong></strong> Intramedullary <strong>Nail</strong> Surgical Technique 13<br />
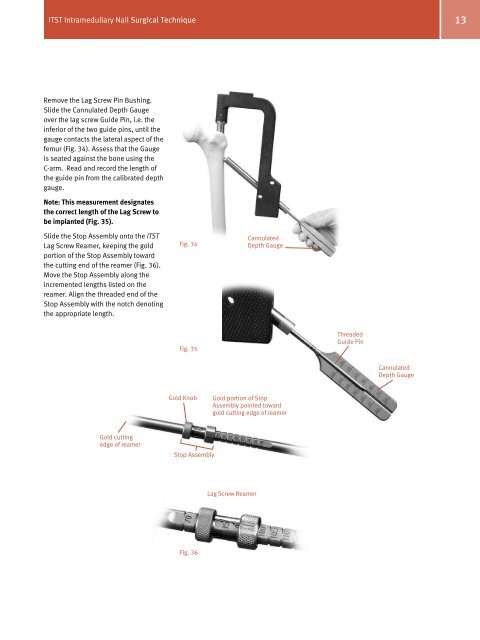
Remove the Lag Screw Pin Bushing.<br />
Slide the Cannulated Depth Gauge<br />
over the lag screw Guide Pin, i.e. the<br />
inferior of the two guide pins, until the<br />
gauge contacts the lateral aspect of the<br />
femur (Fig. 34). Assess that the Gauge<br />
is seated against the bone using the<br />
C-arm. Read and record the length of<br />
the guide pin from the calibrated depth<br />
gauge.<br />
Note: This measurement designates<br />
the correct length of the Lag Screw to<br />
be implanted (Fig. 35).<br />
Slide the Stop Assembly onto the <strong>IT<strong>ST</strong></strong><br />
Lag Screw Reamer, keeping the gold<br />
portion of the Stop Assembly toward<br />
the cutting end of the reamer (Fig. 36).<br />
Move the Stop Assembly along the<br />
incremented lengths listed on the<br />
reamer. Align the threaded end of the<br />
Stop Assembly with the notch denoting<br />
the appropriate length.<br />
Gold cutting<br />
edge of reamer<br />
Fig. 34<br />
Fig. 35<br />
Cannulated<br />
Depth Gauge<br />
Gold Knob Gold portion of Stop<br />
Assembly pointed toward<br />
gold cutting edge of reamer<br />
Stop Assembly<br />
Fig. 36<br />
Lag Screw Reamer<br />
Threaded<br />
Guide Pin<br />
Cannulated<br />
Depth Gauge