Exhaust rattle / buzzing noise during acceleration - JustAnswer
Exhaust rattle / buzzing noise during acceleration - JustAnswer
Exhaust rattle / buzzing noise during acceleration - JustAnswer

You also want an ePaper? Increase the reach of your titles
YUMPU automatically turns print PDFs into web optimized ePapers that Google loves.
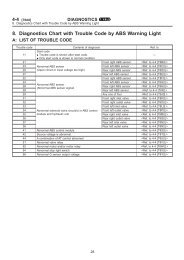
Classification: Reference: Date:<br />
EM05-003d NTB05-021d July 23, 2007<br />
EXHAUST RATTLE / BUZZING NOISE DURING ACCELERATION<br />
This bulletin has been amended. The Applied Vehicles, Applied VINs, and Applied Dates<br />
have been updated. Discard all previous versions of this bulletin.<br />
APPLIED VEHICLES: 2004 – 2006 Maxima (A34)<br />
2004 – 2007 Quest (V42)<br />
2003 – 2006 Murano (Z50)<br />
APPLIED VINS: 2004 – 2006 Maxima, all VINs<br />
2004 – 2006 Quest, all VINs<br />
2007 Quest built before: 5N1BV(*)8U(*)7N136219<br />
2003 – 2005 Murano, all VINs<br />
2006 Murano built before: JN8AZ08T(*)6W 402002 (2WD)<br />
or JN8AZ08W(*)6W 505916 (AWD)<br />
APPLIED DATES: 2004 – 2006 Maxima, all dates<br />
2004 – 2006 Quest, all dates<br />
2007 Quest built before: March 26, 2007<br />
2003 – 2005 Murano, all dates<br />
2006 Murano built before: October 20, 2005<br />
IF YOU CONFIRM<br />
There is an exhaust <strong>rattle</strong>/<strong>buzzing</strong> <strong>noise</strong> that sounds like it is coming from the front exhaust<br />
tube.<br />
ACTIONS<br />
1. Inspect both of the catalyst front tube support brackets for breaks, cracks, or missing<br />
bolts.<br />
2. If you have determined that the support brackets need to be replaced:<br />
• Replace both support brackets and bolts with the new parts listed in the PARTS<br />
INFORMATION section of this bulletin. It is not necessary to replace the front<br />
tube assembly.<br />
NOTE: For vehicles equipped with a 5-speed automatic transmission, you will also<br />
install the exhaust tube mounting brackets listed in the PARTS INFORMATION section<br />
of this bulletin.<br />
IMPORTANT: The purpose of “ACTIONS” (above) is to give you a quick idea of the work you will<br />
be performing. You MUST closely follow the entire Service Procedure (starting on page 3) as it<br />
contains information that is essential to successfully completing the repair.<br />
Nissan Bulletins are intended for use by qualified technicians, not 'do-it-yourselfers'. Qualified technicians are<br />
properly trained individuals who have the equipment, tools, safety instruction, and know-how to do a job properly<br />
and safely. NOTE: If you believe that a described condition may apply to a particular vehicle, DO NOT assume<br />
that it does. See your Nissan dealer to determine if this applies to your vehicle.<br />
1/6
PARTS INFORMATION<br />
DESCRIPTION<br />
Gusset/Bracket - Rear<br />
Gusset/Bracket - Front<br />
Bracket, Upper - <strong>Exhaust</strong> Maxima - 5AT<br />
Tube Mounting Quest - 5AT<br />
Bracket, Lower - <strong>Exhaust</strong> Maxima - 5AT<br />
Tube Mounting Quest - 5AT<br />
Nut - Flange<br />
MODEL/<br />
TRANSMISSION PART # QUANTITY<br />
Maxima<br />
Quest<br />
20817-7Y010<br />
1<br />
Murano 20817-CA010<br />
4AT / 6MT / CVT 20817-CA110<br />
5AT 20817-7Y110<br />
Maxima - 5AT<br />
Quest - 5AT<br />
20711-ZK30A 1<br />
20711-CA020 1<br />
08918-3401A 2<br />
Bolt - Hex All 14069-CA010 4<br />
CLAIMS INFORMATION<br />
Submit a Primary Part (PP) type line claim using the following claims coding:<br />
DESCRIPTION PFP OP CODE SYM DIA FRT<br />
RPL Front and/or Rear <strong>Exhaust</strong><br />
Tube Bracket/Gusset<br />
(1) FX21AA ZL 01 0.5hrs<br />
(1) Reference the Parts Information Table and use the applicable Gusset P/N as the PFP.<br />
2/6<br />
1
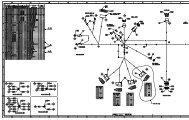
SERVICE PROCEDURE<br />
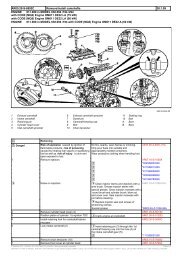
1. Inspect both support brackets on the catalyst front tube (see Figure 1).<br />
• Brackets are located between the exhaust flange of Bank 1 catalyst and the<br />
transmission housing.<br />
• Check for breaks or cracks, and loose or missing bolts.<br />
• See examples of breaks and cracks on the next page.<br />
Catalyst/front tube support<br />
bracket - Towards rear of<br />
engine<br />
Figure 1<br />
3/6<br />
Catalyst/front tube support<br />
bracket - Towards front of<br />
engine
NOTE:<br />
• Breaks or cracks may be found anywhere on the bracket body or at the mounting<br />
bolt holes.<br />
• Cracks appear in a “hair line” form.<br />
Example of break and crack on rear bracket.<br />
Break<br />
Crack<br />
Figure 2<br />
Example of break on front bracket.<br />
Figure 3<br />
4/6<br />
Break
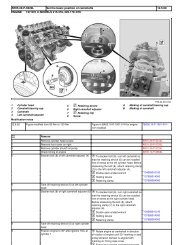
2. If either of the support brackets are broken/cracked, or have loose or missing bolts,<br />
replace both brackets and all their bolts as follows:<br />
• Support brackets and bolts are listed in the PARTS INFORMATION section of<br />
this bulletin.<br />
a. Remove the original bolts and brackets and discard.<br />
b. If the vehicle is equipped with a<br />
5-speed automatic transmission,<br />
install the exhaust tube mounting<br />
brackets (upper and lower) and<br />
flange nuts listed in the PARTS<br />
INFORMATION section of this<br />
bulletin. See Figures 4, 5, and 6.<br />
• Torque each nut to 30.4 - 39.2<br />
N·m (3.1 – 4.0 kg-m, 22.4 –<br />
28.9 ft-lb)<br />
Figure 5<br />
Install upper<br />
bracket around<br />
exhaust tube.<br />
<strong>Exhaust</strong> tube<br />
mounting<br />
bracket - Lower<br />
5/6<br />
Figure 4<br />
<strong>Exhaust</strong> tube<br />
mounting<br />
bracket - Upper<br />
Flange nuts<br />
Figure 5 Attach lower<br />
Figure 6 bracket to upper<br />
bracket using<br />
two flange nuts.
c. Loosely install the new support brackets and bolts.<br />
d. Position all brackets so that each bolt is centered in the bolt holes.<br />
e. Hand tighten each bolt to hold it in the centered position.<br />
f. Torque each bolt to 19.0 - 25.0 N·m (1.93 – 2.43 kg-m, 14 - 18.4 ft-lb), starting with<br />
the transmission side bolt.<br />
3. Make sure the <strong>rattle</strong>/<strong>buzzing</strong> <strong>noise</strong> is gone.<br />
• Conduct a short test drive involving several low speed part throttle <strong>acceleration</strong>s.<br />
• It is best to listen for unusual exhaust <strong>noise</strong> while driving with windows down and<br />
driving next to an object such as a wall, hedge, or parked cars. Any unusual<br />
<strong>noise</strong>s, if they exist, will reflect back to your car and are more noticeable.<br />
6/6