TW190 Turbo 2764.pdf - Arbtalk
TW190 Turbo 2764.pdf - Arbtalk
TW190 Turbo 2764.pdf - Arbtalk

You also want an ePaper? Increase the reach of your titles
YUMPU automatically turns print PDFs into web optimized ePapers that Google loves.
!<br />
4<br />
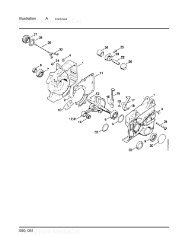
SERVICE INSTRUCTIONS 19<br />
CHANGING BLADES<br />
WARNING<br />
Wear heavy duty gloves for the blade changing operation.<br />
1. Turn off the chipper and remove the key.<br />
2. Remove the negative battery lead.<br />
3. Turn the discharge tube to point across the<br />
machine.<br />
4. Use a 24mm socket with extension bar to<br />
remove the two M16 nuts clamping the rotor<br />
housing shut.<br />
5. Carefully lift the rotor housing until its rests on<br />
its stop.<br />
6. Using the fan blades turn the rotor so the first<br />
blade to be changed is in a convenient<br />
position. Wedge rotor against the housing<br />
with a wooden block to prevent turning.<br />
7. Brush away all dirt and debris from the rotor<br />
and blades.<br />
8. With a 24mm spanner/socket undo the two<br />
nyloc nuts that are holding the blade in place.<br />
9. Grasp the blade by the flat edges while<br />
wearing heavy duty gloves.<br />
10. Withdraw the blade from the rotor.<br />
11. If the blades are being rotated and not<br />
replaced, do not remove the blade bolts.<br />
12. If the blades are to be renewed, place the<br />
blade on a flat surface and tap the top of<br />
the blade bolts with a hammer. The bolts<br />
are designed for this. They should loosen<br />
from the blade. Withdraw them completely.<br />
13. Clean the back surface of the blade, blade<br />
bolts and blade area of the rotor before<br />
WARNING<br />
Always sharpen blades on a regular basis. Failure to do so will cause the machine<br />
to under perform and will overload engine and bearings causing machine<br />
breakdown. Blades must not be sharpened beyond the wear mark (see diagram).<br />
! Failure to comply with this could result in machine damage, injury or loss of life.<br />
5<br />
THIS PROCEDURE SHOULD ONLY BE UNDERTAKEN WITH THE DISCHARGE IN PLACE.<br />
10<br />
reseating blades. The blades must not<br />
have any material underneath them<br />
when tightened. If they are not flat and<br />
tight they will become loose quickly.<br />
14. Reassemble the blades, bolts, washers and<br />
nuts in the order shown in the diagram<br />
above. Use only genuine Timberwolf nuts<br />
and washers, as they are of a higher grade<br />
than normally stocked at fastener factories.<br />
Failure to use the appropriate grade nuts or<br />
washers may result in damage, injury or<br />
death. The use of genuine Timberwolf<br />
blades and bolts is recommended.<br />
15. Apply a smear of anti seize compound<br />
(copper ease) to the bolt threads and back<br />
face of the nuts. Do not apply copper grease<br />
onto the counter bore faces of the blades or<br />
bolts.<br />
16. Wedge rotor against housing with a wooden<br />
block to tension nuts.<br />
17. A calibrated torque wrench must be used<br />
to tighten the bolts to a torque setting of<br />
125 lbs ft (170 Nm).<br />
18. Repeat this procedure for the other blade.<br />
19. Slowly lower the rotor housing to its original<br />
position.<br />
20. Refit the two M16 nuts and tighten to<br />
60 lbs ft (80Nm).<br />
21. Re-attach battery lead.<br />
6<br />
WEAR<br />
MARK<br />
8<br />
!<br />
!