CAMSHAFT FITTING GUIDE - Vivid Racing
CAMSHAFT FITTING GUIDE - Vivid Racing
CAMSHAFT FITTING GUIDE - Vivid Racing
Create successful ePaper yourself
Turn your PDF publications into a flip-book with our unique Google optimized e-Paper software.
<strong>CAMSHAFT</strong> <strong>FITTING</strong> <strong>GUIDE</strong><br />
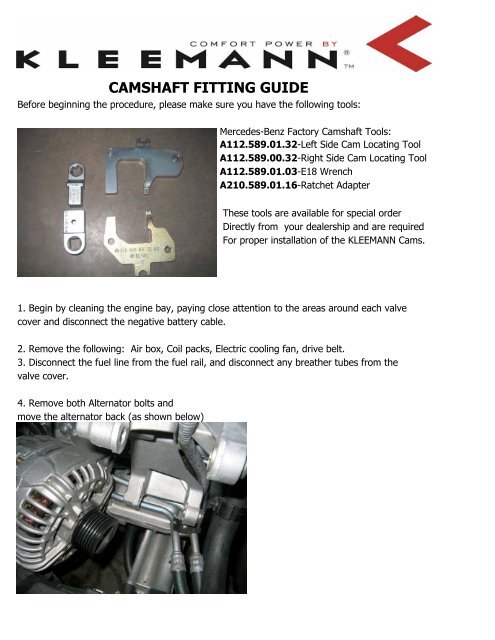
Before beginning the procedure, please make sure you have the following tools:<br />
Mercedes-Benz Factory Camshaft Tools:<br />
A112.589.01.32-Left Side Cam Locating Tool<br />
A112.589.00.32-Right Side Cam Locating Tool<br />
A112.589.01.03-E18 Wrench<br />
A210.589.01.16-Ratchet Adapter<br />
These tools are available for special order<br />
Directly from your dealership and are required<br />
For proper installation of the KLEEMANN Cams.<br />
1. Begin by cleaning the engine bay, paying close attention to the areas around each valve<br />
cover and disconnect the negative battery cable.<br />
2. Remove the following: Air box, Coil packs, Electric cooling fan, drive belt.<br />
3. Disconnect the fuel line from the fuel rail, and disconnect any breather tubes from the<br />
valve cover.<br />
4. Remove both Alternator bolts and<br />
move the alternator back (as shown below)
5. Remove the left and right side valve covers (Below).<br />
6. Set the engine at 40 degrees AFTER TDC (Shown Below). It is imperative that the keyway<br />
on the left and right camshafts are facing towards the "V" of the engine. Always rotate<br />
the engine in the clockwise direction only!!!!
7. Remove the camshaft sensor from the right cylinder head (shown below)<br />
8. Insert the factory MBZ camshaft locating tools (as shown below). You can use 4 short<br />
bolts from the valve cover to hold the locating tools in place. Make sure the finger on the<br />
tools can easily be inserted into the keyway on the camshaft. If not, the engine is not<br />
set to 40 degrees ATDC- Reset the engine to 40 ATDC and repeat until the tool "falls"<br />
into place easily. Tighten the bolts (red arrows) to 8 NM of torque.
9. Secure the timing chain to the cam gear (left and right) with zip ties as shown below.<br />
This will prevent the timing chain from skipping teeth on the cam gears.<br />
10. Remove the chain tensioner as shown below. The tensioner is located on the front<br />
cover, behind the alternator.
11. Remove the camshaft bolts (left and right) using the special E18 wrench. Use a 27mm<br />
open end wrench to hold the cam gear while removing the cam bolt (pictured below).<br />
Do not use the camshaft<br />
locating tool to hold the<br />
camshaft stationary while<br />
removing the cam bolt!!!<br />
12. To ensure the timing chain does not skip, tie the cam gear to the front clip of the<br />
vehicle with releasable zip ties (shown below). Make sure there is no slack in the timing chain<br />
when tying the gear to the front clip- read: adjust the zip ties tightly!!
13. Remove the camshaft bearing bridge. VERY IMPORTANT: Loosen the camshaft bearing<br />
bridge bolts in stages, in the reverse order of the tightening sequence below. On the left side,<br />
Start with 20, moving to 19, 18, 17, etc. The right side starts at 18, moving to 17, 16, etc.<br />
to loosen. It is not necessary to remove the bolts from the bearing bridge completely- loosen<br />
the bolts, and leave them in their original position.<br />
14. Remove the camshaft bearing bridge, and set aside.<br />
15. Remove the MBZ camshaft locating tools<br />
16. Remove the left and right side camshafts. Keep in mind, these are hollow camshafts, so<br />
oil will be present inside the camshaft which will quickly leak out as soon as you remove the<br />
camshaft.
17. Remove the KLEEMANN camshafts from their packaging. It is VERY IMPORTANT to use<br />
assembly lubricant prior to installing the KLEEMANN camshafts into the cylinder heads.<br />
(shown below)<br />
18. Install the KLEEMANN camshafts as shown below. Make sure each camshaft is installed on<br />
the proper side of the car. Take great care to avoid damaging the KLEEMANN camshafts<br />
and the bearing surfaces inside the cylinder head. Make sure the camshaft keyway's face<br />
towards the "V" of the engine.
19. Re-install the MBZ camshaft locating tools (shown below)<br />
20. Re-install the camshaft bearing bridge (left and right). The diagram below shows the<br />
proper torque sequence. Torque specs. Are as follows:<br />
M7X45 1st stage: 15 NM<br />
M7X84 1st stage: 10 NM 2nd stage: +90 degrees<br />
NOTE: Use upper most diagram for M112 V6 engines and lower diagram for M113 V8 engines
21. Re-install the camshaft sprockets left and right. Use the following torque spec:<br />
IMPORTANT: MAKE SURE THE KEYWAY ON THE <strong>CAMSHAFT</strong> IS ALIGNED PROPERLY<br />
WITH THE KEY ON THE <strong>CAMSHAFT</strong> SPROCKET!! IT IS IMPORTANT THAT THE CAM<br />
SPROCKET IS FULLY SEATED AGAINST THE <strong>CAMSHAFT</strong> BEFORE APPLYING TORQUE!!<br />
Camshaft Sprocket Bolt: 1st stage: 50 NM 2nd stage: +90 degrees<br />
NOTE: When using the MBZ special E18 wrench with socket adapter, keep in mind you are<br />
increasing the length of your torque wrench, which in turn increases the amount of torque<br />
you have set for your torque wrench. When using the special tool, reduce the setting on<br />
your torque wrench to 44 NM. DO NOT use the camshaft locating tool to hold the camshaft<br />
stationary while you torque the cam bolt, or you will damage the camshaft and the special tool.<br />
After torquing is complete, remove the camshaft locating tools.<br />
22. Re-install the timing chain tensioner as shown below.<br />
Chain Tensioner Torque: 80 NM<br />
23. Before removing the zip ties from the camshaft sprocket, double check all your work.<br />
Once you have confirmed everything is torqued to spec. and the camshafts are installed<br />
properly, remove the zip ties from the camshaft sprockets.<br />
24. Before installing the valve covers, rotate the engine two full turns, listening carefully for<br />
any signs of valve clearance problems. If the engine becomes "stuck" at any point in the<br />
rotation, re-check all your work. Once you have rotated the engine twice, reset it to<br />
40 degrees AFTER TDC. Re-install the MBZ camshaft locating tools and make sure they<br />
can be installed easily, without needing to turn the engine. Both tools should be installed<br />
at the same time. This procedure ensures the camshaft timing is correct. If you find any<br />
problems, re-check all your work.
25. Re-install the valve covers. Make sure the valve cover gasket is properly installed<br />
Valve cover torque: 10 nm<br />
26. Re-install the alternator, coil packs, electric cooling fan, drive belt, cam sensor and air box.<br />
27. Once you have all parts re-installed correctly, verify proper oil level, then start the car.<br />
If you hear any strange noises (metal against metal, knocking, etc.), immediately turn the car<br />
off and re-check all your work. You will notice once warm, the car will have a slightly "lumpy"<br />
idle- this is normal due to the lift and duration of the KLEEMANN camshafts.<br />
**This installation guide is shown on a W203 C55 AMG. This procedure may vary slightly from chassis to chassis.<br />
These instructions are intended as a guide only- they are in no way a substitute for professional installation.<br />
KLEEMANN USA and KLEEMANN A/S are not responsible for failure to follow these instructions, or any damage resulting<br />
from improper installation. The KLEEMANN warranty is only valid when installation is performed by an authorized<br />
KLEEMANN agent. All pictures and procedures are property of KLEEMANN A/S and shall not be copied without prior written<br />
consent from KLEEMANN A/S. Copyright 2004. Rev. A 11.04


