Serial Interface System RS 422 SYNMET / NAV (SCH 664) - Windaus
Serial Interface System RS 422 SYNMET / NAV (SCH 664) - Windaus
Serial Interface System RS 422 SYNMET / NAV (SCH 664) - Windaus

You also want an ePaper? Increase the reach of your titles
YUMPU automatically turns print PDFs into web optimized ePapers that Google loves.
Operating Instructions<br />
<strong>Serial</strong> <strong>Interface</strong> <strong>System</strong> (<strong>SCH</strong> <strong>664</strong>)<br />
<strong>Serial</strong> <strong>Interface</strong> <strong>System</strong> <strong>RS</strong> <strong>422</strong><br />
<strong>SYNMET</strong> / <strong>NAV</strong> (<strong>SCH</strong> <strong>664</strong>)<br />
OPERATING INSTRUCTIONS<br />
<strong>Serial</strong> <strong>Interface</strong> <strong>System</strong> <strong>SYNMET</strong> / <strong>NAV</strong> (<strong>SCH</strong> <strong>664</strong>)<br />
1
2<br />
Operating Instructions<br />
<strong>Serial</strong> <strong>Interface</strong> <strong>System</strong> (<strong>SCH</strong> <strong>664</strong>)<br />
List of contents<br />
1.0 Description<br />
1.1 General<br />
1.2 Function<br />
1.3 Dimensional drawing<br />
1.4 Technical data<br />
2.0 Setting into operation<br />
2.1 Unpacking<br />
2.2 Choice of installation place<br />
2.3 Mounting<br />
2.4 Electrical connection<br />
2.5 Cable entries<br />
2.6 Setting into operation<br />
2.7 Performance check<br />
3.0 Service and maintenance<br />
3.1 Periodical works<br />
3.2 Change of spare parts<br />
3.3 Spare parts drawing<br />
3.4 Spare parts list<br />
3.5 Repair procedures<br />
3.6 Ordering of spares<br />
4.0 Setting out of operation<br />
4.1 Storage<br />
4.2 Dispatching<br />
5.0 Remarks
Operating Instructions<br />
<strong>Serial</strong> <strong>Interface</strong> <strong>System</strong> (<strong>SCH</strong> <strong>664</strong>)<br />
1.0 Description<br />
1.1 General<br />
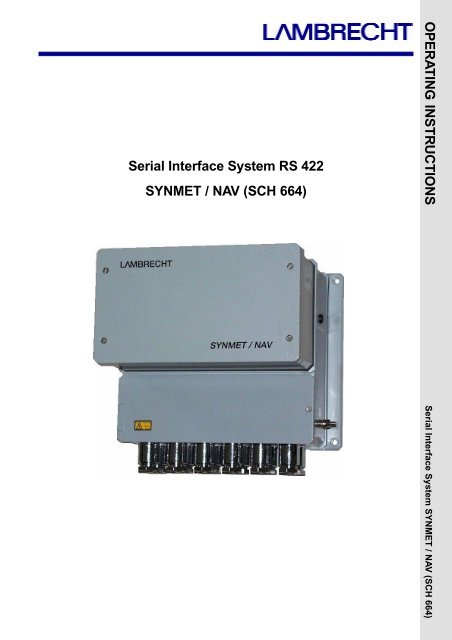
The interface box <strong>SYNMET</strong>-<strong>NAV</strong> model <strong>SCH</strong> <strong>664</strong> is designed to convert up to twelve analogue and 5 digital channels<br />
(pulse and event) of various meteorological sensors into a digital signal of <strong>RS</strong> <strong>422</strong> standard with a message format<br />
according to the NEMA 0183 requirements which are world wide in use for all naval electronic systems.<br />
Regarding the wind parameters the system in general is measuring the relative data which are influenced by own speed<br />
and heading of the vessel. As an option the system can be enabled to calculate true wind data when receiving<br />
corresponding information contained in the "own ship data" or OSD protocol of the NMEA message.<br />
In the standard version two serial ports COM1 and COM2 are implemented as 1 * <strong>RS</strong> <strong>422</strong> for continuous data<br />
transmission and 1 * <strong>RS</strong> 232c or <strong>RS</strong> <strong>422</strong> for service and maintenance. On request the system can be extended with an<br />
option containing four more serial outputs COM3 to COM6 by means of a piggy-back-module.<br />
All generated digital output signals can used for a transfer to other intelligent peripheral control systems as auto pilot<br />
devices or others.<br />
Its is constructed as a primer coated seawater resistant aluminium housing which normally is coated with grey (RAL<br />
7001) lacquer. The performance of lacquering corresponds to the general demands for military equipment.<br />
To fulfil the strong EMC/EMI requirements the housing is equipped with conductive rubber sealings and metallic cable<br />
inlets according to VG 88 812.<br />
1.2 Functional description of sub-components<br />
The interface system <strong>SCH</strong> <strong>664</strong> NMEA (<strong>SYNMET</strong>-<strong>NAV</strong>) in general is consisting of the sub-components power supply PS,<br />
controller-board CPU, sensor interface SI and a motherboard. Corresponding designations are printed on the front<br />
panels of the boards.<br />
1.2.1 Sensor interface board SI<br />
Incoming analogue signals from the sensor first get linked to the sensor interface board SI where an adaptation<br />
potentiometer for the DC-generator and a DC-DC-module for the supply of the N18-ring potentiometer are located. For<br />
service purposes it can be set to a corresponding mode by means of a mini-switch on the front panel.<br />
1.2.2 Controller board CPU<br />
On the controller board CPU the analogue signals of the SI board get converted with a resolution of 12 bit, evaluated and<br />
processed from an advanced micro-processor system (controller) NEC V25. A user specific firmware written in "Turbo<br />
Pascal" carries out the signal processing including plausibility checks, compensation of error effects (e.g. the threshold<br />
and non-linear behaviour of the cup rotor) and creates user-specific digital message formats (e.g. NMEA 0183) to be<br />
linked to other equipment. In general the controller starts again automatically after switching on the power supply of the<br />
system or if firmware errors occurred. Manual resets can be carried out by means of a small push button on the front<br />
panel.<br />
1.2.3 Power supply board PS<br />
The electronically controlled power supply insert PS can be operated in the wide range of 100 to 240 V AC and<br />
frequencies of 50....60 Hz without any manual configurations. Various LED's are indicating its correct operation. For<br />
service purposes the AC and DC circuits can be switched independently on & off by means of two micro switches on the<br />
front panel.<br />
1.2.4 Digital-to-analogue converter<br />
An optional digital-to-analogue converter module (DAC piggy-pack) located on the CPU board provides external<br />
instruments like wind indicators and/or interfaces with corresponding signals of a 0 to 10 volts or 0/4 to 20 mA output.<br />
3
4<br />
Operating Instructions<br />
<strong>Serial</strong> <strong>Interface</strong> <strong>System</strong> (<strong>SCH</strong> <strong>664</strong>)<br />
1.3 Control and operation elements<br />
For the continuous operation of the interface system special manual operations e.g. on a keyboard are not necessary.<br />
Only for servicing and checks the inserted printed circuit boards are fitted with the green and red control LED's and<br />
switches as described below (see also the "drawing of front panels" on the following page).<br />
Sensor interface board - SI<br />
LED indications:<br />
(U1/U2) Indicates the presence of the power supply of 12 V DC for the N18-ring potentiometer of the wind sensor or<br />
other consumers e.g. sensors to be supplied from integrated DC/DC modules of the system.<br />
(U3) Output U3 is not in use - the LED is off<br />
(service) Indicates that the switch is set to the service mode - please refer to the switch function as described below<br />
Switch<br />
(operation) Effects an event message for internal mean value calculation only in the data acquisition mode of the<br />
system; in the service position the LED is shining.<br />
When working as a talker of NMEA 0183 messages the function is not in use for this application<br />
CPU board - CPU<br />
LED indicators:<br />
(DA) Data acquisition LED is indicating the sampling of data from the sensor. Depending on the stipulated<br />
sampling rate it is flashing up to six times per second.<br />
(DP) Data processing LED is indicating the generation of NMEA 0183 data protocols. Depending on the<br />
stipulated transmission rate it is flashing at least once per second.<br />
Remark: In case of errors the LED will shine constantly or not at all<br />
Button Reset of the controller system<br />
Connectors: COM1/COM2 9-pole female sub-D connectors for service and maintenance only<br />
Power supply board - PS<br />
LED indicators:<br />
(AC-power) Power input is connected and switched on<br />
(DC output) Internal DC supply is switched on<br />
(+ 5 V) +5 V DC output of the module is present<br />
(+12 V) +12 V DC output of the module is present<br />
(-12 V) -12 V output of the module is present<br />
Remark: For a proper operation of the whole system all indication LED's mentioned her have to be illuminated (on).<br />
The remaining LED's (solar), (battery charge) and (DC-output) are not in use in this application<br />
Switches:<br />
(AC-power) With these items an independent switching of AC input voltage and DC output voltage is possible -<br />
(DC-output) for operation both have to be in the "On" position.
Operating Instructions<br />
<strong>Serial</strong> <strong>Interface</strong> <strong>System</strong> (<strong>SCH</strong> <strong>664</strong>)<br />
Figure: Drawing of front panels<br />
1.4 Dimensional drawing<br />
5
6<br />
Operating Instructions<br />
<strong>Serial</strong> <strong>Interface</strong> <strong>System</strong> (<strong>SCH</strong> <strong>664</strong>)<br />
1.5.0 Technical data<br />
<strong>Interface</strong> electronic unit No. <strong>SCH</strong> <strong>664</strong> unit with up to six serial ports available on screw terminals.<br />
Technical Data:<br />
Input channels: 12 analogue channels e.g. current, voltage, resistance<br />
3 digital inputs (frequency)<br />
2 digital inputs (status)<br />
- serial ports for intelligent sensors (e.g. barometer)<br />
Input signals: standardised signals from digital and analogue LAMBRECHT sensors and comparable<br />
equipment from other manufacturers.<br />
Outputs: data from various sensors in a message format according to NMEA 0183<br />
Baudrate: 4 800 (desired value according to NMEA 0183 V 2.30)<br />
selectable range in configuration mode: 300 to 38 400<br />
Transmission rate: between 1 and 3 protocols per second<br />
Operating voltage: 115/230 V, 50-60 Hz<br />
Power consumption: approx. 30 W<br />
Housing: seawater resistant aluminium case with separate screw terminal box<br />
Operating temperatures: -20...+70 °C<br />
Cable connection: spring terminals<br />
Cable inlet: cable glands according to VG 88 812<br />
Weight: app. 10.0 kg depending on integrated options<br />
Dimensions: 232 x 241 x 220 mm (W x H x D) without cable inlets<br />
Painting grey, RAL 7001 if not stipulated otherwise<br />
2.0.0 Setting into operation<br />
2.1.0 Unpacking<br />
There are no special handling instructions for removing the interface housing from the original cardboard box.<br />
2.2.0 Choice of installation place<br />
As the digital signals of the <strong>RS</strong> 232c interface can be transmitted over screened cables with a maximum length up to 25<br />
m, the interface has to be mounted closed to the unit which receives the data (e.g. auto pilot, data distribution box). The<br />
<strong>RS</strong> <strong>422</strong> interface signals can be handled less critical as they can be transmitted via cables up to 1000 m. To facilitate<br />
servicing in case of a defect the interface should be easily accessible.<br />
2.3.0 Mounting<br />
The interface electronics are mounted on a flat surface with four stainless steel screws and spring washers (size M5).<br />
2.4.0 Electrical connection<br />
The electrical connection must be carried out according to the main wiring diagram of the entire system; you will find it in<br />
the general part of the system's documentation. To keep the cable inlets watertight special covering material (e.g.<br />
RAYCHEM shrink tube) is recommended. The shields of all cables have to be connected to the ground plug-in units of<br />
the cable glands. The earthing screw has to be connected to the ship's ground by means of a green/yellow coloured<br />
cable and be protected against corrosion with a special acid-free contact grease.<br />
Important note: To prevent electrical hazards for installation staff and damages due to short circuits, it is absolutely<br />
necessary to switch off the power supply until the installation is finished.<br />
Attention: wrong connection may cause a destruction of this and other connected components !<br />
2.5.0 Cable entries<br />
All cables will be linked inside the housing by means of cable glands according to VG standards. The selection of the<br />
right cable inlet will be carried out according to the project specific bloc diagram respectively the wiring diagram. The<br />
corresponding positions are clearly illustrated in the discussed drawings. Due to the small amount of these items a<br />
numbering of them has not been carried out.<br />
For various outer diameters of the installation cables different sized cable inlets will be delivered together with the item.
Operating Instructions<br />
<strong>Serial</strong> <strong>Interface</strong> <strong>System</strong> (<strong>SCH</strong> <strong>664</strong>)<br />
2.6 Setting into operation<br />
After having finished the mechanical and electrical installation the whole cabling should be checked before switching on<br />
the mains respectively the circuit breaker for the anemometer system.<br />
Further switches for service purposes are located on the front panels of the boards. Please get sure they are in the ONposition<br />
for operation.<br />
Due to some intelligent internal self-check and automatic adjustment routines of the equipment no alignments have to be<br />
carried out by the user after the first installation or the replacement of any spares.<br />
Apart from wind sensor heating devices all other power supply of external sensor electronic circuits if required will be<br />
provided by the in-built DC/DC converters in the system and therefore separate AC converters are not required.<br />
The controller of the interface system has an automatic self-start routine in order to start it automatically after switching<br />
on the power. Same process gets in function also after mains failures e.t.c.<br />
The operation will be indicated by two LED's (designations: DA = data acquisition; DP = data processing) on the front<br />
panel of the CPU.<br />
Only in case of strong interference causing software errors the reset button can be pressed in order to re-start the<br />
internal firmware manually.<br />
2.7 Performance checks<br />
First of all it has to be ensured that all three mini-switches on the front-panel are in the on position. The two red LED's on<br />
the CPU board have to flash in clockwise intervals.<br />
The measuring values obtained from the external display consoles can be compered with measurements from other<br />
meteorological sensors on land or from other vessels in the neighbourhood.<br />
More detailed test procedures about this subject are mentioned in the documentation for factory acceptance test (FAT),<br />
harbour acceptance test (HAT) and sea acceptance test (SAT).<br />
More circumference service and maintenance works can be carried out by means of a special simulation and test<br />
equipment (STE) LAMBRECHT model No. <strong>SCH</strong> 463 Mark II which is available to be purchased as an option. Details for<br />
its use are described in an own operation manual.<br />
In general the procedures have to be carried out at least by two people from the maintenance staff. For the vocal<br />
communication between the external sensor located on the mast and a wind data display console a pair of portable<br />
tranceivers (walky-talkies) or similar are recommended.<br />
2.8 Message format standard<br />
All meteorological data of our <strong>SYNMET</strong>-<strong>NAV</strong> interface system get transmitted to others in a message format according to<br />
the NMEA 0183 standards which are world-wide in use on civil and naval systems.<br />
The standardised message is containing of the elements start sign, talker device identifier, sentence formatters,<br />
measuring value(s), field delimiters, check sums and other signs.<br />
According to the nomenclature of the National Marine Electronics Association (NMEA) all equipment generating such<br />
messages is designated as a "talker" whereas the receiving system is called a "listener".<br />
All project specific data and parameters are described in detail in a separate agreement of the <strong>Interface</strong> Design<br />
Specification IDS or a similar document which is signed by the buyer and the manufacturer.<br />
2.9 Built-in test facility = BITE-facility<br />
A built-in test (BITE-) facility enables the user to detect various failures of the measuring system in case of malfunctions.<br />
The designation of faulty values and errors is described in detail in the <strong>Interface</strong> Design Specification (IDS) Document as<br />
mentioned above.<br />
7
8<br />
Operating Instructions<br />
<strong>Serial</strong> <strong>Interface</strong> <strong>System</strong> (<strong>SCH</strong> <strong>664</strong>)<br />
3.0 Service and maintenance<br />
3.1 Periodical works<br />
Apart from periodical checks for damages of the housing, water-tightness and the fixing of the mounting screws no other work<br />
will be necessary.<br />
3.2 Change of spare parts<br />
All spare parts of the interface system listed and illustrated below can be easily removed using a screw driver.<br />
The printed circuit boards can be pulled out after removing the screws of the housing cover and then their little screws on the<br />
front panels.<br />
Before changing any components of the equipment the circuit breaker for the anemometer system has to be switched off and<br />
all mini-switches on the front panels have to be set to their off-respectively service-positions.<br />
After the replacement of boards and switching on the mains again the automatic self-start routine starts the controller again<br />
automatically. Same process gets in function also after mains failures e.t.c. The operation will be indicated by two LED's (designations:<br />
DA = data acquisition; DP = data processing) on the front panel of the CPU. Manual alignments at potentiometers<br />
e.t.c. have not to be carried out as several automatic self-calibration routines are done by the internal firmware periodically<br />
during its operation.<br />
Only in case of strong interference causing software errors the reset button can be pressed in order to re-start the internal<br />
firmware manually.<br />
The re-assembling of the housing parts has to be carried out in reverse order. All screws of the boards have to be fastened<br />
securely and all switches have to be set to the on-position before closing the housings cover.<br />
3.3 Spare parts drawing
Operating Instructions<br />
<strong>Serial</strong> <strong>Interface</strong> <strong>System</strong> (<strong>SCH</strong> <strong>664</strong>)<br />
3.4 Spare parts list<br />
No. Description PPU Order-No.<br />
-<br />
1<br />
2<br />
3<br />
3.1<br />
3.2<br />
4<br />
Complete interface system <strong>SCH</strong> <strong>664</strong><br />
NMEA "<strong>SYNMET</strong>-<strong>NAV</strong>" 00.95<strong>664</strong>.116 011<br />
Power supply unit "<strong>SYNMET</strong>-PS"<br />
Input: 115/230V/60 Hz<br />
Sensor interface board "<strong>SYNMET</strong>-SI" with<br />
2 DC-DC modules for sensor power supply<br />
CPU-board <strong>SYNMET</strong>-CPU with two serial<br />
ports <strong>RS</strong> 232/<strong>RS</strong> <strong>422</strong><br />
4-channel extension module for <strong>SYNMET</strong>-<br />
CPU <strong>RS</strong> <strong>422</strong>/485<br />
8-channel extension module for <strong>SYNMET</strong>-<br />
CPU DAC<br />
overvoltage protection module <strong>SYNMET</strong>-<br />
ESD<br />
1 00.95<strong>664</strong>. xxx xxx 1)<br />
1 32.95660.105 0x0 2)<br />
1 32.95660.107 0x0 2)<br />
1 32.95660. xxx xxx 2)<br />
1 32.95660.011 000 3)<br />
1 32.95660.004 000 3)<br />
1 32.95661.009 000 3)<br />
5 ground insert 21x13.6x16.5 12 35.88812.220 004<br />
6 ground insert 21x10.6x13.5 12 35.88812.220 003<br />
7 ground insert 21x9x11.5 12 35.88881.220 002<br />
8 fuse 5 x 20 mm; 2.0 A 2 68.50010.080 000<br />
8a fuse 5 x 20 mm; 4.0 A 2 68.50010.170 000<br />
1) "x" refer to label on the instrument (final ordering No. is depending on<br />
individual configuration)<br />
2) "x" refer to label on the connector of the printed circuit board (final ordering<br />
3) option in use on demand<br />
3.5 Repair procedures<br />
The fault tracing and service work only should be carried out by skilled maintainers having passed a factory training at<br />
our facilities or a similar event.<br />
According to our repair philosophy the smallest replaceable units are printed circuit boards and other items mentioned<br />
here.<br />
For repair these items have to be returned to the workshop of the manufacturer LAMBRECHT in Göttingen. The full<br />
shipping address of our company is mentioned in this booklet.<br />
Fuses are consumables and can not be repaired.<br />
3.6 Ordering of spares<br />
In case of spares as mentioned here are required are required for replacements or to be put on stock the following<br />
information are required to forward the right spare parts to the customer:<br />
- name of item and type number<br />
- ordering number/parts number<br />
- required quantity<br />
9
10<br />
Operating Instructions<br />
<strong>Serial</strong> <strong>Interface</strong> <strong>System</strong> (<strong>SCH</strong> <strong>664</strong>)<br />
- related component or name of higher assembly<br />
- type of vessel and country of origin<br />
- reference number of LAMBRECHT wiring diagram designated with the bold letters SKF.... or SWF.... and a 3 or 4-digits<br />
running number.<br />
A detailed inquiry containing these information will be appreciated by us for the safe identification of the required item(s)<br />
and to prevent wrong deliveries. Above mentioned data can be obtained from the designation label and from the spares<br />
list of this system component.<br />
3.7 <strong>System</strong> configuration<br />
As mentioned in this manual all functional configuration parameters e.g. connected sensors and interface design<br />
specification data are programmed project-specific according to the stipulated demands in our works before delivery. All<br />
relevant operational data are stored in non-volatile memory circuits (EPROMS, EEPROMS and battery buffered RAM's)<br />
in order to keep the memory content also on stock, during shipment and in a switched-off mode of the system. Therefore<br />
for the user any access to these parameters is not necessary.<br />
Deliveries of spares will be carried out in that way that all configuration settings will be carried out in our works by skilled<br />
staff.<br />
The configuration procedure of the <strong>SYNMET</strong>-<strong>NAV</strong> CPU board in our works has been carried out by means of a<br />
circumference LAMBRECHT software-tool called <strong>SYNMET</strong>-COMMANDER during production and in the test field of the<br />
factory.<br />
4.0 Setting out of Operation<br />
4.1 Storage<br />
The interface box <strong>SCH</strong> 660 should be stored in a clean and dust-free room with temperatures between -40 and 60 øC<br />
(not condensing) in the original cardboard box or a similar packing.<br />
4.2 Dispatching<br />
For shipment we recommend to use the original cardboard box or a similar packing with applicable damping material.<br />
There is no need to lock any parts during transport.<br />
5.0 Remarks<br />
This manual describes the standard design as well as possible options. The respective performance will be stated in the<br />
specification and/or the documents of the contract.<br />
Our products are subject to continuous developments. Technical alterations for the technical progress are reserved.<br />
Quality <strong>System</strong> certified by DQS according to<br />
DIN EN ISO 9001 Reg. No. 3748 Specifications subject to change without notice 09.01<br />
Wilh. Lambrecht GmbH<br />
Friedländer Weg 65-67<br />
37085 Göttingen<br />
Germany<br />
Tel +49-(0)551-4958-0<br />
Fax +49-(0)551-4958-312<br />
E-Mail info@lambrecht.net<br />
Internet www.lambrecht.net<br />
In more than 100 countries