Baader SteelDrive Instruction Manual - Baader Planetarium
Baader SteelDrive Instruction Manual - Baader Planetarium
Baader SteelDrive Instruction Manual - Baader Planetarium

You also want an ePaper? Increase the reach of your titles
YUMPU automatically turns print PDFs into web optimized ePapers that Google loves.
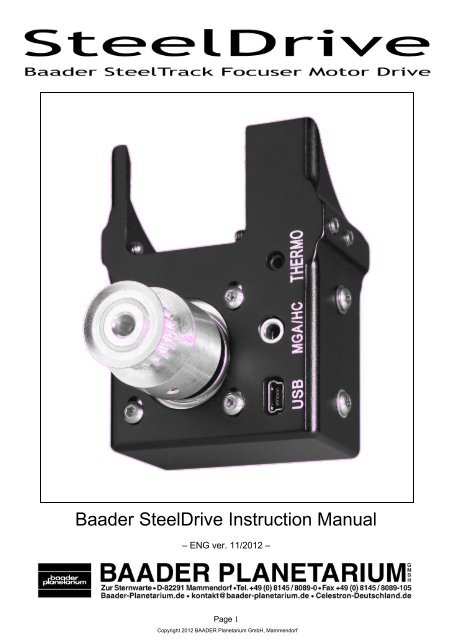
<strong>Baader</strong> <strong>SteelDrive</strong> <strong>Instruction</strong> <strong>Manual</strong><br />
– ENG ver. 11/2012 –<br />
Page 1<br />
Copyright 2012 BAADER <strong>Planetarium</strong> GmbH, Mammendorf
Table of Contents<br />
Table of Contents...........................................................................................................................................................2<br />
1. What’s in the Box........................................................................................................................................................3<br />
2. Installing the <strong>SteelDrive</strong>...............................................................................................................................................3<br />
3. Connecting the <strong>SteelDrive</strong> for Operation....................................................................................................................6<br />
4. Operating the <strong>SteelDrive</strong> with the Hand Controller.....................................................................................................7<br />
5. <strong>SteelDrive</strong> Software and Drivers................................................................................................................................13<br />
6. Installing the Software and Drivers............................................................................................................................13<br />
7. Using SteelGo Controlling Software...........................................................................................................................19<br />
8. Troubleshooting .......................................................................................................................................................23<br />
9. Technical Specifications.............................................................................................................................................25<br />
Page 2<br />
Copyright 2012 BAADER <strong>Planetarium</strong> GmbH, Mammendorf
1.What’s in the Box<br />
The <strong>Baader</strong> <strong>SteelDrive</strong> Focuser comes with the following:<br />
a. 1 pc <strong>SteelDrive</strong> unit with aluminium pulley<br />
b. 1 pc Transmission Belt<br />
c. 1 pc CDROM with drivers, software and instruction manuals<br />
d. 1 pc USB cable<br />
e. 1 pc Thermo Probe<br />
Optional: 12V <strong>Baader</strong> Outdoor Telescope Power Supply #245 7610 and the 5,5/2,5mm adapter<br />
#245 7611, for powering the dedicated Hand Controller.<br />
Important Note: The dedicated Hand Controller must be connected to the <strong>SteelDrive</strong><br />
BEFORE power is connected.<br />
2.Installing the <strong>SteelDrive</strong><br />
The <strong>Baader</strong> <strong>SteelDrive</strong> is straightforward to install on to the <strong>Baader</strong> Steeltrack focuser without any<br />
part of the focuser needing to be removed at all.<br />
Installing the <strong>SteelDrive</strong> to the Steeltrack Focuser<br />
1. Screw out the 4 set screws placed each side of the <strong>SteelDrive</strong> until the black housing can<br />
touch the Steeltrack focuser base where there are placed two small dovetails. You do not<br />
need to unscrew them completely, just sufficiently so<br />
that the Unit can be placed over the Steeltrack.<br />
2. Screw in the 4 set screws so that they push against the<br />
small dovetails. Do not tighten yet.<br />
3. Wrap the belt around the Steeltrack brass gear and<br />
<strong>SteelDrive</strong> pulley.<br />
4. Align the <strong>SteelDrive</strong> with the Steeltrack by making sure that <strong>SteelDrive</strong> motor housing is<br />
lined up with the flattened face of the Steeltrack focuser as shown below.<br />
Page 3<br />
Copyright 2012 BAADER <strong>Planetarium</strong> GmbH, Mammendorf
5. Tighten the set screws adequately (and not excessively!) until the motor housing is firmly<br />
fixed in place with no tilt or rotation with respect to the Steeltrack focuser. The belt should<br />
self-tension when the set screws<br />
are tightened.<br />
6. Once the set screws are tightened<br />
check the belt position to ensure<br />
that it is completely free to gently<br />
rotate by hand with no force or<br />
lateral “escaping” movement, which<br />
denotes a poor co-axiality between<br />
the two pulleys.<br />
If this happens then a more<br />
adequate <strong>SteelDrive</strong> positioning<br />
must be performed again by<br />
adjusting the set screws to ensure<br />
good alignment. In addition to this,<br />
the tension of the motor and belt<br />
can be adjusted below.<br />
Adjust the Tension of the Belt<br />
When the belt is correctly aligned with the pulleys but the tension is low or too high, the stepping<br />
motor position can be adjusted until a correct tension is found.<br />
1. Use a 2.5mm hex wrench to loosen the four<br />
screws keeping the stepping motor safely in place<br />
inside the aluminium housing.<br />
2. The <strong>SteelDrive</strong> pulley position can be adjusted<br />
inward or outward until the correct tension is<br />
found.<br />
3. When the belt is correctly tensioned tighten the<br />
screws.<br />
Page 4<br />
Copyright 2012 BAADER <strong>Planetarium</strong> GmbH, Mammendorf
Correct tension is when the belt is tight but not tense, so that rotation of the brass knob is not<br />
impaired. The focuser can still conveniently be moved manually by hand, and the belt does not<br />
show any looseness or tendency to jump off the teeth.<br />
Obtain Perfect Alignment with the Steeltrack Focuser<br />
The <strong>SteelDrive</strong> motor position can be adjusted inward or outward for a perfect alignment with the<br />
brass pulley of the pinion of the Steeltrack pinion.<br />
1. Using a 1.5mm hex wrench to loosen the 2 set screws keeping the black pulley firmly fixed<br />
onto the stepping motor shaft adjust the motor position up and down to obtain perfect<br />
alignment.<br />
2. Tighten the set screws once perfect alignment is achieved.<br />
3. When the belt is properly aligned with pulleys but tension is low or too high, the stepping<br />
Backlash<br />
motor position can be adjusted till a correct tensioning is found.<br />
Focus backlash is excess play in the focus mechanism. This should be resolved where possible<br />
on the focuser, or dealt with by using focus backlash compensation which is available in popular<br />
imaging control software. Backlash is not caused by the <strong>SteelDrive</strong> as all the teeth between the<br />
focuser unit and <strong>SteelDrive</strong> are always keeping in touch with each other through the rubber belt.<br />
Focus slip can also occur on the SteelTrack focuser if this is not adjusted properly, more<br />
commonly when a heavy load is attached to the focuser. If slippage does occur it is recommend<br />
to adjust the SteelTrack focuser to apply more pressure to the pinion, adjusted correctly no<br />
slippage will occur.<br />
Page 5<br />
Copyright 2012 BAADER <strong>Planetarium</strong> GmbH, Mammendorf
3.Connecting the <strong>SteelDrive</strong> for Operation<br />
The <strong>SteelDrive</strong> can be controlled by the dedicated Control Box, an LVI SmartGuider 2 camera or<br />
by a PC, either using the supplied SteelGo software or through ASCOM. Furthermore, the<br />
<strong>SteelDrive</strong> is provided with a Thermo probe to compensate for the focal point variation with<br />
temperature change.<br />
Connecting the <strong>SteelDrive</strong> to use with the dedicated Hand Controller or LVI SmartGuider 2<br />
Important Note: Be sure to connect all cables first before connecting power to the unit otherwise<br />
damage could occur.<br />
1. Firstly connect the Thermo probe to the THERMO socket on the <strong>SteelDrive</strong>.<br />
2. Connect the dedicated Hand Controller or LVI SmartGuider 2 to the MGA/HC socket.<br />
3. Provide power to the dedicated Hand Controller or LVI SmartGuider 2.<br />
Page 6<br />
Copyright 2012 BAADER <strong>Planetarium</strong> GmbH, Mammendorf
Connecting the <strong>SteelDrive</strong> to use with a PC<br />
1. Firstly connect the Thermo probe to the THERMO socket on the <strong>SteelDrive</strong>.<br />
2. Connect the provided USB cable to the USB socket and then plug into the PC.<br />
Power is provided to the <strong>SteelDrive</strong> through the USB cable. In rare circumstances insufficient<br />
power may be provided by your USB to the <strong>SteelDrive</strong> which is a result of a number of factors. In<br />
this situation the unit may not move correctly, not move at all, or stop responding. In order to<br />
provide sufficient power to the <strong>SteelDrive</strong> consider to:<br />
• Use a powered hub to provide more power to the <strong>SteelDrive</strong>. The <strong>SteelDrive</strong> can absorb up<br />
to 900ma of current.<br />
• Connect the dedicated Hand Controller in parallel to connecting to a PC. The dedicated<br />
Hand Controller can be powered in the usual way with the 12v power supply. Movement<br />
updates will be provided to both the PC and the dedicated Hand Controller by the<br />
<strong>SteelDrive</strong> so that they stay synchronised. Power to the dedicated Hand Controller<br />
must be connected last.<br />
• Try using a non-active USB cable to cover long distances. In some cases active cables<br />
have shown to cause issues due to the cable itself drawing current for itself leaving less<br />
insufficient for the <strong>SteelDrive</strong>.<br />
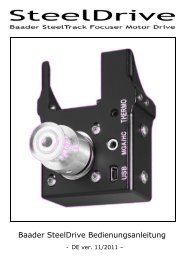
4.Operating the <strong>SteelDrive</strong> with the Hand Controller<br />
When plugging the dedicated Hand Controller to the DC 12V power supply, the unit will<br />
immediately switch on displaying the BAADER STEELDRIVE starting logo.<br />
Page 7<br />
Copyright 2012 BAADER <strong>Planetarium</strong> GmbH, Mammendorf
A while after the STEELDRIVE logo has rolled off the screen, the SETUP menu will appear.<br />
Follow the instructions to correctly setup the dedicated Hand Controller for use with your<br />
Steeltrack.<br />
Setup Mode<br />
This option is to choose if to run the setup mode or not. Setup is for setting the appropriate<br />
settings for your <strong>SteelDrive</strong> in order for it to function correctly with your focuser.<br />
SETUP<br />
Pressing > button (option: NO), the dedicated Hand Controller will go<br />
straight to the ZEROING function. Find more details further in the manual.<br />
Pressing < button (option: YES), the dedicated Hand Controller will enter in SETUP mode where<br />
MODEL, POS. CAL, BACKLIT, T COMP and T COEFF. Functions can be adjusted for a proper<br />
functionality.<br />
MODEL<br />
Pressing < and > buttons, the following focuser options can be set: SC2,<br />
NT2, RT2, RT3, CUSTOM. Pressing MENU, the selected focuser model is<br />
set and BACKLIT function will be then displayed.<br />
If the wrong model is set, a wrong trip will be loaded and the focuser will not move to the correct<br />
positions.<br />
POS. CAL.<br />
If CUSTOM option is set in MODEL menu, the dedicated Hand Controller<br />
will then ask whether to run or calibrate the CUSTOM focuser.<br />
Pressing > button (option: NO), the dedicated Hand Controller will run the<br />
early calculated gear ratio for CUSTOM focuser and the BACKLIT function will be then displayed.<br />
Pressing < button (option: YES), the dedicated Hand Controller will run the POS. CAL. to achieve<br />
the correct gear ratio with CUSTOM focuser.<br />
Page 8<br />
Copyright 2012 BAADER <strong>Planetarium</strong> GmbH, Mammendorf
Important Note: MAKE SURE THE DRAWTUBE IS COMPLETELY RETRACTED TO ZERO<br />
POSITION BEFORE PRESSING YES TO RUN POS. CAL. OR A WRONG CALCULATION<br />
WILL BE DONE!<br />
the focuser drawtube.<br />
POS. CAL. will move the drawtube outward till a 25mm trip is reached.<br />
The dedicated Hand Controller will display the left image and the user will<br />
have to set the real trip measured through the vernier scale printed onto<br />
Pressing < and > buttons, the position value will, respectively, increase or decrease by 0.1mm<br />
step. Pressing MENU button, the dedicated Hand Controller will automatically calculate the<br />
CUSTOM focuser gear ratio and TRIP MAX function will let the user to manually edit the trip with<br />
CUSTOM focuser.<br />
TRIP MAX<br />
Pressing < and > buttons, the trip value shall, respectively, decrease or<br />
increase by 5mm step.<br />
Pressing MENU button, POS. CAL. will calculate and save all the useful parameters with<br />
CUSTOM focuser and the dedicated Hand Controller will lead to the BACKLIT function.<br />
BACKLIT<br />
BACKLIT function allows the dedicated Hand Controller backlit<br />
adjustment.<br />
Pressing < and > buttons, the following options can be set: LCD OFF (the<br />
LCD will turn off in a few seconds when the unit will stand by), FULL OFF (both the LCD and the<br />
pushbuttons will turn off in a few seconds when the unit will stand by) and FIXED ON (both LCD<br />
and pushbuttons will always stay on). LCD and pushbuttons can be turned on again upon pressing<br />
any button.<br />
Pressing MENU button, the T COMP function will be displayed.<br />
Page 9<br />
Copyright 2012 BAADER <strong>Planetarium</strong> GmbH, Mammendorf
T COMP.<br />
Pressing < and > buttons, the following options can be set: ON – OFF<br />
(default: OFF). When the function is ON, the compensation will be<br />
activated, OFF will turn it off.<br />
If OFF option is selected, MENU button will lead the dedicated Hand Controller to the SAVE<br />
function.<br />
If ON option is selected, MENU button will lead the dedicated Hand Controller to the T COEFF<br />
function for further adjustment.<br />
T COEFF.<br />
the screen.<br />
Pressing < and > buttons, the following options can be set: TC1, TC2,<br />
TC3, TC4, TC5 and SET. TC stands for Temperature Coefficient and the<br />
dedicated Hand Controller can save up to 5 values named as printed in<br />
SET will allow the Coefficient value editing by pressing < and > buttons.<br />
Range is 0.01–0.50 °C/mm (step: 0.01). For example, a T COEFF set to 0.20 will compensate the<br />
focuser position by ± 0.20mm when the temperature will change by 1 °C degree. Pressing MENU<br />
button, the dedicated Hand Controller will lead to the SAVE? function.<br />
SAVE?<br />
Pressing > button, the dedicated Hand Controller (option: NO), will not<br />
allow any saving and the dedicated Hand Controller will go through the<br />
STATISTIC screen.<br />
Pressing < button (option: YES), will allow the saving of all the adjustable options within SETUP<br />
mode and the dedicated Hand Controller will then lead to the SAVING function whenever a T<br />
COEFF is adjuted. In such a case, the TC number will blink, press < and > buttons to set the<br />
saving position, MENU button will save the Coefficient in such a position.<br />
Page 10<br />
Copyright 2012 BAADER <strong>Planetarium</strong> GmbH, Mammendorf
SAVING..<br />
overwritten.<br />
Run Mode<br />
The TC number will blink, press < and > buttons to set the saving position,<br />
then press MENU button to save the Coefficient in such a position and<br />
permanently store the value for future use. Any previous value is<br />
When powered up, the dedicated Hand Controller can promptly run the ZEROING function a while<br />
after the starting BAADER STEELDRIVE logo has rolled off the screen.<br />
ZEROING<br />
The ZEROING function will completely retract the focuser drawtube to<br />
achieve the absolute zero position. Pressing the MENU button, the<br />
ZEROING can be stopped in any time.<br />
Important Note: Be aware that the Vernier scale on the focus drawtube is set outwards slightly. If<br />
you want the value reported by the <strong>SteelDrive</strong> through the dedicated Hand Controller to match this<br />
scale, stop zeroing and manually align the Focuser drawtube to the zero position on the Vernier<br />
scale. In most situations it is not important to align the scales.<br />
STATISTIC<br />
Celsius degree.<br />
The top line displayed on the screen is showing the absolute position of<br />
the focuser drawtube, in mm unit. The bottom line is showing the<br />
temperature detected by the probe supplied with the STEELDRIVE, in<br />
The * symbol displayed on the left side of the temperature will advise the T COMP is on and the<br />
STEELDRIVE will automatically compensate the focus shift due to the<br />
temperature variation during the night.<br />
When compensating, the dedicated Hand Controller will switch in a few seconds the absolute<br />
position into relative by showing the variation of the tube position during the stand-by period.<br />
Page 11<br />
Copyright 2012 BAADER <strong>Planetarium</strong> GmbH, Mammendorf
Pressing < and > buttons, the absolute position will be again displayed and the focuser drawtube<br />
will move back and forth within the position range determined by the focuser model.<br />
Pressing MENU button, the dedicated Hand Controller will lead to the SETUP mode.<br />
Keeping MENU button pressed for 2 seconds, the dedicated Hand<br />
Controller will display the POWER message for a short time while saving<br />
all the parameters, then it will power off the device.<br />
Page 12<br />
Copyright 2012 BAADER <strong>Planetarium</strong> GmbH, Mammendorf
5.<strong>SteelDrive</strong> Software and Drivers<br />
Supplied Drivers<br />
The CDRom supplied with <strong>SteelDrive</strong> includes all the required files for a complete PC control.<br />
Files included in the CDRom:<br />
• EXAR Driver (Focuser driver)…………………………………………………....ver. 1.8.0<br />
• ASCOM Platform (ASCOM platform)……………………….…………………..ver. 6 SP1<br />
• ASCOM <strong>SteelDrive</strong> Focuser Driver (ASCOM driver)………….……………...ver. 1.0.6.1<br />
• STEELGO Controlling Software (dedicated software)……………..………..ver. 1.1.15<br />
• <strong>Instruction</strong> manual…………………………………………………………….……ver. 11/2012<br />
6.Installing the Software and Drivers<br />
Earlier versions of ASCOM Platform 6 may not work correctly; the latest version is 6 SP1 and is<br />
required for a correct control of the <strong>SteelDrive</strong> through the PC.<br />
Drivers should be installed into the PC according to the below listed sequence.<br />
1. Install EXAR Driver<br />
2. Install ASCOM Platform V6 with SP1<br />
3. Install ASCOM <strong>SteelDrive</strong> Driver<br />
4. Install SteelGo Controlling Software<br />
6.1 Install EXAR Driver<br />
1. Plug the <strong>SteelDrive</strong> to the PC through the USB cable supplied following the correct<br />
connection sequence described in section 3 of this manual.<br />
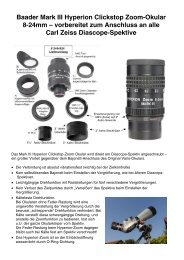
2. When the ‘New Hardware’ wizard will pop up, follow instructions step by step as pictured<br />
on the next page:<br />
Page 13<br />
Copyright 2012 BAADER <strong>Planetarium</strong> GmbH, Mammendorf
3. Click NO, NOT THIS TIME and click NEXT<br />
Page 14<br />
Copyright 2012 BAADER <strong>Planetarium</strong> GmbH, Mammendorf
4. Select INSTALL FROM A LIST OR SPECIFIC LOCATION and click NEXT<br />
5. Select INCLUDE THIS LOCATION IN THE SEARCH<br />
6. Press BROWSE to locate the :\STEELDRIVE\EXAR\Win32 or Win64<br />
directory according by your 32 bit or 64 bit Windows system. Once this directory is selected press<br />
NEXT and follow instructions prompted on the screen.<br />
Page 15<br />
Copyright 2012 BAADER <strong>Planetarium</strong> GmbH, Mammendorf
7. When the driver has been successfully installed, click FINISH and the <strong>SteelDrive</strong> will be<br />
ready to be used and controlled by the PC through the ASCOM driver.<br />
6.2 Install ASCOM Platform V6 with SP1<br />
1. Double click above ASCOM Platform 6SP1 setup file and follow instructions displayed on<br />
the screen to install the ASCOM Platform v. 6. If this platform is already installed into the PC,<br />
there is no need to remove it to install this version unless you are coming from an earlier version<br />
which is below the requirements.<br />
Install ASCOM <strong>SteelDrive</strong> Driver<br />
1. Double click <strong>Baader</strong> <strong>SteelDrive</strong> Focuser setup file to install the dedicated ASCOM driver<br />
and STEELGO Software which will let the <strong>SteelDrive</strong> PC control by all the ASCOM compliant<br />
software in the market.<br />
2. Click NEXT to get started with installation, then follow the on-screen instructions.<br />
3. When the driver has been successfully installed, the <strong>Baader</strong> <strong>SteelDrive</strong> Focuser option<br />
will be listed among other ASCOM devices installed in the PC as pictured here.<br />
4. Select <strong>Baader</strong> <strong>SteelDrive</strong> Focuser option and click above Properties to set correct model.<br />
5. Select the Virtual COM Port as seen in the Device Manager, then the pre-set Focuser<br />
model will be automatically loaded together with pre-set T Coefficent.<br />
Page 16<br />
Copyright 2012 BAADER <strong>Planetarium</strong> GmbH, Mammendorf
Please note, the latter two Position Control parameters are called back from the <strong>SteelDrive</strong><br />
device, so there is no need to manually set them.<br />
Nonetheless, both the Model and T Coefficent can be adjusted in any time and these will<br />
be then stored into the <strong>SteelDrive</strong> device for future re-use ith bot the PC and with the<br />
deciated Hand Controller.<br />
6. The SteelGo Software will be then installed and accessible from the Windows Start Menu.<br />
Install <strong>Baader</strong> SteelGo Controlling Software<br />
1. Double click <strong>Baader</strong> SteelGo setup file to install the STEELGO Controlling Software which<br />
allows full control and calibration of the <strong>SteelDrive</strong>.<br />
2. Click Next to continue the setup.<br />
Page 17<br />
Copyright 2012 BAADER <strong>Planetarium</strong> GmbH, Mammendorf
3. Select the destination where SteelGo should be installed and click Next.<br />
4. SteelGo is ready to be installed, click Install to proceed and complete the installation.<br />
5. Click Finish to close the installer.<br />
Page 18<br />
Copyright 2012 BAADER <strong>Planetarium</strong> GmbH, Mammendorf
7.Using SteelGo Controlling Software<br />
Requirements<br />
The SteelGo Controlling software allows the <strong>SteelDrive</strong> Focuser control through the PC. The<br />
SteelGo Controlling software requires only the EXAR driver to be installed and does not rely on<br />
ASCOM.<br />
Updating SteelGo<br />
SteelGo software is installed when you install the ASCOM <strong>SteelDrive</strong> driver. However, the<br />
program doesn’t require any installation as it is a standalone executable. To update the software<br />
just decompress the latest zipped EXE file and replace the older EXE version saved in Windows<br />
Start Menu.<br />
Future software releases and further documentation is available for free download here:<br />
http://www.baader-planetarium.de/updates/steelgo.htm<br />
Controlling the <strong>SteelDrive</strong> with SteelGo<br />
SteelGo allows complete control of up to three <strong>SteelDrive</strong>s. With SteelGo you can:<br />
1. Move the focuser inwards and outwards.<br />
2. Move the focuser to an absolute position<br />
3. Move the focuser using defined incremental steps<br />
4. Sync the focuser Vernier scale with the software<br />
5. Enable and disable temperature compensation<br />
6. Set the temperature compensation coefficient<br />
7. Set parameters for custom focuser<br />
Page 19<br />
Copyright 2012 BAADER <strong>Planetarium</strong> GmbH, Mammendorf
UP<br />
The focuser is moved outward.<br />
DOWN<br />
The focuser is moved inward.<br />
POSITION<br />
The position value In mm unit) is displayed real-time updated every two seconds.<br />
TEMPERATURE<br />
The temperature value is displayed real-time.<br />
STEP – The position value (in step unit) is displayed real-time.<br />
Page 20<br />
Copyright 2012 BAADER <strong>Planetarium</strong> GmbH, Mammendorf
POINTING FUNCTIONS<br />
SYNC ABSOLUTE [STEP] – Sync the step to be the value you define.<br />
GOTO ABSOLUTE [STEP] – The focuser is moved to the position defined (in step unit). Sign +<br />
means a positive increment (outward). Sign – means a negative increment (inward)<br />
GOTO INCREMENTAL [STEP] – The focuser is moved with the increment defined (in step unit).<br />
Sign + means a positive increment (outward). Sign – means a negative increment (inward)<br />
SYNC ABSOLUTE [MM] – Syncs the <strong>SteelDrive</strong> position in mm<br />
GOTO ABSOLUTE [MM] - The focuser is moved to the position defined (mm unit)<br />
GOTO INCREMENTAL [MM] – The focuser is moved with the increment defined (mm unit)<br />
SETTINGS<br />
T COMPENSATION<br />
START – The self-learning T COEFF function will start by saving the present temperature.<br />
CALCULATE - When the temperature will be significantly changed during the night (0.5°C or<br />
more), the STEELGO will suggest the T COEFF by pressing this button.<br />
WRITE T COEFF – This button will save the T COEFF into the <strong>SteelDrive</strong> device for future re-use.<br />
ENABLE T COMPENSATION – The T compensation can be enabled or disabled.<br />
NUMBER OF T SAMPLES – The SteelGo will take this amount of samples to be averaged for a<br />
smooth (128 samples) or rough (16 samples) T compensation.<br />
Important Note: Once the temp compensation is enabled the focuser can continue to compensate<br />
even when disconnected from the software providing the <strong>SteelDrive</strong> remains powered via USB.<br />
CUSTOM FOCUSER<br />
START – The self-learning Position Calibration will move the focuser outward till a 25mm trip is<br />
reached.<br />
CALCULATE – When the motor has stopped, the absolute 25.00 mm position will be displayed.<br />
Adjust this value by typing the effective trip measured.<br />
TYPE MAX TRIP [MM] – Type the effective trip measured into the <strong>SteelDrive</strong> device.<br />
CALCULATED GEAR RATIO – This is the gear ratio of the focuser calculated by SteelGo.<br />
Page 21<br />
Copyright 2012 BAADER <strong>Planetarium</strong> GmbH, Mammendorf
OTHER FUNCTIONS<br />
SELECT FOCUSER MODEL – Set the proper model of the SteelTrack focuser.<br />
SLEW RATE – Adjust the max speed with GoTo and manual movement with UP and DOWN<br />
buttons.<br />
ACCELERATION RAMP – Adjust the speed profile when the <strong>SteelDrive</strong> is speeding up.<br />
WRITE – Push this button to send any new value with T COMPENSATION, SLEW RATE and<br />
ACCELERATION RAMP to the <strong>SteelDrive</strong> device.<br />
VIRTUAL COM PORT – Select the COM Port where the <strong>SteelDrive</strong> is plugged in.<br />
Important Note: ALL THE CHANGES WILL ONLY TAKE EFFECT WHEN WRITE BUTTON IS<br />
PRESSED<br />
Page 22<br />
Copyright 2012 BAADER <strong>Planetarium</strong> GmbH, Mammendorf
8.Troubleshooting<br />
Important Note: The correct connection sequence should always be used when connecting to the<br />
<strong>SteelDrive</strong>. See section 3 of this manual for connection sequences.<br />
Problem Resolution<br />
Temperature is not being<br />
detected by SteelGo or<br />
ASCOM<br />
<strong>SteelDrive</strong> loses connection<br />
and is not controllable. A<br />
reboot is sometimes required<br />
to clear the problem.<br />
An error is present on the<br />
<strong>SteelDrive</strong> device.<br />
The <strong>SteelDrive</strong> moved too<br />
far/or less.<br />
The <strong>SteelDrive</strong> moved 1mm<br />
too far.<br />
The <strong>SteelDrive</strong> Vernier scale<br />
does not match what the<br />
software reports as the<br />
Focuser position.<br />
There are two retaining screws keeping the circuit board in<br />
place. In rare circumstances it is possible for the circuit board to<br />
move inside the <strong>SteelDrive</strong> housing. A symptom of this is play<br />
in the circuit board positioning which may affect obtaining a<br />
good connection for the thermo probe, dedicated hand controller<br />
or USB. To correct this carefully push the circuit board up<br />
against the inside of the <strong>SteelDrive</strong> on the side where the<br />
connection sockets are located and tighten the two screws until<br />
no more play is present. This ensures that the sockets on the<br />
circuit board protrude far enough through the casing so that a<br />
good connections can be made with the cable plugs.<br />
If this does not resolve the problem then contact your supplier.<br />
This is typically due to insufficient power reaching the<br />
<strong>SteelDrive</strong>.<br />
1. Try to ensure your USB connections have sufficient<br />
power by using powered USB hubs.<br />
2. Use good quality USB cables.<br />
3. Avoid using Active USB cables as these take up power to<br />
boost signal which leaves insufficient power for the<br />
<strong>SteelDrive</strong>. Active USB cables are OK when used in<br />
conjunction with a powered hub and power requirements<br />
of all connected devices are considered.<br />
This is commonly caused by incorrect parameters saved in the<br />
<strong>SteelDrive</strong>.<br />
To resolve use SteelGo and ensure that the correct SteelTrack<br />
focuser is selected. Press the Write button to save the values.<br />
On some SteelTracks the vernier scales does not match what is<br />
reported in ASCOM or SteelGo. The Vernier scale actually<br />
starts 1mm up the focuser. This is usually not an issue as the<br />
scale is only used for manual focussing. When using the<br />
dedicated Hand Controller or SteelGo/ASCOM application those<br />
readings would be used instead.<br />
You can sync the Vernier position to the <strong>SteelDrive</strong> by using the<br />
SteelGo software Sync Absolute (mm) function. See section 7<br />
of this manual on how to use SteelGo to sync the position as<br />
reported by the Vernier scale.<br />
The rubber belt jumps on the Incorrect tension is applied to the <strong>SteelDrive</strong> belt. See section 2<br />
Page 23<br />
Copyright 2012 BAADER <strong>Planetarium</strong> GmbH, Mammendorf
<strong>SteelDrive</strong> Focuser /<br />
SteelTrack<br />
The <strong>SteelDrive</strong> does not move<br />
at a constant speed.<br />
There is backlash in the<br />
<strong>SteelDrive</strong> or connection to the<br />
SteelTrack.<br />
The SteelTrack cannot be<br />
manually focused by hand.<br />
of this manual to correctly adjust the tension of the <strong>SteelDrive</strong><br />
belt.<br />
The <strong>SteelDrive</strong> Pulley/Belt is not correctly aligned with the<br />
SteelTrack Focuser which can cause the speed to fluctuate as<br />
the tension varies. See section 2 of this manual to correctly<br />
adjust the Pulley and Belt alignment with the SteelTrack<br />
Focuser.<br />
Focus backlash is excess play in the focus mechanism. This<br />
should be resolved where possible on the focuser, or dealt with<br />
by using focus backlash compensation which is available in<br />
popular imaging control software.<br />
Backlash is not caused by the <strong>SteelDrive</strong> as all the teeth<br />
between the focuser unit and <strong>SteelDrive</strong> are always keeping in<br />
touch with each other through the rubber belt, unless the belt is<br />
incorrectly tensioned, then it will jump.<br />
Focus slip can also occur on the SteelTrack focuser if this is not<br />
adjusted properly, more commonly when a heavy load is<br />
attached to the focuser. If slippage does occur it is recommend<br />
to adjust the SteelTrack focuser to apply more pressure to the<br />
pinion, adjusted correctly no slippage will occur.<br />
The rubber belt tension is too high. Adjust the tension of the<br />
rubber belt so that the Focuser is free to move by hand. See<br />
section 2 of this manual for instructions on how to correctly<br />
adjust belt tension.<br />
Page 24<br />
Copyright 2012 BAADER <strong>Planetarium</strong> GmbH, Mammendorf
9.Technical Specifications<br />
STEELDRIVE<br />
Focuser supported SteelTrack NT2”, SC2”, RT2”, RT3”, CUSTOM<br />
Power Supply USB port or Jack 3.5mm stereo, 6-14V DC<br />
Maximum current absorption 900 mA<br />
Minimum Drawtube Feed 2.3 microns<br />
Maximum Drawtube Speed 1 mm/sec<br />
MOTOR<br />
Size and Model Nema 14 - 1.8° Stepping motor<br />
Bipolar Torque 9.9 Ncm<br />
Voltage and Current 4.2V – 700 mA<br />
Resistance and Inductance 6.0 Ohm – 7.5 mH<br />
Housing material Aluminum CNC machined<br />
Color Black, hard coating with silky gloss finishing<br />
Total Weight 225g<br />
Dimensions (HxLxW) 78x58x30mm<br />
Material Aluminum CNC machined<br />
PULLEY<br />
Material Aluminum CNC machined<br />
Color Black anodized<br />
Dimensions (DxL) 24x26mm<br />
Number of teeth 18<br />
TRANSMISSION BELT<br />
Material Neoprene, Fiberglass reinforced<br />
Dimension wide: 6mm, length: 168mm, pitch: 3mm (HTD)<br />
CONTROL BOX<br />
Housing ABS, black colour<br />
Keypad Membrane, 3 red backlit pushbuttons<br />
Display 2x8 characters, red backlit<br />
Power Supply Jack 3.5mm stereo, 6-14V DC<br />
Maximum current absorption 900 mA<br />
Weight 110g<br />
Dimensions (LxWxH) 105x72x25mm<br />
©2012 <strong>Baader</strong> <strong>Planetarium</strong> | All Rights reserved | Products or instructions may change without notice or obligation.<br />
Reproduction, complete or in parts, only with written permission by<br />
Page 25<br />
Copyright 2012 BAADER <strong>Planetarium</strong> GmbH, Mammendorf