INSTRUCTIVO DE INSTALACION installation manual - Helvex
INSTRUCTIVO DE INSTALACION installation manual - Helvex
INSTRUCTIVO DE INSTALACION installation manual - Helvex

Create successful ePaper yourself
Turn your PDF publications into a flip-book with our unique Google optimized e-Paper software.
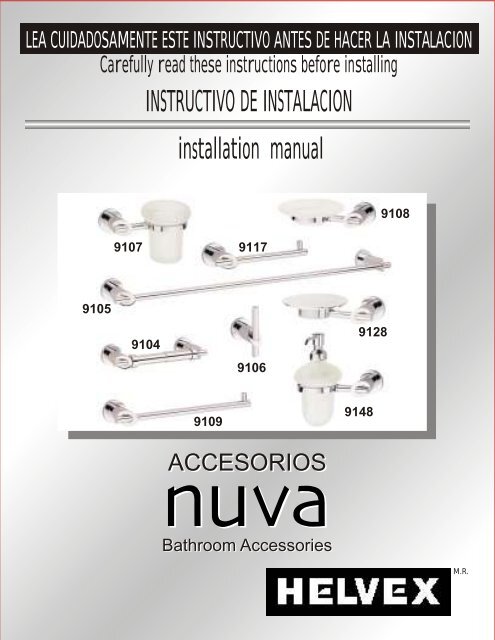
LEA CUIDADOSAMENTE ESTE <strong>INSTRUCTIVO</strong> ANTES <strong>DE</strong> HACER LA <strong>INSTALACION</strong><br />
Carefully read these instructions before installing<br />
<strong>INSTRUCTIVO</strong> <strong>DE</strong> <strong>INSTALACION</strong><br />
9105<br />
<strong>installation</strong> <strong>manual</strong><br />
9107 9117<br />
9104<br />
9109<br />
9106<br />
ACCESORIOS<br />
Bathroom Bathroom Accessories<br />
Accessories<br />
9128<br />
9148<br />
9108<br />
M.R.
Herramienta requerida / Tools required<br />
Taladro y broca de 1/4<br />
Drill with a 1/4 drill<br />
Requerimientos de instalación<br />
Installation requirements<br />
Desarmador<br />
Screwdriver<br />
Llave allen (incluida)<br />
Allen key (included)<br />
Alturas recomendadas para Accesorios de baño<br />
MO<strong>DE</strong>LO <strong>DE</strong>SCRI PCION ALTURA (cm)<br />
9104 Portapapel tradicional 50<br />
9117 Portapapel sencillo 50<br />
9105 Toallero de barra 120<br />
9106 Gancho sencillo 165<br />
9107 Portacepillero de cristal 105<br />
9108 Jabonera sencilla de cristal 105<br />
9128 Jabonera sencilla metalica 105<br />
9148 Jabonera de cristal con dos ificador 105<br />
9109 Toallero sencillo 120<br />
Recomended heights for bathroom’s accesories<br />
MO<strong>DE</strong>L <strong>DE</strong>SCRIPTION HEIGH (in)<br />
9104 Toilet paper holder 19.68<br />
9117 Single toilet paper holder 19.68<br />
9105 Towel bar 47.24<br />
9106 Single robe hook 64.97<br />
9107 Crystal tooth brush holder 41.33<br />
9108 Single crystal soap holder 41.33<br />
9128 Single soap dish 41.33<br />
9148 Crystal liquid soap dispenser 41.33<br />
9109 Single towel 47.24<br />
Accesorios Nuva / Nuva Bathroom Accessories
Instalación / Installation<br />
Accesorios con un solo soporte: Modelos 9106, 9107,<br />
9108, 9109, 9117, 9128 y 9148.<br />
Accessories with a single mounting post: Models 9106<br />
9107,9108,9109,9117,9128 and 9148.<br />
Opresor<br />
Set screw<br />
Ancla<br />
Wall bracket<br />
Opresor<br />
Set screw<br />
26.7 mm<br />
(1.05 in)<br />
Barreno<br />
Drill hole<br />
Wall<br />
Bracket<br />
Pared<br />
Wall<br />
Ancla<br />
Wall bracket<br />
Taquete<br />
Shield<br />
Base<br />
Base<br />
Pija<br />
Lag<br />
Retire el ancla del accesorio.<br />
Take the wall bracket apart from the accessory.<br />
Una vez verificado el lugar donde colocará su<br />
accesorio, presente el ancla como se<br />
muestra en la figura. Marque y perfore.<br />
Once you have marked the place to install your<br />
product set the wall bracket as shown in the<br />
drawing. Should there be a tile type wall finishing,<br />
try to align the holes on the wall bracket to the<br />
union of the tiles.<br />
NOTA: Es importante que la orientación de<br />
los barrenos sea horizontalmente.<br />
NOTE: Make sure that the drill holes align<br />
horizontally.<br />
Inserte los taquetes y coloque el ancla,<br />
procurando que el barreno del ancla quede<br />
hacia abajo como se muestra en la figura.<br />
Fijela firmemente con las pijas.<br />
Insert the shields and place the wall bracket,<br />
making sure that the drill hole on the side faces<br />
downward. Fix in place with the lags.<br />
Una vez instalada el ancla, coloque el<br />
accesorio haciendo coincidir el barreno del<br />
ancla con el barreno roscado de la base del<br />
accesorio. Apriete firmemente con el opresor.<br />
Once the wall bracket is set, place the accessory on<br />
it, making sure that the side holes on the<br />
accessory’s base and on the wall bracket match.<br />
Fix the accessory to the base using the set-screw.<br />
Accesorios Nuva / Nuva Bathroom Accessories
Portavaso<br />
Tumbler<br />
Soporte<br />
Post assembly<br />
Jabonera<br />
Soap holder<br />
Sello<br />
Seal<br />
Sello<br />
Seal<br />
Colocación del portacepillero de cristal (9107)<br />
Setting the crystal tooth brush holder (9107)<br />
Sello<br />
Seal<br />
Ya instalado el soporte, inserte el<br />
portacepillero por la parte superior,<br />
asegurándose que el sello de fijación quede<br />
entre el tope del portacepillero y el soporte.<br />
Once the post assembly is installed, insert the<br />
tumbler from the top, making sure that the<br />
fixing gasket is between the tumbler and the<br />
holding ring of the support. This way the tooth<br />
brush holder will be secure.<br />
Colocación de jabonera de cristal (9108)<br />
Setting the crystal soap holder<br />
Soporte<br />
Post<br />
Ya instalado el soporte, inserte la jabonera<br />
por la parte superior, asegurándose que el<br />
sello de fijación quede entre el tope de la<br />
jabonera y el soporte. Esto asegurará la<br />
jabonera.<br />
Once the post assembly is installed, insert the<br />
soap holder from the top, making sure that the<br />
fixing gasket is between the soap holder and<br />
the holding ring of the support. This way the<br />
plate will be secure.<br />
Colocación de la jabonera con dispensador (9148)<br />
Setting the crystal liquid soap dispenser<br />
Soporte<br />
Post assembly<br />
Jabonera<br />
Dispenser<br />
Ya instalado el soporte, inserte la jabonera<br />
líquida por la parte superior, asegurándose<br />
que el sello de fijación quede entre el tope de<br />
la jabonera y el soporte. Esto asegurará la<br />
jabonera.<br />
Once the post assembly is installed, insert<br />
the liquid soap dispenser from the top,<br />
making sure that the fixing gasket is between<br />
the liquid soap dispenser and the holding ring<br />
of the support. This way the dispenser will be<br />
secure.<br />
Accesorios Nuva / Nuva Bathroom Accessories
Taquete<br />
Shield<br />
Barreno<br />
Drill hole<br />
Accesorios con doble soporte: Modelos 9104 y 9105.<br />
Accessories with two mounting posts.<br />
Ancla<br />
Wall bracket<br />
26.7 mm<br />
(1.05 in)<br />
160 mm<br />
(6.29 in)<br />
Pija<br />
Lag<br />
Portapapel tradicional (9104)<br />
Traditional paper holder (9104)<br />
Opresor<br />
Set screw<br />
Ancla<br />
Wall bracket<br />
Ancla<br />
Wall bracket<br />
Retire las anclas de los soportes.<br />
Take the wall brackets apart from the mounting<br />
posts.<br />
Una vez verificado el lugar donde colocará su<br />
accesorio, presente las anclas como se<br />
muestra en la figura. Marque y perfore.<br />
Place the wall brackets on the wall 1.05 inches<br />
apart from each other´s centers, mark the holes<br />
and drill.<br />
NOTA: Es importante que la orientación de<br />
los barrenos sea horizontalmente.<br />
NOTE: Make sure that the drill holes on both<br />
posts align horizontally.<br />
Inserte los taquetes y coloque las anclas,<br />
procurando que el barreno de cada ancla<br />
quede hacia abajo como se muestra en la<br />
figura. Fijelas firmemente con las pijas<br />
Insert the shields and place the wall brackets,<br />
making sure that the drill holes on the wall<br />
brackets sides face downward. Fix in place with<br />
the lags.<br />
Accesorios Nuva / Nuva Bathroom Accessories
Opresor<br />
Set screw<br />
Soporte<br />
Post<br />
Ancla<br />
Wall bracket<br />
Ancla Soporte<br />
Wall bracket Post<br />
Base<br />
Base<br />
Tubo retractil<br />
Tube<br />
Opresor<br />
Set screw<br />
Coloque los soportes haciendo coincidir el<br />
barreno del ancla con el barreno roscado de<br />
la base del soporte. Apriete firmemente con<br />
el opresor.<br />
Place the mounting posts making sure that the<br />
drill holes on the base and the wall bracket<br />
match. Tighten with the set-screw.<br />
Coloque el tubo retráctil del portapapel,<br />
introduciendo primero un lado y luego<br />
presionando al tiempo que se coloca en el<br />
otro soporte.<br />
Place the paper tube by inserting and pressing<br />
one side into the post’s bases then inserting the<br />
other side.<br />
Toallero de barra (9105)<br />
Towel bar 9105<br />
Retire las anclas de los soportes.<br />
Take the wall brackets apart from the posts.<br />
Accesorios Nuva / Nuva Bathroom Accessories
26.7 mm<br />
1.05 in<br />
Barreno<br />
Drill hole<br />
Base<br />
Base<br />
651 mm<br />
25.63 in<br />
Taquete<br />
Shield<br />
Opresor<br />
Set screw<br />
Ancla<br />
Wall bracket<br />
Pija<br />
Lag<br />
Ancla<br />
Wall bracket<br />
Ancla<br />
Wall bracket<br />
Una vez, verificado el lugar donde colocará<br />
su accesorio, presente las anclas como se<br />
muestra en la figura. Marque y perfore.<br />
Place the wall brackets at desired height and<br />
25.63 inches apart from each other´s center.<br />
Mark the holes and drill them.<br />
Inserte los taquetes y coloque las anclas,<br />
procurando que el barreno de cada ancla<br />
quede hacia abajo, como se muestra en la<br />
figura. Fijelas firmemente con las pijas.<br />
Insert the shields and place the wall brackets,<br />
making sure that the drill holes on the posts’<br />
sides face downward. Fix in place with the lags.<br />
NOTA: Es importante que la orientación de<br />
los barrenos sea horizontalmente.<br />
NOTE: Make sure that the drill holes on both<br />
posts align horizontally.<br />
Coloque el toallero haciendo coincidir el<br />
barreno de cada ancla con el barreno<br />
roscado de la base de los soportes. Apriete<br />
firmemente con el opresor.<br />
Place the towel bar assembly onto the wall<br />
brackets making sure that bases’ drill holes face<br />
downward matching the drill holes in the wall<br />
brackets. Tighten in place with the set-screws.<br />
Accesorios Nuva / Nuva Bathroom Accessories
Limpieza / Cleaning<br />
Es muy importante seguir las siguientes instrucciones para conservar los<br />
acabados de los productos HELVEX, con brillo y en perfecto estado:<br />
1. Utilice únicamente agua y un paño limpio.<br />
2. No utilizar fibras, polvos abrasivos ni productos quimicos.<br />
3. No utilice objetos punzo-cortantes para limpiar los acabados.<br />
It is very important to follow the next instructions to keep <strong>Helvex</strong> products’<br />
finishes shining and in perfect condition:<br />
1. Only use a clean cloth and tap water for cleaning.<br />
2. Don´t use any kind of abrasive products or fibers.<br />
3. Don’t use any sharp or pointed object to clean the finished surfaces.<br />
Refacciones / Spare parts<br />
Contamos con una línea completa de refacciones originales que le asegurarán<br />
vigencia y óptimo funcionamiento a su producto<br />
durante mucho tiempo.<br />
We have a large line of original spare parts that will assure an optimum<br />
performance in your product for<br />
a very long time.<br />
1-03-0657- B<br />
HELVEX, S.A. <strong>DE</strong> C.V.<br />
Calz. Coltongo 293<br />
Col. Industrial Vallejo<br />
02300 México, D.F.<br />
(55) 53 33 94 00<br />
H<br />
M<br />
E<br />
C<br />
E<br />
H<br />
X<br />
O<br />
I<br />
C<br />
E<br />
N<br />
O