Produkt- information Set-Compact-Video SET CV 850-1 bis ... - Siedle
Produkt- information Set-Compact-Video SET CV 850-1 bis ... - Siedle
Produkt- information Set-Compact-Video SET CV 850-1 bis ... - Siedle

Create successful ePaper yourself
Turn your PDF publications into a flip-book with our unique Google optimized e-Paper software.
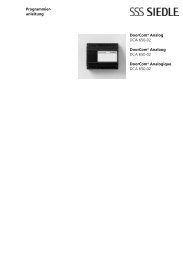
<strong>Produkt</strong><strong>information</strong><br />
1<br />
<strong>Set</strong>-<strong>Compact</strong>-<strong>Video</strong><br />
<strong>SET</strong> <strong>CV</strong> <strong>850</strong>-1 <strong>bis</strong> -2<br />
<strong>SET</strong> <strong>CV</strong> <strong>850</strong>-11 <strong>bis</strong> -12<br />
<strong>SET</strong> <strong>CV</strong>F <strong>850</strong>-1 <strong>bis</strong> -2<br />
<strong>SET</strong> <strong>CV</strong>F <strong>850</strong>-11 <strong>bis</strong> -12<br />
<strong>SET</strong> compact video<br />
<strong>SET</strong> <strong>CV</strong> <strong>850</strong>-1 to -2<br />
<strong>SET</strong> <strong>CV</strong> <strong>850</strong>-11 to -12<br />
<strong>SET</strong> <strong>CV</strong>F <strong>850</strong>-1 to -2<br />
<strong>SET</strong> <strong>CV</strong>F <strong>850</strong>-11 to -12<br />
<strong>Set</strong>-<strong>Compact</strong>-Vidéo<br />
<strong>SET</strong> <strong>CV</strong> <strong>850</strong>-1 à -2<br />
<strong>SET</strong> <strong>CV</strong> <strong>850</strong>-11 à -12<br />
<strong>SET</strong> <strong>CV</strong>F <strong>850</strong>-1 à -2<br />
<strong>SET</strong> <strong>CV</strong>F <strong>850</strong>-11 à -12<br />
<strong>Set</strong>-<strong>Compact</strong>-<strong>Video</strong><br />
<strong>SET</strong> <strong>CV</strong> <strong>850</strong>-1 tot -2<br />
<strong>SET</strong> <strong>CV</strong> <strong>850</strong>-11 tot -12<br />
<strong>SET</strong> <strong>CV</strong>F <strong>850</strong>-1 tot -2<br />
<strong>SET</strong> <strong>CV</strong>F <strong>850</strong>-11 tot -12
1<br />
3<br />
4<br />
5<br />
2<br />
52
6<br />
8 9<br />
10<br />
11<br />
7<br />
12
13 14<br />
16<br />
17<br />
15<br />
18
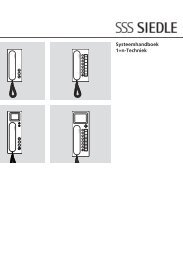
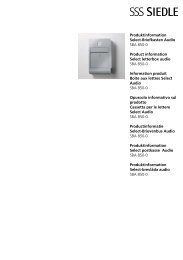
Anschlussplan AS-TVH-1/1 mit <strong>CV</strong> <strong>850</strong>-...
Anschlussplan AS-TVH-1/1 125 V mit <strong>CV</strong> <strong>850</strong>-...
Deutsch<br />
Montage<br />
Inhalt<br />
• Anwendung<br />
• Lieferumfang<br />
• Montage<br />
• Technische Daten<br />
Programmierung plug+play<br />
Programmierung - Manuell<br />
• Türruf programmieren<br />
• Türruf programmieren Bus-<br />
Freisprechtelefon<br />
• Türruf programmieren über<br />
Etagenruftaste<br />
• Internruf programmieren<br />
• Anwahl der Türstation<br />
Anschlussplan<br />
2<br />
Anwendung<br />
Das <strong>Set</strong>-<strong>Compact</strong>-<strong>Video</strong> für 1 oder<br />
2 Wohneinheiten. Beinhaltet die<br />
Türstation für Aufputz-Montage,<br />
Netzgerät für Verteilereinbau (9 TE)<br />
und Bus-Telefone mit Farbmonitor<br />
für Aufputz-Montage. Mit den<br />
Grundfunktionen Rufen, Sprechen,<br />
Sehen und Tür öffnen. Einfache<br />
Inbetriebnahme durch plug+play<br />
Programmierung. Zusätzliche<br />
Funktionen wie Intern Sprechen<br />
oder Anwahl der Türstation sind<br />
programmierbar.<br />
Elektrische Spannung<br />
Einbau, Montage und Servicearbeiten<br />
elektrischer Geräte dürfen<br />
ausschließlich durch eine Elektro-<br />
Fachkraft erfolgen.<br />
Elektrostatische Aufladung<br />
Durch elektrostatische Aufladung<br />
kann bei direktem Kontakt mit<br />
der Leiterplatte das Gerät zerstört<br />
werden. Vermeiden Sie daher ein<br />
direktes Berühren der Leiterplatte.<br />
Folgende Einbausituationen<br />
müssen unbedingt vermieden<br />
werden:<br />
• direktes Gegenlicht<br />
• direkte Sonneneinstrahlung<br />
• Bildhintergrund mit großer<br />
Helligkeit<br />
• stark reflektierende Wände auf<br />
der gegenüberliegenden Seite der<br />
Türstation<br />
• Leuchten bzw. direkte Lichtquellen<br />
Lieferumfang <strong>SET</strong> <strong>CV</strong> <strong>850</strong>-1<br />
• Türstation <strong>CV</strong> <strong>850</strong>-1<br />
• Inbusschlüssel Größe 2,5<br />
• <strong>Video</strong>-<strong>Set</strong>-Netzgerät VSNG <strong>850</strong>-...<br />
• Bus-Telefon BTSV <strong>850</strong>-... oder<br />
BFSV <strong>850</strong>-...<br />
• diese <strong>Produkt</strong><strong>information</strong><br />
Lieferumfang <strong>SET</strong> <strong>CV</strong> <strong>850</strong>-2 wie<br />
oben beschrieben, jedoch<br />
• Türstation <strong>CV</strong> <strong>850</strong>-2<br />
• 2 Bus-Telefone BTSV <strong>850</strong>-... oder<br />
BFSV <strong>850</strong>-...<br />
Lieferumfang <strong>SET</strong> <strong>CV</strong> <strong>850</strong>-11<br />
• Türstation <strong>CV</strong> <strong>850</strong>-1<br />
• Inbusschlüssel Größe 2,5<br />
• <strong>Video</strong>-<strong>Set</strong>-Netzgerät VSNG <strong>850</strong>-1<br />
• Bus-Telefon mit Farbmonitor<br />
BTSV <strong>850</strong>-... oder BFSV <strong>850</strong>-...<br />
• diese <strong>Produkt</strong><strong>information</strong><br />
Lieferumfang <strong>SET</strong> <strong>CV</strong> <strong>850</strong>-12 wie<br />
oben beschrieben, jedoch<br />
• Türstation <strong>CV</strong> <strong>850</strong>-2<br />
• 2 Bus-Telefone mit Farbmonitor<br />
BTSV <strong>850</strong>-... oder BFSV <strong>850</strong>-...<br />
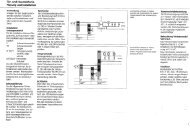
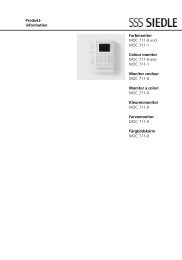
Montage Türstation<br />
1 Gehäusefront abschrauben. Dazu<br />
an der Unterseite des Gehäuse die<br />
Inbusschraube lösen. Gehäusefront<br />
nach vorne aufklappen.<br />
2 Aufputz-Montage der Türstation.<br />
Empfohlene Einbauhöhe ca.<br />
1,50 m/4,9 ft <strong>bis</strong> Gerätemitte.<br />
Bitte beachten: Das Kabel wird im<br />
unteren Bereich der Grundplatte<br />
eingeführt!<br />
3 Das Installationskabel wandnah<br />
abmanteln (ca. 10 mm) und Adern<br />
in die Grundplatte einführen. Die<br />
Grundplatte mit 4 Schrauben befestigen.<br />
Die beiden oberen Öffnungen<br />
mit den Gummistopfen verschliessen.<br />
Installation nach Anschlussplan<br />
vornehmen. Die Adern dürfen nur<br />
im zulässigen Installationsraum<br />
verlegt werden.<br />
4 Der Blickwinkel der Kamera kann<br />
je nach Einbausituation horizontal<br />
und vertikal um ca. 30° vorjustiert<br />
werden. Um die Blickrichtung<br />
der Kamera zu verändern, kann<br />
diese in die gewünschte Richtung<br />
positioniert werden. Um die Blickrichtung<br />
zu verändern, die beiden<br />
Kreuzschlitzschrauben etwas lösen.<br />
Kamera in die gewünschte Richtung<br />
positionieren. Mit den beiden Kreuzschlitzschrauben<br />
anschließend die<br />
gewünschte Position fixieren.<br />
5 Je nach Einbauumgebung kann<br />
es erforderlich sein, die Sprachlaut-
stärke der Türstation zu verändern,<br />
um eine klare Sprachübertragung zu<br />
ermöglichen.<br />
6 Gehäusefront oben auf der Grundplatte<br />
einhängen und schließen. Die<br />
Inbusschraube an der Unterseite des<br />
Gehäuse festdrehen.<br />
Montage Bus-Netzgerät<br />
7 Netzgerät auf Hutschiene montieren<br />
(Verteilung).<br />
8 AP-Montage mit Zubehör ZAP 9-0<br />
möglich. (nicht im Lieferumfang)<br />
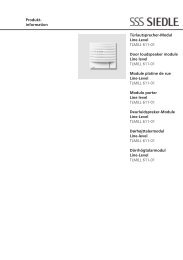
Montage Bus-Telefon<br />
Kabel auf 80 mm abmanteln.<br />
9 Öffnen des Gerätes von der Rückseite;<br />
dazu Rasthebel eindrücken.<br />
10 Empfohlene Einbauhöhe ca.<br />
1,50 m/4,9 ft <strong>bis</strong> Gerätemitte.<br />
11 Bei Montage direkt auf der Wand<br />
die Grundplatte mit 4 Schrauben<br />
befestigen. Einbaulage Oben/Top<br />
beachten.<br />
12 Bei Montage auf Schalterdose<br />
Schraubenöffnungen in der Gerätemitte<br />
verwenden. Einbaulage Oben/<br />
Top beachten.<br />
13 Installation nach Anschlussplan<br />
vornehmen. Die Adern des<br />
Installationskabels müssen innerhalb<br />
des freien Installationsraumes in der<br />
Grundplatte verstaut werden.<br />
14 Farbigen Stecker der Federzugschnur<br />
in die Buchse am Gehäuse<br />
einführen, Stecker muss hörbar<br />
einrasten.<br />
15 Anderes Ende der Federzugschnur<br />
in den Hörer einstecken, <strong>bis</strong><br />
Stecker einrastet. Die Verbindung ist<br />
nicht mehr lösbar.<br />
16 Bei der Plug+Play Programmierung<br />
Gehäuse erst während der<br />
Programmierung schließen. Gehäuse<br />
oben auf der Grundplatte einhängen<br />
und mit leichtem Druck schließen.<br />
Demontage Haustelefon<br />
17 Zum Abnehmen des Gehäuses<br />
mit einem Schlitz-Schraubendreher<br />
die Verriegelung nach oben drücken.<br />
Leiterplatte und Hörer verbleiben am<br />
Gehäuse-Oberteil.<br />
Beschriftung<br />
18 Namensschild von der Außenseite<br />
z. B. mit einem Schlitzschraubendreher<br />
vorsichtig öffnen und Namensschild<br />
entnehmen. Zum Einsetzen<br />
das Namensschild mit leichtem<br />
Druck einrasten.<br />
Installation<br />
Anschluss nach Anschlussplan<br />
AS-TVHa-1/1 vornehmen.<br />
Anschlussplan für 125 V Ausführung.<br />
TÖ = Türöffner<br />
ERT = Etagenruftaste<br />
Li = Licht<br />
Reichweite <strong>Video</strong>-<strong>Set</strong>-Netzgerät zu<br />
Türstation max. 50 m/164 ft, <strong>Video</strong>-<br />
<strong>Set</strong>-Netzgerät zum entferntesten<br />
Bus-Telefon 50 m/164 ft bei 0,8 mm<br />
Leitungsmaterial. Nach erfolgter<br />
Installation muss das <strong>Video</strong>-<strong>Set</strong><br />
programmiert werden.<br />
Klemmenbelegung<br />
TaK/TbK In-Home-Bus: Anschluss<br />
zu <strong>Video</strong>-<strong>Set</strong>-Netzgerät VSNG <strong>850</strong>-...<br />
Technische Daten <strong>CV</strong> <strong>850</strong>-...<br />
• Farbsystem PAL<br />
• Bildaufnehmer CCD-Sensor 1/3”<br />
752 x 582 Bildpunkte (horizontal/<br />
vertikal)<br />
• Objektiv 3,7 mm<br />
• Blickwinkel horizontal ca. 60°,<br />
vertikal ca. 50°<br />
• zusätzlicher mechanischer Verstellbereich<br />
um ca. 30° horizontal und<br />
vertikal<br />
• Auflösung horizontal 450 Linien<br />
• integrierte Infrarotbeleuchtung<br />
• Temperaturbereich<br />
-20°C <strong>bis</strong> + 40°C<br />
• Versorgung über In-Home-Bus:<br />
<strong>Video</strong><br />
• Schutzart Türlautsprecher IP 54<br />
• Abmessungen 82 x 226 x 39 mm<br />
Technische Daten VSNG <strong>850</strong>-0<br />
• Eingangsspannung<br />
230 V AC +/-10%, 50-60 Hz<br />
• Primärsicherung 250 mA (L) 250 V<br />
• Stromaufnahme 200 mA<br />
• Bus-Spannung 27,5 V DC 0,5 A<br />
geregelt +/- 5%, kurzschlussfest an<br />
Klemmen TaK/TbK und TaM/TbM<br />
• 12 V AC, 1 A<br />
• Umgebungstemperatur<br />
0°C <strong>bis</strong> +40°C, Betrieb in einer<br />
Höhenlage zwischen -20 und<br />
2000 m über NN<br />
• max. relative Luftfeuchte 60%<br />
• Schutzart IP 30<br />
• Abmessungen 162 x 89 x 60 mm<br />
Technische Daten VSNG <strong>850</strong>-1<br />
• Eingangsspannung<br />
125 V AC +/-10%, 50-60 Hz<br />
• Primärsicherung 500 mA (L) 250 V<br />
• Stromaufnahme 360 mA<br />
• weitere technische Angaben siehe<br />
oben<br />
Technische Daten<br />
BTSV/BFSV <strong>850</strong>-...<br />
• Versorgung über In-Home-Bus<br />
• Klingellautstärke: max. 83 dB (A)<br />
• Farbmonitor 6,3cm (2,5”)<br />
• Stromaufnahme bei Versorgung<br />
über +M/-M max. 300 mA<br />
• Potentialfreier Kontakt S1/S1 max.<br />
15 V AC, 30V DC, 1A Schaltzeitzeit<br />
0,4 Sek. – 19 Min.<br />
• Abmessungen B x H x T<br />
90 x 261 x 45 mm mit Hörer bzw.<br />
90 x 261 x 27 mm ohne Hörer<br />
3
Programmierung - Plug+Play<br />
Grundlagen<br />
Die Plug+Play Programmierung<br />
bietet die einfachste Möglichkeit,<br />
das <strong>Set</strong>-<strong>Compact</strong>-<strong>Video</strong> ohne<br />
Programmierkenntnisse in Betrieb<br />
zu nehmen. Die gesamte Installation<br />
aller Teilnehmer muss fertig gestellt<br />
sein.<br />
Die Gehäuse der Bus-Telefone<br />
dürfen noch nicht geschlossen<br />
sein. Am <strong>Video</strong>-<strong>Set</strong>-Netzgerät muss<br />
der Plug+Play Modus aktiviert<br />
werden. Die oberste Ruftaste der<br />
Türstation wird immer dem ersten<br />
Bus-Telefon zugeordnet.<br />
Vorgehensweise bei Plug+Play<br />
• Installation der Anlage nach<br />
Anschluss-Plan vornehmen<br />
• Grundplatten der Telefone<br />
anschließen, Gehäuse noch nicht<br />
schließen<br />
• An der Türstation die Zuordnung<br />
der Ruftasten wenn möglich gleich<br />
beschriften.<br />
• <strong>Video</strong>-<strong>Set</strong>-Netzgerät in den<br />
Plug+Play Modus setzen, dazu<br />
die Prog.-Mode Taste 5 Sekunden<br />
gedrückt halten. LED1 muss dauerhaft<br />
leuchten.<br />
• Die Bus-Telefone in der gleichen<br />
Reihenfolge auf die Grundplatten<br />
aufsetzen wie die Ruftasten zugeordnet<br />
sind. (Hörer aufgelegt)<br />
• Der Etagenruf ist nach ca. 7<br />
Sekunden als Quittierung kurzzeitig<br />
zu hören und die LED unter der Taste<br />
Stummschaltung beginnt zu blinken.<br />
Das nächste Bus-Telefon kann<br />
geschlossen werden.<br />
• Nachdem alle Telefone geschlossen<br />
sind, am <strong>Video</strong>-<strong>Set</strong>-Netzgerät<br />
die Taste Prog.-Mode drücken, Programmiermodus<br />
ist ausgeschaltet,<br />
die Anlage ist fertig programmiert.<br />
4<br />
Reset Plug+Play<br />
Bei einem fehlgeschlagenen Programmierversuch<br />
kann die plug+play<br />
Programmierung erneut ausgeführt<br />
werden.<br />
• Versorgungsspannung abschalten.<br />
• Alle Telefone von den Grundplatten<br />
abnehmen.<br />
• Versorgungsspannung wieder<br />
einschalten und abwarten <strong>bis</strong> <strong>Video</strong>-<br />
<strong>Set</strong>-Netzgerät im normalen Betriebsmodus<br />
ist (ca. 1-2 Minuten)<br />
• <strong>Video</strong>-<strong>Set</strong>-Netzgerät in den<br />
plug+play Modus setzen, dazu<br />
Prog.-Mode Taste 5 Sekunden<br />
gedrückt halten.<br />
• Licht-Taste an der Türstation 3<br />
Sekunden gedrückt halten <strong>bis</strong> ein<br />
Quittungston zu hören ist.<br />
• Erneute Plug+Play-Programmierung<br />
kann beginnen.<br />
Belegung der Tasten<br />
<strong>Compact</strong>-<strong>Video</strong><br />
Obere Taste = Bus-Telefon 1<br />
Untere Taste = Bus-Telefon 2
Programmierung - Plug+Play<br />
Vorgehensweise - Beispiel<br />
1 Plug+Play Mode am VSNG <strong>850</strong>-...<br />
aktivieren, Prog.-Mode Taste 5 Sek.<br />
gedrückt halten, LED1 leuchtet auf<br />
Daueranzeige.<br />
4 Plug+Play Mode am VSNG <strong>850</strong>-...<br />
durch kurzes Drücken der Taste<br />
Prog.-Mode ausschalten. LED1 am<br />
VSNG <strong>850</strong>-... blinkt jetzt wieder in<br />
der normalen Betriebsanzeige. Alle<br />
LEDs der Bus-Telefone sind aus, die<br />
Anlage ist betriebsbereit.<br />
2 Bus-Telefon in Wohnung 1 mit aufgelegtem<br />
Hörer aufsetzen, Etagenruf<br />
ist als Quittierung zu hören und<br />
die LED der Taste Stummschaltung<br />
blinkt. Das Bus-Telefon 1 ist der Taste<br />
1 zugeordnet.<br />
3 Bus-Telefon in Wohnung 2 mit<br />
aufgelegtem Hörer aufsetzen,<br />
Etagenruf ist zu hören und die LED<br />
der Taste Stummschaltung blinkt.<br />
Das Bus-Telefon 2 ist der Taste 2<br />
zugeordnet.<br />
5
Programmierung<br />
Übersicht Funktionen<br />
Etagenruf<br />
Die Etagenruftaste (ERT) dient dem<br />
Ruf von einer Wohnungstür in die<br />
Wohnung hinein. Anwendung z. B.<br />
Mehrfamilienhaus 2 Wohnungen mit<br />
einem gemeinsamen Treppenhaus,<br />
vor jeder Wohnungsabschlusstür<br />
sind Etagenruftasten installiert.<br />
Internruf<br />
Bus-Telefone können sich über die<br />
Tasten untereinander anrufen. Mit<br />
dem BTSV/BFSV <strong>850</strong>-... können 4<br />
Teilnehmer gerufen werden, mit dem<br />
BTC/BT<strong>CV</strong> <strong>850</strong>-... können <strong>bis</strong> zu 14<br />
Teilnehmer gerufen werden. Interne<br />
Gespräche sind nur innerhalb eines<br />
Stranges möglich.<br />
Licht-Taste<br />
Die Licht-Taste im Bus-Telefon<br />
schaltet im Auslieferungszustand<br />
den Kontakt im <strong>Video</strong>-<strong>Set</strong>-Netzgerät<br />
für 0,4 Sekunden. Die Funktion der<br />
Licht-Taste kann umprogrammiert<br />
werden, z. B. für Internen Ruf.<br />
Rufabschaltung+Anzeige<br />
Der Türruf, Etagenruf und Internruf<br />
können durch Drücken der Taste<br />
Stummschaltung am BTSV/<br />
BFSV <strong>850</strong>-... abgeschaltet werden.<br />
Zur optischen Anzeige leuchtet die<br />
Taste.<br />
Ruftonkonfiguration<br />
An jedem Bus-Telefon können<br />
für jeden Ruf (Türruf, Internruf,<br />
Etagenruf) verschiedene Ruftöne<br />
ausgewählt werden.<br />
Türanwahl<br />
Die Türstation kann über eine Taste<br />
gezielt angewählt und ein Gespräch<br />
aufgebaut werden.<br />
Türöffner-Taste<br />
Die Türöffnertaste auf den Bus-<br />
Telefonen schaltet immer den<br />
Tö-Kontakt am <strong>Video</strong>-<strong>Set</strong>-Netzgerät<br />
für 3 Sekunden.<br />
Türruf<br />
Wenn ein Besucher die Türklingel<br />
drückt, klingelt das Bus-Telefon und<br />
die Taste Stummschaltung blinkt.<br />
Türstation anwählen<br />
6<br />
Die Türstation kann durch einen<br />
Doppelklick der Licht-Taste angewählt<br />
werden.<br />
Zeit Licht-Kontakt<br />
Die Schaltzeit des Lichtkontaktes am<br />
VSNG <strong>850</strong>-... beträgt im Auslieferungszustand<br />
0,4 Sekunden.<br />
Wichtige Hinweise vor der<br />
Programmierung<br />
Grundsätzlich kann das <strong>SET</strong>-<strong>Compact</strong>-<strong>Video</strong><br />
durch eine Person in<br />
Betrieb genommen und programmiert<br />
werden.<br />
• Installation fertig stellen<br />
• Programmiermodus am<br />
<strong>Video</strong>-<strong>Set</strong>-Netzgerät aktivieren<br />
• Türstation in den Programmiermodus<br />
setzen<br />
• Teilnehmer programmieren<br />
• Programmiermodus beenden<br />
Während das <strong>Video</strong>-<strong>Set</strong>-Netzgerät<br />
im Programmiermodus ist, können<br />
mehrere Schritte nacheinander<br />
programmiert werden. Der Programmiermodus<br />
muss nicht jedesmal<br />
beendet werden.<br />
Bus-Freisprechtelefon<br />
Das Abnehmen und Auflegen<br />
des Hörers entfällt bei dem Bus-<br />
Freisprech-Telefon BFSV <strong>850</strong>-... Das<br />
Gerät schaltet sich durch Drücken<br />
der Licht-Taste in den Programmiermodus.<br />
Wurde der Schritt zur Programmierung<br />
durchgeführt schaltet sich das<br />
Bus-Freisprechtelefon wieder in den<br />
Ruhezustand zurück. Alle anderen<br />
Schritte zur Programmierung sind<br />
identisch.
Programmierung - Manuell<br />
Türruf programmieren<br />
Anwendung<br />
Ruf von der Türstation zu einem<br />
Bus-Telefon.<br />
Am Bus-Telefon kann für den Türruf<br />
wahlweise eine andere Klingeltonmelodie<br />
ausgewählt werden. Die<br />
Lautstärke des Türruf kann am Bus-<br />
Telefon verändert werden.<br />
1 Programmiermodus einschalten.<br />
Am VSNG <strong>850</strong>-... die Taste Prog.-<br />
Mode kurz drücken. Die LED1 blinkt<br />
im 2 Sekunden Rhythmus für die<br />
Anzeige, dass der Programmiermodus<br />
aktiv ist.<br />
4 Licht-Taste für 4 Sekunden<br />
gedrückt halten. Im Hörer ist ein<br />
langgezogener Quittungston zu<br />
hören – die Taste Stummschaltung<br />
blinkt. Es besteht Sprechverbindung<br />
zur Türstation. Das Bus-Telefon ist<br />
jetzt im Programmiermodus. Hörer<br />
nicht auflegen.<br />
2 An der Türstation die Programmier-Taste<br />
4 Sekunden gedrückt<br />
halten. Danach ist ein langgezogener<br />
Quittungston zu hören, der alle<br />
5 Sekunden kurz wiederholt wird,<br />
solange Programmiermodus aktiv ist.<br />
5 An der Türstation die gewünschte<br />
Ruftaste für 4 Sekunden gedrückt<br />
halten, <strong>bis</strong> am Türlautsprecher ein<br />
langgezogener Ton zu hören ist. Die<br />
Ruftaste ist jetzt dem Bus-Telefon<br />
zugeordnet, die Sprechverbindung<br />
besteht nicht mehr.<br />
3 Am Bus-Telefon das programmiert<br />
werden soll, Hörer abnehmen.<br />
6 Am Bus-Telefon Hörer auflegen.<br />
Die Ruftaste ist jetzt dem Bus-<br />
Telefon fest zugewiesen.<br />
7
Programmierung - Manuell<br />
Türruf programmieren<br />
über Etagenruftaste<br />
Anwendung<br />
Ruf von der Türstation zu einem<br />
Bus-Telefon.<br />
Die Programmierung ist nur möglich,<br />
wenn an den Bus-Telefonen die<br />
Etagenruftaste (ERT) angeschlossen<br />
ist. Wenn in eine Wohnung kein<br />
Zutritt besteht, kann auf diese Weise<br />
1 Programmiermodus einschalten.<br />
Am VSNG <strong>850</strong>-... die Taste Prog.-<br />
Mode kurz drücken. Die LED1 blinkt<br />
im 2 Sekunden Rhythmus für die<br />
Anzeige, dass der Programmiermodus<br />
aktiv ist.<br />
4 An der Türstation die gewünschte<br />
Ruftaste für 4 Sekunden gedrückt<br />
halten, <strong>bis</strong> am Türlautsprecher ein<br />
langgezogener Ton zu hören ist. Die<br />
Ruftaste ist jetzt dem Bus-Telefon<br />
zugeordnet, die Sprechverbindung<br />
besteht nicht mehr.<br />
8<br />
trotzdem die Programmierung<br />
durchgeführt werden.<br />
2 An der Türstation die Programmier-Taste<br />
4 Sekunden gedrückt<br />
halten. Danach ist ein langgezogener<br />
Quittungston zu hören, der alle<br />
5 Sekunden kurz wiederholt wird,<br />
solange Programmiermodus aktiv ist.<br />
5 Die Ruftaste ist jetzt dem Bus-<br />
Telefon fest zugewiesen.<br />
Weitere Teilnehmer nach der gleichen<br />
Vorgehensweise programmieren<br />
oder Programmiervorgang<br />
beenden.<br />
3 Die am Bus-Telefon angeschlossene<br />
Etagenruftaste für 4 Sekunden<br />
gedrückt halten. Das Bus-Telefon ist<br />
jetzt im Programmiermodus. Während<br />
dieser Zeit darf innerhalb der<br />
Anlage nicht geklingelt werden!
Programmierung - Manuell<br />
Türruf programmieren<br />
Bus-Freisprechtelefon<br />
Anwendung<br />
Ruf von der Türstation zu einem<br />
Bus-Telefon.<br />
Am Bus-Freisprechtelefon kann für<br />
den Türruf wahlweise eine andere<br />
Klingeltonmelodie ausgewählt werden.<br />
Die Lautstärke des Türruf kann<br />
am Bus-Telefon verändert werden.<br />
1 Programmiermodus einschalten.<br />
Am VSNG <strong>850</strong>-... die Taste Prog.-<br />
Mode kurz drücken. Die LED1 blinkt<br />
im 2 Sekunden Rhythmus für die<br />
Anzeige, dass der Programmiermodus<br />
aktiv ist.<br />
4 An der Türstation die gewünschte<br />
Ruftaste für 4 Sekunden gedrückt<br />
halten, <strong>bis</strong> am Türlautsprecher ein<br />
langgezogener Ton zu hören ist. Die<br />
Ruftaste ist jetzt dem Bus-Telefon<br />
zugeordnet, die Sprechverbindung<br />
besteht nicht mehr.<br />
2 An der Türstation die Programmier-Taste<br />
4 Sekunden gedrückt<br />
halten. Danach ist ein langgezogener<br />
Quittungston zu hören, der alle<br />
5 Sekunden kurz wiederholt wird,<br />
solange Programmiermodus aktiv ist.<br />
5 Die Ruftaste ist jetzt dem Bus-<br />
Freisprechtelefon fest zugewiesen.<br />
Weitere Teilnehmer nach der gleichen<br />
Vorgehensweise programmieren<br />
oder Programmiervorgang<br />
beenden.<br />
3 Licht-Taste für 4 Sekunden<br />
gedrückt halten. Im Lautsprecher ist<br />
ein langgezogener Quittungston zu<br />
hören – die Taste Stummschaltung<br />
blinkt. Es besteht Sprechverbindung<br />
zur Türstation. Das Bus-Freisprechtelefon<br />
ist jetzt im Programmiermodus.<br />
9
Programmierung - Manuell<br />
Internruf programmieren<br />
Anwendung<br />
Ein Bus-Telefon soll ein anderes Bus-<br />
Telefon in der Anlage anrufen und<br />
sprechen können.<br />
Die Tasten Stummschaltung und<br />
Licht der Bus-Telefone können bei<br />
Bedarf für interne Ruffunktion<br />
umprogrammiert werden.<br />
1 Programmiermodus einschalten.<br />
Am VSNG <strong>850</strong>-... die Taste Prog.-<br />
Mode kurz drücken. Die LED1 blinkt<br />
im 2 Sekunden Rhythmus für die<br />
Anzeige, dass der Programmiermodus<br />
aktiv ist.<br />
4 Am zweiten Bus-Telefon das intern<br />
Sprechen soll, Hörer abnehmen, es<br />
ist der Programmiermodus zu hören.<br />
10<br />
2 Am ersten Bus-Telefon das intern<br />
Sprechen soll, Hörer abnehmen, es<br />
ist der Programmiermodus zu hören.<br />
5 Licht-Taste 4 Sekunden gedrückt<br />
halten, Quittungston ist zu hören.<br />
Hörer nicht auflegen.<br />
3 Licht-Taste 4 Sekunden gedrückt<br />
halten, Quittungston ist zu hören.<br />
Hörer nicht auflegen.<br />
6 Beide Bus-Telefone haben jetzt<br />
eine Sprechverbindung untereinander.
7 Am ersten Bus-Telefon die<br />
Internruftaste für 4 Sekunden<br />
gedrückt halten, mit dem das zweite<br />
Bus-Telefon gerufen werden soll.<br />
Langgezogener Ton ist zu hören.<br />
Bus-Telefon ist jetzt programmiert,<br />
Hörer noch nicht auflegen.<br />
10 Programmiermodus am<br />
VSNG <strong>850</strong>-... ausschalten.<br />
8 Am zweiten Bus-Telefon die Internruftaste<br />
für 4 Sekunden drücken, mit<br />
dem das erste Bus-Telefon gerufen<br />
werden soll. Langgezogener Ton ist<br />
zu hören. Die Tasten sind jetzt an<br />
beiden Bus-Telefonen programmiert.<br />
9 An beiden Bus-Telefonen Hörer<br />
auflegen. Weitere Bus-Telefone<br />
nach der gleichen Vorgehensweise<br />
programmieren oder Programmiervorgang<br />
beenden.<br />
11
Programmierung - Manuell<br />
Anwahl der Türstation<br />
Anwendung<br />
Die Türstation soll von einem Bus-<br />
Telefon über Tasten angewählt werden,<br />
z. B. um einen Besucher gezielt<br />
anzusprechen und zu sehen.<br />
1 Programmiermodus einschalten.<br />
Am VSNG <strong>850</strong>-... die Taste Prog.-<br />
Mode kurz drücken. Die LED1 blinkt<br />
im 2 Sekunden Rhythmus für die<br />
Anzeige, dass der Programmiermodus<br />
aktiv ist.<br />
4 Licht-Taste für 4 Sekunden<br />
gedrückt halten. Im Hörer ist ein<br />
langgezogener Signalton zu hören.<br />
Das Bus-Telefon ist jetzt im Programmiermodus.<br />
Hörer nicht auflegen. Es<br />
besteht Sprechverbindung mit Bild<br />
zur Türstation.<br />
12<br />
Bei den Bus-Telefonen BTSV/<br />
BFSV <strong>850</strong>-... kann die Licht- oder<br />
Stummschalte-Taste für diese Funktion<br />
genutzt werden.<br />
2 An der Türstation die Programmier-Taste<br />
4 Sekunden gedrückt<br />
halten. Danach ist ein langgezogener<br />
Quittungston zu hören, der alle<br />
5 Sekunden kurz wiederholt wird,<br />
solange Programmiermodus aktiv ist.<br />
5 Am Bus-Telefon die gewünschte<br />
Taste für 4 Sekunden gedrückt<br />
halten, mit welcher die Türstation<br />
angewählt werden soll. Am Bus-<br />
Telefon Hörer auflegen. Die Taste<br />
ist jetzt der Türstation zugeordnet.<br />
Der Türlautsprecher kann jederzeit<br />
angewählt werden.<br />
3 Am Bus-Telefon das programmiert<br />
werden soll, Hörer abnehmen<br />
6 Hörer auflegen. Weitere Bus-<br />
Telefone programmieren oder<br />
Programmierung beenden.
English<br />
Mounting<br />
Contents<br />
• Application<br />
• Scope of delivery<br />
• Mounting<br />
• Technical data<br />
Programming plug+play<br />
Programming - manual<br />
• Programming door calls<br />
• Programming door calls at the<br />
handsfree bus telephone<br />
• Programming door calls via the<br />
storey call butto<br />
• Programming internal calls<br />
• Dialling the door station<br />
Wiring diagram<br />
14<br />
Application<br />
The compact video set for 1 or 2<br />
residential units. Encompasses the<br />
door station for surface mounting,<br />
line rectifier for distributor<br />
mounting (9 TE) and bus telephones<br />
with colour monitor for surface<br />
mounting. With the basic functions<br />
calling, speech, vision and door<br />
release. Simple commissioning using<br />
plug+play programming. Additional<br />
functions such as internal speech<br />
or dialling the door station can be<br />
programmed.<br />
Electrical voltage<br />
Mounting, installation and servicing<br />
work on electrical devices may only<br />
be performed by a suitably qualified<br />
electrician.<br />
Electrostatic charging<br />
As a result of electrostatic charging,<br />
direct contact with the circuit board<br />
can result in destruction of the<br />
device. Direct contact with the circuit<br />
board must therefore be avoided.<br />
The following installation situations<br />
must be avoided without<br />
fail:<br />
• Direct ajour light<br />
• Direct sunlight<br />
• Extremely bright picture background<br />
• Highly reflective walls on the<br />
opposite side of the door station<br />
• Lamps or direct light sources<br />
Scope of supply <strong>SET</strong> <strong>CV</strong> <strong>850</strong>-1<br />
• Door station <strong>CV</strong> <strong>850</strong>-1<br />
• Allen key size 2.5<br />
• <strong>Video</strong> set line rectifier<br />
VSNG <strong>850</strong>-...<br />
• Bus telephone BTSV <strong>850</strong>-... or<br />
BFSV <strong>850</strong>-...<br />
• This product <strong>information</strong> sheet<br />
Scope of supply <strong>SET</strong> <strong>CV</strong> <strong>850</strong>-2 as<br />
described above, but<br />
• door station <strong>CV</strong> <strong>850</strong>-2<br />
• 2 bus telephones BTSV <strong>850</strong>-... or<br />
BFSV <strong>850</strong>-...<br />
• This product <strong>information</strong> sheet<br />
Scope of supply <strong>SET</strong> <strong>CV</strong> <strong>850</strong>-11<br />
• Door station <strong>CV</strong> <strong>850</strong>-1<br />
• Allen key size 2.5<br />
<strong>Video</strong> set line rectifier<br />
VSNG <strong>850</strong>-1<br />
• Bus telephone with colour monitor<br />
BTSV <strong>850</strong>-... or BFSV <strong>850</strong>-...<br />
• This product <strong>information</strong> sheet<br />
Scope of supply <strong>SET</strong> <strong>CV</strong> <strong>850</strong>-12 as<br />
described above, but<br />
• door station <strong>CV</strong> <strong>850</strong>-2<br />
• 2 bus telephones with colour<br />
monitor BTSV <strong>850</strong>-... or BFSV <strong>850</strong>-...<br />
Door station mounting<br />
1 Unscrew the front of the housing.<br />
To do this, release the Allen key<br />
on the underneath of the housing.<br />
Hinge the front of the housing<br />
forward.<br />
2 Surface mounting the door<br />
station. Recommended mounting<br />
height appr. 1.50 m /4.9 ft. to centre<br />
device. Please note: The cable is<br />
inserted in the lower area of the<br />
base plate!<br />
3 Strip back the installation cable<br />
close to the wall (appr. 10 mm)<br />
and insert the cores into the base<br />
plate. Fasten the base plate using 4<br />
screws. Close the two openings at<br />
the top using rubber stoppers. Install<br />
in accordance with the terminal<br />
diagram.<br />
4 The pick-up angle of the camera<br />
can be mechanically preadjusted on<br />
the vertical and horizontal by appr.<br />
30° depending on the mounting<br />
situation. To change the pick-up<br />
direction of the camera, it can be<br />
positioned in the required direction.<br />
To change the pick-up direction,<br />
loosen the two cross-head screws<br />
slightly. Position the camera in the<br />
required direction. Then fix the<br />
required position using the two<br />
cross-head screws.
5 Depending on the installation<br />
environment, it may be necessary<br />
to change the door station speech<br />
volume in order to permit clear<br />
speech transmission.<br />
6 Hook the front of the housing<br />
onto the base plate at the top and<br />
close. Tighten the Allen key on the<br />
underneath of the housing.<br />
Mounting the bus line rectifier<br />
7 Mount the line rectifier on the top<br />
hat rail (distribution).<br />
8 Surface mounting is possible with<br />
accessory ZAP 9-0. (not included in<br />
scope of supply)<br />
Mounting the bus telephone<br />
Strip back cable to appr. 80 mm.<br />
9 Open the device from the back by<br />
pressing in the locking lever.<br />
10 Recommended mounting height<br />
appr. 1.50 m /4.9 ft. to centre<br />
device.<br />
11 When mounting directly on the<br />
wall, fasten the base plate using<br />
4 screws, paying attention that<br />
the plate is the right way up (top<br />
marking).<br />
12 When mounting on a switch box,<br />
use the screw openings in the centre<br />
of the device, paying attention that<br />
the plate is the right way up (top<br />
marking).<br />
13 Install in accordance with the<br />
wiring diagram. The cores of the<br />
installation cable must be stored<br />
inside the free installation space in<br />
the base plate.<br />
14 Insert the coloured plug of the<br />
spiral cable into the socket at the<br />
housing. A distinct click is audible<br />
when the plug is correctly inserted.<br />
15 Insert the other end of the spiral<br />
cable in the receiver until the plug<br />
clicks audibly into place.<br />
This connection can no longer be<br />
detached.<br />
16 With plug+play programming<br />
do not close the housing until<br />
programming is under way. Hook<br />
the housing into the base plate from<br />
above and close by exerting a slight<br />
pressure.<br />
Removing the in-house telephone<br />
17 To remove the housing, press<br />
the lock upwards using a flat blade<br />
screwdriver. The circuit board and<br />
receiver remain on the upper part of<br />
the housing.<br />
Lettering<br />
18 Open the name plate from the<br />
outside, for example using a flat<br />
bladed screwdriver, and carefully<br />
remove the name plate. To insert<br />
the name plate, lock into place by<br />
exerting light pressure.<br />
Installation<br />
Connect in accordance with the<br />
wiring diagram AS-TVHa-1/1.<br />
Terminal diagram for 125 V version<br />
TÖ = door release<br />
ERT = Storey call button<br />
Li = Light<br />
Range from video set line rectifier to<br />
door station max. 50 m/164 ft, video<br />
set line rectifier to the most distant<br />
bus telephone 50 m/164 ft with<br />
0.8 mm conductor material. Following<br />
completed installation, the<br />
video set must be programmed.<br />
Terminal assignment<br />
TaK/TbK In-Home bus: Terminal<br />
to the video set line rectifier<br />
VSNG <strong>850</strong>-...<br />
Specifications <strong>CV</strong> <strong>850</strong>-...<br />
• Colour system PAL<br />
• Image pick-up CCD-Sensor 1/3”<br />
752 x 582 pixel (horizontal/vertical)<br />
• Lens 3.7 mm<br />
• Pick-up angle horizontal appr. 60°,<br />
vertical appr. 50°<br />
• Additional mechanical adjustment<br />
range by around 30° horizontally<br />
and vertically<br />
• Horizontal resolution 450 lines<br />
• Integrated infrared lighting<br />
• Temperature range<br />
-20°C to + 40°C<br />
• Supply via In-Home bus: <strong>Video</strong><br />
• Door loudspeaker protection<br />
system IP 54<br />
• Dimensions 82 x 226 x 39 mm<br />
Specifications VSNG <strong>850</strong>-0<br />
• Input voltage 230 V AC +/-10%,<br />
50-60 Hz<br />
• Primary fuse 250 mA (L) 250 V<br />
• Current consumption 200 mA<br />
• Bus voltage 27.5 V DC 0.5 A stabilized<br />
+/- 5%, short circuit proof at<br />
terminals TaK/TbK and TaM/TbM<br />
• 12 V AC, 1 A<br />
• Ambient temperature<br />
0°C to +40°C, operation at an<br />
altitude between -20 and 2000 m<br />
above sea level<br />
• Max. relative humidity 60%<br />
• Protection system IP 30<br />
• Dimensions 162 x 89 x 60 mm<br />
Specifications VSNG <strong>850</strong>-1<br />
• Input voltage 125 V AC +/-10%,<br />
50-60 Hz<br />
• Primary fuse 500 mA (L) 250 V<br />
• Current consumption 360 mA<br />
• For other specifications, see above<br />
Specifications<br />
• Supply via in-home bus<br />
• Ring tone volume: max. 83 dB (A)<br />
• Colour monitor 6.3 cm (2.5 „)<br />
• Current consumption on supply via<br />
+M/-M max. 300 mA<br />
• Potential-free contact S1/S1 max.<br />
15 V AC, 30V DC, 1A Switching<br />
time 0.4 secs. - 19 mins.<br />
• Dimensions W x H x D<br />
90 x 261 x 45 mm (BTSV <strong>850</strong>-...)<br />
• Dimensions W x H x D<br />
90 x 261 x 27 mm (BFSV <strong>850</strong>-...)<br />
15
Plug+play programming<br />
Basics<br />
Plug+play programming offers<br />
the simplest opportunity for those<br />
without programming experience to<br />
commission the <strong>SET</strong> compact video.<br />
The entire installation of all users<br />
must have been completed.<br />
The housings of the bus telephones<br />
must not yet have been closed. The<br />
plug+play mode must be activated<br />
at the video set line rectifier. The<br />
top call button of the door station<br />
is always assigned to the first bus<br />
telephone.<br />
Conditions for Plug+Play<br />
• Install the system in accordance<br />
with the wiring diagram<br />
• Connect the base plates of the<br />
telephones, do not yet close the<br />
housings<br />
• At the door station, inscribe the<br />
assignment of call buttons if possible<br />
straight away.<br />
• <strong>Set</strong> the video set line rectifier to<br />
the plug+play mode by holding<br />
down the programming mode<br />
button for 5 seconds. LED1 must<br />
light continuously.<br />
• Mount the bus telephones on the<br />
base plates in the same sequence<br />
as the assignment of call buttons.<br />
(receiver down)<br />
• The storey call is audible briefly<br />
after appr. 7 seconds as acknowledgement<br />
and the LED under the<br />
call silencing button starts to flash.<br />
The next bus telephone can then be<br />
closed.<br />
• After all the telephones have been<br />
closed, at the video set line rectifier<br />
press the programming mode<br />
button. The programming mode is<br />
switched off, the programming of<br />
the system is complete.<br />
16<br />
Reset Plug+Play<br />
In the event of a failed programming<br />
attempt, plug+play programming<br />
can be carried out again.<br />
• Switch off the supply voltage.<br />
• Remove all telephones from the<br />
base plate.<br />
• Switch the supply voltage back<br />
on and wait until the video set line<br />
rectifier is in the normal operating<br />
mode (appr. 1-2 minutes).<br />
• <strong>Set</strong> the video set line rectifier to<br />
the Plug+Play mode by holding<br />
down the programming mode<br />
button for 5 seconds.<br />
• Hold down the light button at the<br />
door station for 5 seconds until an<br />
acknowledgement tone is audible.<br />
• Plug+Play programming can now<br />
begin again.<br />
Button assignment<br />
<strong>Compact</strong> video<br />
Upper button = Bus telephone 1<br />
Lower button = Bus telephone 2
Programming - Plug+Play<br />
Procedure - Example<br />
1 Activate the Plug+Play mode at<br />
the VSNG <strong>850</strong>-..., hold down the<br />
programming mode button for 5<br />
seconds. LED1 lights up permanently.<br />
4 Switch off the Plug+Play mode at<br />
the VSNG <strong>850</strong>-... by briefly pressing<br />
the programming mode key. The<br />
LED1 at the VSNG <strong>850</strong>-... now<br />
flashes again to indicate normal<br />
operation. All LEDs at the bus telephones<br />
are off, the system is ready<br />
for operation.<br />
2 Position the bus telephone in<br />
apartment 1 with the receiver<br />
down. The story call is audible as an<br />
acknowledgement, and the LED of<br />
the muting button flashes. Bus telephone<br />
1 is assigned to button 1.<br />
3 Position the bus telephone in<br />
apartment 2 with the receiver<br />
down. The story call is audible as an<br />
acknowledgement, and the LED of<br />
the muting button flashes. Bus telephone<br />
2 is assigned to button 2.<br />
17
Programming<br />
Overview of functions<br />
Storey call<br />
The storey call button (ERT) is used<br />
to call into the apartment from<br />
an apartment door. Application<br />
e.g. apartment building with 4<br />
apartments and a common staircase.<br />
Storey call buttons are installed in<br />
front of every apartment front door.<br />
Internal call<br />
Bus telephones can place calls to<br />
each other using the buttons. With<br />
the BTSV/BFSV <strong>850</strong>-... it is possible<br />
to call up to 4 users, with the BTC/<br />
BT<strong>CV</strong> <strong>850</strong>-... up to 14 users. Internal<br />
calls are only possible within a line.<br />
Light button<br />
In the as-delivered status, the light<br />
button in the bus telephone switches<br />
the contact in the bus line rectifier<br />
for 0.4 seconds. The function of the<br />
light button can be reprogrammed,<br />
e.g. for internal calls.<br />
Call silencing and display<br />
The door call, storey call and internal<br />
call can be switched off using the<br />
muting button at the BTSV/<br />
BFSV <strong>850</strong>-... The button lights up to<br />
provide an optical display.<br />
Call tone configuration<br />
At each bus telephone, different call<br />
tones can be selected for every call<br />
type (door call, internal call, storey<br />
call).<br />
Door dialling<br />
The door station can be selectively<br />
dialled and a call established.<br />
18<br />
Door release button<br />
The door release button on the bus<br />
telephones always switches the DR<br />
contact at the video set line rectifier<br />
for 3 seconds.<br />
Door call<br />
When a visitor presses the door bell<br />
button, the bus telephone rings and<br />
the call silencing button flashes.<br />
Selecting a door station<br />
The door station can be dialled by a<br />
double click on the light button.<br />
Time light contact<br />
The light contact switching time at<br />
the VSNG <strong>850</strong>-... is 0.4 seconds in<br />
the as-delivered status.<br />
Important remarks prior to<br />
programming<br />
On principle, the compact video <strong>SET</strong><br />
can be commissioned and programmed<br />
by one person.<br />
• Complete the installation<br />
• Activate the programming mode<br />
at the video set line rectifier<br />
• <strong>Set</strong> the door station to the programming<br />
mode<br />
• Program the users<br />
• Quit the programming mode<br />
While the video set line rectifier<br />
is in the programming mode,<br />
several steps can be programmed in<br />
sequence. There is no need to quit<br />
the programming mode after every<br />
operation.<br />
Handsfree bus telephone<br />
Picking up and replacing the receiver<br />
are not required with handsfree<br />
bus telephones BFSV <strong>850</strong>-... The<br />
devices switch to the programming<br />
mode by pressing the light button.<br />
Once the programming step has<br />
been performed, the handsfree bus<br />
telephone switches back to the idle<br />
status. All other programming steps<br />
are identical.
Programming - manual<br />
Programming door calls<br />
Application<br />
Call from the door station to a bus<br />
telephone.<br />
At the bus telephone, a different<br />
ring tone optionally be selected.<br />
The volume of the door call can be<br />
changed at the bus telephone.<br />
1 Switch on the programming mode.<br />
At the VSNG <strong>850</strong>-..., press the programming<br />
mode button briefly. The<br />
LED1 flashes in a 2-second rhythm<br />
to indicate that the programming<br />
mode is active.<br />
4 Hold down the light button for 4<br />
seconds. A protracted acknowledgement<br />
tone sounds in the receiver,<br />
the muting button flashes. A speech<br />
connection exists to the door<br />
station. The bus telephone is now in<br />
the programming mode. Leave the<br />
receiver off the hook.<br />
2 At the door station, hold down the<br />
programming button for 4 seconds.<br />
A protracted acknowledgement tone<br />
is then audible which is repeated<br />
every 5 seconds as long as the<br />
programming mode remains active.<br />
5 At the door station, hold down the<br />
required call button for 4 seconds<br />
until a protracted tone sounds at the<br />
door loudspeaker. The call button is<br />
now assigned to the bus telephone,<br />
no speech connection now exists.<br />
3 Lift the receiver at the bus telephone<br />
which you wish to program.<br />
6 Replace the receiver at the bus<br />
telephone. The call button is now<br />
firmly assigned to the bus telephone.<br />
19
Programming - manual<br />
Programming door calls<br />
via the storey call butto<br />
Application<br />
Call from the door station to a bus<br />
telephone.<br />
Programming is only possible if the<br />
storey call button (ERT) is connected<br />
at the bus telephones.<br />
1 Switch on the programming mode.<br />
At the VSNG <strong>850</strong>-..., press the programming<br />
mode button briefly. The<br />
LED1 flashes in a 2-second rhythm<br />
to indicate that the programming<br />
mode is active.<br />
4 At the door station, hold down the<br />
required call button for 4 seconds<br />
until a protracted tone sounds at the<br />
door loudspeaker. The call button is<br />
now assigned to the bus telephone,<br />
no speech connection now exists.<br />
20<br />
If there is no access available to an<br />
apartment, this allows programming<br />
to still be carried out.<br />
2 At the door station, hold down the<br />
programming button for 4 seconds.<br />
A protracted acknowledgement tone<br />
is then audible which is repeated<br />
every 5 seconds as long as the programming<br />
mode remains active.<br />
5 The call button is now firmly assigned<br />
to the bus telephone.<br />
Program additional users using<br />
the same procedure or quit the<br />
programming mode.<br />
3 Hold down the storey call button<br />
connected to the bus telephone for<br />
4 seconds. The bus telephone is now<br />
in the programming mode. During<br />
this period, no ringing is admissible<br />
within the system.
Programming - manual<br />
Programming door calls<br />
at the handsfree bus telephone<br />
Application<br />
Call from the door station to a bus<br />
telephone.<br />
At the handsfree bus telephone a<br />
different ring tone can optionally<br />
be selected for the door call. The<br />
volume of the door call can be<br />
changed at the bus telephone.<br />
1 Switch on the programming mode.<br />
At the VSNG <strong>850</strong>-..., press the programming<br />
mode button briefly. The<br />
LED1 flashes in a 2-second rhythm<br />
to indicate that the programming<br />
mode is active.<br />
4 At the door station, hold down the<br />
required call button for 4 seconds<br />
until a protracted tone sounds at the<br />
door loudspeaker. The call button is<br />
now assigned to the bus telephone,<br />
no speech connection now exists.<br />
2 At the door station, hold down the<br />
programming button for 4 seconds.<br />
A protracted acknowledgement tone<br />
is then audible which is repeated<br />
every 5 seconds as long as the<br />
programming mode remains active.<br />
5 The call button is now permanently<br />
assigned to the handsfree bus<br />
telephone.<br />
Program additional users using<br />
the same procedure or quit the<br />
programming mode.<br />
3 Hold down the light button for 4<br />
seconds. A protracted acknowledgement<br />
tone sounds in the loudspeaker,<br />
the muting button flashes. A<br />
speech connection exists to the door<br />
station. The handsfree bus telephone<br />
is now in the programming mode.<br />
21
Programming - manual<br />
Programming internal calls<br />
Application<br />
You wish a bus telephone to be<br />
able to call and communicate with<br />
another bus telephone in the system.<br />
The muting and light buttons<br />
of the bus telephones can be<br />
reprogrammed if required for<br />
internal call functions.<br />
1 Switch on the programming mode.<br />
At the VSNG <strong>850</strong>-..., press the programming<br />
mode button briefly. The<br />
LED1 flashes in a 2-second rhythm<br />
to indicate that the programming<br />
mode is active.<br />
4 Lift the receiver at the second<br />
bus telephone you wish to enable<br />
for internal calls. The programming<br />
mode tone is audible.Hold the light<br />
button down for 4 seconds. The<br />
acknowledgement tone is audible.<br />
Do not replace the receiver.<br />
22<br />
2 Lift the receiver at the first bus<br />
telephone you wish to enable for<br />
internal calls. The programming<br />
mode tone is audible.<br />
5 Hold the light button down for<br />
4 seconds. The acknowledgement<br />
tone is audible. Do not replace the<br />
receiver.<br />
3 Hold the light button down for<br />
4 seconds. The acknowledgement<br />
tone is audible. Do not replace the<br />
receiver.<br />
6 A speech connection now exists<br />
between the two bus telephones.
7 At the first bus telephone, hold<br />
down the internal call button you<br />
wish to use to call the second<br />
bus telephone for 4 seconds. A<br />
protracted tone is audible. The bus<br />
telephone is now programmed.<br />
Do not yet replace the receiver.<br />
10 Switch off the programming<br />
mode at the VSNG <strong>850</strong>-...<br />
8 At the second bus telephone,<br />
hold down the internal call button<br />
you wish to use to call the first bus<br />
telephone for 4 seconds. A protracted<br />
tone is audible. The buttons<br />
are now programmed at both bus<br />
telephones.<br />
9 Replace the receiver at both bus<br />
telephones. Program additional<br />
bus telephones using the same<br />
procedure or quit the programming<br />
mode.<br />
23
Programming - manual<br />
Dialling the door station<br />
Application<br />
You wish to be able to call the door<br />
station from a bus telephone using<br />
buttons, e.g. in order to selectively<br />
speak to a visitor. In bus telephones<br />
BTSV/BFSV <strong>850</strong>-... the light or<br />
muting button can be used for this<br />
function.<br />
1 Switch on the programming mode.<br />
At the VSNG <strong>850</strong>-..., press the programming<br />
mode button briefly. The<br />
LED1 flashes in a 2-second rhythm<br />
to indicate that the programming<br />
mode is active.<br />
4 Hold down the light button for 4<br />
seconds. A protracted signal tone is<br />
audible in the receiver. The bus telephone<br />
is now in the programming<br />
mode. Do not replace the receiver.<br />
A speech connection with picture is<br />
established to the door station.<br />
24<br />
2 At the door station, hold down the<br />
programming button for 4 seconds.<br />
A protracted acknowledgement tone<br />
is then audible which is repeated<br />
every 5 seconds as long as the programming<br />
mode remains active.<br />
5 At the bus telephone, hold down<br />
the button you wish to use to call<br />
the door station for 4 seconds.<br />
Replace the receiver at the bus telephone.<br />
The button is now assigned<br />
to the door station. The door loudspeaker<br />
can be dialled at any time.<br />
3 Lift the receiver at the bus telephone<br />
which you wish to program.<br />
6 Replace the receiver. Continue to<br />
program more bus telephones or<br />
quit the programming mode.
Français<br />
Montage<br />
Sommaire<br />
• Application<br />
• Etendue de la fourniture<br />
• Montage<br />
• Specifications<br />
Programmation plug+play<br />
Programmation - Manuelle<br />
• Programmer l‘appel de porte<br />
• Programmer l‘appel de porte du<br />
téléphone mains libres bus<br />
• Programmer l‘appel de porte par<br />
l‘intermédiaire de la touche d‘appel<br />
d‘étage<br />
• Programmer l‘appel interne<br />
• Sélection de la platine de rue<br />
Schéma de raccordement<br />
Application<br />
Le <strong>Set</strong>-<strong>Compact</strong>-Vidéo pour 1 ou<br />
2 unités d‘habitation. Comprend<br />
la platine de rue pour montage en<br />
saillie, le bloc d‘alimentation pour<br />
montage dans distributeur (9 TE) et<br />
les téléphones bus avec moniteur<br />
couleur pour montage en saillie.<br />
Avec les fonctions de base appeler,<br />
parler, voir et ouvrir porte. Mise en<br />
service facile par programmation<br />
plug+play. Des fonctions complémentaires<br />
telles que conversation<br />
interne ou sélection de la platine de<br />
rue sont programmables.<br />
Tension électrique<br />
L‘installation, le montage et<br />
l‘entretien d‘appareils électriques<br />
ne doivent être réalisés que par un<br />
spécialiste en électricité.<br />
Charge électrostatique<br />
La charge électrostatique peut<br />
détruire l’appareil en cas de contact<br />
direct avec la carte de circuits<br />
26<br />
imprimés. Evitez par conséquent l‘avant.<br />
tout contact direct avec la carte de 2 Montage en saillie de la platine de<br />
circuits imprimés.<br />
rue. Hauteur de montage conseillée<br />
env. 1,50/4,9 pieds du centre de<br />
Les situations de montage<br />
suivantes doivent impérativement<br />
être évitées:<br />
• Contre-jour direct<br />
• Rayonnement direct du soleil<br />
• Arrière-plan d‘une grande luminosité<br />
• Parois fortement réfléchissantes du<br />
côté opposé de la platine de rue<br />
• Lampes ou sources de lumière<br />
directes<br />
l‘appareil. A noter : Le câble<br />
s‘introduit dans la zone inférieure<br />
du socle!<br />
3 Dénuder le câble d‘installation à<br />
proximité de la paroi (env. 10 mm) et<br />
introduire les fils dans le socle. Fixer<br />
le socle à l‘aide de 4 vis. Obturer les<br />
deux orifices supérieurs à l‘aide des<br />
bouchons en caoutchouc. Effectuer<br />
l‘installation conformément au<br />
schéma de raccordement.<br />
Etendue de la fourniture<br />
<strong>SET</strong> <strong>CV</strong> <strong>850</strong>-1<br />
• Platine de rue <strong>CV</strong> <strong>850</strong>-1<br />
• Clé mâle coudée pour vis à six<br />
pans creux taille 2,5<br />
• Bloc d‘alimentation du kit vidéo<br />
VSNG <strong>850</strong>-...<br />
• Téléphone bus BTSV <strong>850</strong>-... ou<br />
BFSV <strong>850</strong>-...<br />
• la présente <strong>information</strong> produit<br />
4 L‘angle de visée de la caméra<br />
peut être pré-ajusté, en fonction de<br />
la situation de montage, horizontalement<br />
et verticalement sur 30°<br />
environ. Pour modifier le sens de<br />
visée de la caméra, il est possible de<br />
positionner cette dernière dans le<br />
sens souhaité. Pour modifier le sens<br />
de visée, desserrer un peu les deux<br />
vis à empreinte cruciforme. Positionner<br />
la caméra dans le sens souhaité.<br />
Etendue de la fourniture<br />
Ensuite, fixer la position souhaitée<br />
<strong>SET</strong> <strong>CV</strong> <strong>850</strong>-2 telle que décrite à l‘aide des deux vis à empreinte<br />
ci-dessus, mais<br />
cruciforme.<br />
• Platine de rue <strong>CV</strong> <strong>850</strong>-2<br />
• 2 téléphones bus BTSV <strong>850</strong>-... ou<br />
BFSV <strong>850</strong>-...<br />
5 En fonction de l‘environnement<br />
de montage, il peut être nécessaire<br />
de modifier le volume audio de la<br />
platine de rue afin de permettre une<br />
Etendue de la fourniture<br />
transmission claire de la voix.<br />
<strong>SET</strong> <strong>CV</strong> <strong>850</strong>-11<br />
6 Accrocher la façade du boîtier en<br />
• Platine de rue <strong>CV</strong> <strong>850</strong>-1<br />
haut du socle, et la fermer. Bloquer<br />
• Clé mâle coudée pour vis à six la vis à six pans creux sur la face<br />
pans creux taille 2,5<br />
inférieure du boîtier.<br />
• Bloc d‘alimentation kit vidéo<br />
VSNG <strong>850</strong>-1<br />
• Téléphone bus avec moniteur couleur<br />
BTSV <strong>850</strong>-... ou BFSV <strong>850</strong>-...<br />
• la présente <strong>information</strong> produit<br />
Montage du bloc d‘alimentation<br />
bus<br />
7 Monter le bloc d‘alimentation sur<br />
barre DIN (distribution).<br />
8 Montage en saillie possible avec<br />
Etendue de la fourniture<br />
l‘accessoire ZAP 9-0. (ne fait pas<br />
<strong>SET</strong> <strong>CV</strong> <strong>850</strong>-12 telle que décrite partie de l‘étendue de la fourniture)<br />
ci-dessus, mais<br />
• Platine de rue <strong>CV</strong> <strong>850</strong>-2<br />
• 2 téléphones bus avec moniteur<br />
couleur BTSV <strong>850</strong>-... ou BFSV <strong>850</strong>-...<br />
Montage du téléphone bus<br />
Dénuder le câble sur 80 mm.<br />
9 Ouverture de l‘appareil par la face<br />
arrière ; à ces fins, appuyer sur le<br />
Montage platine de rue<br />
levier encliquetable.<br />
1 Dévisser la façade du boîtier. A 10 Hauteur de montage conseillée<br />
ces fins, desserrer la vis à six pans env. 1,50/4,9 pieds du centre de<br />
creux sur la face inférieure du boîtier.<br />
Rabattrer la façade du boîtier vers<br />
l‘appareil.
11 Dans le cas d‘un montage<br />
directement au mur, fixer le socle à<br />
l‘aide de 4 vis. Respecter la position<br />
de montage Haut/Top.<br />
12 Dans le cas d‘un montage sur<br />
prise, utiliser les orifices pour vis<br />
prévus au centre de l‘appareil.<br />
Respecter la position de montage<br />
Haut/Top.<br />
13 Effectuer l‘installation conformément<br />
au schéma de raccordement.<br />
Les fils du câble d‘installation<br />
doivent être regroupés dans la zone<br />
d‘installation libre du socle.<br />
14 Introduire la prise mâle de couleur<br />
du cordon spiralé dans la prise<br />
femelle du boîtier, un clic devant<br />
être perçu lorsque la prise mâle<br />
s‘emboîte.<br />
15 Emboîter l‘autre extrémité du<br />
cordon spiralé dans le combiné,<br />
jusqu‘à l‘encliquetage de la prise<br />
mâle. Le raccordement ne peut plus<br />
être défait.<br />
16 Pour la programmation<br />
Plug+Play, ne fermer le boîtier<br />
que pendant la programmation.<br />
Accrocher le boîtier en haut du socle<br />
et fermer en exerçant une légère<br />
pression.<br />
Démontage du combiné intérieur<br />
17 Pour déposer le boîtier à l‘aide<br />
d‘un tournevis pour vis à tête fendue,<br />
repousser le verrouillage vers le<br />
haut. La carte de circuits imprimés<br />
et le combiné restent sur la partie<br />
supérieure du boîtier.<br />
Marquage<br />
18 Ouvrir l‘étiquette avec précautions<br />
par le côté extérieur, p. ex.<br />
à l‘aide d‘un tournevis pour vis à<br />
tête fendue, et retirer l‘étiquette.<br />
Pour la mise en place de l‘étiquette,<br />
l‘encliqueter en exerçant une légère<br />
pression.<br />
Installation<br />
Effectuer le raccordement conformément<br />
au schéma de raccordement<br />
AS-TVHa-1/1.<br />
Schéma de raccordement pour<br />
version 125 V<br />
TÖ = gâche<br />
ERT = Touche d’appel d’étage<br />
Li = Lumière<br />
Portée entre le bloc d‘alimentation<br />
du kit vidéo et la platine de rue max.<br />
50 m/164 ft, et 50 m/164 ft entre le<br />
bloc d‘alimentation du kit vidéo et le<br />
téléphone bus le plus éloigné, dans<br />
le cas de câbles de 0,8 mm. Une<br />
fois l‘installation effectuée, il faut<br />
programmer le kit vidéo.<br />
Implantation des bornes<br />
TaK/TbK Bus In-Home :<br />
Raccordement au bloc<br />
d‘alimentation du kit vidéo<br />
VSNG <strong>850</strong>-...<br />
Caractéristiques techniques<br />
<strong>CV</strong> <strong>850</strong>-...<br />
• Système couleur PAL<br />
• Appareil de prise de vues capteur<br />
CCD 1/3” 752 x 582 points d‘image<br />
(horizontalement/verticalement)<br />
• Objectif 3,7 mm<br />
• Angle de visée horizontal 60°<br />
environ, vertical 50° environ<br />
• Plage de réglage mécanique<br />
supplémentaire sur 30° environ horizontalement<br />
et verticalement<br />
• Résolution horizontale 450 lignes<br />
• Eclairage infrarouge intégré<br />
• Plage de températures<br />
-20°C à + 40°C<br />
• Alimentation par l‘intermédiaire du<br />
bus In-Home : Vidéo<br />
• Indice de protection platine de<br />
rue IP 54<br />
• Dimensions 82 x 226 x 39 mm<br />
Caractéristiques techniques<br />
VSNG <strong>850</strong>-0<br />
• Tension d‘entrée<br />
230 V CA +/-10%, 50-60 Hz<br />
• Fusible primaire 250 mA (L) 250 V<br />
• Intensité absorbée 200 mA<br />
• Tension bus 27,5 V CC 0,5 A<br />
régulée +/- 5%, résistant aux courtscircuits<br />
aux bornes TaK/TbK et TaM/<br />
TbM<br />
• 12 V CA, 1 A<br />
• Température ambiante<br />
0°C à +40°C, exploitation à une<br />
altitude comprise entre<br />
-20 et 2000 m au-dessus du niveau<br />
de la mer<br />
• Humidité relative de l‘air<br />
max. 60%<br />
• Indice de protection IP 30<br />
Dimensions 162 x 89 x 60 mm<br />
Caractéristiques techniques<br />
VSNG <strong>850</strong>-1<br />
• Tension d‘entrée<br />
125 V CA +/-10%, 50-60 Hz<br />
• Fusible primaire 500 mA (L) 250 V<br />
• Intensité absorbée 360 mA<br />
• Autres indications techniques, voir<br />
ci-dessus<br />
Caractéristiques techniques<br />
• Alimentation par l‘intermédiaire du<br />
bus In-Home<br />
• Volume de la sonnerie max.<br />
83 dB (A)<br />
• Moniteur couleur 6,3 cm (2,5”)<br />
• Intensité absorbée dans le cas<br />
d‘une alimentation supérieure à<br />
+M/-M max. 300 mA<br />
• Contact sans potentiel S1/S1 max.<br />
15 V AC, 30V DC, 1A Temps de<br />
commutation 0,4 sec. – 19 mn<br />
• Dimensions L x H x P<br />
90 x 261 x 45 mm (BTSV <strong>850</strong>-...)<br />
• Dimensions L x H x P<br />
90 x 261 x 27 mm (BFSV <strong>850</strong>-...)<br />
27
Programmation - Plug+play<br />
Fondements<br />
La programmation Plug+Play offre la<br />
possibilité de mettre très facilement<br />
en service le kit <strong>Compact</strong> Vidéo, sans<br />
avoir de connaissances en programmation.<br />
Toute l‘installation de tous<br />
les postes doit être terminée.<br />
Les boîtiers des téléphones bus ne<br />
doivent pas encore être fermés. Sur<br />
le bloc d‘alimentation du kit vidéo,<br />
il faut activer le mode Plug+Play. La<br />
touche d‘appel se trouvant tout en<br />
haut de la platine de rue s‘attribue<br />
toujours au premier téléphone bus.<br />
Conditions à remplir pour<br />
Plug+Play<br />
• Effectuer le montage de<br />
l‘installation selon le schéma de<br />
raccordement.<br />
• Raccorder les socles des téléphones,<br />
ne pas fermer tout de suite<br />
les boîtiers.<br />
• Sur la platine de rue, inscrire<br />
aussitôt, si possible, l‘affectation des<br />
touches d‘appel.<br />
• Mettre le bloc d‘alimentation du<br />
kit vidéo en mode Plug+Play. A ces<br />
fins, appuyer sur la touche mode<br />
prog. pendant 5 secondes. La LED1<br />
doit rester éclairée en permanence.<br />
• Placer les téléphones bus sur les<br />
socles, dans l‘ordre dans lequel les<br />
touches d‘appel ont été attribuées.<br />
(combiné raccroché)<br />
• A titre d‘acquittement, on perçoit<br />
brièvement l‘appel d‘étage, au<br />
bout de 7 secondes environ, et la<br />
LED se trouvant sous la touche de<br />
désactivation du microphone se met<br />
à clignoter. Le téléphone bus suivant<br />
peut être fermé.<br />
• Une fois que tous les téléphones<br />
sont fermés, appuyer sur la touche<br />
mode prog. du bloc d‘alimentation<br />
du kit vidéo, le mode programmation<br />
s‘arrête, la programmation de<br />
l‘installation est terminée.<br />
28<br />
Reset Plug+Play<br />
Si une tentative de programmation a<br />
échoué, la programmation plug+play<br />
peut être refaite.<br />
• Couper la tension d‘alimentation.<br />
• Retirer tous les téléphones des<br />
socles.<br />
• Rétablir la tension d‘alimentation<br />
et attendre jusqu‘à ce que le bloc<br />
d‘alimentation du kit vidéo soit en<br />
mode d‘exploitation normal (1-2<br />
minutes environ)<br />
• Mettre le bloc d‘alimentation du<br />
kit vidéo en mode plug+play. A ces<br />
fins, appuyer sur la touche mode<br />
prog. pendant 5 secondes.<br />
• Appuyer sur la touche lumière de<br />
la platine de rue pendant 5 secondes,<br />
jusqu‘à ce que l‘on entende une<br />
tonalité d‘acquittement.<br />
• La nouvelle programmation<br />
Plug+Play peut commencer.<br />
Affectation des touches<br />
<strong>Compact</strong>-Vidéo<br />
Touche supérieure<br />
= téléphone bus 1<br />
Touche inférieure<br />
= téléphone bus 2
Programming - Plug+Play<br />
Procedure - Example<br />
1 Activer le mode Plug+Play sur le<br />
VSNG <strong>850</strong>-..., appuyer sur la touche<br />
mode prog. pendant 5 sec., la LED1<br />
reste éclairée en permanence.<br />
4 Arrêter le mode Plug+Play sur<br />
le VSNG <strong>850</strong>-..., en appuyant<br />
briève-ment sur la touche mode<br />
prog. La LED1 du VSNG <strong>850</strong>-... se<br />
remet maintenant à clignoter dans<br />
l‘affichage de fonctionnement normal.<br />
Toutes les LED des téléphones<br />
bus sont éteintes, l‘installation est<br />
prête à fonctionner.<br />
2 Placer le téléphone bus dans<br />
l‘appartement 1 avec le combiné<br />
raccroché, on entend l‘appel d‘étage<br />
à titre d‘acquittement et la LED de<br />
la touche désactivation clignote.<br />
Le téléphone bus 1 est affecté à la<br />
touche 1.<br />
3 Placer le téléphone bus dans<br />
l‘appartement 2 avec le combiné<br />
raccroché, on entend l‘appel d‘étage<br />
et la LED de la touche désactivation<br />
clignote. Le téléphone bus 2 est<br />
affecté à la touche 2.<br />
29
Programmation<br />
Liste des fonctions<br />
Appel d‘étage<br />
La touche d‘appel d‘étage (ERT) sert<br />
à appeler l‘appartement, à partir de<br />
la porte d‘un appartement. Exemple<br />
d‘application : maison à 4 appartements<br />
avec une cage d‘escalier<br />
commune, des touches d‘appel<br />
d‘étage sont installées devant la<br />
porte de fermeture de chaque<br />
appartement.<br />
Appel interne<br />
Les téléphones bus pevent s‘appeler<br />
entre eux par l‘intermédiaire des<br />
touches. Le BTSV/BFSV <strong>850</strong>-...<br />
permet d‘appeler 4 postes, et le<br />
BTC/BT<strong>CV</strong> <strong>850</strong>-... permet d‘appeler<br />
jusqu‘à 14 postes. Des conversations<br />
internes ne sont possibles qu‘à<br />
l‘intérieur d‘une ligne.<br />
Touche lumière<br />
A l‘état à la livraison, la touche lumière<br />
du tél. bus commute le contact<br />
du bloc d‘alimentation bus pendant<br />
0,4 secondes. La fonction de la<br />
touche lumière peut être reprogrammée,<br />
p. ex. pour appel interne.<br />
Désactivation de la sonnerie<br />
d‘appel+affichage<br />
L‘appel de porte, l‘appel d‘étage<br />
et l‘appel interne peuvent être<br />
désactivés par appui sur la touche<br />
désactivation du BTSV/BFSV <strong>850</strong>-...<br />
A des fins d‘affichage optique, la<br />
touche s‘éclaire.<br />
Configuration de la tonalité<br />
d‘appel<br />
Sur chaque téléphone bus, différentes<br />
tonalités d‘appel peuvent être<br />
sélectionnées pour chaque appel<br />
(appel de porte, appel interne, appel<br />
d‘étage).<br />
30<br />
Sélection de porte<br />
La platine de rue peuvent être<br />
sélectionnée de façon ciblée par<br />
l‘intermédiaire d‘une touche, et une<br />
conversation peut être établie.<br />
Touche gâche<br />
La touche gâche des téléphones<br />
bus commute toujours le contact Tö<br />
(gâche) du bloc d‘alimentation du kit<br />
vidéo pendant 3 secondes.<br />
Appel de porte<br />
Lorsqu‘un visiteur appuie sur la sonnette<br />
de la porte, le téléphone bus<br />
sonne et la touche de désactivation<br />
clignote.<br />
Sélectionner la platine<br />
La platine de rue peut être sélectionnée<br />
par un double clic sur la<br />
touche lumière.<br />
Temps contact lumière<br />
Le temps de commutation du<br />
contact lumière, sur le VSNG <strong>850</strong>-...,<br />
est de 0,4 seconde à l‘état à la<br />
livraison.<br />
Consignes importantes à<br />
prendre en compte avant la<br />
programmation<br />
En principe, le <strong>SET</strong>-<strong>Compact</strong>-Vidéo<br />
peut être mis en service et programmé<br />
par une personne.<br />
• Terminer l‘installation<br />
• Activer le mode programmation<br />
sur le bloc d‘alimentation du kit<br />
vidéo<br />
• Mettre la platine de rue en mode<br />
programmation<br />
• Programmer les postes<br />
• Mettre fin au mode programmation<br />
Pendant que le bloc d‘alimentation<br />
du kit vidéo est en mode programmation,<br />
plusieurs étapes peuvent<br />
être programmées les unes après<br />
les autres. Il n‘est pas nécessaire de<br />
mettre fin au mode programmation<br />
chaque fois.<br />
Poste bus mains libres<br />
Dans le cas du téléphone mains<br />
libres bus BFSV <strong>850</strong>-..., il n‘y a pas<br />
lieu de décrocher et de raccrocher le<br />
combiné. Lorsque l‘on appuie sur la<br />
touche lumière, l‘appareil passe en<br />
mode programmation.<br />
Si l‘on a procédé à l‘étape relative<br />
à la programmation, le téléphone<br />
mains libres bus revient à l‘état<br />
de repos. Toutes les autres étapes<br />
relatives à la programmation sont<br />
identiques.
Programmation - Manuelle<br />
Programmer l‘appel de porte<br />
Application<br />
Appel entre la platine de rue et un<br />
téléphone bus.<br />
Sur le téléphone bus, il est possible<br />
de sélectionner pour l‘appel de<br />
porte, au choix, une mélodie de<br />
sonnerie différente.<br />
1 Mettre le mode programmation en<br />
service. Sur le VSNG <strong>850</strong>-..., appuyer<br />
brièvement sur la touche mode<br />
prog. La LED1 clignote toutes les 2<br />
secondes pour indiquer que le mode<br />
programmation est actif.<br />
4 Maintenir la touche lumière<br />
appuyée pendant 4 secondes. Dans<br />
le combiné, on perçoit une tonalité<br />
d‘acquittement longue, la touche<br />
désactivation clignote. Il y a une<br />
liaison vocale avec la platine de rue.<br />
Le téléphone bus est maintenant<br />
en mode programmation, ne pas<br />
raccrocher le combiné.<br />
Le volume sonore de l‘appel de<br />
porte peut être modifié sur le téléphone<br />
bus.<br />
2 Sur la platine de rue, maintenir la<br />
touche de programmation appuyée<br />
pendant 4 secondes. On perçoit<br />
ensuite une tonalité d‘acquittement<br />
longue qui revient toutes les<br />
5 secondes brièvement, tant que le<br />
mode programmation est actif.<br />
5 Sur la platine de rue, appuyer sur<br />
la touche d‘appel souhaitée pendant<br />
4 secondes, jusqu‘à ce que l‘on<br />
entende une tonalité longue sur la<br />
platine de rue. La touche d‘appel est<br />
maintenant affectée au téléphone<br />
bus, il n‘y a plus de liaison vocale.<br />
3 Sur le téléphone bus qu‘il s‘agit de<br />
programmer, décrocher le combiné.<br />
6 Sur le téléphone bus, raccrocher<br />
le combiné. La touche d‘appel est<br />
maintenant affectée de façon fixe au<br />
téléphone bus.<br />
31
Programmation - Manuelle<br />
Programmer l‘appel de porte<br />
par l‘intermédiaire<br />
de la touche d‘appel d‘étage<br />
Application<br />
Appel entre la platine de rue et un<br />
téléphone bus.<br />
La programmation n‘est possible<br />
que si, sur les téléphones bus, la<br />
touche d‘appel d‘étage (ERT) est<br />
raccordée. S‘il n‘y a pas d‘accès à<br />
un appartement, la programmation<br />
1 Mettre le mode programmation en<br />
service. Sur le VSNG <strong>850</strong>-..., appuyer<br />
brièvement sur la touche mode<br />
prog. La LED1 clignote toutes les 2<br />
secondes pour indiquer que le mode<br />
programmation est actif.<br />
4 Sur la platine de rue, appuyer sur<br />
la touche d‘appel souhaitée pendant<br />
4 secondes, jusqu‘à ce que l‘on<br />
entende une tonalité longue sur la<br />
platine de rue. La touche d‘appel est<br />
maintenant affectée au téléphone<br />
bus, il n‘y a plus de liaison vocale.<br />
32<br />
peut malgré tout être effectuée de<br />
cette façon.<br />
2 Sur la platine de rue, maintenir la<br />
touche de programmation appuyée<br />
pendant 4 secondes. On perçoit<br />
ensuite une tonalité d‘acquittement<br />
longue qui revient toutes les<br />
5 secondes brièvement, tant que le<br />
mode programmation est actif.<br />
5 La touche d‘appel est maintenant<br />
affectée de façon fixe au téléphone<br />
bus.<br />
Programmer d‘autres postes selon<br />
la même procédure ou mettre fin au<br />
processus de programmation<br />
3 Appuyer pendant 4 secondes sur<br />
la touche d‘appel d‘étage raccordée<br />
au téléphone bus. Le téléphone bus<br />
est maintenant en mode programmation.<br />
Pendant cette période, il ne<br />
doit pas y avoir de sonnerie dans<br />
l‘installation !
Programmation - Manuelle<br />
Programmer l‘appel de porte<br />
du téléphone mains libres bus<br />
Application<br />
Appel entre la platine de rue et un<br />
téléphone bus. Sur le téléphone<br />
mains libres bus, on peut sélectionner<br />
une autre mélodie de sonnerie<br />
pour l‘appel de porte. Le volume<br />
sonore de l‘appel de porte peut être<br />
modifié sur le téléphone bus.<br />
1 Mettre le mode programmation en<br />
service. Sur le VSNG <strong>850</strong>-..., appuyer<br />
brièvement sur la touche mode<br />
prog. La LED1 clignote toutes les 2<br />
secondes pour indiquer que le mode<br />
programmation est actif.<br />
4 Sur la platine de rue, appuyer sur<br />
la touche d‘appel souhaitée pendant<br />
4 secondes, jusqu‘à ce que l‘on<br />
entende une tonalité longue sur la<br />
platine de rue. La touche d‘appel est<br />
maintenant affectée au téléphone<br />
bus, il n‘y a plus de liaison vocale.<br />
2 Sur la platine de rue, maintenir la<br />
touche de programmation appuyée<br />
pendant 4 secondes. On perçoit<br />
ensuite une tonalité d‘acquittement<br />
longue qui revient toutes les<br />
5 secondes brièvement, tant que le<br />
mode programmation est actif.<br />
5 La touche d‘appel est maintenant<br />
affectée de façon fixe au téléphone<br />
mains libres bus.<br />
Programmer d‘autres postes selon<br />
la même procédure ou mettre fin au<br />
processus de programmation<br />
3 Maintenir la touche lumière<br />
appuyée pendant 4 secondes. Dans<br />
le haut-parleur, on perçoit une<br />
tonalité d‘acquittement longue, la<br />
touche désactivation clignote. Il y a<br />
une liaison vocale avec la platine de<br />
rue. Le téléphone mains libres bus<br />
est maintenant en mode programmation.<br />
33
Programmation - Manuelle<br />
Programmer l‘appel interne<br />
Application<br />
Un téléphone bus doit pouvoir<br />
appeler un autre téléphone bus de<br />
l‘installation, et pouvoir converser<br />
avec lui.<br />
1 Mettre le mode programmation en<br />
service. Sur le VSNG <strong>850</strong>-..., appuyer<br />
brièvement sur la touche mode<br />
prog. La LED1 clignote toutes les 2<br />
secondes pour indiquer que le mode<br />
programmation est actif.<br />
4 Maintenir la touche lumière<br />
appuyée pendant 4 secondes, on<br />
entend la tonalité d‘acquittement.<br />
Ne pas raccrocher le combiné.<br />
34<br />
Les touches désactivation et lumière<br />
des téléphones bus peuvent, en cas<br />
de besoin, être reprogrammées pour<br />
une fonction d‘appel interne.<br />
2 Sur le premier téléphone bus qui<br />
doit parler en interne, décrocher<br />
le combiné, on entend le mode<br />
programmation.<br />
5 Les deux téléphones bus ont maintenant<br />
une liaison vocale entre eux.<br />
3 Maintenir la touche lumière<br />
appuyée pendant 4 secondes, on<br />
entend la tonalité d‘acquittement.<br />
Ne pas raccrocher le combiné.<br />
6 Sur le premier téléphone bus,<br />
appuyer pendant 4 secondes sur la<br />
touche d‘appel interne avec laquelle<br />
il s‘agit d‘appeler le deuxième<br />
téléphone bus. On perçoit une<br />
tonalité longue. Le téléphone bus<br />
est maintenant programmé, ne pas<br />
raccrocher le combiné tout de suite.
7 Sur le premier téléphone bus,<br />
appuyer pendant 4 secondes sur la<br />
touche d‘appel interne avec laquelle<br />
il s‘agit d‘appeler le deuxième<br />
téléphone bus. On perçoit une<br />
tonalité longue. Le téléphone bus<br />
est maintenant programmé, ne pas<br />
raccrocher le combiné tout de suite.<br />
10 Arrêter le mode programmation<br />
sur le VSNG <strong>850</strong>-...<br />
8 Sur le deuxième téléphone bus,<br />
appuyer pendant 4 secondes sur la<br />
touche d‘appel interne avec laquelle<br />
il s‘agit d‘appeler le premier téléphone<br />
bus. On perçoit une tonalité<br />
longue. Les touches sont maintenant<br />
programmées sur les deux téléphones<br />
bus.<br />
9 Sur les deux téléphones bus,<br />
raccrocher le combiné. Programmer<br />
d‘autres téléphones bus selon la<br />
même procédure ou mettre fin au<br />
processus de programmation.<br />
35
Programmation - Manuelle<br />
Sélection de la platine de rue<br />
Application<br />
La platine de rue doit être sélectionnées<br />
à partir d‘un téléphone bus,<br />
par l‘intermédiaire de touches, afin<br />
par exemple de s‘adresser à dessein<br />
à un visiteur et de le voir.<br />
1 Mettre le mode programmation en<br />
service. Sur le VSNG <strong>850</strong>-..., appuyer<br />
brièvement sur la touche mode<br />
prog. La LED1 clignote toutes les 2<br />
secondes pour indiquer que le mode<br />
programmation est actif.<br />
4 Maintenir la touche lumière<br />
appuyée pendant 4 secondes. Dans<br />
le combiné, on perçoit un signal<br />
sonore long. Le téléphone bus est<br />
maintenant en mode programmation.<br />
Ne pas raccrocher le combiné.<br />
Il y a une liaison vocale avec image<br />
vers la platine de rue.<br />
36<br />
Avec les téléphones bus BTSV/<br />
BFSV <strong>850</strong>-..., on peut utiliser la touche<br />
lumière ou désactivation pour<br />
cette fonction.<br />
Programmation - Manuelle<br />
2 Sur la platine de rue, maintenir la<br />
touche de programmation appuyée<br />
pendant 4 secondes. On perçoit<br />
ensuite une tonalité d‘acquittement<br />
longue qui revient toutes les<br />
5 secondes brièvement, tant que le<br />
mode programmation est actif.<br />
5 Sur le téléphone bus, appuyer<br />
pendant 4 secondes sur la touche<br />
souhaitée, avec laquelle il s‘agit<br />
de sélectionner la platine de rue.<br />
Sur le téléphone bus, raccrocher le<br />
combiné. La touche est maintenant<br />
affectée à la platine de rue. La<br />
platine de rue peut être sélectionnée<br />
à tout moment.<br />
3 Sur le téléphone bus qu‘il s‘agit de<br />
programmer, décrocher le combiné.<br />
6 Raccrocher le combiné. Programmer<br />
d‘autres téléphones bus ou<br />
mettre fin à la programmation.
Nederlands<br />
Montage<br />
Inhoud<br />
• Toepassing<br />
• Leveringsomvang<br />
• Montage<br />
• Technische gegevens<br />
Programmering plug+play<br />
Programmering - handmatig<br />
• Deuroproep programmering<br />
• Deuroproep programmeren Bus-<br />
Hands-free telefoon<br />
• Deuroproep programmering via<br />
etage-oproeptoets<br />
• Interne oproep programmering<br />
• Keuze van het deurstation<br />
Aansluitschema<br />
38<br />
Toepassing<br />
De <strong>Set</strong>-<strong>Compact</strong>-<strong>Video</strong> voor 1<br />
of 2 wooneenheden. Bevat het<br />
deurstation voor opbouwmontage,<br />
netvoeding voor verdelerinbouw<br />
(9 TE) en bus-telefoons met kleurenmonitor<br />
voor opbouwmontage.<br />
Met de basisfuncties bellen, spreken,<br />
zien en deur openen. Eenvoudige<br />
ingebruikname door plug+play<br />
programmering. Extra functies zoals<br />
intern spreken of keuze van het<br />
deurstation zijn programmeerbaar.<br />
Elektrische spanning<br />
Inbouw, montage en onderhoudswerkzaamheden<br />
aan elektrische<br />
apparaten mogen uitsluitend<br />
door een elektro-vakman worden<br />
uitgevoerd.<br />
Elektrostatische lading<br />
Door elektrostatische lading kan bij<br />
een direct contact met de printplaat<br />
het apparaat worden vernietigd. Vermijdt<br />
u daarom het direct aanraken<br />
van de printplaat.<br />
De volgende inbouwsituaties<br />
dienen absoluut vermeden te<br />
worden:<br />
• direct tegenlicht<br />
• direct inschijnen van zonlicht<br />
• beeldachtergrond met grote<br />
helderheid<br />
• sterk reflecterende wanden<br />
tegenover het deurstation<br />
• lampen resp. directe lichtbronnen<br />
Leveringsomvang <strong>SET</strong> <strong>CV</strong> <strong>850</strong>-1<br />
• Deurstation <strong>CV</strong> <strong>850</strong>-1<br />
• Inbussleutel grootte 2,5<br />
• <strong>Video</strong>-<strong>Set</strong>-Netvoeding<br />
VSNG <strong>850</strong>-...<br />
• Bus-Telefoon BTSV <strong>850</strong>-... of<br />
BFSV <strong>850</strong>-...<br />
• Deze productinformatie<br />
Leveringsomvang <strong>SET</strong> <strong>CV</strong> <strong>850</strong>-2<br />
zoals boven beschreven, echter<br />
• deurstation <strong>CV</strong> <strong>850</strong>-2<br />
• 2 Bus-Telefoons BTSV <strong>850</strong>-... of<br />
BFSV <strong>850</strong>-...<br />
Leveringsomvang <strong>SET</strong> <strong>CV</strong> <strong>850</strong>-11<br />
• Deurstation <strong>CV</strong> <strong>850</strong>-1<br />
• Inbussleutel grootte 2,5<br />
• <strong>Video</strong>-<strong>Set</strong>-Netvoeding VSNG <strong>850</strong>-1<br />
• Bus-Telefoon met kleurenmonitor<br />
BTSV <strong>850</strong>-... of BFSV <strong>850</strong>-...<br />
• Deze productinformatie<br />
Leveringsomvang <strong>SET</strong> <strong>CV</strong> <strong>850</strong>-12<br />
zoals boven beschreven, echter<br />
• deurstation <strong>CV</strong> <strong>850</strong>-2<br />
• 2 Bus-Telefoons met kleurenmonitor<br />
BTSV <strong>850</strong>-... of BFSV <strong>850</strong>-...<br />
Montage deurstation<br />
1 Behuizingvoorpaneel losschroeven.<br />
Daarvoor aan de onderzijde van<br />
de behuizing de inbusschroef losdraaien.<br />
Behuizingvoorpaneel naar<br />
voren openklappen.<br />
2 Opbouwmontage van het deurstation.<br />
Aanbevolen inbouwhoogte<br />
ca. 1,50 m/4,9 ft tot midden van het<br />
apparaat. Let op a.u.b.: De kabel<br />
wordt in het onderste deel van de<br />
basisplaat ingevoerd!<br />
3 De installatiekaabel dicht bij de<br />
muur afmantelen (ca. 10 mm) en de<br />
aders in de basisplaat invoeren. De<br />
basisplaat met 4 schroeven bevestigen.<br />
De beide bovenste openingen<br />
met de rubberen afdichtingen<br />
afsluiten. Installatie volgens aansluitschema<br />
uitvoeren.<br />
4 De beeldhoek van de camera kan<br />
afhankelijk van de inbouwsituatie<br />
horizontaal en verticaal tot ca.<br />
30° worden vooringesteld. Om de<br />
blikrichting van de camera te veranderen,<br />
kan deze in de gewenste<br />
richting worden gepositioneerd.<br />
Om de blikrichting te veranderen,<br />
de beiden kruisschroeven iets los<br />
draaien. Camera in de gewenste<br />
richting positioneren. Met de beide<br />
kruisschroeven aansluitend de<br />
gewenste positie fixeren.<br />
5 Afhankelijk van de inbouwomgeving<br />
kan het nodig zijn, het<br />
spraakvolume van het deurstation
te veranderen, om een duidelijke<br />
spraakverbinding mogelijk te maken.<br />
6 Behuizingvoorpaneel boven op<br />
de basisplaat hangen en sluiten. De<br />
inbusschroef aan de onderzijde van<br />
de behuizing vastdraaien.<br />
Montage Bus-Netvoeding<br />
7 Netvoeding op DIN-rail monteren<br />
(verdeling).<br />
8 Opbouwmontage met accessoire<br />
ZAP 9-0 mogelijk. (niet in leveringsomvang)<br />
Montage Bus-Telefoon<br />
Kabel op 80 mm afmantelen.<br />
9 Openen van het apparaat vanaf<br />
de achterzijde; daarvoor de rustpal<br />
indrukken.<br />
10 Aanbevolen inbouwhoogte ca.<br />
1,50 m/4,9 ft tot midden van het<br />
apparaat.<br />
11 Bij montage direct op de muur<br />
de basisplaat met 4 schroeven<br />
bevestigen. Let op de inbouwpositie<br />
boven/top.<br />
12 Bij montage op schakelaardoos<br />
de schroefopeningen in het midden<br />
van het apparaat gebruiken. Let op<br />
de inbouwpositie boven/top.<br />
13 Installatie volgens aansluitschema<br />
uitvoeren. De aders van de<br />
installatiekabel moeten binnen de<br />
vrije installatieruimte in de basisplaat<br />
worden weggestopt.<br />
14 Gekleurde stekker van de spiraalkabel<br />
in de bus op de behuizing<br />
invoeren, stekker dient hoorbaar op<br />
zijn plaats te klikken.<br />
15 Andere eind van de spiraalkabel<br />
in de hoorn insteken, totdat de<br />
stekker op zijn plaats zit. De verbinding<br />
is niet meer los te maken.<br />
16 Bij de Plug+Play programmering<br />
behuizing pas tijdens de programmering<br />
sluiten. Behuizing boven op<br />
de basisplaat inhangen en met lichte<br />
druk sluiten.<br />
Demontage intercom<br />
17 Voor het afnemen van de<br />
behuizing met een platet schroevendraaier<br />
de vergrendeling naar boven<br />
drukken. De printplaat en hoorn<br />
blijven in het bovenste deel van de<br />
behuizing.<br />
Beschrifting<br />
18 Naambordje vanaf de buitenzijde<br />
bijv. met een platte schroevendraaier<br />
voorzichtig openen en naambordje<br />
verwijderen. Voor het plaatsen het<br />
naambordje met lichte druk op zijn<br />
plaats drukken.<br />
Installatie<br />
Aansluiting volgens aansluitschema<br />
AS-TVHa-1/1 uitvoeren.<br />
Aansluitschema voor 125 V uitvoering.<br />
TÖ = Deuropener<br />
ERT = Etage-oproeptoets<br />
Li = Licht<br />
Reikwijdte <strong>Video</strong>-<strong>Set</strong>-Netvoeding<br />
naar deurstation max. 50 m/164 ft,<br />
<strong>Video</strong>-<strong>Set</strong>-Netvoeding naar verste<br />
Bus-Telefoon 50 m/164 ft bij 0,8 mm<br />
leidingmateriaal. Na geslaagde installatie<br />
dient de <strong>Video</strong>-<strong>Set</strong> te worden<br />
geprogrammeerd.<br />
Klemmenindeling<br />
TaK/TbK In-Home-Bus: aansluiting<br />
naar <strong>Video</strong>-<strong>Set</strong>-netvoeding<br />
VSNG <strong>850</strong>-...<br />
Technische gegevens <strong>CV</strong> <strong>850</strong>-...<br />
• kleurensysteem PAL<br />
• beeldopname CCD-sensor 1/3”<br />
752 x 582 beeldpunten (horizontaal/<br />
verticaal)<br />
• objectief 3,7 mm<br />
• beeldhoek horizontaal ca. 60°,<br />
verticaal ca. 50°<br />
• extra mechanisch verstelbereik met<br />
ca. 30° horizontaal en verticaal<br />
• resolutie horizontaal 450 lijnen<br />
• geintegreerde infra-rood verlichting<br />
• temperatuurbereik<br />
-20°C tot + 40°C<br />
• verzorging via In-Home-Bus: <strong>Video</strong><br />
• beschermingsklasse deurluidspreker<br />
IP 54<br />
• afmetingen 82 x 226 x 39 mm<br />
Technische gegevens VSNG <strong>850</strong>-0<br />
• Ingangsspanning<br />
230 V AC +/-10%, 50-60 Hz<br />
• Primaire beveiliging 250 mA (L)<br />
250 V<br />
• Stroomverbruik 200 mA<br />
• Busspanning 27,5 V DC 0,5 A<br />
geregeld +/- 5%, kortsluitingvast op<br />
klemmen TaK/TbK en TaM/TbM<br />
• 12 V AC, 1 A<br />
• Omgevingstemperatuur<br />
0°C tot +40°C, gebruik op een<br />
hoogte tussen -20 en<br />
2000 m boven NN<br />
• Max. relatieve luchtvochtigheid<br />
60%<br />
• Beschermingsklasse IP 30<br />
• Afmetingen 162 x 89 x 60 mm<br />
Technische gegevens VSNG <strong>850</strong>-1<br />
• Ingangsspanning<br />
125 V AC +/-10%, 50-60 Hz<br />
• Primaire beveiliging 500 mA (L)<br />
250 V<br />
• Stroomverbruik 360 mA<br />
• Verdere technische opgaven zie<br />
boven<br />
39
Programmering - Plug+Play<br />
Grondslagen<br />
De Plug+Play programmering biedt<br />
de eenvoudigste mogelijkheid, de<br />
<strong>Set</strong>-<strong>Compact</strong>-<strong>Video</strong> zonder programmeerkennis<br />
in gebruik te nemen. De<br />
gehele installatie van alle toestellen<br />
dient klaar te zijn opgesteld.<br />
De behuizingen van de Bus-<br />
Telefoons mogen nog niet gesloten<br />
zijn. Op de <strong>Video</strong>-<strong>Set</strong>-Netvoeding<br />
dient de Plug+Play mode te worden<br />
geprogrammeerd. De bovenste<br />
oproeptoets van het deurstation<br />
wordt altijd aan de eerste Bus-<br />
Telefoon toegewezen.<br />
Vereisten voor Plug+Play<br />
• Installatie van de centrale volgens<br />
aansluitschema uitvoeren<br />
• Basisplaten van de telefoons aansluiten,<br />
behuizing nog niet sluiten<br />
• Op het deurstation de toewijzing<br />
van de oproeptoetsen indien<br />
mogelijk direct opschrijven.<br />
• <strong>Video</strong>-<strong>Set</strong>-Netvoeding in de<br />
Plug+Play mode zetten, daarvoor<br />
de Prog.-Mode toets gedurende 5<br />
seconden ingedrukt houden. LED1<br />
moet voortdurend branden.<br />
• De Bus-Telefoons in dezelfde<br />
volgorde op de basisplaten opzetten<br />
zoals de oproeptoetsen ingedeeld<br />
zijn. (hoorn opgelegd)<br />
• De etage-oproep is na ca. 7 seconden<br />
als bevestiging kort te horen en<br />
de LED onder de mute-toets begint<br />
te knipperen. De volgende Bus-<br />
Telefoon kan worden aangesloten.<br />
• Nadat alle telefoons gesloten zijn,<br />
op de <strong>Video</strong>-<strong>Set</strong>-Netvoeding de toets<br />
Prog.-Mode drukken, programmeermode<br />
is uitgeschakeld, het programmeren<br />
van de centrale is gereed.<br />
40<br />
Reset Plug+Play<br />
Bij een mislukte programmeerpoging<br />
kan de Plug+Play programmering<br />
opnieuw worden uitgevoerd.<br />
• Verzorgingsspanning uitschakelen.<br />
• Alle telefoons van de basisplaat<br />
losmaken.<br />
• Verzorgingsspanning weer<br />
inschakelen en wachten tot de<br />
<strong>Video</strong>-<strong>Set</strong>-Netvoeding in de normale<br />
gebruiksmode is (ca. 1-2 minuten)<br />
• <strong>Video</strong>-<strong>Set</strong>-Netvoeding in de<br />
Plug+Play mode zetten, daarvoor<br />
de Prog.-mode toets gedurende 5<br />
seconden ingedrukt houden.<br />
• Lichttoets op het deurstation<br />
gedurende 5 seconden ingedrukt<br />
houden totdat een bevestigingstoon<br />
te horen is.<br />
• Vernieuwde Plug+Play-programmering<br />
kan beginnen.<br />
Indeling van de toetsen<br />
<strong>Compact</strong>-<strong>Video</strong><br />
Bovenste toets = Bus-Telefoon 1<br />
Onderste toets = Bus-Telefoon 2
Programmering - Plug+Play<br />
Werkwijze - Voorbeeld<br />
1 Plug+Play mode op VSNG <strong>850</strong>-...<br />
activeren, Prog.-Mode toets 5 sec.<br />
ingedrukt houden, LED1 brandt op<br />
continue weergave.<br />
4 Plug+Play mode op VSNG <strong>850</strong>-...<br />
door kort drukken van de toets<br />
Prog.-Mode uitschakelen. LED1 op<br />
de VSNG <strong>850</strong>-... knippert nu weer in<br />
de normale gebruiksweergave. Alle<br />
LEDs van de Bus-Telefoons zijn uit,<br />
de installatie is gereed voor gebruik.<br />
2 Bus-Telefoon in woning 1 met<br />
opgelegde hoorn opzetten, etageoproep<br />
is als bevestiging te horen en<br />
de LED van de mute-toets knippert.<br />
De Bus-Telefoon 1 is toegewezen<br />
aan toets 1.<br />
3 Bus-Telefoon in woning 2 met<br />
opgelegde hoorn opzetten, etageoproep<br />
is te horen en de LED van de<br />
mute-toets knippert. De Bus-Telefoon<br />
2 is toegewezen aan toets 2.<br />
41
Programmering<br />
Overzicht functies<br />
Etage-oproep<br />
De etage-oproeptoets (ERT) dient<br />
voor het bellen vanaf een woningdeur<br />
naar de woning. Gebruik bijv.<br />
meergezinswoning 4 woningen met<br />
een gemeenschappelijk trappenhuis,<br />
voor iedere woning-afsluitdeur zijn<br />
etage-oproeptoetsen geïnstalleerd.<br />
Interne oproep<br />
Bus-Telefoons kunnen elkaar via de<br />
toetsen onderling bellen. Met de<br />
BTSV/BFSV <strong>850</strong>-... kunnen 4 toestellen<br />
gebeld worden, met de BTC/<br />
BT<strong>CV</strong> <strong>850</strong>-... kunnen tot maxi-maal<br />
14 toestellen gebeld worden. Interne<br />
gesprekken zijn alleen binnen een<br />
streng mogelijk.<br />
Licht-toets<br />
De Licht-Toets in de Bus-Telefoon<br />
schakelt in de afleveringstoestand<br />
het contact in de Bus-Netvoeding<br />
voor 0,4 seconden. De functie van<br />
de licht-toets kan omgeprogrammeerd<br />
worden, bijv. voor interne<br />
oproep.<br />
Oproepuitschakeling+weergave<br />
De deuroproep, etage-oproep en<br />
interne oproep kunnen door drukken<br />
van de mute-toets op de BTSV/<br />
BFSV <strong>850</strong>-... worden uitgeschakeld.<br />
Voor de optische weergave brandt<br />
de toets.<br />
42<br />
Beltoonkonfiguratie<br />
Op iedere Bus-Telefoon kunnen voor<br />
iedere oproep (deuroproep, interne<br />
oproep, etage-oproep) verschillende<br />
beltonen worden gekozen.<br />
Deurkeuze<br />
Het deurstation kan via een toets<br />
gericht worden gekozen en een<br />
gesprek kan worden opgebouwd.<br />
Deuropener-toets<br />
De deuropenertoets op de Bus-<br />
Telefoons schakelt altijd het Töcontact<br />
op de <strong>Video</strong>-<strong>Set</strong>-Netvoeding<br />
gedurende 3 seconden.<br />
Deuroproep<br />
Indien een bezoeker op de deurbel<br />
drukt, gaat de Bus-Tel. over en de<br />
mute-toets knippert.<br />
Deurstation kieze<br />
Het deurstation kan door een<br />
dubbele klik van de lichttoets<br />
worden gekozen.<br />
Tijd licht-contact<br />
De schakeltijd van het lichtcontact<br />
op de VSNG <strong>850</strong>-... bedraagt in de<br />
afleveringstoestand 0,4 seconden.<br />
Belangrijke aanwijzingen voor<br />
het programmering<br />
In beginsel kan de <strong>SET</strong>-<strong>Compact</strong>-<br />
<strong>Video</strong> door een persoon in gebruik<br />
genomen en geprogrammeerd<br />
worden.<br />
• Installatie gereed maken<br />
• Programmeermode op de <strong>Video</strong>-<br />
<strong>Set</strong>-Netvoeding activeren<br />
• Deurstation in de programmeermode<br />
zetten<br />
• Toestellen programmeren<br />
• Programmeermode beëindigen<br />
Wanneer de <strong>Video</strong>-<strong>Set</strong>-Netvoeding<br />
in de programmeermode is, kunnen<br />
meerdere stappen na elkaar worden<br />
geprogrammeerd. De programmeermode<br />
hoeft niet iedere keer te<br />
worden beëindigd.<br />
Bustelefoon handsfree<br />
Het opnemen en opleggen van de<br />
hoorn vervalt bij de Bus-Hands-free<br />
telefoon BFSV <strong>850</strong>-... Het apparaat<br />
schakelt zich door het drukken<br />
van de lichttoets in de programmeermode.<br />
Werd de stap naar de<br />
programmering doorgevoerd dan<br />
schakelt de Bus-Telefoon weer<br />
terug naar de ruststand. Alle andere<br />
stappen voor de programmering zijn<br />
identiek.
Programmering - handmatig<br />
Deuroproep programmering<br />
Gebruik<br />
Oproep van een deurstation naar<br />
een Bus-Telefoon.<br />
Op de Bus-telefoon kan voor de<br />
deuroproep naar keuze een andere<br />
beltoonmelodie worden gekozen.<br />
1 Programmeermode inschakelen.<br />
Op de VSNG <strong>850</strong>-... de toets<br />
Prog.- Mode kort drukken. De LED1<br />
knippert in een 2 seconden ritme<br />
voor de weergave, dat de programmeermode<br />
actief is.<br />
4 Licht-toets gedurende 4 seconden<br />
ingedrukt houden. In de hoorn<br />
is een lange bevestigingstoon te<br />
horen, de mute-toets knippert. Er<br />
bestaat een spraakverbinding naar<br />
het deurstation. De Bus-Telefoon is<br />
nu in de programmeermode, hoorn<br />
niet opleggen.<br />
Het volume van de deuroproep<br />
kan op de Bus-telefoon worden<br />
veranderd.<br />
2 Op het deurstation de programmeertoets<br />
gedurende 4 seconden<br />
ingedrukt houden. Daarna is een<br />
lange bevestigingstoon te horen,<br />
die iedere 5 seconden kort herhaald<br />
wordt, zo lang de programmeermode<br />
actief is.<br />
5 Op het deurstation de gewenste<br />
oproeptoets gedurende 4 seconden<br />
ingedrukt houden, tot op de deurluidspreker<br />
een langdurige toon te<br />
horen is. De oproeptoets is nu aan<br />
de Bus-Telefoon toegewezen, de<br />
spraakverbinding bestaat niet meer.<br />
3 Op de Bus-Telefoon die geprogrammeerd<br />
moet worden, hoorn<br />
opnemen.<br />
6 Op de Bus-Telefoon de hoorn<br />
opleggen. De oproeptoets is nu vast<br />
aan de Bus-Telefoon toegewezen.<br />
43
Programmering - handmatig<br />
Deuroproep programmering<br />
via etage-oproeptoets<br />
Gebruik<br />
Oproep van een deurstation naar<br />
een Bus-Telefoon.<br />
Het programmering is alleen<br />
mogelijk indien op de Bus-Telefoons<br />
de etage-oproeptoets (ERT) aangesloten<br />
is. Indien tot een woning<br />
geen toegang bestaat, kan op deze<br />
1 Programmeermode inschakelen.<br />
Op de VSNG <strong>850</strong>-... de toets<br />
Prog.- Mode kort drukken. De LED1<br />
knippert in een 2 seconden ritme<br />
voor de weergave, dat de programmeermode<br />
actief is.<br />
4 Op het deurstation de gewenste<br />
oproeptoets gedurende 4 seconden<br />
ingedrukt houden, tot op de deurluidspreker<br />
een langdurige toon te<br />
horen is. De oproeptoets is nu aan<br />
de Bus-Telefoon toegewezen, de<br />
spraakverbinding bestaat niet meer.<br />
44<br />
manier toch het programmering<br />
worden doorgevoerd.<br />
2 Op het deurstation de programmeertoets<br />
gedurende 4 seconden<br />
ingedrukt houden. Daarna is een<br />
lange bevestigingstoon te horen,<br />
die iedere 5 seconden kort herhaald<br />
wordt, zo lang de programmeermode<br />
actief is.<br />
5 De oproeptoets is nu vast aan de<br />
Bus-telefoon toegewezen.<br />
Verdere toestellen programmeren<br />
volgens dezelfde voortgangswijze of<br />
programmering beëindigen.<br />
3 De op de Bus-Telefoon aangesloten<br />
etage-oproeptoets gedurende<br />
4 seconden ingedrukt houden. De<br />
Bus-Telefoon is nu in de programmeermode.<br />
Gedurende deze tijd<br />
mag binnen de installatie niet gebeld<br />
worden!
Programmering - handmatig<br />
Deuroproep programmeren<br />
Bus-Hands-free telefoon<br />
Gebruik<br />
Oproep van een deurstation naar<br />
een Bus-Telefoon.<br />
Op de Bus-Hands-free telefoon kan<br />
voor de deuroproep naar keuze<br />
een andere beltoonmelodie worden<br />
gekozen.<br />
1 Programmeermode inschakelen.<br />
Op de VSNG <strong>850</strong>-... de toets<br />
Prog.- Mode kort drukken. De LED1<br />
knippert in een 2 seconden ritme<br />
voor de weergave, dat de programmeermode<br />
actief is.<br />
4 Op het deurstation de gewenste<br />
oproeptoets gedurende 4 seconden<br />
ingedrukt houden, tot op de deurluidspreker<br />
een langdurige toon te<br />
horen is. De oproeptoets is nu aan<br />
de Bus-Telefoon toegewezen, de<br />
spraakverbinding bestaat niet meer.<br />
Het volume van de deuroproep<br />
kan op de Bus-Telefoon worden<br />
veranderd.<br />
2 Op het deurstation de programmeertoets<br />
gedurende 4 seconden<br />
ingedrukt houden. Daarna is een<br />
lange bevestigingstoon te horen,<br />
die iedere 5 seconden kort herhaald<br />
wordt, zo lang de programmeermode<br />
actief is.<br />
5 De oproeptoets is nu vast aan de<br />
Bus-Hands-free telefoon toegewezen.<br />
Verdere toestellen programmeren<br />
volgens dezelfde voortgangswijze of<br />
programmering beëindigen.<br />
3 Licht-toets gedurende 4 seconden<br />
ingedrukt houden. In de luidspreker<br />
is een lange bevestigingstoon te<br />
horen, de mute-toets knippert. Er<br />
bestaat een spraakverbinding naar<br />
het deurstation. De Bus-Hands-free<br />
telefoon is nu in de programmeermode.<br />
45
Programmering - handmatig<br />
Interne oproep programmering<br />
Gebruik<br />
Een Bus-Telefoon moet een andere<br />
Bus-Telefoon in de installatie oproepen<br />
en kunnen spreken.<br />
De mute-toetsen en licht van de Bus-<br />
Telefoons kunnen indien gewenst<br />
voor interne oproepfunctie worden<br />
omgeprogrammeerd.<br />
1 Programmeermode inschakelen.<br />
Op de VSNG <strong>850</strong>-... de toets<br />
Prog.- Mode kort drukken. De LED1<br />
knippert in een 2 seconden ritme<br />
voor de weergave, dat de programmeermode<br />
actief is.<br />
4 Lichttoets 4 seconden ingedrukt<br />
houden, bevestigingstoon is te<br />
horen. Hoorn niet opleggen.<br />
46<br />
2 Op de eerste Bus-Telefoon die<br />
intern dient te spreken, hoorn<br />
opnemen, de programmeermode is<br />
te horen.<br />
5 Beide Bus-Telefoons hebben nu<br />
een onderlinge spraakverbinding.<br />
3 Lichttoets 4 seconden ingedrukt<br />
houden, bevestigingstoon is te<br />
horen. Hoorn niet opleggen.<br />
6 Op de eerste Bus-Telefoon de<br />
interne oproeptoets gedurende<br />
4 seconden ingedrukt houden,<br />
waarmee de tweede Bus-Telefoon<br />
moet worden opgeroepen. Lange<br />
toon is te horen. Bus-Telefoon is nu<br />
geprogrammeerd, hoorn nog niet<br />
opleggen.
7 Op de eerste Bus-Telefoon de<br />
interne oproeptoets gedurende<br />
4 seconden ingedrukt houden,<br />
waarmee de tweede Bus-Telefoon<br />
moet worden opgeroepen. Lange<br />
toon is te horen. Bus-Telefoon is nu<br />
geprogrammeerd, hoorn nog niet<br />
opleggen.<br />
10 Programmeermode op de<br />
VSNG <strong>850</strong>-... uitschakelen.<br />
8 Op de tweede Bus-Telefoon de<br />
interne oproeptoets gedurende 4<br />
seconden indrukken, waarmee de<br />
eerste Bus-Telefoon moet worden<br />
opgeroepen. Lange toon is te horen.<br />
De toetsen zijn nu op beide Bus-<br />
Telefoons geprogrammeerd.<br />
9 Op beide Bus-Telefoons hoorn<br />
opleggen. Verdere Bus-Telefoons<br />
volgens de gelijke voortgangswijze<br />
programmering of het programmering<br />
beëindigen.<br />
47
Programmering - handmatig<br />
Keuze van het deurstation<br />
Gebruik<br />
Het deurstation dient door een<br />
Bus-telefoon via toetsen te worden<br />
gekozen, bijv. om een bezoeker<br />
gericht aan te spreken en te zien. Bij<br />
de Bus-telefoons BTSV/BFSV <strong>850</strong>-...<br />
kan de licht- of mute-toets voor<br />
deze functie worden gebruikt.<br />
1 Programmeermode inschakelen.<br />
Op de VSNG <strong>850</strong>-... de toets<br />
Prog.- Mode kort drukken. De LED1<br />
knippert in een 2 seconden ritme<br />
voor de weergave, dat de programmeermode<br />
actief is.<br />
4 Licht-toets gedurende 4 seconden<br />
ingedrukt houden. In de hoorn is<br />
een lange signaaltoon te horen. De<br />
Bus-Telefoon is nu in de programmeermode.<br />
Hoorn niet opleggen. Er<br />
bestaat spraakverbinding met beeld<br />
naar het deurstation.<br />
48<br />
2 Op het deurstation de programmeertoets<br />
gedurende 4 seconden<br />
ingedrukt houden. Daarna is een<br />
lange bevestigingstoon te horen,<br />
die iedere 5 seconden kort herhaald<br />
wordt, zo lang de programmeermode<br />
actief is.<br />
5 Op de Bus-Telefoon de gewenste<br />
toets gedurende 4 seconden ingedrukt<br />
houden, waarmee het deurstation<br />
gekozen dient te worden. Op<br />
de Bus-Telefoon de hoorn opleggen.<br />
De toets is nu aan het deurstation<br />
toegewezen. De deurluidspreker kan<br />
op ieder moment gekozen worden.<br />
3 Op de Bus-Telefoon die geprogrammeerd<br />
moet worden, hoorn<br />
opnemen.<br />
6 Hoorn opleggen. Verdere Bus-<br />
Telefoons programmering of het<br />
programmering beëindigen.
S. <strong>Siedle</strong> & Söhne<br />
Postfach 1155<br />
78113 Furtwangen<br />
Bregstraße 1<br />
78120 Furtwangen<br />
Telefon +49 7723 63-0<br />
Telefax +49 7723 63-300<br />
www.siedle.de<br />
info@siedle.de<br />
© 2008/07.09 DE, EN, FR, NL<br />
Printed in Germany<br />
Best. Nr. 0-1101/036916