SmartScan Model 2400 Portable AEI Reader - Signal Computer ...
SmartScan Model 2400 Portable AEI Reader - Signal Computer ...
SmartScan Model 2400 Portable AEI Reader - Signal Computer ...

Create successful ePaper yourself
Turn your PDF publications into a flip-book with our unique Google optimized e-Paper software.
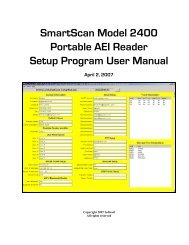
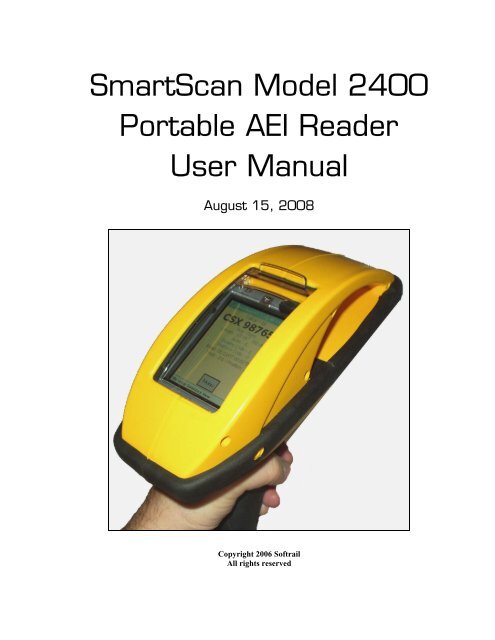
<strong>SmartScan</strong> <strong>Model</strong> <strong>2400</strong><br />
<strong>Portable</strong> <strong>AEI</strong> <strong>Reader</strong><br />
User Manual<br />
August 15, 2008<br />
Copyright 2006 Softrail<br />
All rights reserved
<strong>SmartScan</strong> <strong>Model</strong> <strong>2400</strong> <strong>Portable</strong> <strong>AEI</strong> <strong>Reader</strong><br />
Softrail<br />
1098 Venetia Road<br />
Eighty-Four, PA 15330<br />
Tel. 888 872-4612 (toll free US and Canada only)<br />
Tel. 724 942-1473<br />
Fax. 724 942-1480<br />
E-mail aei@signalcc.com<br />
Web Page www.aeitag.com<br />
ii August 15, 2008
<strong>SmartScan</strong> <strong>Model</strong> <strong>2400</strong> <strong>Portable</strong> <strong>AEI</strong> <strong>Reader</strong><br />
Table of Contents<br />
1. BRIEF OVERVIEW.................................................................................................... 1<br />
2. QUICK START ........................................................................................................ 2<br />
2.1. Battery Operation......................................................................................................2<br />
2.2. Reading <strong>AEI</strong> Tags ......................................................................................................2<br />
2.3. Placing Rail Vehicles on Tracks ...................................................................................4<br />
2.4. Ending Track Inventory ...............................................................................................7<br />
2.5. Send Track Inventory .................................................................................................8<br />
2.6. Manual Entry of Vehicle Identification..........................................................................11<br />
3. ADDITIONAL DATA FIELDS...................................................................................... 13<br />
3.1. Vehicle Comments ..................................................................................................14<br />
3.2. Vehicle System Defined Fields ...................................................................................14<br />
3.3. Vehicle User Defined Fields.......................................................................................15<br />
3.4. Rail Vehicle Data Field Display ...................................................................................16<br />
4. SCREEN DISPLAYS................................................................................................ 17<br />
5. SETUP FUNCTIONS ............................................................................................... 18<br />
5.1. Methods for Entering Setup Data ..............................................................................19<br />
5.2. Setup Password .....................................................................................................20<br />
5.3. Contact Information Setup........................................................................................20<br />
5.4. Default Values Setup ...............................................................................................21<br />
5.5. Memorized Data Maintenance ..................................................................................22<br />
5.6. <strong>Portable</strong> <strong>Reader</strong> Identifier.........................................................................................24<br />
5.7. Track Setup ...........................................................................................................25<br />
5.8. User Field Names Setup ..........................................................................................32<br />
5.9. <strong>AEI</strong> RR TCP/IP Setup ..............................................................................................33<br />
5.10. Email Setup............................................................................................................35<br />
5.11. Email Addresses .....................................................................................................36<br />
5.12. FTP Setup..............................................................................................................36<br />
5.13. Network Communications.........................................................................................37<br />
5.14. Automatic Clock Update...........................................................................................38<br />
5.15. Barcodes...............................................................................................................39<br />
5.16. OEM Folder Setup ...................................................................................................44<br />
6. INVENTORY ......................................................................................................... 45<br />
6.1. View Track Inventory................................................................................................46<br />
6.1.1. Add Rail Vehicle......................................................................................................48<br />
6.1.2. Delete Rail Vehicle ..................................................................................................48<br />
6.1.3. Change Rail Vehicle Position on Track ........................................................................48<br />
6.1.4. View and Change Rail Vehicle Data ............................................................................49<br />
6.1.5. Reverse Track Inventory...........................................................................................50<br />
6.1.6. Track T94 and Email Comments................................................................................50<br />
6.1.7. Send Track Inventory ...............................................................................................51<br />
6.2. Move Track Inventory ..............................................................................................51<br />
6.2.1. Move Selected Rail Vehicles to Another Track .............................................................52<br />
6.2.2. Move All Rail Vehicles to Another Track......................................................................53<br />
6.2.3. Other Move Rail Vehicle Functions .............................................................................53<br />
6.3. Find Rail Vehicle and Rail Vehicle Movement History .....................................................54<br />
6.4. Delete All Track Inventory .........................................................................................55<br />
7. TRACK TAGS ....................................................................................................... 55<br />
8. SPOT TAGS.......................................................................................................... 57<br />
9. OEM FUNCTIONS .................................................................................................. 57<br />
9.1. Accessing Tag Data ................................................................................................58<br />
9.2. Sending OEM Data ..................................................................................................63<br />
iii August 15, 2008
<strong>SmartScan</strong> <strong>Model</strong> <strong>2400</strong> <strong>Portable</strong> <strong>AEI</strong> <strong>Reader</strong><br />
9.2.1. Email Transmit Request File ......................................................................................64<br />
9.2.2. FTP Transmit Request File ........................................................................................67<br />
9.2.3. OEM Transmit Request Status ..................................................................................68<br />
10. OPTIONS ............................................................................................................. 69<br />
11. ABOUT................................................................................................................ 71<br />
12. MAINTENANCE AND COMMUNICATION LOGS............................................................ 71<br />
12.1. Maintenance Log ....................................................................................................71<br />
12.2. Communications Log ...............................................................................................72<br />
13. FILE MAINTENANCE .............................................................................................. 73<br />
14. TEXT FILE FORMAT ............................................................................................... 74<br />
14.1. EDI Text File Format ................................................................................................74<br />
14.2. Excel Text File .........................................................................................................82<br />
15. TECHNICAL SUPPORT AND UPDATES ...................................................................... 84<br />
16. SYSTEM SPECIFICATIONS ....................................................................................... 85<br />
iv August 15, 2008
<strong>SmartScan</strong> <strong>Model</strong> <strong>2400</strong> <strong>Portable</strong> <strong>AEI</strong> <strong>Reader</strong><br />
List of Figures<br />
Figure 1 - <strong>SmartScan</strong> Information Display....................................................................................3<br />
Figure 2 - <strong>AEI</strong> Tag Display .........................................................................................................3<br />
Figure 3 - <strong>SmartScan</strong> <strong>Portable</strong> <strong>Reader</strong> Side View..........................................................................4<br />
Figure 4 - Active Track Display...................................................................................................5<br />
Figure 5 - Start Track Inventory Menu.........................................................................................6<br />
Figure 6 - Start Track Inventory Dialog ........................................................................................ 6<br />
Figure 7 - End Track Inventory Menu ..........................................................................................8<br />
Figure 8 - Send Track Inventory Dialog ........................................................................................9<br />
Figure 9 - Message Status Dialog ............................................................................................11<br />
Figure 10 - Manual Entry Dialog...............................................................................................12<br />
Figure 11 - Manually Entered Vehicle Display .............................................................................13<br />
Figure 12 - Vehicle Comments Dialog .......................................................................................14<br />
Figure 13 - System Fields Dialog ..............................................................................................15<br />
Figure 14 - User Fields Dialog ................................................................................................. 16<br />
Figure 15 - Rail Vehicle Data Field Display .................................................................................17<br />
Figure 16 - Screen Displays .................................................................................................... 18<br />
Figure 17 - Setup Password Dialog ..........................................................................................20<br />
Figure 18 - Contact Information Dialog......................................................................................21<br />
Figure 19 - Default Values Dialog .............................................................................................22<br />
Figure 20 - Memorized Field Select Dialog .................................................................................23<br />
Figure 21 - Memorized Fields Data Dialog .................................................................................24<br />
Figure 22 - <strong>Portable</strong> <strong>Reader</strong> Identifier Dialog..............................................................................25<br />
Figure 23 - Track Setup Dialog ................................................................................................26<br />
Figure 24 - Spot Name Setup Dialog ........................................................................................27<br />
Figure 25 - Rename Track Spot Dialog......................................................................................28<br />
Figure 26 - T94 Track Data Dialog ...........................................................................................29<br />
Figure 27 - Send Track Inventory Setup Dialog ...........................................................................30<br />
Figure 28 - Track Comments and Email Text Dialog.....................................................................32<br />
Figure 29 - User Field Name Setup Dialog .................................................................................33<br />
Figure 30 - <strong>Model</strong> <strong>2400</strong> <strong>Portable</strong> <strong>Reader</strong> TCP/IP Setup .............................................................34<br />
Figure 31 - <strong>AEI</strong> RR TCP/IP Setup Dialog ...................................................................................34<br />
Figure 32 - Email Setup Dialog................................................................................................. 35<br />
Figure 33 - Email Address Setup Dialog ....................................................................................36<br />
Figure 34 - FTP Server Setup Dialog.........................................................................................37<br />
Figure 35 - WiFi / Bluetooth Enable Dialog................................................................................38<br />
Figure 36 - Automatic Clock Update Dialog................................................................................39<br />
Figure 37 - Barcode Examples.................................................................................................40<br />
Figure 38 - Barcode Setup Dialog ............................................................................................41<br />
Figure 39 - Barcode Field Structure .........................................................................................42<br />
Figure 40 - Barcode Text Translation Dialog ..............................................................................43<br />
Figure 41 - Barcode Add/Edit Dialog........................................................................................44<br />
Figure 42 - OEM Folder Setup .................................................................................................45<br />
Figure 43 - Inventory Menu ..................................................................................................... 46<br />
Figure 44 - Track Select Dialog................................................................................................ 47<br />
Figure 45 - Track View Dialog.................................................................................................. 48<br />
Figure 46 - Rail Vehicle Data Dialog..........................................................................................49<br />
Figure 47 - Rail Vehicle Data Pop-up Menu ................................................................................50<br />
Figure 48 - Comments and Email Text Dialog .............................................................................51<br />
Figure 49 - Move Rail Vehicle From Dialog.................................................................................52<br />
Figure 50- Move Rail Vehicle To Dialog .....................................................................................53<br />
Figure 51 - Find Rail Vehicle Dialog........................................................................................... 54<br />
v August 15, 2008
<strong>SmartScan</strong> <strong>Model</strong> <strong>2400</strong> <strong>Portable</strong> <strong>AEI</strong> <strong>Reader</strong><br />
Figure 52 - Rail Vehicle History Display......................................................................................55<br />
Figure 53 - Installed Options Display .........................................................................................70<br />
Figure 54 - About Display........................................................................................................71<br />
vi August 15, 2008
<strong>SmartScan</strong> <strong>Model</strong> <strong>2400</strong> <strong>Portable</strong> <strong>AEI</strong> <strong>Reader</strong><br />
1. BRIEF OVERVIEW<br />
The <strong>SmartScan</strong> <strong>Model</strong> <strong>2400</strong> <strong>Portable</strong> <strong>AEI</strong> <strong>Reader</strong> is a very versatile <strong>AEI</strong> tag reader. It<br />
is primarily used to verify <strong>AEI</strong> tag data or to capture track consist by reading the <strong>AEI</strong><br />
tags on the rail vehicles.<br />
Its two main components are a commercial Personal Data Assistant (PDA) and an <strong>AEI</strong><br />
RF reader board along with a battery, housed in a rugged enclosure. An optional<br />
barcode reader is available.<br />
The battery that provides power to the <strong>AEI</strong> reader electronics also provides power to<br />
the PDA, and the case protects the PDA from mishandling and weather.<br />
Because the PDA has wireless network capabilities (both 802.11b and Bluetooth), <strong>AEI</strong><br />
tag data can be easily sent directly to other computer systems (see Paragraph 2.5).<br />
<strong>AEI</strong> data is sent in a comma delimited text file or a file containing the T94 records.<br />
Either of these file types can be attached to an email or uploaded to an FTP server.<br />
The <strong>Model</strong> <strong>2400</strong> <strong>Portable</strong> <strong>AEI</strong> reader can send <strong>AEI</strong> data files directly to as many as<br />
seven email addresses in addition to an FTP server.<br />
Some of the other capabilities of the <strong>SmartScan</strong> <strong>Model</strong> <strong>2400</strong> <strong>Portable</strong> <strong>AEI</strong> <strong>Reader</strong> are<br />
listed below:<br />
• Displays <strong>AEI</strong> tag data in user-friendly format (see Figure 2).<br />
• Allows manual entry of vehicle identification information in the event an <strong>AEI</strong> tag<br />
cannot be read (see Paragraph 11).<br />
• Allows vehicles to be assigned to a track or a spot on a track (see Paragraph 4).<br />
• Allows the user to assign track and spot names (see Paragraph 5.7).<br />
• Allows the scanning of two tracks at the same time (see 2.3).<br />
• Allows the use of special <strong>AEI</strong> tags that are programmed with track and spot<br />
information to eliminate the requirement of entering this information manually (see<br />
Paragraphs 7 and 8).<br />
• Allows additional data to be added about vehicles (see Paragraph 3). There are<br />
twelve data fields available. The user can define and name seven of these fields.<br />
The other five fields are: two Maintenance Data fields, a Status field, a Consist field<br />
and a Comments field.<br />
• Allows the use of special barcode labels to enter maintenance and status<br />
information about a rail vehicle (see Paragraph 5.15).<br />
• Allows for the easy development of custom applications.<br />
• Enables other vendors (OEMs) to develop special applications for the portable <strong>AEI</strong><br />
reader (see Paragraph 9). The portable <strong>AEI</strong> readers allow other applications to<br />
1 August 15, 2008
<strong>SmartScan</strong> <strong>Model</strong> <strong>2400</strong> <strong>Portable</strong> <strong>AEI</strong> <strong>Reader</strong><br />
easily access tag and barcode data and send their generated data as files attached<br />
to emails or uploaded to an FTP server.<br />
• Allows the portable reader to access data from other devices (scales, wayside<br />
sensors, etc.) via its Bluetooth connection and associate this data with <strong>AEI</strong> tag<br />
reads.<br />
• Will eventually allow the portable <strong>AEI</strong> reader to talk directly to Bluetooth enabled<br />
GPRS phones and Global Positioning Systems (GPS).<br />
2. QUICK START<br />
2.1. Battery Operation<br />
The portable reader has two batteries. The main battery is located in the pistol grip<br />
and is used to power the RF board and charge the battery in the iPAQ PDA.<br />
To charge the main battery, plug the charger into the connector that is behind the<br />
portable reader’s pistol grip and next to the USB connector. The blue light next to the<br />
USB connector should come on indicating that the main battery is being charged and<br />
the orange light on the PDA should begin to blink. When the main battery is being<br />
charged, the PDA’s battery is also being charged. Please note that the portable<br />
reader will not read tags when it is being charged.<br />
When the blue light goes out, the portable reader’s main battery is charged. When<br />
the PDA’s orange light stops blinking and stays on, its battery is charged.<br />
Each time you pull the rocker switch in the portable reader’s handle to read tags, the<br />
unit will begin charging the PDA’s battery from the main battery. The PDA’s battery<br />
will be charged for 10 minutes after the last time the rocker switch was pulled.<br />
If the portable reader’s charging status light turns red instead of blue when you are<br />
charging the portable reader, there is a problem with the battery or the battery<br />
charger and you should return both for repair.<br />
Please note that the battery status displayed on the PDA’s screen is for the PDA’s<br />
battery only. It does not show the status of the portable reader’s main battery.<br />
2.2. Reading <strong>AEI</strong> Tags<br />
To read an <strong>AEI</strong> tag, first turn on the portable reader's PDA by depressing the black<br />
switch at the top right corner of the PDA. The screen in Figure 1 or Figure 2 should<br />
be displayed. If neither screen is displayed, use a pen to depress the reset button.<br />
The reset button is located on the backside of the portable reader's case on the left.<br />
This will cause the <strong>SmartScan</strong> program to restart.<br />
2 August 15, 2008
<strong>SmartScan</strong> <strong>Model</strong> <strong>2400</strong> <strong>Portable</strong> <strong>AEI</strong> <strong>Reader</strong><br />
Figure 1 - <strong>SmartScan</strong> Information Display<br />
Figure 2 - <strong>AEI</strong> Tag Display<br />
3 August 15, 2008
<strong>SmartScan</strong> <strong>Model</strong> <strong>2400</strong> <strong>Portable</strong> <strong>AEI</strong> <strong>Reader</strong><br />
There is a two-position rocker switch on the portable reader's pistol grip (see Figure<br />
3). Pressing down on the top part of this switch will cause the portable reader to read<br />
<strong>AEI</strong> tags. Pressing down on the bottom part of this switch will cause the portable<br />
reader to read barcodes (if the portable reader is equipped with the optional barcode<br />
reader).<br />
Figure 3 - <strong>SmartScan</strong> <strong>Portable</strong> <strong>Reader</strong> Side View<br />
To read an <strong>AEI</strong> tag press down the top part of the rocker switch while pointing the<br />
portable <strong>AEI</strong> reader at the <strong>AEI</strong> tag.<br />
You will hear a beep and the display will be updated when the <strong>AEI</strong> tag is read. Figure 2<br />
is an example of what the screen will display when an <strong>AEI</strong> tag that contains rail vehicle<br />
information is read. Other displays will appear when <strong>AEI</strong> tags with track or track spot<br />
information are read.<br />
If a tag fails to be read after 5 seconds, release the rocker switch button. You can<br />
then manually enter vehicle identification information (see Paragraph 2.6).<br />
2.3. Placing Rail Vehicles on Tracks<br />
Prior to reading rail vehicle <strong>AEI</strong> tags, track information should be entered into the<br />
portable reader.<br />
There are two methods for assigning rail vehicles to a track.<br />
The first is to equip each track with a Track <strong>AEI</strong> tag (see Paragraph 7 on the format of<br />
the Track tag). These are placed at each end of the track and contain the track name<br />
and the orientation of the track.<br />
4 August 15, 2008
<strong>SmartScan</strong> <strong>Model</strong> <strong>2400</strong> <strong>Portable</strong> <strong>AEI</strong> <strong>Reader</strong><br />
To start taking inventory use the portable <strong>AEI</strong> reader to read one of these tags before<br />
reading the tags on the rail vehicles. When a Track <strong>AEI</strong> tag is read the display in<br />
Figure 4 will be shown.<br />
Figure 4 - Active Track Display<br />
Two tracks can be active at any given time. This allows rail vehicles on two adjacent<br />
tracks to be scanned in the same session.<br />
When two tracks are active, rail vehicles can be moved back and forth between the<br />
two tracks by depressing the Switch Track button shown in Figure 2 or by reading the<br />
same vehicle's <strong>AEI</strong> tag a second time. Each time the same vehicle's <strong>AEI</strong> tag is read,<br />
the portable reader will switch the vehicle to the other track.<br />
The portable reader will assign all of the rail vehicles to one of up to two active tracks<br />
until a second Track tag on one of the active tracks is read or until the user issues a<br />
command to the portable reader to stop taking inventory on that track (see Paragraph<br />
2.4).<br />
The second method is to manually enter the track information into the portable reader.<br />
To manually enter a track name, tap the Menu button on the screen. This will cause a<br />
pop-up menu to appear (see Figure 5).<br />
5 August 15, 2008
<strong>SmartScan</strong> <strong>Model</strong> <strong>2400</strong> <strong>Portable</strong> <strong>AEI</strong> <strong>Reader</strong><br />
Figure 5 - Start Track Inventory Menu<br />
Select the Start Track Inventory menu item by tapping on it. This will cause the Start<br />
Track Inventory dialog to be displayed (see Figure 6).<br />
Figure 6 - Start Track Inventory Dialog<br />
6 August 15, 2008
<strong>SmartScan</strong> <strong>Model</strong> <strong>2400</strong> <strong>Portable</strong> <strong>AEI</strong> <strong>Reader</strong><br />
In the Start Track Inventory dialog you will either select a previously entered track<br />
name, by selecting a name from the pull down list (which appears when you tap on the<br />
down triangle located on the right side of the Track field), or manually enter a new<br />
track name. To enter a new track name, tap on the keyboard icon located near the<br />
bottom right of the screen. This will cause a keyboard to be displayed. Tap on the<br />
characters of the new name.<br />
After you have entered a new track name, this name will appear in the Track pull down<br />
list when this dialog is displayed again.<br />
The track's inventory orientation can be entered by selecting a direction item from the<br />
Inventory Orientation field's pull down list.<br />
The default track inventory orientation can be set by going to the Default Values dialog<br />
(see Paragraph 5.4).<br />
Some tracks can assign spot names to individual locations on the track. If you want to<br />
assign rail vehicles to individual track spot locations, check the Use Track Spots<br />
checkbox.<br />
When this dialog is completed, tap on the OK button. This will cause the Active Track<br />
display to appear (see Figure 4).<br />
2.4. Ending Track Inventory<br />
There are two ways to end taking track inventory. The first method is to read a Track<br />
<strong>AEI</strong> tag on one of the active tracks.<br />
The second is to tap on the Menu button. This will cause a pop-up menu to appear<br />
(see Figure 7).<br />
7 August 15, 2008
<strong>SmartScan</strong> <strong>Model</strong> <strong>2400</strong> <strong>Portable</strong> <strong>AEI</strong> <strong>Reader</strong><br />
Figure 7 - End Track Inventory Menu<br />
Select the End Track Inventory item for the track on which you are done taking<br />
inventory. This will end inventory for the track. All subsequent vehicle tag reads will<br />
not appear on that track until Start Track Inventory is again selected or a Track tag is<br />
read.<br />
When track inventory is ended, the portable reader will ask if you want to send the<br />
track inventory to another system. If you respond "Yes", the Send Track Inventory<br />
dialog shown in Figure 8 will be displayed.<br />
2.5. Send Track Inventory<br />
The Send Track Inventory dialog (see Figure 8) allows you to enter the track inventory's<br />
file format and how the track inventory will be sent.<br />
The portable <strong>AEI</strong> reader can send track inventory in three types of file formats. The<br />
T94 format is the standard format used for communication between wayside <strong>AEI</strong><br />
readers and railroads' host computers. Information about this format can be found in<br />
the Association of American Railroads' <strong>AEI</strong> Standard S-918, which can be downloaded<br />
from our web page at www.aeitag.com.<br />
The second format is a comma delimited text file. This format uses Electronic Data<br />
Interchange (EDI) type records. This file has many different types of records and is<br />
generally used for computer-to-computer communications. For information about this<br />
file format go to Paragraph 14.<br />
8 August 15, 2008
<strong>SmartScan</strong> <strong>Model</strong> <strong>2400</strong> <strong>Portable</strong> <strong>AEI</strong> <strong>Reader</strong><br />
The third format is also a comma delimited text file. We refer to it has the Excel file<br />
format since it was designed so that it can be easily imported into most commercial<br />
word processing, spreadsheet and database programs. For information about the<br />
Excel file format go to Paragraph 14.<br />
Track inventory in any file format can be sent as an attachment to an email and/or a<br />
file directly sent to an FTP server. To use either of these options the email server<br />
name or FTP server name, user name and password must be entered into the<br />
portable reader's PDA prior to attempting to send inventory. Information on setting up<br />
the email or FTP functions can be found in Paragraphs 5.9 or 5.12, respectively. Files<br />
can be sent to as many as seven email addresses. For information on entering email<br />
addresses into the system go to Paragraph 5.11.<br />
Softrail also maintains an FTP server for receiving track inventory. Softrail uses this<br />
server to provide a data redistribution service to portable reader users. Softrail can<br />
forward track inventory received on Softrail's FTP server to multiple email addresses,<br />
FTP servers or computers using dialup connections.<br />
For more information about this service contact Softrail at 888 872-4612 or 724<br />
942-1473.<br />
Figure 8 - Send Track Inventory Dialog<br />
The portable <strong>AEI</strong> reader can also send track inventory to Softrail's <strong>AEI</strong> Rail and Road<br />
Manager program directly via a TCP/IP connection (see Paragraph 5.9).<br />
9 August 15, 2008
<strong>SmartScan</strong> <strong>Model</strong> <strong>2400</strong> <strong>Portable</strong> <strong>AEI</strong> <strong>Reader</strong><br />
For more information about the <strong>AEI</strong> Rail and Road Manager software program contact<br />
Softrail at 888 872-4612 or 724 942-1473 or go to Softrail's web page at<br />
www.aeitag.com.<br />
Once the Send button is tapped the message or messages will be placed into a queue<br />
for transmission. Up to 200 messages can be in the message queue waiting for<br />
transmission.<br />
When the portable <strong>AEI</strong> reader sees that there is a message to transmit, it will attempt<br />
to make an internet connection.<br />
The portable <strong>AEI</strong> reader connects to the internet using its integral wireless 802.11b<br />
radio or a USB connection to a local computer that has access to the internet.<br />
Normally the portable <strong>AEI</strong> reader's wireless radio is turned off to conserve battery life.<br />
When there are messages to be sent the portable reader turns the radio on and tries<br />
to make a connection. A blue light at the top left of the portable reader's PDA will<br />
come on when the radio is turned on. This light will turn green when a connection is<br />
made (usually for a few seconds) and turn off when all messages are sent.<br />
If a user is in the field and is in a location that does not have good radio coverage, the<br />
portable reader will turn the radio off after 30 seconds and wait another 5 minutes<br />
before trying to transmit the messages again.<br />
When a user moves to an area that has better radio coverage, the portable reader will<br />
automatically send all pending messages.<br />
The wireless feature can be turned off if you don’t want to use it. Go to Paragraph 5.9<br />
for more information.<br />
To find the status of pending transmission messages tap the View menu item near the<br />
bottom of the screen and then select the Message Status item. This will cause the<br />
Message Status dialog shown in Figure 9 to be displayed.<br />
10 August 15, 2008
<strong>SmartScan</strong> <strong>Model</strong> <strong>2400</strong> <strong>Portable</strong> <strong>AEI</strong> <strong>Reader</strong><br />
Figure 9 - Message Status Dialog<br />
The Message Status dialog shows all of the messages that are waiting to be sent and<br />
the last 100 messages that were sent.<br />
2.6. Manual Entry of Vehicle Identification<br />
In situations where a rail vehicle has a bad tag or is missing a tag vehicle identification<br />
information can be manually entered. To manually enter vehicle identification<br />
information, tap anywhere on the screen, which will cause a pop-up menu to be<br />
displayed (see Figure 7). Select the Manually Enter Tag Info menu item, and the<br />
Manual Entry dialog shown in Figure 10 will appear.<br />
11 August 15, 2008
<strong>SmartScan</strong> <strong>Model</strong> <strong>2400</strong> <strong>Portable</strong> <strong>AEI</strong> <strong>Reader</strong><br />
Figure 10 - Manual Entry Dialog<br />
To display the keyboard, tap the white keyboard icon in the bottom right corner.<br />
Tapping this icon a second time will cause the keyboard to disappear.<br />
The vehicle initial can either be selected from a list of previously entered initials in the<br />
Vehicle Initial field's pull down list (which appears when you tap on the down triangle<br />
located on the right side of the Vehicle Initial field), or a new initial can be typed in<br />
using the keyboard. To enter a new initial, tap on the keyboard icon located near the<br />
bottom right of the screen. This will cause a keyboard to be displayed. Tap on the<br />
characters of the new name.<br />
After you have entered a new initial, this new initial will appear in the Vehicle Initial's<br />
pull down list when the dialog is displayed again.<br />
A default vehicle initial can be set by going to the Default Values dialog (see Paragraph<br />
5.4).<br />
The Vehicle Number field must contain between 1 to 6 digits to be accepted. The<br />
portable reader will insert any leading zeroes. Numbers can be quickly entered into<br />
this field by tapping the number buttons under this field. It is not necessary to tap on<br />
the Vehicle Number field prior to tapping on these number buttons.<br />
The Vehicle Type can be either Locomotive or Railcar and is selected from this field's<br />
pull down list.<br />
When the OK button is tapped, the screen shown in Figure 11 will be displayed.<br />
12 August 15, 2008
<strong>SmartScan</strong> <strong>Model</strong> <strong>2400</strong> <strong>Portable</strong> <strong>AEI</strong> <strong>Reader</strong><br />
Figure 11 - Manually Entered Vehicle Display<br />
This display shows that a vehicle's data was manually entered and the time the entry<br />
occurred. As with vehicles entered via tag reads, manually entered vehicle information<br />
can be included in track inventory and can be sent to other systems via the internet.<br />
3. ADDITIONAL DATA FIELDS<br />
When a vehicle is entered into the portable reader via an <strong>AEI</strong> tag read or manual<br />
entry, additional data can be entered about the vehicle and passed to other systems<br />
(only in a text file format, T94 does not support these additional data fields).<br />
The additional data fields are broken down into three categories. These are:<br />
• Vehicle comments<br />
• System defined fields such as maintenance, status and consist<br />
• User defined fields<br />
There are two methods for entering data into these fields. Data can be entered<br />
manually through a group of displays or entered via barcodes (if the portable reader is<br />
equipped with an optional barcode reader). For more information about entering<br />
information via barcodes go to Paragraph 5.15.<br />
To manually enter information about a rail vehicle into these fields, tap the Menu<br />
button on the screen. This will cause a pop-up menu to be displayed (see Figure 7).<br />
Select the appropriate menu item for the type of additional data to be entered.<br />
13 August 15, 2008
<strong>SmartScan</strong> <strong>Model</strong> <strong>2400</strong> <strong>Portable</strong> <strong>AEI</strong> <strong>Reader</strong><br />
3.1. Vehicle Comments<br />
When the Vehicle Comments menu item is tapped, the Vehicle Comments dialog<br />
shown in Figure 12 will appear.<br />
Figure 12 - Vehicle Comments Dialog<br />
To display the keyboard, tap the white keyboard icon in the bottom right corner.<br />
Tapping this icon a second time will cause the keyboard to disappear.<br />
Up to 200 characters of comments about a vehicle can be entered.<br />
3.2. Vehicle System Defined Fields<br />
When the Vehicle Systems / Maintenance Fields menu item is tapped, the System<br />
Defined Fields dialog shown in Figure 13 will appear.<br />
14 August 15, 2008
<strong>SmartScan</strong> <strong>Model</strong> <strong>2400</strong> <strong>Portable</strong> <strong>AEI</strong> <strong>Reader</strong><br />
Figure 13 - System Fields Dialog<br />
To display the keyboard, tap the white keyboard icon in the bottom right corner.<br />
Tapping this icon a second time will cause the keyboard to disappear.<br />
There are four system-defined fields. The user can enter any data into these fields or<br />
use each field's pull down list of previously entered values for the fields.<br />
The system will remember all entries into these fields and add them to the fields' pull<br />
down lists the next time this dialog is displayed.<br />
3.3. Vehicle User Defined Fields<br />
When the Vehicle User Fields menu item is tapped, the User Fields dialog shown in<br />
Figure 14 will appear.<br />
15 August 15, 2008
<strong>SmartScan</strong> <strong>Model</strong> <strong>2400</strong> <strong>Portable</strong> <strong>AEI</strong> <strong>Reader</strong><br />
Figure 14 - User Fields Dialog<br />
To display the keyboard, tap the white keyboard icon in the bottom right corner.<br />
Tapping this icon a second time will cause the keyboard to disappear.<br />
The user can specify up to seven fields of data that will be maintained for a rail vehicle.<br />
The name of each field can be entered using the User Field Name Setup dialog (see<br />
Paragraph 5.8).<br />
The user can enter any data into these fields or use the fields' pull down lists.<br />
The system will remember all entries into these fields and add them to the fields' pull<br />
down lists the next time this dialog is displayed.<br />
3.4. Rail Vehicle Data Field Display<br />
When a rail vehicle tag is read, the <strong>AEI</strong> Tag display is shown (see Figure 2). When<br />
data is entered into one the vehicle's data fields, the Rail Vehicle Data Field display in<br />
Figure 15 will be shown.<br />
16 August 15, 2008
<strong>SmartScan</strong> <strong>Model</strong> <strong>2400</strong> <strong>Portable</strong> <strong>AEI</strong> <strong>Reader</strong><br />
Figure 15 - Rail Vehicle Data Field Display<br />
This display shows all of the user entered data for the rail vehicle with the exception of<br />
the Comments field.<br />
4. SCREEN DISPLAYS<br />
There are six screen displays. These are:<br />
• <strong>SmartScan</strong> Information Display<br />
• <strong>AEI</strong> Tag Display<br />
• Rail Vehicle Data Field Display<br />
• Active Track Display<br />
• Current Spot Tag Display<br />
• Current Bar Code Display<br />
You can cycle through these displays in the above order by tapping anywhere on the<br />
top half of the screen. Each time you tap, the next screen will appear (see Figure 16).<br />
If a rail vehicle tag has not been read, the <strong>AEI</strong> Tag and Rail Vehicle Data Field displays<br />
will not appear.<br />
17 August 15, 2008
<strong>SmartScan</strong> <strong>Model</strong> <strong>2400</strong> <strong>Portable</strong> <strong>AEI</strong> <strong>Reader</strong><br />
Figure 16 - Screen Displays<br />
5. SETUP FUNCTIONS<br />
There are a number of setup functions. These functions are used to configure the<br />
portable <strong>AEI</strong> reader to perform various tasks and reduce repetitive input.<br />
The following is a list of setup functions:<br />
• Setup Password - allows the user to enter a password to prevent unauthorized<br />
users from changing the setup parameters.<br />
• Contact information - used when sending emails and maintenance information.<br />
• Default values - allows the user to enter a default vehicle initial for the manual<br />
vehicle entry dialog and default track orientation when the user starts taking track<br />
inventory.<br />
• Memorized Data Maintenance - many data fields have pull down lists of previously<br />
entered data. This function allows the user to edit the pull down (memorized) lists.<br />
18 August 15, 2008
<strong>SmartScan</strong> <strong>Model</strong> <strong>2400</strong> <strong>Portable</strong> <strong>AEI</strong> <strong>Reader</strong><br />
• <strong>Portable</strong> <strong>Reader</strong> Identifier - allows the user to assign a name to the portable<br />
reader.<br />
• Track Setup - allows the user to edit track names and add T94 setup data for a<br />
track.<br />
• User Defined Field Names Setup - allows the user to enter the names of user<br />
defined fields.<br />
• <strong>AEI</strong> TCP/IP Setup - used to enter the IP address of the computer hosting Softrail's<br />
<strong>AEI</strong> Rail and Road Manager program.<br />
• Email Setup – used to enter email outbound server information for sending data via<br />
email.<br />
• Email Send to Addresses - used to enter up to seven email addresses that will<br />
receive <strong>AEI</strong> data.<br />
• FTP Setup - used to enter FTP server information for sending files to an FTP server.<br />
• Network Communications - used to enable or disable wireless (80211.b) or<br />
Bluetooth communications.<br />
• Automatic Clock Update - used to enable the automatic updating of the portable<br />
reader’s time and date.<br />
• Barcode Setup - used to specify the barcode parameters for barcodes that are<br />
used to enter data into a rail vehicle's data fields.<br />
• Barcode Text - used to enter a list of barcode numbers that are translated by the<br />
portable reader into text.<br />
• OEM Folder Setup - used to define where the OEM's application can find files<br />
containing <strong>AEI</strong> tag data and where the OEM's application should save files that are<br />
to be transmitted via email or to an FTP server.<br />
The following paragraphs define the setup functions in more detail.<br />
5.1. Methods for Entering Setup Data<br />
Because the portable reader has many capabilities, there are a large number of setup<br />
parameters. To make the setup easier and to transfer setup parameters from one<br />
portable reader to another, a special Windows desktop program has been developed<br />
that allows users to upload and download parameters from a portable reader to a<br />
desktop computer in order to edit the setup parameters on the desktop. The<br />
<strong>SmartScan</strong> <strong>Portable</strong> <strong>Reader</strong> Setup program and manual is included with each<br />
<strong>SmartScan</strong> <strong>Model</strong> <strong>2400</strong> <strong>Portable</strong> <strong>Reader</strong>.<br />
To edit the setup parameters on the portable reader, select the Setup menu item.<br />
This will cause a pop-up menu to appear with a list of all of the setup functions.<br />
19 August 15, 2008
<strong>SmartScan</strong> <strong>Model</strong> <strong>2400</strong> <strong>Portable</strong> <strong>AEI</strong> <strong>Reader</strong><br />
5.2. Setup Password<br />
The Setup Password function allows users to enable password protection so<br />
unauthorized personnel cannot make changes to any of the Setup Parameters in the<br />
portable reader.<br />
To set up password protection select the Setup Password menu item under the Setup<br />
menu.<br />
This will cause the Setup Password dialog shown in Figure 17 to be displayed.<br />
Figure 17 - Setup Password Dialog<br />
If the password protection is enabled, when the user tries to change any of the setup<br />
parameters, the portable reader will ask for the password before making the change.<br />
Once the Setup Parameters are unlocked by entering a password they will stay<br />
unlocked until the Lock Setup Parameters menu item under the Setup menu is<br />
selected.<br />
5.3. Contact Information Setup<br />
To set up contact information tap the Contact Information menu item under the Setup<br />
menu.<br />
This will cause the Contact Information dialog shown in Figure 18 to be displayed.<br />
20 August 15, 2008
<strong>SmartScan</strong> <strong>Model</strong> <strong>2400</strong> <strong>Portable</strong> <strong>AEI</strong> <strong>Reader</strong><br />
Figure 18 - Contact Information Dialog<br />
Information entered in this display is used in the body of some email messages and in<br />
maintenance messages sent to Softrail.<br />
5.4. Default Values Setup<br />
To set up default values tap the Default Values menu item under the Setup menu.<br />
This will cause the Default Values dialog shown in Figure 19 to be displayed.<br />
21 August 15, 2008
<strong>SmartScan</strong> <strong>Model</strong> <strong>2400</strong> <strong>Portable</strong> <strong>AEI</strong> <strong>Reader</strong><br />
Figure 19 - Default Values Dialog<br />
Default values for vehicle initial and track orientation can be entered into the system.<br />
The default value for the vehicle initial is used when vehicle identification is manually<br />
entered into the portable reader.<br />
The vehicle initial can either be selected from a list of previously entered initials in the<br />
Vehicle Initial field's pull down list (which appears when you tap on the down triangle<br />
located on the right side of the Vehicle Initial field), or a new initial can be typed in. To<br />
enter a new initial, tap on the keyboard icon located near the bottom right of the<br />
screen. This will cause a keyboard to be displayed. Tap on the characters of the new<br />
initial and then tap on OK.<br />
After you have entered a new initial, the new initial will appear in the Vehicle Initial's pull<br />
down list when this dialog is displayed again.<br />
The default track orientation is used when track inventory is started and the track<br />
name is entered.<br />
5.5. Memorized Data Maintenance<br />
For many fields the portable reader remembers previous entries so they can be easily<br />
reused by simply selecting them from a pull down list. This eliminates retyping of<br />
common data entries.<br />
22 August 15, 2008
<strong>SmartScan</strong> <strong>Model</strong> <strong>2400</strong> <strong>Portable</strong> <strong>AEI</strong> <strong>Reader</strong><br />
The portable reader has a function to maintain memorized lists of previously entered<br />
data. To access this function tap the Memorized Data Maintenance menu item under<br />
the Setup menu.<br />
This will cause the Memorized Field Select dialog shown in Figure 20 to be displayed.<br />
Figure 20 - Memorized Field Select Dialog<br />
The Memorized Field Select dialog displays all of the fields on which the portable reader<br />
maintains memorized lists of data entries. To edit a particular field's list, tap on the<br />
particular field to be edited, and the Memorized Fields Data dialog will be displayed (see<br />
Figure 21).<br />
23 August 15, 2008
<strong>SmartScan</strong> <strong>Model</strong> <strong>2400</strong> <strong>Portable</strong> <strong>AEI</strong> <strong>Reader</strong><br />
Figure 21 - Memorized Fields Data Dialog<br />
Previously entered values can be deleted or new values can be added to each<br />
particular field's memorized list. To delete an entry, select the entry by tapping on it<br />
and then tap the Delete button. Only one entry can be selected at a time.<br />
5.6. <strong>Portable</strong> <strong>Reader</strong> Identifier<br />
The portable reader allows the user to assign a ten-character identifier to the portable<br />
reader. If the user does not define an identifier, the portable reader will use the last<br />
four characters of its PDA serial number as the identifier.<br />
To access this function select the <strong>Portable</strong> <strong>Reader</strong> Identifier menu item under the<br />
Setup menu.<br />
This will cause the <strong>Portable</strong> <strong>Reader</strong> Identifier dialog shown in Figure 22 to be displayed.<br />
24 August 15, 2008
<strong>SmartScan</strong> <strong>Model</strong> <strong>2400</strong> <strong>Portable</strong> <strong>AEI</strong> <strong>Reader</strong><br />
Figure 22 - <strong>Portable</strong> <strong>Reader</strong> Identifier Dialog<br />
5.7. Track Setup<br />
To set up track values tap the Track Setup menu item under the Setup menu.<br />
This will cause the Track Setup dialog shown in Figure 23 to be displayed.<br />
25 August 15, 2008
<strong>SmartScan</strong> <strong>Model</strong> <strong>2400</strong> <strong>Portable</strong> <strong>AEI</strong> <strong>Reader</strong><br />
Figure 23 - Track Setup Dialog<br />
Previously entered track names can be deleted or renamed, and new track names can<br />
be added. To delete or rename a track, first select the track by tapping on it and then<br />
tap the Delete or Rename button. Only one track name can be selected at a time.<br />
To add a new track name tap the Add button, and an Add Track dialog will appear.<br />
Tracks can be assigned to have spot locations. To designate that a track will have<br />
spot locations, select the track and tap the Type button.<br />
Names can be assigned to track spots. To assign names to track spots, select the<br />
track and tap the Spot Names button. The Spot Name Setup dialog shown in Figure<br />
24 will appear.<br />
26 August 15, 2008
<strong>SmartScan</strong> <strong>Model</strong> <strong>2400</strong> <strong>Portable</strong> <strong>AEI</strong> <strong>Reader</strong><br />
Figure 24 - Spot Name Setup Dialog<br />
Up to 100 spot names can be assigned. The user can specify the direction in which<br />
the spot locations are listed. Spot names are by default given numerical names based<br />
on their position on the track (see Position 005 in Figure 24). To assign a new name<br />
to a spot, tap the spot name you want to change, and the Rename Track Spot dialog<br />
shown in Figure 25 will appear.<br />
27 August 15, 2008
<strong>SmartScan</strong> <strong>Model</strong> <strong>2400</strong> <strong>Portable</strong> <strong>AEI</strong> <strong>Reader</strong><br />
Figure 25 - Rename Track Spot Dialog<br />
28 August 15, 2008
<strong>SmartScan</strong> <strong>Model</strong> <strong>2400</strong> <strong>Portable</strong> <strong>AEI</strong> <strong>Reader</strong><br />
The T94 protocol has a TRK (track) segment. This segment is defined in Paragraph<br />
2.26 in the Association of American Railroad's <strong>AEI</strong> Standard S-918, which can be<br />
downloaded from our web page at www.aeitag.com. T94 messages also have a<br />
requirement for an <strong>AEI</strong> site identifier (see Paragraph 2.1.5 in the S-918 standard).<br />
This information is entered by selecting a track and tapping the T94 Setup button.<br />
This will cause the T94 Track Data dialog to be displayed (see Figure 26).<br />
Figure 26 - T94 Track Data Dialog<br />
If data is to be transmitted in a T94 format, at a minimum, the 7-character AEM Site<br />
identifier must be entered. All other fields can be left blank.<br />
When the user stops taking inventory on a track (see Paragraph 2.4), he can request<br />
that the track's consist be sent to other systems. To set the default parameters for<br />
sending track information, select a track via the Track Setup dialog (see Figure 23)<br />
and tap the Send Setup button. This will cause the Send Track Inventory dialog shown<br />
in Figure 27 to appear.<br />
29 August 15, 2008
<strong>SmartScan</strong> <strong>Model</strong> <strong>2400</strong> <strong>Portable</strong> <strong>AEI</strong> <strong>Reader</strong><br />
Figure 27 - Send Track Inventory Setup Dialog<br />
The portable <strong>AEI</strong> reader can send track inventory in three types of file formats. The<br />
T94 format is the standard format used for communication between wayside <strong>AEI</strong><br />
readers and railroads' host computers. Information about this format can be found in<br />
the Association of American Railroads' <strong>AEI</strong> Standard S-918, which can be downloaded<br />
from our web page at www.aeitag.com.<br />
The second format is a comma delimited text file. This format uses Electronic Data<br />
Interchange (EDI) type records. This file has many different types of records and is<br />
generally used for computer-to-computer communications. For information about this<br />
file format go to Paragraph 14.<br />
The third format is also a comma delimited text file. We refer to it has Excel file format<br />
since it was designed so that it can be easily imported into most commercial word<br />
processing, spreadsheet and database programs. For information about the Excel file<br />
format go to Paragraph 14.<br />
Track inventory in any file format can be sent as an attachment to an email and/or a<br />
file directly sent to an FTP server. To use either of these options the email server<br />
name or FTP server name, user name and password must be entered into the<br />
portable reader's PDA prior to attempting to send inventory. Information on setting up<br />
the email or FTP functions can be found in Paragraphs 5.9 or 5.12, respectively. Files<br />
can be sent to as many as seven email addresses. For information on entering email<br />
addresses into the system go to Paragraph 5.11.<br />
30 August 15, 2008
<strong>SmartScan</strong> <strong>Model</strong> <strong>2400</strong> <strong>Portable</strong> <strong>AEI</strong> <strong>Reader</strong><br />
Softrail also maintains an FTP server for receiving track inventory. Softrail uses this<br />
server to provide a data redistribution service to portable reader users. Softrail can<br />
forward track inventory received on Softrail's FTP server to multiple email addresses,<br />
FTP servers or computers using dialup connections.<br />
For more information about this service contact Softrail at 888 872-4612 or 724<br />
942-1473.<br />
The portable <strong>AEI</strong> reader can also send track inventory to Softrail's <strong>AEI</strong> Rail and Road<br />
Manager program directly via a TCP/IP connection (see Paragraph 5.9).<br />
For more information about the <strong>AEI</strong> Rail and Road Manager software program contact<br />
Softrail at 888 872-4612 or 724 942-1473 or go to Softrail's web page at<br />
www.aeitag.com.<br />
The user can cause the track inventory to be automatically sent when he finishes<br />
taking track inventory by reading a Track <strong>AEI</strong> tag or by selecting the End Track<br />
Inventory menu item from a pop-up menu (see Paragraph 2.4).<br />
Normally the portable reader will not send track data if the track does not contain any<br />
rail vehicles. However, this can be overridden by checking the “Send empty track” box<br />
in this dialog. This will cause a message to be sent when there are no rail vehicles on<br />
the track.<br />
There are two comments fields associated with a track. To enter data into the<br />
comments fields, select a track via the Track Setup dialog (see Figure 23) and tap the<br />
Comments button. This will cause the T94 Comments and Email Text dialog shown in<br />
Figure 28 to appear.<br />
The TRK segment in the T94 message has a field for comments. This function allows<br />
the user to enter comments about a track in the TRK segment prior to the data being<br />
sent. It also allows the user to enter comments about the track in the body text of an<br />
email if the message is being sent via an email.<br />
31 August 15, 2008
<strong>SmartScan</strong> <strong>Model</strong> <strong>2400</strong> <strong>Portable</strong> <strong>AEI</strong> <strong>Reader</strong><br />
Figure 28 - Track Comments and Email Text Dialog<br />
5.8. User Field Names Setup<br />
The portable reader allows the user to define up to seven data fields. Data entered<br />
into these fields is maintained with the vehicle and can be sent to other systems in text<br />
file format.<br />
The user can specify unique names for these fields by using the User Field Name<br />
Setup function. To access this function tap the User Field Names Setup menu item<br />
under the Setup menu.<br />
This will cause the User Field Names Setup dialog shown in Figure 29 to be displayed.<br />
32 August 15, 2008
<strong>SmartScan</strong> <strong>Model</strong> <strong>2400</strong> <strong>Portable</strong> <strong>AEI</strong> <strong>Reader</strong><br />
Figure 29 - User Field Name Setup Dialog<br />
5.9. <strong>AEI</strong> RR TCP/IP Setup<br />
The portable reader is designed to work in conjunction with Softrail's <strong>AEI</strong> Rail and Road<br />
Manager program.<br />
The <strong>AEI</strong> Rail & Road Manager software was designed as a low cost package for<br />
tracking rail vehicle movements in a rail yard. This is a Windows based program that<br />
can run under the Windows 98, NT, 2000, ME, or XP operating system.<br />
The <strong>AEI</strong> Rail & Road Manager software program allows the user to draw his/her own<br />
facility and move rail cars by reading their tags with a portable <strong>AEI</strong> reader or by<br />
manually dragging and dropping rail car icons from one track to another. By using<br />
input from wayside <strong>AEI</strong> readers, the program can also automatically track rail car<br />
movements.<br />
A limited copy of the <strong>AEI</strong> Rail & Road Manager Program called <strong>AEI</strong> Rail & Road<br />
Manager Express is included with each <strong>SmartScan</strong> <strong>Model</strong> <strong>2400</strong> <strong>Portable</strong> <strong>AEI</strong> <strong>Reader</strong>.<br />
To send track data to the <strong>AEI</strong> Rail and Road Manager program the portable reader<br />
needs to know the IP address of the computer hosting the <strong>AEI</strong> Rail and Road Manager<br />
program and the port to which the program is listening for a connection.<br />
To find this information in the <strong>AEI</strong> Rail & Road Manager program, select the <strong>Portable</strong><br />
<strong>Reader</strong> TCP/IP Setup menu item under the <strong>Portable</strong> <strong>Reader</strong>/<strong>Model</strong> <strong>2400</strong> <strong>Portable</strong><br />
33 August 15, 2008
<strong>SmartScan</strong> <strong>Model</strong> <strong>2400</strong> <strong>Portable</strong> <strong>AEI</strong> <strong>Reader</strong><br />
<strong>Reader</strong> menu in the <strong>AEI</strong> Rail & Road Manager's menu bar. The dialog shown in Figure<br />
30 will appear.<br />
Figure 30 - <strong>Model</strong> <strong>2400</strong> <strong>Portable</strong> <strong>Reader</strong> TCP/IP Setup<br />
The listening port is a setup parameter in the <strong>AEI</strong> Rail and Road Manager program.<br />
To enter this information into the portable reader, tap the Communications Setup<br />
menu item under the Setup menu and then the <strong>AEI</strong> RR TCP/IP Setup button.<br />
This will cause the <strong>AEI</strong> RR TCP/IP Setup dialog shown in Figure 31 to be displayed.<br />
Figure 31 - <strong>AEI</strong> RR TCP/IP Setup Dialog<br />
34 August 15, 2008
<strong>SmartScan</strong> <strong>Model</strong> <strong>2400</strong> <strong>Portable</strong> <strong>AEI</strong> <strong>Reader</strong><br />
Enter the IP address and port information that was displayed in <strong>AEI</strong> Rail and Road<br />
Manager's <strong>Model</strong> <strong>2400</strong> <strong>Portable</strong> <strong>Reader</strong> Setup dialog (see Figure 30).<br />
This display also shows the portable reader's PDA Name and the current IP address of<br />
the PDA.<br />
5.10. Email Setup<br />
To send track inventory via an email attachment, the portable reader must have<br />
information on how to access the user's outbound email server. To enter this<br />
information tap the Communications Setup menu item under the Setup menu and then<br />
the Email Setup button.<br />
This will cause the Email Setup dialog shown in Figure 32 to be displayed.<br />
Figure 32 - Email Setup Dialog<br />
The Domain Name may not be required. Some outbound email servers require a<br />
different Domain Name than the Reply Address.<br />
Some outbound email servers do not require a password, and this field can be left<br />
blank.<br />
The reply address entered in this dialog is used as the reply address for all outbound<br />
emails.<br />
The portable reader's PDA does not receive inbound emails.<br />
35 August 15, 2008
<strong>SmartScan</strong> <strong>Model</strong> <strong>2400</strong> <strong>Portable</strong> <strong>AEI</strong> <strong>Reader</strong><br />
5.11. Email Addresses<br />
The portable <strong>AEI</strong> reader can send emails with track inventory information to as many<br />
as seven email addresses. To enter the email addresses tap the Communication<br />
Setup menu item under the Setup menu and then the Email Send to Addresses button.<br />
This will cause the Email Address Setup dialog shown in Figure 33 to be displayed.<br />
Figure 33 - Email Address Setup Dialog<br />
5.12. FTP Setup<br />
To send track data to an FTP server the portable reader must have information on<br />
how to access the FTP server. To enter this information tap the Communications<br />
Setup menu item under the Setup menu and then the FTP Setup button.<br />
This will cause the FTP Setup dialog shown in Figure 34 to be displayed.<br />
36 August 15, 2008
<strong>SmartScan</strong> <strong>Model</strong> <strong>2400</strong> <strong>Portable</strong> <strong>AEI</strong> <strong>Reader</strong><br />
Figure 34 - FTP Server Setup Dialog<br />
The FTP Server must have either a Server Name or an IP Address. If both are<br />
present the portable reader will use the Server Name.<br />
The Listening Port is almost always 21.<br />
The portable reader sends files to the FTP server. It does not retrieve files from the<br />
FTP server.<br />
5.13. Network Communications<br />
If you plan to communicate using the WiFi (802.1b) or Bluetooth radio networks you<br />
must enable their use. To enable the use of either of these radio networks tap the<br />
Communications Setup menu item under the Setup menu and then the Network<br />
Communication button. This will cause the WiFi / Bluetooth Enable dialog shown in<br />
Figure 35 to be displayed.<br />
37 August 15, 2008
<strong>SmartScan</strong> <strong>Model</strong> <strong>2400</strong> <strong>Portable</strong> <strong>AEI</strong> <strong>Reader</strong><br />
Figure 35 - WiFi / Bluetooth Enable Dialog<br />
5.14. Automatic Clock Update<br />
The portable reader can automatically update its date and time from either Softrail’s<br />
<strong>AEI</strong> Rail and Road Manager software or the National Institute of Standards website.<br />
To automatically update the portable reader’s date and time from either of these<br />
locations this function must be enabled. To enable the automatic updating of the<br />
portable reader’s date and time tap the Communications Setup menu item under the<br />
Setup menu and then the Automatic Clock Update button. This will cause the<br />
Automatic Clock Update dialog shown in Figure 36 to be displayed.<br />
38 August 15, 2008
<strong>SmartScan</strong> <strong>Model</strong> <strong>2400</strong> <strong>Portable</strong> <strong>AEI</strong> <strong>Reader</strong><br />
Figure 36 - Automatic Clock Update Dialog<br />
5.15. Barcodes<br />
The portable reader is designed to operate with an optional barcode reader. With a<br />
barcode reader information on barcodes can be used to quickly and easily enter data<br />
about a rail vehicle.<br />
The portable reader is set up to read barcodes in the Universal Bar Code (UPC)<br />
format. The UPC format contains 12 digits. The first digit is usually 0 and specifies<br />
the Number Character System. The next ten digits are user specified and the last<br />
digit is a check digit.<br />
Figure 37 shows examples of barcodes.<br />
39 August 15, 2008
<strong>SmartScan</strong> <strong>Model</strong> <strong>2400</strong> <strong>Portable</strong> <strong>AEI</strong> <strong>Reader</strong><br />
Figure 37 - Barcode Examples<br />
The portable reader reads the barcode and enters the information into one of the 11<br />
data fields (see Paragraph 3) that are associated with the rail vehicle. The user can<br />
specify into which of the eleven fields data from a barcode will be entered and can also<br />
specify if this is a special barcode that was developed by the user for use with the<br />
portable reader.<br />
The portable reader looks at the second and third digit of the barcode to determine<br />
how to handle the barcode. If these two digits are not the same as those entered into<br />
the Default Start Code field in the Barcode Setup dialog (see Figure 38), then the<br />
barcode data will be entered in the field that is specified in the Default Bar Code Field<br />
in the Barcode Setup dialog.<br />
In Figure 37 the UPC label at the bottom left does not have "99" in the second and<br />
third digits and, therefore, its data (025262888883) would be entered in the User 1<br />
field for the rail vehicle.<br />
To display the Barcode Setup dialog select the Barcode Setup menu item under the<br />
Setup menu.<br />
40 August 15, 2008
<strong>SmartScan</strong> <strong>Model</strong> <strong>2400</strong> <strong>Portable</strong> <strong>AEI</strong> <strong>Reader</strong><br />
Figure 38 - Barcode Setup Dialog<br />
The user can specify his own unique set of barcodes that have special meaning to the<br />
portable <strong>AEI</strong> reader. These barcodes have a special format that consists of three<br />
fields in the user specified ten-digit number of the bar code.<br />
41 August 15, 2008
<strong>SmartScan</strong> <strong>Model</strong> <strong>2400</strong> <strong>Portable</strong> <strong>AEI</strong> <strong>Reader</strong><br />
Figure 39 is a table that shows the barcode field structure.<br />
Field Description Position Field<br />
Length<br />
Numeric<br />
System<br />
Character<br />
Default Start<br />
Code<br />
Data<br />
1 1 Usually 0<br />
2-3 2 Any two-digit combination<br />
specified by the user.<br />
Field Code 4-6 3 Specifies the field into which the<br />
barcode data will be entered.<br />
200 = Status Field<br />
201 = Consist Field<br />
211 = Maintenance 1 Field<br />
212 = Maintenance 2 Field<br />
301 = User 1 Field<br />
302 = User 2 Field<br />
303 = User 3 Field<br />
304 = User 4 Field<br />
305 = User 5 Field<br />
306 = User 6 Field<br />
307 = User 7 Field<br />
User Data Field 7-11 5 Five digits of data that will be<br />
entered into the field specified<br />
in the Field Code field.<br />
Check Digit 12 1 Barcode check digit, not user<br />
specified.<br />
Figure 39 - Barcode Field Structure<br />
Based on this structure, the barcodes in Figure 37 cause the following:<br />
• Barcode 0 9930100010 9 - 00010 entered into the User 1 field<br />
• Barcode 0 9920000051 4 - 00051 entered into the Status field<br />
• Barcode 0 9921100401 4 - 00401 entered into the Maintenance 1 field<br />
• Barcode 0 9930600555 0 - 00555 entered into the User 6 field<br />
42 August 15, 2008
<strong>SmartScan</strong> <strong>Model</strong> <strong>2400</strong> <strong>Portable</strong> <strong>AEI</strong> <strong>Reader</strong><br />
• Barcode 0 2526288888 3 - 025262888883 entered into the User 1 field,<br />
since 99 is not in the second and third digit<br />
• Barcode 0 9920200112 0 – 099202001120 entered into the User 1 field,<br />
since 202 is not a legal Field Code<br />
The user can also have the portable reader translate the 5 digits of data in the<br />
barcode to a text string. For example, 00010 can be translated by the portable<br />
reader into "empty". Instead of 00010 appearing in the User1 field, the text string<br />
"empty" would appear.<br />
To enter barcode text translations select the Barcode Text Translation item in the<br />
Setup menu. This will cause the Barcode Text Translation dialog shown in Figure 40 to<br />
appear.<br />
Figure 40 - Barcode Text Translation Dialog<br />
To add a new barcode translation tap the Add button and the Barcode Add/Edit dialog<br />
shown in Figure 41 will appear.<br />
To delete or edit a translation, select the translation in the list and tap the Edit or<br />
Delete button.<br />
43 August 15, 2008
<strong>SmartScan</strong> <strong>Model</strong> <strong>2400</strong> <strong>Portable</strong> <strong>AEI</strong> <strong>Reader</strong><br />
Figure 41 - Barcode Add/Edit Dialog<br />
5.16. OEM Folder Setup<br />
The portable reader is designed to make it easy for other companies (OEMs) to<br />
develop their own applications to incorporate into the portable reader.<br />
To assist OEMs, the portable reader provides easy access to <strong>AEI</strong> tag data and provides<br />
a simple method for applications to send their data to other system via email<br />
attachments or as a file transfer to an FTP server.<br />
Data transfer between the portable reader and an OEM's application is through a set<br />
of text files that are written into a specific folder in the portable reader's PDA.<br />
The folder to which the files are written can be specified by using the OEM Folder<br />
Setup function.<br />
To access this function tap the OEM Folder Setup menu item under the Setup menu.<br />
This will cause the OEM Folder Setup dialog shown in Figure 42 to be displayed.<br />
44 August 15, 2008
<strong>SmartScan</strong> <strong>Model</strong> <strong>2400</strong> <strong>Portable</strong> <strong>AEI</strong> <strong>Reader</strong><br />
Figure 42 - OEM Folder Setup<br />
The transmit folder contains the OEM files that are to be transmitted by the portable<br />
reader, and the <strong>AEI</strong> Tag Folder contains the file that has the <strong>AEI</strong> tag and barcode data.<br />
For more information on interfacing OEM applications see Paragraph 9.<br />
6. INVENTORY<br />
The portable <strong>AEI</strong> reader has a number of inventory functions, which allows the user to<br />
add and delete rail vehicles from tracks, move rail vehicles from one track to another,<br />
and change vehicles' positions on tracks.<br />
To access the inventory functions tap on the Inventory menu item, and the pop-up<br />
menu shown in Figure 43 will appear.<br />
The inventory functions are:<br />
• View Track Inventory<br />
• Move Track Inventory<br />
• Send Track Inventory<br />
• Send All Track Inventory<br />
• Find Rail Vehicle<br />
• Delete All Track Inventory<br />
45 August 15, 2008
<strong>SmartScan</strong> <strong>Model</strong> <strong>2400</strong> <strong>Portable</strong> <strong>AEI</strong> <strong>Reader</strong><br />
Figure 43 - Inventory Menu<br />
6.1. View Track Inventory<br />
To access the View Track Inventory function, tap the View Track Inventory menu item.<br />
The Track Select dialog shown in Figure 44 will then appear.<br />
46 August 15, 2008
<strong>SmartScan</strong> <strong>Model</strong> <strong>2400</strong> <strong>Portable</strong> <strong>AEI</strong> <strong>Reader</strong><br />
Figure 44 - Track Select Dialog<br />
The Track Select dialog displays all of the tracks that have been entered into the<br />
portable reader. The number of rail vehicles that are on each track is displayed after<br />
the track's name in the list.<br />
You will notice that at the end of the track list there is a track name called Phantom.<br />
The Phantom track is a fictitious track that is used as a temporary storage area in the<br />
portable reader for vehicles that have been deleted from one track, but have not yet<br />
been moved to a new track.<br />
To view a track's consist, tap on the track name in the list, and the Track View dialog<br />
shown in Figure 45 will appear.<br />
47 August 15, 2008
<strong>SmartScan</strong> <strong>Model</strong> <strong>2400</strong> <strong>Portable</strong> <strong>AEI</strong> <strong>Reader</strong><br />
Figure 45 - Track View Dialog<br />
The Track View dialog allows the user to add a vehicle, delete a vehicle, or delete all<br />
rail vehicles on a track.<br />
6.1.1. Add Rail Vehicle<br />
To add a rail vehicle, first select the location in the consist where you want the vehicle<br />
to be added by tapping on the vehicle in the list that will be behind the vehicle to be<br />
added. If you want, for example, to add a vehicle between NS 1526 and CSX 987654<br />
in the list shown in Figure 45, tap on CSX 987654 and then tap the Add button. The<br />
Manual Entry dialog shown in Figure 10 will then be displayed.<br />
6.1.2. Delete Rail Vehicle<br />
To delete a vehicle, tap on the vehicle to be deleted, and then tap on the Delete<br />
button.<br />
The Delete All button will delete all rail vehicles on the track.<br />
6.1.3. Change Rail Vehicle Position on Track<br />
The Advance button is used to change the position of a rail vehicle on a track. To<br />
change a position of a rail vehicle tap on the vehicle you want to move. Each time you<br />
tap the Advance button the vehicle will move up the list one position.<br />
48 August 15, 2008
<strong>SmartScan</strong> <strong>Model</strong> <strong>2400</strong> <strong>Portable</strong> <strong>AEI</strong> <strong>Reader</strong><br />
6.1.4. View and Change Rail Vehicle Data<br />
The View button allows the user to view and modify data about a rail vehicle. To use<br />
this function, tap on the rail vehicle and then tap the View button. This will cause the<br />
Rail Vehicle dialog shown in Figure 46 to appear.<br />
Figure 46 - Rail Vehicle Data Dialog<br />
The Rail Vehicle Data dialog shows the tag information for the rail vehicle. To display<br />
the other data about the rail vehicle, tap the Menu button, and a pop-up menu will<br />
appear (see Figure 47).<br />
49 August 15, 2008
<strong>SmartScan</strong> <strong>Model</strong> <strong>2400</strong> <strong>Portable</strong> <strong>AEI</strong> <strong>Reader</strong><br />
Figure 47 - Rail Vehicle Data Pop-up Menu<br />
By selecting one of the pop-up menu items, the user can view and change the system<br />
defined fields (see Paragraph 3.2), the user defined fields (see Paragraph 3.3), and<br />
the vehicle comments (see Paragraph 3.1) for the displayed vehicle.<br />
6.1.5. Reverse Track Inventory<br />
Occasionally track inventory is initially reported in the wrong direction (West to East<br />
instead of East to West). The Reverse List button in Figure 45 allows the user to<br />
correct this error, by re-listing the track inventory in the opposite direction.<br />
6.1.6. Track T94 and Email Comments<br />
The TRK segment in the T94 message has a field for comments. This function allows<br />
the user to enter comments about a track in the TRK segment prior to the data being<br />
sent. It also allows the user to enter comments about the track in the body text of an<br />
email if the message is being sent via an email.<br />
To access this function tap the Comments button in Figure 45, and the Comments and<br />
Email Text dialog shown in Figure 48 will appear.<br />
Data entered into this dialog will be saved and used in all sent messages until it is<br />
changed by the user.<br />
50 August 15, 2008
<strong>SmartScan</strong> <strong>Model</strong> <strong>2400</strong> <strong>Portable</strong> <strong>AEI</strong> <strong>Reader</strong><br />
Figure 48 - Comments and Email Text Dialog<br />
6.1.7. Send Track Inventory<br />
Track inventory messages can be sent from the Track View dialog (see Figure 45) by<br />
tapping the Send button. This will cause the Send Track Inventory dialog shown in<br />
Figure 8 to be displayed (see Paragraph 2.5).<br />
6.2. Move Track Inventory<br />
To access the Move Track Inventory function, tap the Move Track Inventory menu item<br />
in the Inventory menu. The Track Select dialog shown in Figure 44 will then appear.<br />
The Move Track Inventory function is very similar to the View Track Inventory function<br />
with two exceptions. First, it allows rail vehicles to be moved from one track to<br />
another. Second, it allows multiple rail vehicles to be selected at the same time.<br />
After a track is selected in the Track Select dialog the Move Rail Vehicle From dialog<br />
shown in Figure 49 will appear.<br />
51 August 15, 2008
<strong>SmartScan</strong> <strong>Model</strong> <strong>2400</strong> <strong>Portable</strong> <strong>AEI</strong> <strong>Reader</strong><br />
Figure 49 - Move Rail Vehicle From Dialog<br />
6.2.1. Move Selected Rail Vehicles to Another Track<br />
To move rail vehicles from one track to another, select the rail vehicles you want to<br />
move by tapping on each one and then tap the Move Selected button. This will cause<br />
the Track Select dialog shown in Figure 44 to reappear. Select the track to which you<br />
want to move the vehicles, and the Move Rail Vehicle To dialog shown in Figure 50 will<br />
appear.<br />
52 August 15, 2008
<strong>SmartScan</strong> <strong>Model</strong> <strong>2400</strong> <strong>Portable</strong> <strong>AEI</strong> <strong>Reader</strong><br />
Figure 50- Move Rail Vehicle To Dialog<br />
If there are already rail vehicles on the track to which the rail vehicles are being<br />
moved, you can add the moved rail vehicles to the top or bottom of the list of existing<br />
rail vehicles. You can also replace the existing rail vehicles with the moved vehicles.<br />
If you replace the existing vehicles on the track, you will be asked if you want to move<br />
the existing vehicles to the Phantom Track (see Paragraph 6.1).<br />
6.2.2. Move All Rail Vehicles to Another Track<br />
To move all of the rail vehicles on a track to another track, tap the Move All button.<br />
6.2.3. Other Move Rail Vehicle Functions<br />
The other functions in the Move Rail Vehicle From dialog (see Figure 49) operate in the<br />
same manner as those in the Track View dialog (see Figure 45) with the exception of<br />
the Delete function. The Delete function in the Move Rail Vehicle From dialog allows<br />
multiple rail vehicles to be selected for deletion. The Track View dialog only allows one<br />
rail vehicle at a time to be selected for deletion.<br />
53 August 15, 2008
<strong>SmartScan</strong> <strong>Model</strong> <strong>2400</strong> <strong>Portable</strong> <strong>AEI</strong> <strong>Reader</strong><br />
The following is a list of other functions in the Move Rail Vehicle From dialog and the<br />
paragraphs that describe them.<br />
• Add - see Paragraph 6.1.1<br />
• Delete - see Paragraph 6.1.2<br />
• Delete All - see Paragraph 6.1.2<br />
• Advance - see Paragraph 6.1.3<br />
• View - see Paragraph 6.1.4<br />
• Reverse List - see Paragraph 6.1.5<br />
6.3. Find Rail Vehicle and Rail Vehicle Movement History<br />
To access the Find Rail Vehicle function, tap the Find Rail Vehicle menu item in the<br />
Inventory menu. The Find Rail Vehicle dialog shown in Figure 51 will then appear.<br />
Figure 51 - Find Rail Vehicle Dialog<br />
All of the rail vehicles in the portable reader's database will be displayed in alphabetical<br />
order in the Find Rail Vehicle dialog. To find a particular vehicle, tap on the vehicle<br />
identification, and the Rail Vehicle History display shown in Figure 52 will appear.<br />
54 August 15, 2008
<strong>SmartScan</strong> <strong>Model</strong> <strong>2400</strong> <strong>Portable</strong> <strong>AEI</strong> <strong>Reader</strong><br />
Figure 52 - Rail Vehicle History Display<br />
The Rail Vehicle History display shows the rail vehicle's current location and the time it<br />
was moved to the current location. It also shows the vehicle's previous locations (up to<br />
10).<br />
6.4. Delete All Track Inventory<br />
To delete all of the rail vehicles in the portable reader's database, tap the Delete All<br />
Track Inventory menu item in the Inventory menu.<br />
7. TRACK TAGS<br />
Track tags are <strong>AEI</strong> tags that are programmed with track information. Their purpose is<br />
to eliminate the need to manually enter this information when taking track inventory.<br />
Before reading <strong>AEI</strong> tags on rail vehicles, the operator would read the Track tag at the<br />
starting point on the track. After reading all of the rail vehicles tags, the operator<br />
would read the Track tag at the ending point on the track. After reading the second<br />
Track tag, the portable reader will end taking inventory for the track and either send<br />
the track consist automatically (see Paragraph 5.7 for setting up automatic<br />
transmission) or ask the operator if he wants to send the inventory.<br />
Track tags contain the track name, the orientation of the track (North to South, South<br />
to North, etc), the tag sequence number, whether the track has track spot locations,<br />
and the orientation of the track spot locations.<br />
55 August 15, 2008
<strong>SmartScan</strong> <strong>Model</strong> <strong>2400</strong> <strong>Portable</strong> <strong>AEI</strong> <strong>Reader</strong><br />
There can be up to 99 Track tags along the side of the track. Each has a different<br />
sequence number. The Track tag closest to the start of the track (if the track<br />
orientation is North to South, then the North end of the track would be the starting<br />
point) would have the lowest number and the Track tag farthest from the start of the<br />
track would have the highest number.<br />
Track tags are standard AT5110 or AT5118 tags that are programmed in ASCII. The<br />
following table is the format of the Track tag:<br />
Field Starting<br />
Position<br />
Field Size Data<br />
Tag Type Identifier 1 3 TRK<br />
Track Orientation 4 1 N = North to<br />
South<br />
S = South to<br />
North<br />
W = West to East<br />
E = East to West<br />
Sequence Number 5 2 Two-digits<br />
Track Name 7 10 Up to 10<br />
alpha/numeric<br />
characters<br />
Track has Spot<br />
Location<br />
Track Spot<br />
Orientation<br />
Examples:<br />
TRKW99201 YW<br />
TRKW01101 NW<br />
17 1 Y = Has spot<br />
locations<br />
N = Does not have<br />
spot locations<br />
18 1 N = North to<br />
South<br />
S = South to<br />
North<br />
W = West to East<br />
E = East to West<br />
56 August 15, 2008
<strong>SmartScan</strong> <strong>Model</strong> <strong>2400</strong> <strong>Portable</strong> <strong>AEI</strong> <strong>Reader</strong><br />
8. SPOT TAGS<br />
Spot tags are <strong>AEI</strong> tags that are programmed with track spot location information.<br />
Their purpose is to eliminate the need to manually enter track spot information when<br />
taking track inventory.<br />
Before reading Spot tags, the operator would read the Track tag at his starting point<br />
on the track.<br />
Prior to reading the tag on the rail vehicle the Spot tag for the vehicle's location should<br />
be read. When the rail vehicle's tag is read, the vehicle's location will be determined<br />
by the information in the last Spot tag read.<br />
Spot tags contain the track name associated with the spot location and the spot<br />
name.<br />
Spot tags are standard AT5110 or AT5118 tags that are programmed in ASCII. The<br />
following table is the format of the Spot tag:<br />
Field Starting<br />
Position<br />
Field Size Data<br />
Tag Type Identifier 1 4 SPOT<br />
Track Name 5 10 Up to 10<br />
alpha/numeric<br />
characters<br />
Spot Name 15 5 Up to 5<br />
alpha/numeric<br />
characters<br />
Examples:<br />
SPOT201 2A<br />
SPOT201 2B<br />
9. OEM FUNCTIONS<br />
As an option the portable reader allows other companies to incorporate their own<br />
application software into the device. These companies are referred to as Original<br />
Equipment Manufactures (OEMs).<br />
To make it easier for OEM's to develop applications, the portable reader has several<br />
functions that allow OEM's to access tag data read by the portable reader and to send<br />
57 August 15, 2008
<strong>SmartScan</strong> <strong>Model</strong> <strong>2400</strong> <strong>Portable</strong> <strong>AEI</strong> <strong>Reader</strong><br />
OEM-application generated data to other computer systems as a file transfer to an FTP<br />
server or as a file attachment to an email.<br />
9.1. Accessing Tag Data<br />
When the portable reader reads a tag or barcode it writes a record into a text file<br />
called "tag data.txt". This file is located in a folder designated by the user in the OEM<br />
Setup function (see Paragraph 5.16).<br />
The Tag Data file is a text file that has an individual record for each tag read. Each<br />
record is terminated with a carriage return character (hex 0D) and line feed character<br />
(hex 0A). All fields within the record are separated by commas.<br />
There are four types of records in the Tag Data file. These are:<br />
• Rail vehicle tag<br />
• Track tag<br />
• Spot tag<br />
• Barcode data<br />
Each of these records starts with a type designator in the first field of the record.<br />
The following table shows the designator for each record type:<br />
Type Designator<br />
Rail vehicle tag RAIL<br />
Track tag TRK<br />
Spot tag SPOT<br />
Barcode data BAR<br />
58 August 15, 2008
<strong>SmartScan</strong> <strong>Model</strong> <strong>2400</strong> <strong>Portable</strong> <strong>AEI</strong> <strong>Reader</strong><br />
The following table is the layout of the record for the rail vehicle tag:<br />
Field Description Values<br />
1 Date and time when the tag was<br />
read<br />
2 Record Designator RAIL<br />
The field is in the following format<br />
MM/DD/YYYY(space)HH:MM<br />
MM = month of year<br />
DD = day of month<br />
YYYY = year<br />
HH = hour<br />
MM = minute<br />
3 Data format code Two digits<br />
51 = standard rail vehicle<br />
identification format<br />
(see AAR Specification S-918 for all<br />
codes)<br />
4 Equipment group code One to two digits<br />
5 = locomotive<br />
19 = railcar<br />
(see AAR Specification S-918 for all<br />
codes)<br />
5 Vehicle initial (reporting marks) Four alpha characters<br />
The field is filled with spaces if the<br />
vehicle initial is less than four<br />
characters<br />
6 Vehicle number One to six digits<br />
7 Side indicator Left or Right<br />
8 Length in decimeters 1 to 4 digits<br />
9 Number of axles 1 to 2 digits<br />
10 Bearing code 1 digit from 0 to 7<br />
(see AAR Specification S-918 for<br />
codes)<br />
11 Platform code (for railcars only) 1 to 2 digits from 0 to 15<br />
(see AAR Specification S-918 for<br />
codes)<br />
59 August 15, 2008
<strong>SmartScan</strong> <strong>Model</strong> <strong>2400</strong> <strong>Portable</strong> <strong>AEI</strong> <strong>Reader</strong><br />
The following are examples of records in this file:<br />
01/16/2006 10:58,RAIL,"51","5","NS ","1526","Left","183","4","1"<br />
01/16/2006 10:58,RAIL,"51","19","UP ","123456","Left","161","4","1","0"<br />
01/16/2006 10:58,RAIL,"51","19","CSX ","987654","Right","193","6","1","0"<br />
01/16/2006 10:58,RAIL,"51","19","DEFX","112344","Left","185","4","1","0"<br />
60 August 15, 2008
<strong>SmartScan</strong> <strong>Model</strong> <strong>2400</strong> <strong>Portable</strong> <strong>AEI</strong> <strong>Reader</strong><br />
The following table is the layout of the record for the Track tag:<br />
Field Description Values<br />
1 Date and time when the tag was<br />
read<br />
2 Record Designator TRK<br />
The field is in the following format<br />
MM/DD/YYYY(space)HH:MM<br />
MM = month of year<br />
DD = day of month<br />
YYYY = year<br />
HH = hour<br />
MM = minute<br />
3 Track Name Up to 10 alpha/numeric characters<br />
4 Track Orientation none<br />
North-South<br />
South-North<br />
West-East<br />
East-West<br />
5 Sequence Number A two-digit number that represents<br />
the tag's position from the starting<br />
end of the track.<br />
The tag nearest the start would be<br />
00 and the farthest 99<br />
If the track is oriented North to<br />
South, the North most tag would be<br />
00 and the South most 99<br />
5 Track uses spot location no spots<br />
spots<br />
6 Spot Orientation none<br />
North-South<br />
South-North<br />
West-East<br />
East-West<br />
The following are examples of records in this file:<br />
01/16/2006 10:58,TRK,"101","North-South","00 ","spots","North-South"<br />
01/16/2006 10:58,TRK,"301","North-South","99 ","no spots","none"<br />
61 August 15, 2008
<strong>SmartScan</strong> <strong>Model</strong> <strong>2400</strong> <strong>Portable</strong> <strong>AEI</strong> <strong>Reader</strong><br />
The following table is the layout of the record for the Spot tag:<br />
Field Description Values<br />
1 Date and time when the tag was<br />
read<br />
2 Record Designator SPOT<br />
The field is in the following format<br />
MM/DD/YYYY(space)HH:MM<br />
MM = month of year<br />
DD = day of month<br />
YYYY = year<br />
HH = hour<br />
MM = minute<br />
3 Track Name Up to 10 alpha/numeric characters<br />
4 Spot Up to 5 alpha/numeric characters<br />
The following are examples of records in this file:<br />
01/16/2006 10:58,SPOT,"101","2A"<br />
01/16/2006 10:58,SPOT,"101","2B"<br />
62 August 15, 2008
<strong>SmartScan</strong> <strong>Model</strong> <strong>2400</strong> <strong>Portable</strong> <strong>AEI</strong> <strong>Reader</strong><br />
The following table is the layout of the record for the barcode read:<br />
Field Description Values<br />
1 Date and time when the tag was<br />
read<br />
2 Record Designator BAR<br />
3 Raw Barcode Data 12-digits<br />
The field is in the following format<br />
MM/DD/YYYY(space)HH:MM<br />
MM = month of year<br />
DD = day of month<br />
YYYY = year<br />
HH = hour<br />
MM = minute<br />
4 Field Name Up to 20 alpha/numeric characters<br />
Name of the field into which the<br />
barcode data will be entered<br />
5 Data Translation Up to 20 alpha/numeric characters<br />
Text the portable reader translated<br />
the 5-digit field (digits 6 thru 11) of<br />
the barcode data into<br />
The following are examples of records in this file:<br />
01/16/2006 10:58,BAR,"09920000514","Maint1","empty"<br />
01/16/2006 10:58,BAR,"025262888883","User1",""<br />
9.2. Sending OEM Data<br />
An OEM application can send data to other computers over the wireless LAN via the<br />
portable reader's software. OEM data can either be sent as a file attached to an email<br />
or in a file that is transferred to an FTP server.<br />
To send data as an email file attachment, the OEM application writes a transmit<br />
request text file into the folder the user has specified as the Transmit Folder in the<br />
OEM Setup function (see Paragraph 5.16).<br />
When the portable reader sees a new text file in this file folder it decodes the first<br />
record in this file to see if it is an email request or an FTP transfer request.<br />
The transmit request file consists of a number of records which are each terminated<br />
with a carriage return character (hex 0D) and line feed character (hex 0A). All fields<br />
within the record are separated by commas.<br />
63 August 15, 2008
<strong>SmartScan</strong> <strong>Model</strong> <strong>2400</strong> <strong>Portable</strong> <strong>AEI</strong> <strong>Reader</strong><br />
The first record in the transmit request file is always the SETUP record, which<br />
specifies if it is an email request or an FTP transfer request.<br />
9.2.1. Email Transmit Request File<br />
To send OEM data via email, information on the email outbound server must be<br />
entered in the Email Setup dialog (see Paragraph 5.9).<br />
The email transmit request file consists of a number of record segments. These<br />
segments must be written in the following order:<br />
SETUP<br />
FROM<br />
TO (up to 10 TO segments)<br />
TO<br />
TO<br />
.<br />
.<br />
SUBJECT<br />
BODY<br />
FILE<br />
(OEM Application Data)<br />
The following is the layout of each segment record:<br />
SETUP Segment<br />
Field Description Values<br />
1 Segment code SETUP<br />
2 Transmit type EMAIL<br />
Example: SETUP,EMAIL<br />
FROM Segment<br />
Field Description Values<br />
1 Segment code FROM<br />
2 Reply email address 1 to 40 alpha/numeric characters<br />
Example: FROM,tomlevine@signalcc.com<br />
64 August 15, 2008
<strong>SmartScan</strong> <strong>Model</strong> <strong>2400</strong> <strong>Portable</strong> <strong>AEI</strong> <strong>Reader</strong><br />
TO Segment<br />
Field Description Values<br />
1 Segment code TO<br />
2 To email address 1 to 40 alpha/numeric characters<br />
Example: TO,sales@signalcc.com<br />
TO,aeitag@signalcc.com<br />
Up to 10 TO segments<br />
SUBJECT Segment<br />
Field Description Values<br />
1 Segment code SUBJECT<br />
2 Subject text 1 to 40 alpha/numeric characters<br />
Example: SUBJECT,Test <strong>Portable</strong> <strong>Reader</strong> Email<br />
65 August 15, 2008
<strong>SmartScan</strong> <strong>Model</strong> <strong>2400</strong> <strong>Portable</strong> <strong>AEI</strong> <strong>Reader</strong><br />
BODY Segment<br />
Field Description Values<br />
1 Segment code BODY<br />
2 Email body text 1 to 800 alpha/numeric characters<br />
in quotations<br />
Example: BODY,"This is a test email sent from a portable reader."<br />
FILE Segment<br />
Field Description Values<br />
1 Segment code FILE<br />
2 Name of the file that will be<br />
attached to the email and<br />
contains the OEM's application<br />
data<br />
1 to 255 alpha/numeric characters<br />
Example: FILE,emailtest.txt<br />
After it writes the FILE segment, the OEM application writes its data into the transmit<br />
request file. The amount of user data that can be written is limited by the amount of<br />
free file data area in the portable reader's PDA. The portable reader software will<br />
write this data to a temporary file and attach it to the email. The name of the<br />
attached file is the file name specified in the FILE segment.<br />
The following is an example of the email transmit request file:<br />
SETUP,EMAIL<br />
FROM,tomlevine@signalcc.com<br />
TO,aei@signalcc.com<br />
TO,sales@signalcc.com<br />
TO,tomlevine@signalcc.com<br />
SUBJECT,Test Email<br />
BODY,"This is a test email."<br />
FILE,emailtest.txt<br />
Test data 1<br />
Test data 2<br />
Test data 3<br />
66 August 15, 2008
<strong>SmartScan</strong> <strong>Model</strong> <strong>2400</strong> <strong>Portable</strong> <strong>AEI</strong> <strong>Reader</strong><br />
9.2.2. FTP Transmit Request File<br />
The FTP transmit request file consists of a SETUP segment and OEM application data.<br />
The information is written in the following order<br />
SETUP<br />
(OEM Application Data)<br />
The following is the layout of each segment record:<br />
SETUP Segment<br />
Field Description Values<br />
1 Segment code SETUP<br />
2 Transmit type FTP<br />
3 Server name or DEFAULT 0 to 40 alpha/numeric characters<br />
If "DEFAULT" is in this field, this is the<br />
last field in the segment and the<br />
portable reader will use the FTP<br />
server setting in the FTP Setup dialog<br />
(see 5.12)<br />
If no value is in this field, the portable<br />
reader will use the value in the IP<br />
address field to connect to the FTP<br />
server<br />
4 IP address of the FTP server IP address format<br />
xxx.xxx.xxx.xxx where XXX is any<br />
number between 0 and 255<br />
5 Listening port 1 to 4 digits usually 21<br />
6 Directory in which to store the<br />
file on the FTP server<br />
1 to 40 alpha/numeric characters<br />
7 User name 1 to 40 alpha/numeric characters<br />
8 Password 1 to 40 alpha/numeric characters<br />
9 File name of the file to be stored 1 to 255 alpha/numeric characters<br />
Examples: SETUP,FTP,ftp.signalcc.com,,21,www,signacc,sftsha12,ftptest.txt<br />
SETUP,FTP,DEFAULT<br />
67 August 15, 2008
<strong>SmartScan</strong> <strong>Model</strong> <strong>2400</strong> <strong>Portable</strong> <strong>AEI</strong> <strong>Reader</strong><br />
After the SETUP segment, the OEM application writes its data into the transmit<br />
request file. The amount of user data that can be written is limited by the amount of<br />
free file data area in the portable reader's PDA. The portable reader software will<br />
write this data to a temporary file and transfer it to the FTP server. The name of the<br />
stored file is the file name specified in the SETUP segment.<br />
The following is an example of the FTP transmit request file:<br />
SETUP,FTP,ftp.signalcc.com,192.168.0.1,21,www,signalcc,7yg2512aa,ftptest.txt<br />
Test data 1<br />
Test data 2<br />
Test data 3<br />
9.2.3. OEM Transmit Request Status<br />
The portable reader, when it reads an OEM transmit request file, checks the file for<br />
errors. If it finds an error it writes an error record into a file called "oem status<br />
log.txt" which is located in the same folder as the transmit request files. The following<br />
is the format of an error record:<br />
Error,"transmit request file name","error description".<br />
The following are examples of error records:<br />
Error,"testftp.txt","no FTP file name in the first record of the OEM FTP transmit file"<br />
Error,"testftp.txt","missing password in the first record of the OEM FTP transmit file"<br />
Error,"testemail"," could not find carriage return line feed at the end of "FROM" record<br />
in the OEM Email transmit file"<br />
A record will also be written in the "oem status log.txt" file when the data in a transmit<br />
request file is successfully sent.<br />
The following are the email and FTP formats for a sent status record:<br />
SENT,mm/dd/yyyy hh:mm, EMAIL, "transmit request file name"<br />
SENT,mm/dd/yyyy hh:mm, FTP, "transmit request file name"<br />
68 August 15, 2008
<strong>SmartScan</strong> <strong>Model</strong> <strong>2400</strong> <strong>Portable</strong> <strong>AEI</strong> <strong>Reader</strong><br />
10. OPTIONS<br />
The <strong>SmartScan</strong> <strong>Model</strong> <strong>2400</strong> <strong>Portable</strong> <strong>AEI</strong> <strong>Reader</strong> has five software options. Two of<br />
these options allow OEMs to access <strong>AEI</strong> tag and barcode data and send files as<br />
attachments to emails or directly to an FTP Server. The other three options allow<br />
Bluetooth communications to various devices.<br />
The OEM version of the portable reader allows other companies to develop their own<br />
applications. These applications can be easily incorporated into the portable reader's<br />
PDA. The OEM version provides an easy interface so that <strong>AEI</strong> tag and barcode data<br />
can be accessed by an OEM's application and sent to other systems via an email or to<br />
an FTP server (see Paragraph 9).<br />
Because the portable reader's PDA has Bluetooth communication capabilities, the<br />
portable reader can communicate with various external devices. Data received from<br />
these devices can be entered into each rail vehicle's data fields.<br />
Currently none of the Bluetooth communication interfaces have been implemented.<br />
The three planned interfaces are:<br />
• Serial interface, which will allow serial RS-232 devices to send and receive data<br />
from the portable reader.<br />
• Telephone interface, which will allow the portable reader to access the internet<br />
through a Bluetooth enabled GPSR telephone.<br />
• Global Position Satellite interface, which will allow the portable reader to record<br />
the location where a tag was read.<br />
To see what options are available in the portable reader, select the File menu and then<br />
tap the Installed Options menu item in the pop-up menu. This will cause the Installed<br />
Options display shown in Figure 53 to appear.<br />
69 August 15, 2008
<strong>SmartScan</strong> <strong>Model</strong> <strong>2400</strong> <strong>Portable</strong> <strong>AEI</strong> <strong>Reader</strong><br />
Figure 53 - Installed Options Display<br />
70 August 15, 2008
<strong>SmartScan</strong> <strong>Model</strong> <strong>2400</strong> <strong>Portable</strong> <strong>AEI</strong> <strong>Reader</strong><br />
11. ABOUT<br />
To find information about the software version and the unit's serial number, tap the<br />
About menu item under the File menu, and the About display shown in Figure 54 will<br />
appear.<br />
Figure 54 - About Display<br />
12. MAINTENANCE AND COMMUNICATION LOGS<br />
To help find problems with the portable reader, the portable reader maintains two<br />
logs. These are the maintenance log and the communications log.<br />
12.1. Maintenance Log<br />
The maintenance log is located in a text file called "maint log.txt". It contains<br />
information about when various events occurred and if internal problems were<br />
detected.<br />
To view the maintenance log tap the Maintenance Log menu item under the View<br />
menu.<br />
The following is an example of information contained in this log:<br />
12/29/2005 12:48 Start of program<br />
12/29/2005 12:48 TCP/IP Initialized Name = "Tom_Levine_PDA" IP = "127.0.0.1"<br />
12/29/2005 12:48 Request to turn off wireless radio<br />
12/29/2005 12:48 Could not open comm log file for clean up<br />
71 August 15, 2008
<strong>SmartScan</strong> <strong>Model</strong> <strong>2400</strong> <strong>Portable</strong> <strong>AEI</strong> <strong>Reader</strong><br />
12/29/2005 12:49 Program closed<br />
12/29/2005 16:30 Start of program<br />
12/29/2005 16:30 TCP/IP Initialized Name = "Tom_Levine_PDA" IP = "127.0.0.1"<br />
12/29/2005 16:31 Program closed<br />
01/13/2006 10:14 Start of program<br />
01/13/2006 10:14 TCP/IP Initialized Name = "Tom_Levine_PDA" IP = "192.168.55.101"<br />
01/13/2006 10:14 0 rail vehicle(s) assigned to tracks were deleted, 4 tag record(s) not assigned to<br />
tracks were deleted.<br />
01/16/2006 12:01 Manual clear inventory request<br />
To help find problems, Softrail may need to obtain a copy of the maintenance log. This<br />
can be easily sent via email by tapping on the Send Maintenance Log to Softrail menu<br />
item under the File menu. For this file to be sent via email the portable reader's PDA<br />
must have a connection to the internet. It is not necessary to enter information in the<br />
Email Setup dialog (see Paragraph 5.9) for the maintenance log to be sent.<br />
12.2. Communications Log<br />
The communications log is located in a text file called "comm log.txt". It contains<br />
information about communications between the portable reader's PDA and other<br />
devices including the internal <strong>AEI</strong> RF reader. The internal <strong>AEI</strong> RF reader is connected<br />
to the PDA's serial communications port.<br />
To view the communications log, tap the Communications Log menu item under the<br />
View menu.<br />
The following is an example of information contained in this log:<br />
12/29/2005 12:49 R (COM1) Received "*P=H@!?8MQD S"<br />
12/29/2005 12:49 R (COM1) Received "FXO3!XD H1D S"<br />
12/29/2005 12:49 R (COM1) Received "FC2:?$@:P2D S"<br />
12/29/2005 12:49 R (COM1) Received "GCUH!MM@N1D S"<br />
To help find problems, Softrail may need to obtain a copy of the communications log.<br />
This can be easily sent via email by tapping on the Send Communications Log to<br />
Softrail menu item under the File menu. For this file to be sent via email the portable<br />
reader's PDA must have a connection to the internet. It is not necessary to enter<br />
information in the Email Setup dialog (see Paragraph 5.9) for the communications log<br />
to be sent.<br />
72 August 15, 2008
<strong>SmartScan</strong> <strong>Model</strong> <strong>2400</strong> <strong>Portable</strong> <strong>AEI</strong> <strong>Reader</strong><br />
13. FILE MAINTENANCE<br />
The portable reader software generates a number of files and continuously adds<br />
records to these files. Periodically, records in these files must be deleted so that the<br />
portable reader does not run out of storage area.<br />
The following table describes the rules for deleting records from the files:<br />
File Name Record Deletion Rules<br />
Maintenance Log "maint<br />
log.txt"<br />
Communications Log "comm<br />
log.txt"<br />
Does not allow file to exceed 200,000<br />
bytes. Deletes oldest records to maintain<br />
this size.<br />
Does not allow file to exceed 200,000<br />
bytes. Deletes oldest records to maintain<br />
this size.<br />
OEM Tag Data "tag data.txt" Does not allow file to exceed 20,000<br />
bytes. Deletes oldest records to maintain<br />
this size.<br />
OEM Status Log "oem<br />
status.txt"<br />
Does not allow file to exceed 20,000<br />
bytes. Deletes oldest records to maintain<br />
this size.<br />
Rail Car Data Base Deletes all tag records for vehicles that<br />
have not been assigned to a track and<br />
were last read over 3 days ago.<br />
Deletes all tag records for vehicles that<br />
have been assigned to a track and were<br />
last read or moved over 30 days ago.<br />
73 August 15, 2008
<strong>SmartScan</strong> <strong>Model</strong> <strong>2400</strong> <strong>Portable</strong> <strong>AEI</strong> <strong>Reader</strong><br />
14. TEXT FILE FORMAT<br />
The portable reader can send track inventory information in two types of comma<br />
delimited text file formats.<br />
These are referred to as EDI and Excel text files.<br />
The EDI format is a comma delimited text file. This format uses Electronic Data<br />
Interchange (EDI) type records. This file has many different types of records and is<br />
generally used for computer-to-computer communications.<br />
The second format is also a comma delimited text file. We refer to it as Excel file<br />
format since it was designed to be easily imported into most commercial word<br />
processing, spreadsheet and database programs.<br />
The following describes these formats:<br />
14.1. EDI Text File Format<br />
The EDI text file format consists of a number of segment records, which are each<br />
terminated with a carriage return character (hex 0D) and line feed character (hex 0A).<br />
There are seven segment record types. The following defines the segment types and<br />
their associated codes:<br />
Segment<br />
Code<br />
Maximum<br />
Number in<br />
File<br />
Description<br />
START 1 Message header segment<br />
TRACK 1 Track segment - contains the track<br />
name and the orientation of the vehicle<br />
inventory<br />
USER 1 User segment - contains the names of<br />
user defined fields<br />
RAIL1 200 Rail 1 segment – contains time on the<br />
track, the rail vehicle's tag data and<br />
system defined fields<br />
RAIL2 200 Rail 2 segment – contains data in the<br />
user defined fields<br />
RAIL3 200 Rail 3 segment (optional) – contains<br />
user comments<br />
END 1 Message trailer segment<br />
74 August 15, 2008
<strong>SmartScan</strong> <strong>Model</strong> <strong>2400</strong> <strong>Portable</strong> <strong>AEI</strong> <strong>Reader</strong><br />
A segment code is at the beginning of each segment. A comma follows the segment<br />
code and commas separate the remaining fields in the segment, which are enclosed in<br />
quotes. The following is the general layout of all types of segments:<br />
Segment code,"field 1","field 2","field 3",……,<br />
The segments are written in the following order:<br />
START<br />
TRACK<br />
USER<br />
RAIL1<br />
RAIL2<br />
RAIL3 (optional)<br />
RAIL1<br />
RAIL2<br />
RAIL3 (optional)<br />
.<br />
.<br />
END<br />
75 August 15, 2008
<strong>SmartScan</strong> <strong>Model</strong> <strong>2400</strong> <strong>Portable</strong> <strong>AEI</strong> <strong>Reader</strong><br />
The following is the layout of each segment record:<br />
Field<br />
Number<br />
Data<br />
Name<br />
ST1 Segment<br />
Code<br />
START Segment<br />
Data Format Description<br />
START Segment code<br />
ST2 Version Numeric 4 digits Version number of the file format<br />
ST3 Date/Time MM/DD/YYYY<br />
HH:MM<br />
ST4 Sequence<br />
Number<br />
Date and time the file was created<br />
MM = month<br />
DD = day of month<br />
YYYY = year<br />
HH = hour<br />
SS = second<br />
Numeric 4 digits The sequence number of the file<br />
from 0 to 9999. This sequence<br />
number is incremented each time a<br />
new file is created. When it<br />
reached 10,000, it is reset to 0<br />
Example: START,"0001","12/19/2005 12:11","0021"<br />
Field<br />
Number<br />
Data<br />
Name<br />
TRK1 Segment<br />
Code<br />
TRACK Segment<br />
Data Format Description<br />
TRACK Segment code<br />
TRK2 Track Alpha/Numeric 1 to<br />
10 characters<br />
TRK3 Orientation NORTH<br />
SOUTH<br />
EAST<br />
WEST<br />
Example: TRACK,"301","WEST"<br />
Track where the rail vehicles are<br />
located<br />
The end of the track where the rail<br />
inventory begins<br />
76 August 15, 2008
<strong>SmartScan</strong> <strong>Model</strong> <strong>2400</strong> <strong>Portable</strong> <strong>AEI</strong> <strong>Reader</strong><br />
Field<br />
Number<br />
Data<br />
Name<br />
USR1 Segment<br />
Code<br />
USR2 Field<br />
Name 1<br />
USR3 Field<br />
Name 2<br />
USR4 Field<br />
Name 3<br />
USR5 Field<br />
Name 4<br />
USR6 Field<br />
Name 5<br />
USR7 Field<br />
Name 6<br />
USR8 Field<br />
Name 7<br />
USER Segment<br />
Data Format Description<br />
USER Segment code<br />
Alpha/Numeric 1 to<br />
20 characters<br />
Alpha/Numeric 1 to<br />
20 characters<br />
Alpha/Numeric 1 to<br />
20 characters<br />
Alpha/Numeric 1 to<br />
20 characters<br />
Alpha/Numeric 1 to<br />
20 characters<br />
Alpha/Numeric 1 to<br />
20 characters<br />
Alpha/Numeric 1 to<br />
20 characters<br />
Name of user defined field 1<br />
Name of user defined field 2<br />
Name of user defined field 3<br />
Name of user defined field 4<br />
Name of user defined field 5<br />
Name of user defined field 6<br />
Name of user defined field 7<br />
Example: USER,"commodity","not assigned 2",”not assigned 3","not assigned 4","not<br />
assigned 5",”not assigned 6",”not assigned 7"<br />
77 August 15, 2008
<strong>SmartScan</strong> <strong>Model</strong> <strong>2400</strong> <strong>Portable</strong> <strong>AEI</strong> <strong>Reader</strong><br />
Field<br />
Number<br />
Data<br />
Name<br />
RAIL101 Segment<br />
Code<br />
RAIL102 Position<br />
RAIL103 Equipment<br />
Code<br />
RAIL 1 Segment<br />
Data Format Description<br />
RAIL1 Segment code<br />
Numeric 1 to 3 digits<br />
1 to 200<br />
Position vehicle is in from end of<br />
the track<br />
Numeric 1 to 2 digits Type of vehicle<br />
5 = locomotive 19 = railcar<br />
RAIL104 Vehicle Initial Alpha 4 characters Vehicle initial (reporting marks)<br />
The field is filled with spaces if the<br />
vehicle initial is less than four<br />
characters<br />
RAIL105 Vehicle<br />
Number<br />
RAIL106 Date/Time<br />
Numeric 1 to 6 digits Vehicle number<br />
MM/DD/YYYY<br />
HH:MM:SS<br />
Date and time the vehicle was<br />
moved to the track<br />
MM = month<br />
DD = day of month<br />
YYYY = year<br />
HH = hour<br />
MM = minute<br />
SS = second<br />
RAIL107 Track Spot Alpha/Numeric 0 to 5 Spot name or "None" if spot<br />
locations are not used<br />
RAIL108 Spot<br />
Position<br />
RAIL109 Tag Side<br />
RAIL110 Tag Length<br />
Numeric 1 to 3 digits Spot position in the track starting<br />
with one.<br />
Left<br />
Right<br />
Side indicator reported by <strong>AEI</strong> tag<br />
Numeric 1 to 4 digits Vehicle's length reported by <strong>AEI</strong><br />
tag in decimeters<br />
RAIL111 Tag Axle Numeric 2 digits Vehicle's axle count reported by<br />
<strong>AEI</strong> tag<br />
RAIL112 Tag Bearing<br />
Code<br />
Numeric 1 digit<br />
Vehicle's bearing code reported by<br />
<strong>AEI</strong> tag<br />
78 August 15, 2008
<strong>SmartScan</strong> <strong>Model</strong> <strong>2400</strong> <strong>Portable</strong> <strong>AEI</strong> <strong>Reader</strong><br />
RAIL113 Tag<br />
Platform<br />
Code<br />
RAIL114 Maintenance<br />
Field 1<br />
RAIL115 Maintenance<br />
Field 2<br />
Numeric 1 to digits or<br />
blank if locomotive<br />
Alpha/Numeric 0 to<br />
20 characters<br />
Alpha/Numeric 0 to<br />
20 characters<br />
RAIL116 Status Field Alpha/Numeric 0 to<br />
20 characters<br />
RAIL117 Consist Field Alpha/Numeric 0 to<br />
20 characters<br />
Example:<br />
RAIL1,"1","5","NS ","1526","01/17/2006<br />
10:41:54","None","1","Left","183","4","1","","","","","",""<br />
Field<br />
Number<br />
Data<br />
Name<br />
RAIL201 Segment<br />
Code<br />
RAIL202 Position<br />
RAIL203 Equipment<br />
Code<br />
RAIL204 Vehicle<br />
Initial<br />
RAIL205 Vehicle<br />
Number<br />
RAIL206 User Field<br />
1<br />
RAIL207 User Field<br />
2<br />
RAIL 2 Segment<br />
Platform code reported by tag<br />
Maintenance field 1<br />
Maintenance field 2<br />
Status field<br />
Consist field<br />
Data Format Description<br />
RAIL2 Segment code<br />
Numeric 1 to 3<br />
digits<br />
1 to 200<br />
Numeric 1 to 2<br />
digits<br />
Position vehicle is in from end of<br />
the track<br />
Type of vehicle<br />
5 = locomotive 19 = railcar<br />
Alpha 4 characters Vehicle initial (reporting marks)<br />
The field is filled with spaces if the<br />
vehicle initial is less than four<br />
characters<br />
Numeric 1 to 6<br />
digits<br />
Alpha/Numeric 0 to<br />
20 characters<br />
Alpha/Numeric 0 to<br />
20 characters<br />
Vehicle number<br />
User defined field 1<br />
User defined field 2<br />
79 August 15, 2008
<strong>SmartScan</strong> <strong>Model</strong> <strong>2400</strong> <strong>Portable</strong> <strong>AEI</strong> <strong>Reader</strong><br />
RAIL208 User Field<br />
3<br />
RAIL209 User Field<br />
4<br />
RAIL210 User Field<br />
5<br />
RAIL211 User Field<br />
6<br />
RAIL212 User Field<br />
7<br />
Alpha/Numeric 0 to<br />
20 characters<br />
Alpha/Numeric 0 to<br />
20 characters<br />
Alpha/Numeric 0 to<br />
20 characters<br />
Alpha/Numeric 0 to<br />
20 characters<br />
Alpha/Numeric 0 to<br />
20 characters<br />
Example: RAIL2,"1","5","NS ","1526","coal","","","","",""<br />
User defined field 3<br />
User defined field 4<br />
User defined field 5<br />
User defined field 6<br />
User defined field 6<br />
80 August 15, 2008
<strong>SmartScan</strong> <strong>Model</strong> <strong>2400</strong> <strong>Portable</strong> <strong>AEI</strong> <strong>Reader</strong><br />
Field<br />
Number<br />
Data<br />
Name<br />
RAIL301 Segment<br />
Code<br />
RAIL302 Position<br />
RAIL303 Equipment<br />
Code<br />
RAIL304 Vehicle<br />
Initial<br />
RAIL305 Vehicle<br />
Number<br />
RAIL306 Comments<br />
Field<br />
RAIL 3 Segment<br />
Data Format Description<br />
RAIL3 Segment code<br />
Numeric 1 to 3<br />
digits<br />
1 to 200<br />
Numeric 1 to 2<br />
digits<br />
Position vehicle is in from end of<br />
the track<br />
Type of vehicle<br />
5 = locomotive 19 = railcar<br />
Alpha 4 characters Vehicle initial (reporting marks)<br />
The field is filled with spaces if the<br />
vehicle initial is less than four<br />
characters<br />
Numeric 1 to 6<br />
digits<br />
Alpha/Numeric 0 to<br />
200 characters<br />
Vehicle number<br />
Example: RAIL3,"1","5","NS ","1526","Broken glad hand"<br />
Field<br />
Number<br />
Data<br />
Name<br />
END1 Segment<br />
Code<br />
END2 Segment<br />
count<br />
Example: END,"11"<br />
END Segment<br />
Vehicle comments field<br />
Data Format Description<br />
END Segment code<br />
Numeric 0 to 4<br />
digits<br />
Number of segment records in the<br />
file not including the END segments<br />
81 August 15, 2008
<strong>SmartScan</strong> <strong>Model</strong> <strong>2400</strong> <strong>Portable</strong> <strong>AEI</strong> <strong>Reader</strong><br />
The following is an example of a track inventory text file:<br />
START,"0001","01/17/2006 13:21:55","0002"<br />
TRACK,"201","WEST"<br />
USER,"commodity","not assigned 2","not assigned 3","not assigned 4","not assigned 5","not assigned<br />
6","not assigned 7"<br />
RAIL1,"1","5","NS ","1526","01/17/2006 10:41:54","None","1","Left","183","4","1","","","","","",""<br />
RAIL2,"1","5","NS ","1526","coal","","","","","",""<br />
RAIL3,"1","5","NS ","1526","broken glad hand"<br />
RAIL1,"2","19","UP ","123456","01/17/2006<br />
10:42:06","None","2","Left","161","","4","1","0","","","",""<br />
RAIL2,"2","19","UP ","123456","","","","","","",""<br />
RAIL1,"3","19","CSX ","987654","01/17/2006<br />
10:42:08""None","3",,"Right","193","","6","1","0","","","",""<br />
RAIL2,"3","19","CSX ","987654","timber","","","","","",""<br />
RAIL1,"4","19","DEFX","112344","01/17/2006<br />
10:42:10","None","1","Left","185","","4","1","0","","","",""<br />
RAIL2,"4","19","DEFX","112344","","","","","","",""<br />
END,"12"<br />
14.2. Excel Text File<br />
The Excel text file consists of a header record and data records. The first record in<br />
the file is the header record, which gives a description of data in each field of the data<br />
records.<br />
Each record is terminated with a carriage return character (hex 0D) and line feed<br />
character (hex 0A).<br />
The following is an example of the header record:<br />
"Vehicle ID","Track","Position","Type","Time","Manual","Status","Consist","Maint 1",<br />
"Maint 2,"User 1","User 2",”User 3","User 4","User 5","User 6”,"User 7”<br />
The “User 1” through “User 7” fields will contain the field names that were entered in<br />
the User Defined Fields dialog (see Paragraph 3.3).<br />
Field<br />
Number<br />
Data<br />
Name<br />
Data Record<br />
Data Format Description<br />
1 Vehicle ID Alpha 4 characters<br />
Numeric 1 to 6 digits<br />
AAAANNNNNN<br />
2 Track<br />
Alpha/Numeric 1 to<br />
10 characters<br />
Vehicle initial and number<br />
The initial is filled with spaces if the<br />
vehicle initial is less than four<br />
characters<br />
Name of the track the vehicle is<br />
located<br />
82 August 15, 2008
<strong>SmartScan</strong> <strong>Model</strong> <strong>2400</strong> <strong>Portable</strong> <strong>AEI</strong> <strong>Reader</strong><br />
3 Position on<br />
track<br />
4 Type of<br />
Vehicle<br />
5 Date/Time<br />
Alpha 1 character<br />
Dash<br />
Numeric 3 digits<br />
A - NNN<br />
Diesel<br />
Railcar<br />
6 Manual Yes<br />
No<br />
MM/DD/YYYY<br />
HH:MM:SS<br />
7 Status Alpha/Numeric 0 to<br />
20 characters<br />
8 Consist Alpha/Numeric 0 to<br />
20 characters<br />
9 Maintenance<br />
Field 1<br />
10 Maintenance<br />
Field 2<br />
Alpha/Numeric 0 to<br />
20 characters<br />
Alpha/Numeric 0 to<br />
20 characters<br />
11 User 1 Alpha/Numeric 0 to<br />
20 characters<br />
12 User 2 Alpha/Numeric 0 to<br />
20 characters<br />
13 User 3 Alpha/Numeric 0 to<br />
20 characters<br />
The first character designates the<br />
end of the track where the first<br />
position is located.<br />
N = North<br />
S = South<br />
W = West<br />
E = East<br />
The next 1 to 3 digits indicates the<br />
position of the vehicle on the track<br />
Type of rail vehicle<br />
Date and time the vehicle was<br />
moved to the track<br />
MM = month<br />
DD = day of month<br />
YYYY = year<br />
HH = hour<br />
MM = minute<br />
SS = second<br />
Indicates if the vehicle was entered<br />
manually into the portable reader<br />
(Yes) or read from an <strong>AEI</strong> tag (no)<br />
Status field<br />
Consist field<br />
Maintenance field 1<br />
Maintenance field 2<br />
User field 1<br />
User field 2<br />
User field 3<br />
83 August 15, 2008
<strong>SmartScan</strong> <strong>Model</strong> <strong>2400</strong> <strong>Portable</strong> <strong>AEI</strong> <strong>Reader</strong><br />
14 User 4 Alpha/Numeric 0 to<br />
20 characters<br />
15 User 5 Alpha/Numeric 0 to<br />
20 characters<br />
16 User 6 Alpha/Numeric 0 to<br />
20 characters<br />
17 User 7 Alpha/Numeric 0 to<br />
20 characters<br />
18 User 8 Alpha/Numeric 0 to<br />
20 characters<br />
User field 4<br />
User field 5<br />
User field 6<br />
User field 7<br />
User field 8<br />
Example:<br />
"NS 1526",”101”,”W - 004",”Railcar”,”01/17/2008 10:41:54","No","empty","",<br />
"bad glad hand",”","","","","","","","",””<br />
15. TECHNICAL SUPPORT AND UPDATES<br />
Periodically Softrail issues maintenance releases and new versions of this program.<br />
Maintenance releases are free and correct problems found with the program and/or<br />
provide minor enhancements to the program. Before contacting us with problems we<br />
suggest that you contact your sales representative and review the issues with him and<br />
then check our web page at www.aeitag.com to insure that you have the latest<br />
maintenance release of the program.<br />
Technical support is free for the first one year after purchase, but is limited to two<br />
hours of support for each portable reader that is purchased. Time is charged in<br />
blocks of 15 minutes.<br />
A maintenance agreement can be purchased to extend the period of technical support<br />
or add additional hours.<br />
For technical support or more information on the maintenance agreement contact<br />
Softrail at:<br />
Softrail, Inc.<br />
1098 Venetia Road<br />
Eighty Four, PA 15330<br />
Tel. 888 872-4612 (toll free US and Canada only) or 724 942-1473<br />
Fax. 724 942-1480<br />
E-mail aei@signalcc.com<br />
Web Page www.aeitag.com<br />
84 August 15, 2008
<strong>SmartScan</strong> <strong>Model</strong> <strong>2400</strong> <strong>Portable</strong> <strong>AEI</strong> <strong>Reader</strong><br />
16. SYSTEM SPECIFICATIONS<br />
Maximum Number of Vehicles in System 5,000<br />
Maximum Number of Vehicles per Track 200<br />
Maximum Number of Tracks 100<br />
Maximum Number of Messages Pending Transmission 200<br />
Maximum Character Size of Track Name 10<br />
Maximum Number of User Defined Fields 7<br />
Maximum Character Size of User and System Defined Fields 20<br />
Maximum Vehicle Comments Field’s Character Size per Vehicle 200<br />
Maximum Vehicle Comments Field’s Character Size per System 50,000<br />
85 August 15, 2008
<strong>SmartScan</strong> <strong>Model</strong> <strong>2400</strong> <strong>Portable</strong> <strong>AEI</strong> <strong>Reader</strong><br />
802.11b interface, 69<br />
Active Track display, 5<br />
<strong>AEI</strong> Rail & Road Manager, 9, 31, 33<br />
barcode, 39<br />
text translation, 43<br />
battery operation, 2<br />
Bluetooth, 37, 38, 69<br />
clock update, 38<br />
communications log, 72<br />
email<br />
addresses, 36<br />
sending track inventory, 9, 30<br />
setup, 35, 37, 38<br />
track comments, 31, 50<br />
file maintenance, 73<br />
find<br />
rail vehicle, 54<br />
FTP<br />
server setup, 36<br />
Global Positioning Satellite system, 69<br />
identifier, 24<br />
inventory, 45<br />
delete all, 55<br />
move to another track, 51<br />
reverse track, 50<br />
send, 51<br />
maintenance fields, 14<br />
maintenance log, 71<br />
manual entry, 11<br />
memorized data maintenance, 22<br />
message status, 10<br />
OEM<br />
accessing tag data, 58<br />
folder setup, 44<br />
functions, 55, 57<br />
options, 69<br />
sending data, 63<br />
sending email, 64<br />
sending FTP, 67<br />
sending status, 68<br />
options, 69<br />
overview, 1<br />
password, 20<br />
PDA<br />
IP address, 35<br />
name, 35<br />
serial number, 71<br />
portable reader identifier, 24<br />
Index<br />
quick start, 2<br />
rail vehicle<br />
add, 48<br />
adding to track, 4<br />
additional fields, 13<br />
change position on track, 48<br />
comments, 14<br />
delete, 48<br />
delete all vehicles, 55<br />
find, 54<br />
maintenance fields, 14<br />
manual entry, 11<br />
system defined fields, 14<br />
user defined fields, 15<br />
view, 46, 49<br />
Rail Vehicle Data Field display, 16<br />
reading tags, 2<br />
reset button, 2<br />
reset inventory, 55<br />
screen displays, 17<br />
sending track inventory, 8, 51<br />
serial interface, 69<br />
setup<br />
<strong>AEI</strong> Rail & Road Manager, 33<br />
barcode, 39<br />
barcode text translation, 43<br />
communications, 37, 38<br />
contact information, 20<br />
default track orientation, 21<br />
default vehicle initial, 21<br />
email, 35, 37, 38<br />
email addresses, 36<br />
FTP server, 36<br />
functions, 18<br />
OEM folder setup, 44<br />
TCP/IP, 33<br />
track data, 25<br />
user defined names, 32<br />
Setup Password, 20<br />
<strong>SmartScan</strong> Information display, 2<br />
specifications, 85<br />
Spot, 57<br />
spot locations, 57<br />
T94<br />
sending track inventory, 8, 30<br />
track comments, 31, 50<br />
TCP/IP<br />
setup, 33<br />
86 August 15, 2008
<strong>SmartScan</strong> <strong>Model</strong> <strong>2400</strong> <strong>Portable</strong> <strong>AEI</strong> <strong>Reader</strong><br />
technical support, 84<br />
telephone interface, 69<br />
track<br />
email comments, 31, 50<br />
inventory, 45, 47<br />
inventory text file, 74<br />
move inventory, 51<br />
reverse inventory, 50<br />
sending inventory, 8<br />
spots, 57<br />
T94 comments, 31, 50<br />
Track tags, 55<br />
usb connection, 10<br />
user defined names, 32<br />
version, 71<br />
WiFi, 37, 38, 69<br />
wireless radio 802.11b, 10<br />
2 August 15, 2008