Mindray North America Frequently Asked Questions Product
Mindray North America Frequently Asked Questions Product
Mindray North America Frequently Asked Questions Product

Create successful ePaper yourself
Turn your PDF publications into a flip-book with our unique Google optimized e-Paper software.
<strong>Product</strong><br />
Passport V<br />
Part number 0002-08-9010 Rev A<br />
<strong>Mindray</strong> <strong>North</strong> <strong>America</strong><br />
<strong>Frequently</strong> <strong>Asked</strong> <strong>Questions</strong><br />
1) Q.) What is the Password to save User Settings?<br />
A.) The default password is: SYSTEM<br />
2) Q.) Can the Passport V interface to an EMR system?<br />
A.) In most cases, yes. The Passport V features two serial ports, either of which may be<br />
configured with the DIAP protocol. Click Here for the complete list of <strong>Mindray</strong> interface<br />
partners.<br />
3) Q.) How can I check the software revision of the Passport V?<br />
A.) In Normal Screen, highlight and select “Functions” button. Highlight and select “System<br />
Information” button to display the table of software modules. Highlight and select the<br />
“Scroll” button to browse the complete list of software modules and their revision<br />
levels.<br />
4) Q.) How do I connect my dual lumen (two hose) cuff to our Passport V monitor?<br />
A.) <strong>Mindray</strong> does not sell or recommend the use of dual lumen cuffs, hoses, or adaptors.<br />
CAUTION: Use of dual lumen cuffs on monitors designed for use with single lumen cuffs<br />
may cause false believable readings to be displayed.<br />
DPM Low Acuity<br />
1) Q.) What is the User Maintenance Password?<br />
A.) DPM 2, 3, Accutorr V: 321<br />
DPM 4, 5: MINDRAY<br />
2) Q.) Where can I find part numbers of accessories for my DPM monitors?<br />
A.) Click Here for a complete list of monitor accessories.<br />
3) Q.) How do I connect our monitor to an Invasive Blood Pressure transducer?<br />
A.) <strong>Mindray</strong> offers the following cables to be used for connecting DPM monitors featuring<br />
IBP to the specific brand of transducer:<br />
6 Pin IBP Cable (for Becton Dickinson) 001C-30-70758<br />
6 Pin IBP Cable (for Hospira) 001C-30-70760<br />
6 Pin IBP Cable (for Memscap SP844 transducer) 0010-21-43081<br />
6 Pin IBP Cable (for Edwards Life Science) 0010-21-43094<br />
Cables for many other brands may be obtained through Fogg System Co, Inc. (Tel: 800-<br />
525-0292).<br />
1
4) Q.) How do I connect my dual lumen (two hose) cuff to our DPM monitor?<br />
A.) <strong>Mindray</strong> does not sell or recommend the use of dual lumen cuffs, hoses, or adaptors.<br />
CAUTION: Use of dual lumen cuffs on monitors designed for use with single lumen cuffs<br />
may cause false believable readings to be displayed.<br />
DPM 6/7<br />
1) Q.) What is the Password to enter into User maintenance?<br />
A.) Enter 888888<br />
2) Q.) How can I disable the touch screen for cleaning?<br />
A.) Hold “Main Menu” button on screen for 3 seconds until it beeps. A red padlock will<br />
appear indicating the touch screen is now locked. You can revert back the same way, by<br />
holding “Main Menu” again for 3 seconds. The touch screen will now be fully functional<br />
once again.<br />
3) Q.) How many Invasive Blood Pressures can I have working at once?<br />
A.) DPM 6/7 monitors are capable of up to eight (8) invasive pressures simultaneously.<br />
4) Q.) How can I add additional modules when the monitor module slots are at capacity?<br />
A.) You can add the USB connected SMR (Satellite Module Rack) which will add eight<br />
module slots that can be used in any combination: (single, double or triple wide<br />
modules)<br />
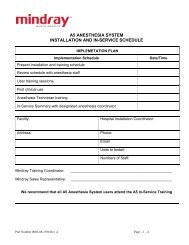
5) Q.) How do I know which kind of SpO2 cable/sensor I need?<br />
A.) Nellcor SpO2 connector is GREY<br />
<strong>Mindray</strong> SpO2 connector is BLUE<br />
Masimo SpO2 connector is either WHITE (Old 7 Pin style) or<br />
LAVENDER (New 8 Pin style)<br />
Part number 0002-08-9010 Rev A<br />
2
<strong>Mindray</strong> SpO2 Masimo SpO2 7 Pin (old) Nellcor SpO-<br />
Part number 0002-08-9010 Rev A<br />
Masimo SpO2 White 7-Pin Masimo SpO2 Lavender 8-Pin<br />
5) Q.) What do the different color alarms flashing in the upper right corner mean?<br />
A. When a physiological alarm or technical alarm occurs this lamp will flash as defined<br />
Below:<br />
• High level alarms: the lamp quickly flashes red ____.<br />
• Medium level alarms: the lamp slowly flashes yellow *_*_*_*_*_*.<br />
• Low level physiological alarms: the lamp lights yellow ____without flashing.<br />
• Low level technical alarms: the lamp does not light.<br />
Technical alarm lamp<br />
This lamp will light blue ____ when a technical alarm occurs.<br />
3
7) Q.) Why can’t I print to the built in strip recorder? When I touch the “Record”<br />
button, nothing happens.<br />
A.) The recorder may be turned off. To check, touch Main Menu > Maintenance ><br />
Factory Maintenance, enter password 332888 > Enter > OK. Find “Recorder” on<br />
left of menu and ensure it is turned “ON” then X out to the main screen. This<br />
setting will be automatically saved so this only needs to be done once.<br />
8) Q.) What is the part number for the Lithium-Ion Batteries for my DPM6/7 or<br />
Beneview T5/T8 monitor?<br />
A.) All of these monitors use battery part number 022-000008-00 . The DPM7 and<br />
Beneview T8 must have two (2) batteries installed to operate on battery power.<br />
The DPM6 and Beneview T5 monitors will hold two batteries, but, will operate<br />
on just one.<br />
9) Q.) What is the part number for the power cord for my DPM6/7 or Beneview T5/T8<br />
monitor?<br />
A-Series Anesthesia<br />
A.) Ten (10) foot Power Cord is part number 0012-25-0001.<br />
Please refer to Ops Manual for calibration questions<br />
V-Series Monitor<br />
1) Q.) How do I adjust the Alarm volume setting?<br />
A.) Go to Setup/Audio Levels, adjust to the desired level then hit Accept.<br />
2) Q.) How do I adjust the Time and Date?<br />
A.) Press the time and date on the screen. After the screen opens, adjust the time and<br />
date.<br />
Part number 0002-08-9010 Rev A<br />
4
3) Q.) How do I change ECG Lead type (SW 2.4.0.18 and above)?<br />
A.) Press the ECG waveform on screen, then press ECG Cable Type. When done press<br />
Accept to save.<br />
4) Q.) How can I clear a Comm Loss message that occurs on the monitor or the monitor<br />
does not show up on the Central Station?<br />
A.) Reseat the Ethernet cable. Undock VPS module and re-dock. Restart the monitor.<br />
5) Q.) My NIBP Start is greyed out on the screen, what could cause this?<br />
A.) Check to make sure that a digital data box is set for NIBP in the display setup.<br />
6) Q.) The SpO2 only gives digital data and no waveform.<br />
A.) Check to make sure that the SpO2 is set to display in a waveform box and not a<br />
digital data box.<br />
DPM Central Station<br />
1) How do I change the time on the DPM CS?<br />
A. Click on the “System Setup” tile in the lower right of the display.<br />
B. Click on the “Admin Setup” tile.<br />
C. Enter password and hit enter on the keyboard or click on “OK”<br />
D. In the “Admin Setup” window click on the “Other” tab on the right side.<br />
E. Click on the “Change Time” tile to open the “Change Time” dialog box.<br />
F. Highlight the Hour parameter in the window and click on the up or down arrows to<br />
change the hour to the correct time. Click on “OK”.<br />
G. A “Change Time” message box will appear stating “Invalid data in database will be<br />
deleted after the time is changed. Are you sure you want to continue?” Click “Yes”<br />
and a “Deleting outdated data” message box will popup and disappear after the<br />
outdated data is updated.<br />
H. All Bedside monitors will update immediately.<br />
I. Close “Admin Setup” window and click on the “Main Screen” tile on the bottom of<br />
the screen.<br />
Part number 0002-08-9010 Rev A<br />
5
2) One of my screens has rotated 90 degrees or is upside down, how do I correct this?<br />
A. With the mouse, click inside the screen that has rotated.<br />
B. On the keyboard, simultaneously, hit “Ctrl”, Alt”, and the up arrow.<br />
C. The screen will rotate back to normal.<br />
3) Q.) Does DPM CS automatically adjust for daylight savings time?<br />
A.) No, the time must manually be changed on each DPM CS in the network individually.<br />
See “How do I change the time on the DPM CS?” for time change procedure.<br />
4) How do I find the DPM CS Software Version?<br />
A. Click on the “System Setup” tile in the lower right of the display.<br />
B. Click on the “Help” tile to enter the “Central Monitoring System” window.<br />
C. In the upper left corner, click on the “About” tile.<br />
5) How do I shut down the DPM CS?<br />
A. Click on the “System Setup” tile in the lower right of the display.<br />
B. Click on the “Shut Down” tile.<br />
C. Enter password and hit enter on the keyboard or click on “OK”<br />
D. Confirm Shut Down of system by clicking on “Yes”.<br />
6) How do I Re-start the DPM CS?<br />
A. Click on the “System Setup” tile in the lower right of the display.<br />
B. Click on the “Factory” tile.<br />
C. Enter password and hit enter on the keyboard or click on “OK”<br />
D. Click on the “Exit to Windows” tile in the lower left corner.<br />
E. Confirm exit to Windows by clicking on “Yes”.<br />
Part number 0002-08-9010 Rev A<br />
6
F. When the DPM Desk Top appears, click on the “Start” menu and choose “Turn off<br />
Computer”.<br />
G. Click on the Green “Restart” Icon. The DPM CS will turn off and automatically restart.<br />
Panorama Central Station<br />
1) Q.) Does Panorama automatically adjust for daylight savings time?<br />
A.) No, the time must manually be changed on the Panorama Central Station and<br />
View/WorkStation. Each unit must be changed individually.<br />
2) Q.) How do I determine Central Station and View/WorkStation Software revision?<br />
A.) Click on the Time/Date area four (4) times. A window will open displaying the S/W<br />
version<br />
3) Q.) How do I know what software revision my Instrument Radio Kit is compatible with?<br />
A.) Instrument radio Kit 0040-00-0361-01 (Firmware C.09) is only compatible with<br />
Panorama software 8.2.7 and below Instrument radio Kit 0040-00-0361-02 (Firmware<br />
E.02) is only compatible with Panorama software 8.3 and above<br />
4) Q.) How do I clear error logs from Central Station and View/WorkStations? (Software 8.6<br />
and above)<br />
A. Click on the Time/Date area four (4) times. A window will open displaying the S/W<br />
version.<br />
B. Click on the Password box. Using the on-screen keyboard, type in the password:<br />
servicelogs. Press Shutdown.<br />
C. To clear the error logs, Press the Clear Error Logs button.<br />
D. When completed, press the Done button to close the dialog box<br />
5) How do I capture error logs from Central Station and View/WorkStations?<br />
(Software 8.6.4 and above)<br />
A. Error Logs can be captured and written to a CD. Insert a blank CD into the CDROM drive<br />
B. Click on the Time/Date area four (4) times. A window will open.<br />
C. Click on the Password box. Using the on-screen keyboard, type in the password:<br />
servicelogs.<br />
D. Press the Shutdown button.<br />
E. Press the Capture Error Logs button.<br />
Part number 0002-08-9010 Rev A<br />
7
F. After the logs have been written to the CD, press the Done button to close the dialog<br />
box.<br />
G. Remove the CD from the drive.<br />
6) How do I backup error logs from Central Station and View/WorkStations? (Software version<br />
8.6.4 and above only)<br />
A. Click on the Time/Date area four (4) times. A window will open displaying the S/W<br />
version.<br />
B. Click on the Password box. Using the on-screen keyboard, type in the password:<br />
(Multiply the day times the month as displayed on the Panorama screen).<br />
C. Press the Shutdown button.<br />
D. Press the Backup Logs button.<br />
E. After the logs have been backed-up, press the Done button to close the dialog box.<br />
7) How do I create an emergency disk CD from a Central Station? (Software 8.6.4 and above)<br />
A. Error Logs can be captured and written to a CD. Insert a blank CD into the CDROM drive.<br />
B. Click on the Time/Date area four (4) times. A window will open<br />
C. Click on the Password box. Using the on-screen keyboard, type in the password:<br />
servicelogs. Press Shutdown.<br />
D. Press the Create Emergency Disk button.<br />
E. After the logs have been written, Press the Done button to close the dialog box.<br />
F. Remove the CD.<br />
8) What is the proper Shut down/Re-start sequence for Panorama systems?<br />
Shutting down the PanoramaTelemetry Network:<br />
A. Shut down all Telemetry Servers<br />
B. Shut down the Wireless Transceiver<br />
C. Shutdown all Central Stations and Work Stations<br />
Restarting the Panorama Telemetry Network:<br />
A. Restart the Wireless Transceiver<br />
B. Restart one of the Central Stations.<br />
C. After the Central station has come back on-line, restart the Telemetry Server connected<br />
to DS1 on the Wireless Transceiver.<br />
D. After the first Telemetry Server has come back on-line, re-start the remaining Telemetry<br />
Servers.<br />
E. Re-start the remaining Central Stations and View/WorkStations.<br />
Part number 0002-08-9010 Rev A<br />
8