PFMM-WFI-99 - Pure-Flo
PFMM-WFI-99 - Pure-Flo
PFMM-WFI-99 - Pure-Flo

You also want an ePaper? Increase the reach of your titles
YUMPU automatically turns print PDFs into web optimized ePapers that Google loves.
For models with switch options or a<br />
potentiometer, an adjustment is required if<br />
the Hot Lock Out lower cover is repositioned<br />
in the field (Conduit rotated 90 degrees from<br />
factory setting). Fully close the valve, remove<br />
the plastic cap, handwheel, upper cover and<br />
bushing o-ring. Remove the screws holding<br />
the circuit board to the lower cover, lift the<br />
circuit board out of the way. Loosen the hub<br />
set screw and lift the hub up off the bushing<br />
using care not to disturb the potentiometer<br />
gear position. Lift up the lower cover, rotate<br />
90° to the new position, line up the 2 pins<br />
and cored holes between the bonnet/lower<br />
cover and press down. Slide the hub over<br />
the bushing with the set screw lined up with<br />
the counterbore, pull the pawl out of the way,<br />
press down and lock up the set screw with a<br />
0.005" gap between the hub and shim.<br />
Position the circuit board and tighten the<br />
screws. Replace the o-ring, upper cover,<br />
handwheel and plastic cap.<br />
2.0 OPERATION AND ADJUSTMENT<br />
2.1 General<br />
The valve is closed with a clockwise rotation of<br />
the handwheel. See Table 2 for stroke length<br />
and number of turns information.<br />
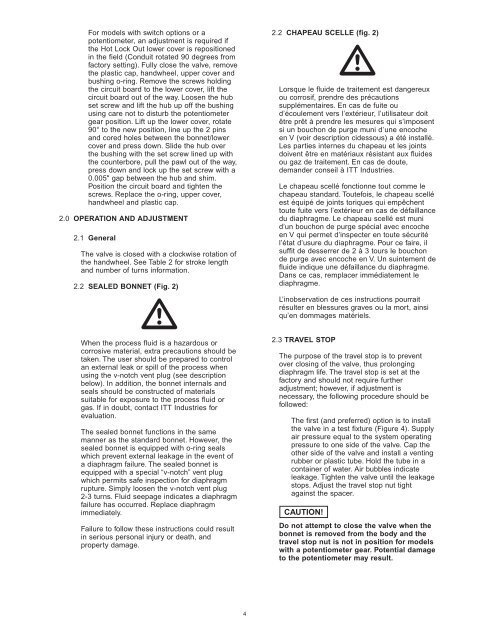
2.2 SEALED BONNET (Fig. 2)<br />
<br />
When the process fluid is a hazardous or<br />
corrosive material, extra precautions should be<br />
taken. The user should be prepared to control<br />
an external leak or spill of the process when<br />
using the v-notch vent plug (see description<br />
below). In addition, the bonnet internals and<br />
seals should be constructed of materials<br />
suitable for exposure to the process fluid or<br />
gas. If in doubt, contact ITT Industries for<br />
evaluation.<br />
The sealed bonnet functions in the same<br />
manner as the standard bonnet. However, the<br />
sealed bonnet is equipped with o-ring seals<br />
which prevent external leakage in the event of<br />
a diaphragm failure. The sealed bonnet is<br />
equipped with a special “v-notch” vent plug<br />
which permits safe inspection for diaphragm<br />
rupture. Simply loosen the v-notch vent plug<br />
2-3 turns. Fluid seepage indicates a diaphragm<br />
failure has occurred. Replace diaphragm<br />
immediately.<br />
Failure to follow these instructions could result<br />
in serious personal injury or death, and<br />
property damage.<br />
4<br />
2.2 CHAPEAU SCELLE (fig. 2)<br />
<br />
Lorsque le fluide de traitement est dangereux<br />
ou corrosif, prendre des précautions<br />
supplémentaires. En cas de fuite ou<br />
d’écoulement vers l’extérieur, l’utilisateur doit<br />
être prêt à prendre les mesures qui s’imposent<br />
si un bouchon de purge muni d’une encoche<br />
en V (voir description cidessous) a été installé.<br />
Les parties internes du chapeau et les joints<br />
doivent être en matériaux résistant aux fluides<br />
ou gaz de traitement. En cas de doute,<br />
demander conseil à ITT Industries.<br />
Le chapeau scellé fonctionne tout comme le<br />
chapeau standard. Toutefois, le chapeau scellé<br />
est équipé de joints toriques qui empêchent<br />
toute fuite vers l’extérieur en cas de défaillance<br />
du diaphragme. Le chapeau scellé est muni<br />
d’un bouchon de purge spécial avec encoche<br />
en V qui permet d’inspecter en toute sécurité<br />
l’état d’usure du diaphragme. Pour ce faire, il<br />
suffit de desserrer de 2 à 3 tours le bouchon<br />
de purge avec encoche en V. Un suintement de<br />
fluide indique une défaillance du diaphragme.<br />
Dans ce cas, remplacer immédiatement le<br />
diaphragme.<br />
L’inobservation de ces instructions pourrait<br />
résulter en blessures graves ou la mort, ainsi<br />
qu’en dommages matériels.<br />
2.3 TRAVEL STOP<br />
The purpose of the travel stop is to prevent<br />
over closing of the valve, thus prolonging<br />
diaphragm life. The travel stop is set at the<br />
factory and should not require further<br />
adjustment; however, if adjustment is<br />
necessary, the following procedure should be<br />
followed:<br />
The first (and preferred) option is to install<br />
the valve in a test fixture (Figure 4). Supply<br />
air pressure equal to the system operating<br />
pressure to one side of the valve. Cap the<br />
other side of the valve and install a venting<br />
rubber or plastic tube. Hold the tube in a<br />
container of water. Air bubbles indicate<br />
leakage. Tighten the valve until the leakage<br />
stops. Adjust the travel stop nut tight<br />
against the spacer.<br />
CAUTION!<br />
Do not attempt to close the valve when the<br />
bonnet is removed from the body and the<br />
travel stop nut is not in position for models<br />
with a potentiometer gear. Potential damage<br />
to the potentiometer may result.