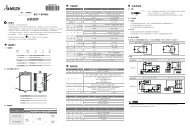
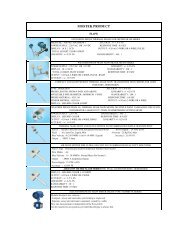
Digital Fiber Sensor FS-N10 Series Instruction Manual 96M00603
Digital Fiber Sensor FS-N10 Series Instruction Manual 96M00603
Digital Fiber Sensor FS-N10 Series Instruction Manual 96M00603

Create successful ePaper yourself
Turn your PDF publications into a flip-book with our unique Google optimized e-Paper software.
Connecting Multiple Amplifiers<br />
Up to 16 sub units can be connected to one main unit.<br />
Note<br />
Warning<br />
1 Remove the protection covers of the main unit and<br />
sub unit(s).<br />
2 Install the amplifiers one by one on the DIN rail.<br />
3 Engage the two claws of the sub unit with the<br />
recesses on the main unit side until you hear a<br />
click.<br />
4 Attach the end units (option: OP-26751) to the<br />
both ends of the connected amplifiers in the same<br />
way as in step (2).<br />
5 Sandwich the amplifiers between the end units.<br />
Tighten the screws at the top (two screws x two<br />
units) with a Phillips screwdriver to fix the end<br />
units.<br />
Calibration Method<br />
Mount on DIN rail and install on metal sheeting when connecting to<br />
multiple amplifiers or mounting main units together.<br />
• Multiple connections cannot be made to equipment other than the <strong>FS</strong>-<strong>N10</strong><br />
series.<br />
• Turn the power off before connecting multiple sub units.<br />
• Do not touch the expansion connector with your bare hands.<br />
Detecting Even Small Differences<br />
Two-point Calibration<br />
Two-point calibration is the basic method for making calibration.<br />
You can set the sensitivity level automatically, simply by pressing the [SET] button twice.<br />
Just press once with the workpiece set up, and once without.<br />
Through-beam model setting method<br />
Workpiece<br />
Reflective model setting method<br />
Workpiece<br />
OP-26751 (a set of two)<br />
Press [SET] button once with<br />
no workpiece set<br />
Press [SET] button once with<br />
workpiece set<br />
Settings complete<br />
Press [SET] button once with<br />
no workpiece set<br />
Press [SET] button once with<br />
workpiece set<br />
Settings complete<br />
2<br />
Two-point calibration performs detection at a location where there is a workpiece, and<br />
another location where there is not, uses the intermediate value as the setting.<br />
If the sensitivity difference does not have enough room, "- - - -" flashes for about two seconds<br />
after the calibration is complete. The set value is stored in memory even in that case.<br />
Other Calibration Methods<br />
Increase Resistance to Dust and Dirt<br />
Maximum Sensitivity Setting<br />
In the state shown below, press and hold the [SET] button for three seconds and stop pushing<br />
when "" flashes.<br />
The sensitivity is set slightly higher than the light intensity.<br />
Through-beam model : with workpiece set<br />
Workpiece<br />
Reflective model : without workpiece set<br />
Calibrate with Moving Workpiece<br />
Full Auto Calibration<br />
Press and hold the [SET] button with no workpiece in place, while “” is flashing, pass<br />
through a workpiece. (Continue pressing the [SET] button while the workpiece passes<br />
through.)<br />
Common to<br />
Through-beam and Reflective Models<br />
Position Workpiece<br />
Positioning Calibration<br />
Workpiece<br />
Press and hold for 3 seconds or more<br />
Press and hold for 3 seconds or more<br />
Press and hold until<br />
"" flashes<br />
While pressing the [SET] button<br />
pass through a workpiece<br />
Settings complete<br />
Press the [SET] button with no workpiece set.<br />
Place the workpiece in the location you wish to position it, and press and hold the [SET] button<br />
for at least 3 seconds. Release the button when "" flashes.<br />
Common to<br />
Through-beam and Models<br />
Reflective<br />
Workpiece<br />
Press [SET] button once with<br />
no workpiece set<br />
Press and hold [SET] button with<br />
workpiece set<br />
Press and hold until<br />
"" flashes<br />
Settings complete