

Making Wood Countertops - WEST SYSTEM Epoxy
Making Wood Countertops - WEST SYSTEM Epoxy
Making Wood Countertops - WEST SYSTEM Epoxy

Create successful ePaper yourself
Turn your PDF publications into a flip-book with our unique Google optimized e-Paper software.
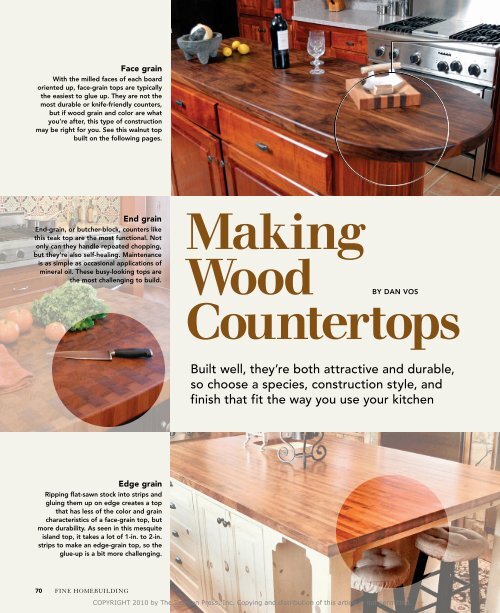
Face grain<br />
With the milled faces of each board<br />
oriented up, face-grain tops are typically<br />
the easiest to glue up. they are not the<br />
most durable or knife-friendly counters,<br />
but if wood grain and color are what<br />
you’re after, this type of construction<br />
may be right for you. See this walnut top<br />
built on the following pages.<br />
End grain<br />
end-grain, or butcher-block, counters like<br />
this teak top are the most functional. not<br />
only can they handle repeated chopping,<br />
but they’re also self-healing. Maintenance<br />
is as simple as occasional applications of<br />
mineral oil. these busy-looking tops are<br />
the most challenging to build.<br />
Edge grain<br />
Ripping flat-sawn stock into strips and<br />
gluing them up on edge creates a top<br />
that has less of the color and grain<br />
characteristics of a face-grain top, but<br />
more durability. as seen in this mesquite<br />
island top, it takes a lot of 1-in. to 2-in.<br />
strips to make an edge-grain top, so the<br />
glue-up is a bit more challenging.<br />
70<br />
fINe hOmebuILDING<br />
<strong>Making</strong><br />
<strong>Wood</strong><br />
<strong>Countertops</strong><br />
BY dan VoS<br />
Built well, they’re both attractive and durable,<br />
so choose a species, construction style, and<br />
finish that fit the way you use your kitchen<br />
COPYRIGHT 2010 by The Taunton Press, Inc. Copying and distribution of this article is not permitted.
Step BY Step<br />
The most common thing I hear<br />
when people first see my wood<br />
countertops is, “Wow, that’s<br />
beautiful. but are wood countertops<br />
durable enough for a kitchen?” my<br />
answer is, “mine are.”<br />
having made a career of building wood<br />
countertops, I’ve developed construction<br />
methods and finishing techniques that make<br />
them both durable and beautiful. beauty<br />
comes from the nature of wood itself, from<br />
the way I orient its grain, and from the finish<br />
I apply to it. Durability comes from design<br />
and construction specifications appropriate<br />
for the use of the top. for instance, no matter<br />
how much you love the way that it looks,<br />
a face-grain pine top is not an appropriate<br />
chopping surface. Pine is soft, and face-grain<br />
construction is not durable enough to handle<br />
pressure from knives.<br />
my shop is production-oriented with special<br />
tools and worksurfaces that allow us<br />
to build large, complicated countertops<br />
efficiently. but as you’ll see in the process of<br />
making the face-grain walnut island counter<br />
shown here, all you need to make a wood<br />
counter is a large worksurface, a jointer, a<br />
planer, a router, a random-orbit sander, and<br />
a handful of bar clamps. before you jump<br />
into a countertop project, though, it’s a good<br />
idea to explore the aesthetics and durability<br />
of different wood species and three types of<br />
construction for wood counters. Then you<br />
can determine if a top like this one is right<br />
for you.<br />
Choose a wood you like, and<br />
expect it to change color and move<br />
I try to guide my clients toward a wood species<br />
and grain orientation that appeals to<br />
their aesthetics and also suits how they will<br />
use the countertop. Where nothing more<br />
than a tough chopping surface is what the<br />
client wants, I usually recommend an endgrain<br />
top of hard sugar maple (more on grain<br />
orientation later). When a homeowner wants<br />
visual interest, there are lots of wood species<br />
that make great face-grain or edge-grain<br />
tops. among domestic hardwoods, cherry,<br />
walnut, beech, and oak are good choices;<br />
among tropical hardwoods, sipo, santos,<br />
african mahogany, and jatoba (brazil-<br />
MILL the StoCK<br />
For a standard 1 1 ⁄2-in.-thick countertop, I start<br />
with 2-in. rough-sawn boards. I buy boards longer<br />
than I need and have enough material to<br />
make the blank wider than the finished top will<br />
be. Before choosing or arranging boards, I skipplane<br />
each one (top board, photo left) to reveal<br />
its grain, color, and blemishes.<br />
Prepare the surfaces’ mating edges. Use a jointer or a router and guide to create one perfectly<br />
straight edge. If you use the latter technique, rip the board on a tablesaw, removing<br />
just enough material to create a parallel straight edge. Flatten the board on a jointer, and<br />
plane it to within 1 ⁄32 in. of final thickness. The remaining 1 ⁄32 in. will be removed later when<br />
the blank is sanded.<br />
TIP<br />
Alternate bark up and<br />
bark down, if possible.<br />
Lay out for looks first.<br />
Pick the best face of<br />
each board, and lay the<br />
boards side by side. To<br />
help keep the top flat<br />
over time, try to arrange<br />
them so that they alternate<br />
bark up and bark<br />
down (drawing above).<br />
But don’t sacrifice a perfect<br />
face for a top that<br />
will be well fastened<br />
to the cabinets. Draw<br />
a triangle across all the<br />
boards to maintain the<br />
arrangement.<br />
If the boards join nicely at the center but the ends are open, you need to get<br />
the edges straighter. If the opposite is true and you’re making a long top, you<br />
can rely on clamps to close a gap up to 1 ⁄16 in. Springing the joint in this manner<br />
builds stress into the top that actually counters potential wood movement.<br />
www.finehomebuilding.com bottom photo, facing page: courtesy of the author. Drawing by Dan Thornton.<br />
february/march 2010 71<br />
COPYRIGHT 2010 by The Taunton Press, Inc. Copying and distribution of this article is not permitted.
Add pressure a little at a time. Start by tightening<br />
the middle clamp just enough to hold the<br />
top together. Check the joints for alignment, and<br />
tighten the remaining clamps from the outside,<br />
bottom clamp first, then top, then bottom, and<br />
so on. Check the top with a straightedge between<br />
clamps. Cupping reveals uneven pressure.<br />
You’ll need to loosen the clamps and start again.<br />
Scrape away glue squeeze-out with a putty knife.<br />
72<br />
fINe hOmebuILDING<br />
GLUe Up the BLanK<br />
For most tops, I use Titebond II (or Titebond II Extend for a few<br />
more minutes of open time). On oily tropical hardwoods, I use<br />
West Systems <strong>Epoxy</strong> (105 resin and 205 hardener). Glue joints<br />
are generally stronger than wood, so I don’t biscuit the tops for<br />
strength. Sometimes I use them for alignment. For tops wider<br />
than 36 in. or that use more than five boards, consider gluing up<br />
the top in two halves and then gluing the halves together. Leave<br />
the top clamped for at least four hours, preferably overnight.<br />
Glue both faces liberally.<br />
Starting about 3 in.<br />
in from the ends, space<br />
clamps every 12 in. Top<br />
clamps will be placed<br />
between the bottom<br />
clamps after the glue is<br />
applied. Start with an<br />
outside board, tip it up,<br />
and run a glueline down<br />
the middle. You can’t<br />
put on too much glue,<br />
but you can use too<br />
little. Use a solder brush<br />
to spread glue.<br />
ian cherry) are all stable and are all easy to<br />
work with.<br />
I don’t get caught up with the hardness<br />
ratings of various wood species, but I avoid<br />
some that are either inordinately difficult<br />
to work or are better suited to outdoor use,<br />
including cypress, cedar, and hemlock. also,<br />
some of the superhard tropical woods, such<br />
as bloodwood and ipé, have problems with<br />
end-checking.<br />
bear in mind that wood can change color<br />
over time due to age, ambient conditions,<br />
or the type of finish you use. for example,<br />
the tung-oil-based finishes I use bring out<br />
amber tones in lighter woods, and they<br />
deepen and enrich darker species.<br />
Once you determine which species to use,<br />
make sure to buy kiln-dried stock to minimize<br />
the potential for movement. I test one<br />
or two boards from every order to be sure<br />
the moisture content is between 6% and 9%.<br />
Still, every board and every top will move,<br />
especially across the grain. you have to take<br />
that movement into account when you build<br />
and install a wood top.<br />
To balance the stresses between boards, it is<br />
a good practice to alternate the growth-ring<br />
pattern in the glue-up. It is also a good idea<br />
to turn boards frequently during the planing<br />
and jointing process. Working both sides of<br />
the boards before glue-up can remove some<br />
of their internal stresses and reduce their<br />
propensity to go their own way. If you have<br />
time, you also should acclimate the wood to<br />
the site before gluing up the counter.<br />
To accommodate wood movement when<br />
installing wood counters, I fasten them<br />
through slotted screw holes. for tops held<br />
tight to a wall, you can use a matching backsplash<br />
to hide seasonal gaps or slot only the<br />
screw holes nearest the overhanging areas.<br />
The top should transfer most of its stress<br />
toward the path of least resistance.<br />
Build it for the way you’ll use it<br />
When homeowners say they want a “pretty”<br />
wood counter, I usually end up building a<br />
face-grain top like the one featured here.<br />
The wide face of a board is where color and<br />
grain come alive. however, the cost of the<br />
rift-sawn, quartersawn, and flitch-cut stock<br />
that I commonly choose for these tops can<br />
be significantly more than what you would<br />
pay for suitable edge- or end-grain materials.<br />
face-grain tops have pros and cons when it<br />
comes to durability. a teak face-grain top, for<br />
example, is an excellent choice for sink areas<br />
COPYRIGHT 2010 by The Taunton Press, Inc. Copying and distribution of this article is not permitted.
Cut to length and width,<br />
parallel and square. With<br />
a circular saw outfitted<br />
with a high-quality blade<br />
and edge guide, rip one of<br />
the long edges. Measure<br />
across for a parallel rip.<br />
Repeat this process to<br />
crosscut the ends if they’re<br />
being cut square.<br />
Shape and Sand the top<br />
I make the blank approximately 2 in. longer<br />
and 3 ⁄4 in. wider than needed so that the first<br />
step out of the clamps is to cut it to size. Start<br />
by ripping one edge, and then use it as a reference<br />
to rip the top parallel and crosscut to<br />
square. Shaping and sanding require a series<br />
of sandpaper from 60 grit to 220 grit.<br />
Make shapes and cutouts<br />
with a template.<br />
First, use the template<br />
to trace the shape on<br />
the top. Rough-cut the<br />
shape with a jigsaw;<br />
then use the template<br />
again to guide a router<br />
and pattern bit to shape<br />
the top. Use the same<br />
process for sink cutouts,<br />
but work with the top<br />
upside down. This way,<br />
you can screw the template<br />
to the top.<br />
Fill knots and blemishes<br />
with epoxy. After<br />
scraping away any loose<br />
material, use five-minute<br />
epoxy with a coloring<br />
dye (www.homestead<br />
finishingproducts.com)<br />
to fill knots and other<br />
blemishes.<br />
Sand, then sand more.<br />
With 60-grit sandpaper<br />
on a random-orbit<br />
sander, correct any cosmetic<br />
defects, paying<br />
special attention to the<br />
joints. Use a straightedge<br />
to make sure that<br />
the top is perfectly flat.<br />
Sand with 80-, 100-,<br />
120-, and 180-grit sandpaper.<br />
Start sanding<br />
the edges once you’ve<br />
gotten to the 120-grit<br />
paper. Wet the top with<br />
mineral spirits to reveal<br />
remaining defects.<br />
Profile the edges. Use<br />
a bottom-mount,<br />
bearing-guided router<br />
bit. Depending on the<br />
profile, you might need<br />
to make multiple passes.<br />
Sand the profile with<br />
120- to 180-grit sandpaper.<br />
Soften or ease<br />
all sharp edges. Finally,<br />
sand the entire top to<br />
220 grit.<br />
www.finehomebuilding.com february/march 2010 73<br />
COPYRIGHT 2010 by The Taunton Press, Inc. Copying and distribution of this article is not permitted.
Flood and wipe the first coats. A wood counter<br />
lets you know how much finish it needs by the way<br />
it absorbs (or doesn’t). Most wood species suck<br />
up the first two coats, so start by flooding the top<br />
with a foam brush. After a few minutes, wipe off<br />
the excess finish.<br />
74<br />
fINe hOmebuILDING<br />
FInISh the CoUnteR<br />
For most tops, I use one of two tung-oil-based finishes: Waterlox<br />
or a 50/50 mix of pure tung oil and citrus solvent, shown here.<br />
No matter what finish I’m using, I coat all surfaces, including the<br />
bottom. While I work, the top rests on the tips of drywall screws<br />
driven through small plywood blocks placed atop the worktable.<br />
Wet-sand the last coat. When the<br />
counter stops absorbing the finish<br />
at a dramatic rate, likely by the third<br />
coat, apply the finish, and wet-sand<br />
it with fine foam sanding pads.<br />
Once you’ve sanded the entire top,<br />
wipe off the excess finish. Use a<br />
power buffer to bring the finished<br />
top to life.<br />
because it likes water, but you’ll cry wet tears<br />
on it the first time it’s marked by a knife.<br />
When I’m putting together a face-grain<br />
top, much more effort goes into pre-glueup<br />
layout than with other kinds of tops. I<br />
skip-plane both faces of the rough boards to<br />
reveal flaws, color, and grain before choosing<br />
which to use. Then I carefully lay out the<br />
boards, keeping visual characteristics and<br />
internal-stress characteristics in mind until<br />
I’m satisfied with the balance of cosmetics<br />
and stability. Just prior to finishing, I spend<br />
extra time with face-grain tops, detailing<br />
small flaws with colored epoxy. Gluing up a<br />
face-grain top, however, is easier than gluing<br />
up edge- or end-grain counters because there<br />
are typically fewer boards to join.<br />
edge-grain tops offer the best combination<br />
of durability, beauty, and cost. When made<br />
from boards 1 in. to 2 in. wide, they can show<br />
a lot of color and a straight, elegant grain<br />
pattern, but when used for food prep and<br />
chopping, edge-grain tops scar and acquire<br />
a patina. The glue-up is more involved with<br />
edge-grain tops than with face-grain tops<br />
because there are more glue joints. here, you<br />
can save money on lumber by starting with<br />
flat-sawn boards that will be ripped and can<br />
be oriented to reveal a rift-sawn or quartersawn<br />
face.<br />
end-grain counters are the last word in<br />
chopping. They are resistant to scarring, are<br />
self-healing, are easy on fine knife edges, and<br />
soak up finishes like nobody’s business. but<br />
end grain is a busy look. There are lots of glue<br />
joints and lots of growth rings. Performance<br />
comes at a price, too. Not only are these the<br />
most expensive tops I make, but because of<br />
the laborious construction process, they’re<br />
also the most difficult to manage in the shop,<br />
being fussy to put together and somewhat<br />
brittle until installed. It doesn’t matter what<br />
type of stock you use for an end-grain top as<br />
long as it is all the same. In this way, the individual<br />
pieces expand and contract similarly.<br />
Be prepared to work quickly<br />
I’m often asked what tools are absolutely<br />
essential, even for someone planning to build<br />
only one wood countertop. I think that a<br />
10-in. tablesaw, a 6-in. jointer, and a portable<br />
planer are important to get the job done<br />
right. I assume that anyone planning to build<br />
a countertop has a router and a random-orbit<br />
sander. The number of bar clamps you need<br />
depends on the length of the top, but a general<br />
rule is one clamp per foot, plus one.<br />
COPYRIGHT 2010 by The Taunton Press, Inc. Copying and distribution of this article is not permitted.
Install it with movement in mind<br />
• Use slotted screw holes<br />
Fastening the counter through elongated screw holes in the<br />
bracing at the top of the cabinet allows the counter to move<br />
freely as the boards expand and contract.<br />
• Don’t use adhesives unless you have to<br />
If you glue down the top, it won’t be able to move and can<br />
crack. Bar tops set on pony walls or other narrow edges,<br />
however, may need adhesive to keep the top stable.<br />
• Support overhangs<br />
an overhang more than 4 in. on an edge should have support<br />
such as a corbel or a decorative or hidden bracket. overhanging<br />
ends, on the other hand, need no extra support. In<br />
this direction, the wood countertop is inherently strong.<br />
• Site modifications need to be sealed<br />
If you scribe the countertop to fit tightly to a wall or cabinet<br />
or make a penetration for a faucet or sink on site, be sure to<br />
reapply finish to the cut area.<br />
• Keep water from getting trapped<br />
Standing water will eventually erode even the most durable<br />
materials. no matter what type of sink or faucet you install,<br />
make sure to apply a heavy bead of caulk between the sink<br />
or faucet and countertop.<br />
I started making wood tops as an amateur<br />
woodworker, and the biggest mistake I made<br />
back then was not sufficiently planning for<br />
handling and working large boards and<br />
slabs. Today, I’ve tweaked my production<br />
shop to the nth degree. I have plenty of handling<br />
clearance, but I keep machines close<br />
enough to make it easy to move materials<br />
around. you might not have the luxury of a<br />
space as large as mine, but with careful planning<br />
before you begin to build, you can spare<br />
yourself a lot of unnecessary frustration.<br />
The first steps require milling long boards<br />
with a planer and jointer and ripping them<br />
on a tablesaw or with a circular saw and<br />
straightedge. here, dust control is an important<br />
consideration. for the remainder of the<br />
work, you need a well-lit open space, preferably<br />
a workbench, though you can glue up<br />
a top on the floor. The space should be easy<br />
to keep clean, within reach of an outlet, and<br />
easy to maneuver around from all sides.<br />
Once you begin the glue-up, you have to<br />
work quickly. you only have about eight<br />
minutes, so take the time to get the clamps<br />
spaced out and ready to use, and have glue<br />
bottles, brushes, and cleanup supplies close at<br />
hand. It’s also a good idea to have someone<br />
available to help because a lot needs to happen<br />
during those eight minutes.<br />
When the clamps come off, you’ll have to<br />
manage the large, heavy blank. consider<br />
making a simple cart with heavy-duty casters.<br />
you also should make screw blocks<br />
( 3 ⁄4-in. plywood cut into 2-in. by 3-in. pieces,<br />
with a 1 5 ⁄8-in. drywall screw flush-set through<br />
one side). The screw blocks are used to raise<br />
the top above the worksurface to allow air<br />
to circulate, which helps to prevent the top<br />
from warping and cupping, and also to make<br />
it easier to apply finish to the edges.<br />
Easily renewable finishes promise<br />
a long-lasting countertop<br />
Like choosing a wood species and construction<br />
technique, I choose the most appropriate<br />
finish based on how the top will be used.<br />
for tough, hard, built-up protection, I use<br />
Waterlox, which combines the amber tone<br />
of tung oil with hardeners to create a film on<br />
the surface of the counter. for tops that will<br />
be used for food preparation, I use a mix of<br />
tung oil and citrus solvent, which is food safe.<br />
This penetrating finish cures in the grain but<br />
doesn’t build up on the surface. for smaller<br />
end-grain chopping blocks, regular applications<br />
of mineral oil are sufficient. These finishes<br />
are easy to repair and renew, which is<br />
the key to a long-lasting wood countertop,<br />
and both are water resistant.<br />
Whichever finish I’m using, I work in a<br />
finishing room isolated from the dust and debris<br />
of the fabrication shop. If you don’t have<br />
this luxury, make sure to clean the work area<br />
before finishing. and even though these finishes<br />
are safe, make sure you have adequate<br />
ventilation and wear gloves. □<br />
Dan Vos owns DeVos Custom <strong>Wood</strong>working<br />
(www.devoswoodworking.com)<br />
in Dripping Springs, Texas. Photos by<br />
Brian Pontolilo, except where noted.<br />
www.finehomebuilding.com february/march 2010 75<br />
COPYRIGHT 2010 by The Taunton Press, Inc. Copying and distribution of this article is not permitted.


