

Making Wood Countertops - WEST SYSTEM Epoxy
Making Wood Countertops - WEST SYSTEM Epoxy
Making Wood Countertops - WEST SYSTEM Epoxy

You also want an ePaper? Increase the reach of your titles
YUMPU automatically turns print PDFs into web optimized ePapers that Google loves.
Step BY Step<br />
The most common thing I hear<br />
when people first see my wood<br />
countertops is, “Wow, that’s<br />
beautiful. but are wood countertops<br />
durable enough for a kitchen?” my<br />
answer is, “mine are.”<br />
having made a career of building wood<br />
countertops, I’ve developed construction<br />
methods and finishing techniques that make<br />
them both durable and beautiful. beauty<br />
comes from the nature of wood itself, from<br />
the way I orient its grain, and from the finish<br />
I apply to it. Durability comes from design<br />
and construction specifications appropriate<br />
for the use of the top. for instance, no matter<br />
how much you love the way that it looks,<br />
a face-grain pine top is not an appropriate<br />
chopping surface. Pine is soft, and face-grain<br />
construction is not durable enough to handle<br />
pressure from knives.<br />
my shop is production-oriented with special<br />
tools and worksurfaces that allow us<br />
to build large, complicated countertops<br />
efficiently. but as you’ll see in the process of<br />
making the face-grain walnut island counter<br />
shown here, all you need to make a wood<br />
counter is a large worksurface, a jointer, a<br />
planer, a router, a random-orbit sander, and<br />
a handful of bar clamps. before you jump<br />
into a countertop project, though, it’s a good<br />
idea to explore the aesthetics and durability<br />
of different wood species and three types of<br />
construction for wood counters. Then you<br />
can determine if a top like this one is right<br />
for you.<br />
Choose a wood you like, and<br />
expect it to change color and move<br />
I try to guide my clients toward a wood species<br />
and grain orientation that appeals to<br />
their aesthetics and also suits how they will<br />
use the countertop. Where nothing more<br />
than a tough chopping surface is what the<br />
client wants, I usually recommend an endgrain<br />
top of hard sugar maple (more on grain<br />
orientation later). When a homeowner wants<br />
visual interest, there are lots of wood species<br />
that make great face-grain or edge-grain<br />
tops. among domestic hardwoods, cherry,<br />
walnut, beech, and oak are good choices;<br />
among tropical hardwoods, sipo, santos,<br />
african mahogany, and jatoba (brazil-<br />
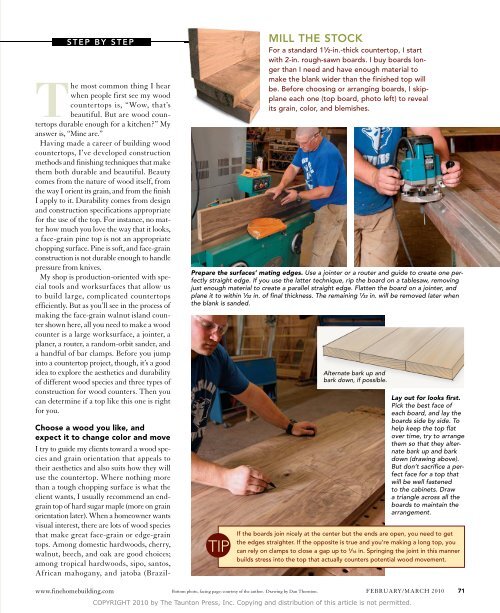
MILL the StoCK<br />
For a standard 1 1 ⁄2-in.-thick countertop, I start<br />
with 2-in. rough-sawn boards. I buy boards longer<br />
than I need and have enough material to<br />
make the blank wider than the finished top will<br />
be. Before choosing or arranging boards, I skipplane<br />
each one (top board, photo left) to reveal<br />
its grain, color, and blemishes.<br />
Prepare the surfaces’ mating edges. Use a jointer or a router and guide to create one perfectly<br />
straight edge. If you use the latter technique, rip the board on a tablesaw, removing<br />
just enough material to create a parallel straight edge. Flatten the board on a jointer, and<br />
plane it to within 1 ⁄32 in. of final thickness. The remaining 1 ⁄32 in. will be removed later when<br />
the blank is sanded.<br />
TIP<br />
Alternate bark up and<br />
bark down, if possible.<br />
Lay out for looks first.<br />
Pick the best face of<br />
each board, and lay the<br />
boards side by side. To<br />
help keep the top flat<br />
over time, try to arrange<br />
them so that they alternate<br />
bark up and bark<br />
down (drawing above).<br />
But don’t sacrifice a perfect<br />
face for a top that<br />
will be well fastened<br />
to the cabinets. Draw<br />
a triangle across all the<br />
boards to maintain the<br />
arrangement.<br />
If the boards join nicely at the center but the ends are open, you need to get<br />
the edges straighter. If the opposite is true and you’re making a long top, you<br />
can rely on clamps to close a gap up to 1 ⁄16 in. Springing the joint in this manner<br />
builds stress into the top that actually counters potential wood movement.<br />
www.finehomebuilding.com bottom photo, facing page: courtesy of the author. Drawing by Dan Thornton.<br />
february/march 2010 71<br />
COPYRIGHT 2010 by The Taunton Press, Inc. Copying and distribution of this article is not permitted.


