

Making Wood Countertops - WEST SYSTEM Epoxy
Making Wood Countertops - WEST SYSTEM Epoxy
Making Wood Countertops - WEST SYSTEM Epoxy

Create successful ePaper yourself
Turn your PDF publications into a flip-book with our unique Google optimized e-Paper software.
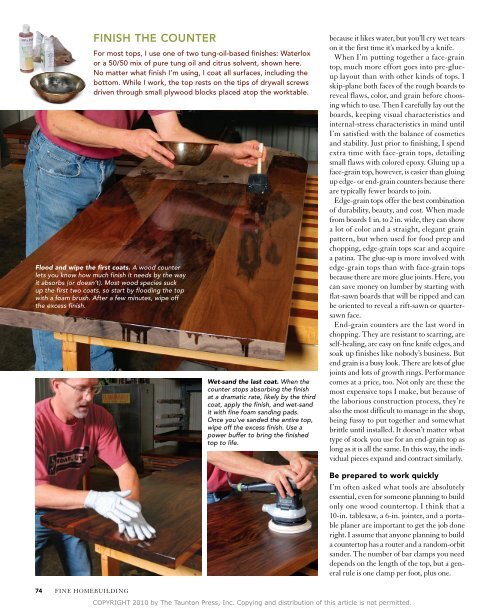
Flood and wipe the first coats. A wood counter<br />
lets you know how much finish it needs by the way<br />
it absorbs (or doesn’t). Most wood species suck<br />
up the first two coats, so start by flooding the top<br />
with a foam brush. After a few minutes, wipe off<br />
the excess finish.<br />
74<br />
fINe hOmebuILDING<br />
FInISh the CoUnteR<br />
For most tops, I use one of two tung-oil-based finishes: Waterlox<br />
or a 50/50 mix of pure tung oil and citrus solvent, shown here.<br />
No matter what finish I’m using, I coat all surfaces, including the<br />
bottom. While I work, the top rests on the tips of drywall screws<br />
driven through small plywood blocks placed atop the worktable.<br />
Wet-sand the last coat. When the<br />
counter stops absorbing the finish<br />
at a dramatic rate, likely by the third<br />
coat, apply the finish, and wet-sand<br />
it with fine foam sanding pads.<br />
Once you’ve sanded the entire top,<br />
wipe off the excess finish. Use a<br />
power buffer to bring the finished<br />
top to life.<br />
because it likes water, but you’ll cry wet tears<br />
on it the first time it’s marked by a knife.<br />
When I’m putting together a face-grain<br />
top, much more effort goes into pre-glueup<br />
layout than with other kinds of tops. I<br />
skip-plane both faces of the rough boards to<br />
reveal flaws, color, and grain before choosing<br />
which to use. Then I carefully lay out the<br />
boards, keeping visual characteristics and<br />
internal-stress characteristics in mind until<br />
I’m satisfied with the balance of cosmetics<br />
and stability. Just prior to finishing, I spend<br />
extra time with face-grain tops, detailing<br />
small flaws with colored epoxy. Gluing up a<br />
face-grain top, however, is easier than gluing<br />
up edge- or end-grain counters because there<br />
are typically fewer boards to join.<br />
edge-grain tops offer the best combination<br />
of durability, beauty, and cost. When made<br />
from boards 1 in. to 2 in. wide, they can show<br />
a lot of color and a straight, elegant grain<br />
pattern, but when used for food prep and<br />
chopping, edge-grain tops scar and acquire<br />
a patina. The glue-up is more involved with<br />
edge-grain tops than with face-grain tops<br />
because there are more glue joints. here, you<br />
can save money on lumber by starting with<br />
flat-sawn boards that will be ripped and can<br />
be oriented to reveal a rift-sawn or quartersawn<br />
face.<br />
end-grain counters are the last word in<br />
chopping. They are resistant to scarring, are<br />
self-healing, are easy on fine knife edges, and<br />
soak up finishes like nobody’s business. but<br />
end grain is a busy look. There are lots of glue<br />
joints and lots of growth rings. Performance<br />
comes at a price, too. Not only are these the<br />
most expensive tops I make, but because of<br />
the laborious construction process, they’re<br />
also the most difficult to manage in the shop,<br />
being fussy to put together and somewhat<br />
brittle until installed. It doesn’t matter what<br />
type of stock you use for an end-grain top as<br />
long as it is all the same. In this way, the individual<br />
pieces expand and contract similarly.<br />
Be prepared to work quickly<br />
I’m often asked what tools are absolutely<br />
essential, even for someone planning to build<br />
only one wood countertop. I think that a<br />
10-in. tablesaw, a 6-in. jointer, and a portable<br />
planer are important to get the job done<br />
right. I assume that anyone planning to build<br />
a countertop has a router and a random-orbit<br />
sander. The number of bar clamps you need<br />
depends on the length of the top, but a general<br />
rule is one clamp per foot, plus one.<br />
COPYRIGHT 2010 by The Taunton Press, Inc. Copying and distribution of this article is not permitted.


