
Create successful ePaper yourself
Turn your PDF publications into a flip-book with our unique Google optimized e-Paper software.
Constructing the Wind Tunnel:<br />
1. Using the box cutter, cut three openings<br />
in the tube form. The first is a small slot<br />
about 2 inches tall and 1 inch wide. Cut it<br />
10 inches below the upper rim of the tube<br />
standing upright. This is the pivot hole for<br />
the balance lever. The second hole should<br />
be 12 by 6 inches. This is the access door<br />
hole. Cut it midway down the tube and 90<br />
degrees away from the pivot hole. Use a<br />
strip of duct tape to hinge the door along<br />
one side. A small flap of duct tape can serve<br />
as the latch to hold the door closed during<br />
operation. The third opening should be 18<br />
by 6 inches. It should be on the opposite<br />
side of the door. This is the viewing port.<br />
2. Cover and tape the viewing port with<br />
transparency paper or cellophane.<br />
3. Make the lever arm by cutting off a piece of<br />
coat hanger wire with the cutter. Loosely<br />
bend the wire around the nail about three<br />
times. With the pliers, bend one arm into a<br />
hook. The hook should be about 1 inch from<br />
the loops. Trim off any excess wire. Make<br />
a second hook on the other end about 6<br />
inches away if using the 12” tube, 4 inches<br />
if using the 8” tube. The nail becomes the<br />
fulcrum for the lever.<br />
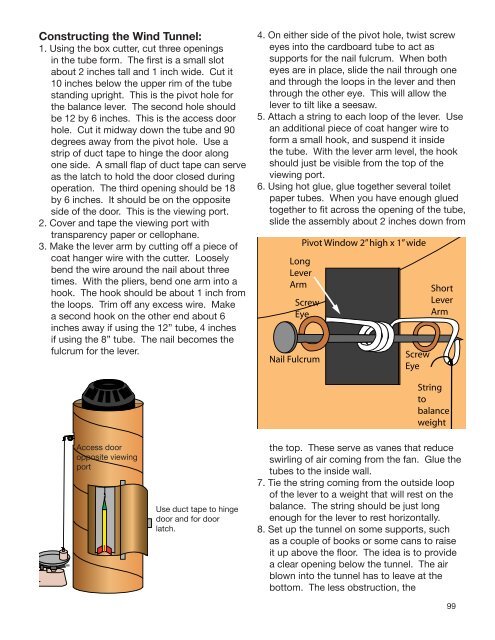
Access door<br />
opposite viewing<br />
port<br />
Use duct tape to hinge<br />
door and for door<br />
latch.<br />
4. On either side of the pivot hole, twist screw<br />
eyes into the cardboard tube to act as<br />
supports for the nail fulcrum. When both<br />
eyes are in place, slide the nail through one<br />
and through the loops in the lever and then<br />
through the other eye. This will allow the<br />
lever to tilt like a seesaw.<br />
5. Attach a string to each loop of the lever. Use<br />
an additional piece of coat hanger wire to<br />
form a small hook, and suspend it inside<br />
the tube. With the lever arm level, the hook<br />
should just be visible from the top of the<br />
viewing port.<br />
6. Using hot glue, glue together several toilet<br />
paper tubes. When you have enough glued<br />
together to fit across the opening of the tube,<br />
slide the assembly about 2 inches down from<br />
the top. These serve as vanes that reduce<br />
swirling of air coming from the fan. Glue the<br />
tubes to the inside wall.<br />
7. Tie the string coming from the outside loop<br />
of the lever to a weight that will rest on the<br />
balance. The string should be just long<br />
enough for the lever to rest horizontally.<br />
8. Set up the tunnel on some supports, such<br />
as a couple of books or some cans to raise<br />
it up above the floor. The idea is to provide<br />
a clear opening below the tunnel. The air<br />
blown into the tunnel has to leave at the<br />
bottom. The less obstruction, the<br />
99