
You also want an ePaper? Increase the reach of your titles
YUMPU automatically turns print PDFs into web optimized ePapers that Google loves.
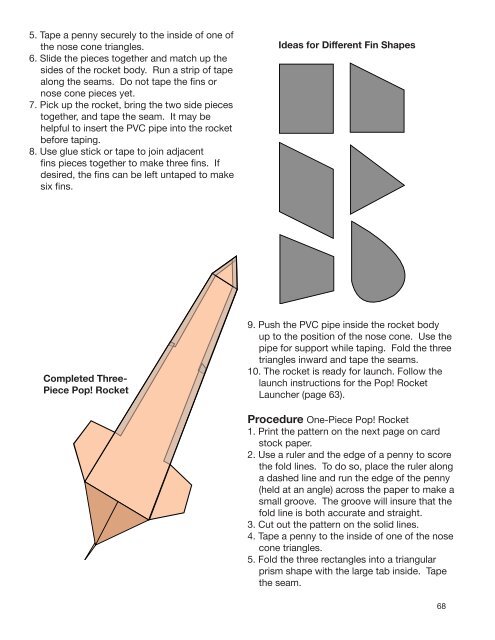
5. Tape a penny securely to the inside of one of<br />
the nose cone triangles.<br />
6. Slide the pieces together and match up the<br />
sides of the <strong>rocket</strong> body. Run a strip of tape<br />
along the seams. Do not tape the fins or<br />
nose cone pieces yet.<br />
7. Pick up the <strong>rocket</strong>, bring the two side pieces<br />
together, and tape the seam. It may be<br />
helpful to insert the PVC pipe into the <strong>rocket</strong><br />
before taping.<br />
8. Use glue stick or tape to join adjacent<br />
fins pieces together to make three fins. If<br />
desired, the fins can be left untaped to make<br />
six fins.<br />
Completed Three-<br />
Piece Pop! Rocket<br />
Ideas for Different Fin Shapes<br />
9. Push the PVC pipe inside the <strong>rocket</strong> body<br />
up to the position of the nose cone. Use the<br />
pipe for support while taping. Fold the three<br />
triangles inward and tape the seams.<br />
10. The <strong>rocket</strong> is ready for launch. Follow the<br />
launch instructions for the Pop! Rocket<br />
Launcher (page 63).<br />
Procedure One-Piece Pop! Rocket<br />
1. Print the pattern on the next page on card<br />
stock paper.<br />
2. Use a ruler and the edge of a penny to score<br />
the fold lines. To do so, place the ruler along<br />
a dashed line and run the edge of the penny<br />
(held at an angle) across the paper to make a<br />
small groove. The groove will insure that the<br />
fold line is both accurate and straight.<br />
3. Cut out the pattern on the solid lines.<br />
4. Tape a penny to the inside of one of the nose<br />
cone triangles.<br />
5. Fold the three rectangles into a triangular<br />
prism shape with the large tab inside. Tape<br />
the seam.<br />
68