user manual Minolta PS 7000 - Lib4RI
user manual Minolta PS 7000 - Lib4RI
user manual Minolta PS 7000 - Lib4RI

Create successful ePaper yourself
Turn your PDF publications into a flip-book with our unique Google optimized e-Paper software.
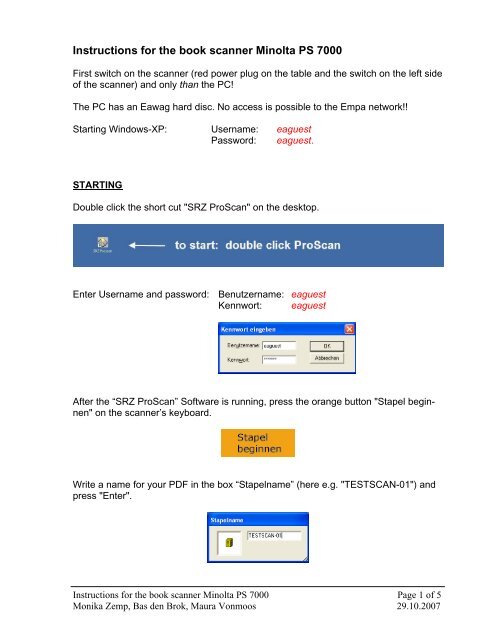
Instructions for the book scanner <strong>Minolta</strong> <strong>PS</strong> <strong>7000</strong><br />
First switch on the scanner (red power plug on the table and the switch on the left side<br />
of the scanner) and only than the PC!<br />
The PC has an Eawag hard disc. No access is possible to the Empa network!!<br />
Starting Windows-XP: Username: eaguest<br />
Password: eaguest.<br />
STARTING<br />
Double click the short cut "SRZ ProScan" on the desktop.<br />
Enter Username and password: Benutzername: eaguest<br />
Kennwort: eaguest<br />
After the “SRZ ProScan” Software is running, press the orange button "Stapel beginnen"<br />
on the scanner’s keyboard.<br />
Write a name for your PDF in the box “Stapelname” (here e.g. "TESTSCAN-01") and<br />
press "Enter".<br />
Instructions for the book scanner <strong>Minolta</strong> <strong>PS</strong> <strong>7000</strong> Page 1 of 5<br />
Monika Zemp, Bas den Brok, Maura Vonmoos 29.10.2007
Place the book you want to scan on the board (straight to the upper border, with the<br />
pages to be scanned facing up) and choose the size of the document reading the<br />
sizes written in the middle of the board B4, B5, A4... (always choose the next larger<br />
size).<br />
Enter the corresponding size with the light blue buttons of the scanner’s keyboard (on<br />
the left) (here e.g. “B5 quer”).<br />
Then press the yellow button "1 Rahmen".<br />
SCANNING<br />
Press the book gently with your fingers on its left and right side on the board. Start the<br />
scanning process with either the left or the right long button on the board. You have to<br />
press it quite hard.<br />
After the scanning of the first page you have to adjust the green frame on the computer’s<br />
screen. Move, enlarge or reduce the frame by clicking on it (it will be red and can<br />
be adjusted). The frame’s content is the content of the PDF page!<br />
!!!Attention: Only what’s inside the frame will be scanned and thus saved in the<br />
PDF!!!<br />
After placing and scaling the frame correctly for the first page, it can be duplicated by<br />
pressing the blue button "2 Rahmen“.<br />
The active one of the two frames is always red, the other one green (change their status<br />
by clicking on them).<br />
Placing and scaling first one frame and then duplicating it by pressing the “2 Rahmen“ button has the<br />
advantage that both frames, that is, both sides of the PDF, will have the same size.<br />
Instructions for the book scanner <strong>Minolta</strong> <strong>PS</strong> <strong>7000</strong> Page 2 of 5<br />
Monika Zemp, Bas den Brok, Maura Vonmoos 29.10.2007
Turn the page of the book and scan the following pages. On the left side of the computer’s<br />
screen the scanned pages are listed and can be selected, deleted or moved by<br />
clicking on them (see more in the last section, p.5).<br />
If the light of the long buttons is red instead of green, the scanner is in a sleeping<br />
mode and the button has to be pressed twice.<br />
!!!Attention: Always give a look on the computer’s screen to see if the scanned text is<br />
within both frames. If not, rescale and replace the frames!!!<br />
The scanner could report the following errors: Buchdicke nicht erkannt<br />
Buch.zur.o.Blt.Scan.einst<br />
Just ignore them and start again with the scanning of the pages. The button has to be<br />
pressed twice.<br />
FINISHING<br />
When you are finished with the scanning (and you did potential corrections, see for<br />
that the last section, p.5) press the orange button "Stapel abschliessen“ to finish the<br />
scanning process.<br />
By pressing "Stapel beginnen" you can start with the scanning of an other book,<br />
or you click on the minimize button in the top right edge of the window of the “SRZ<br />
ProScan” program.<br />
PDF-FILE<br />
Instructions for the book scanner <strong>Minolta</strong> <strong>PS</strong> <strong>7000</strong> Page 3 of 5<br />
Monika Zemp, Bas den Brok, Maura Vonmoos 29.10.2007
Your scanned PDF file is stored locally on C in the directory “c:\ProScan Ablage“.<br />
Shortcut on the desktop:<br />
here’s the scanned PDF<br />
The folder „TESCAN-01“ contains the TIFF files of every single scanned page, and, at<br />
the end, the whole PDF file.<br />
the scanned PDF-files<br />
TIFF-files of<br />
the scanned<br />
pages<br />
ACCESS TO YOUR PDF FILE<br />
Instructions for the book scanner <strong>Minolta</strong> <strong>PS</strong> <strong>7000</strong> Page 4 of 5<br />
Monika Zemp, Bas den Brok, Maura Vonmoos 29.10.2007
To get access to your PDF file from your own computer, the PDF has to be transferred<br />
to the personal Scratch Disc on “Osiris“ (only for Eawag employees) or to the<br />
server “library“ (\\Library\scans). The latter is accessible from both Eawag AND<br />
Empa. Shortcuts on the desktop:<br />
POSSIBLE CORRECTION TOOLS<br />
Fingers holding the pages flat, holes, margins, shadows,... could be visible on the<br />
scan. They all can be deleted. Further, askew pages can be straightened and the<br />
order of the pages can be changed. However, it is best to scan first all the pages and<br />
only at the end, but before finishing the scanning process, to do the corrections.<br />
On the left of the screen you see the pages consecutively numbered. They can be<br />
opened by clicking on these numbers.<br />
• With the right mouse button clicking on the respective page numbers on this list,<br />
the pages can be deleted or their order changed by cutting one page and inserting<br />
it at the desired place (if, e.g., one of the first pages had to be rescanned<br />
afterwards).<br />
By pressing the right mouse button within the displayed page or with "Bildbearbeitung"<br />
from the menu list, you can apply corrections, so, e.g.:<br />
• Straight the text with the commands “Deskew“ or "Manueller Deskew“.<br />
• Erase unwanted shadows with the command "Radiergummi“.<br />
Please neither turn the computer nor the scanner off!<br />
Instructions for the book scanner <strong>Minolta</strong> <strong>PS</strong> <strong>7000</strong> Page 5 of 5<br />
Monika Zemp, Bas den Brok, Maura Vonmoos 29.10.2007