PlugInChain documentation - Universität Oldenburg
PlugInChain documentation - Universität Oldenburg
PlugInChain documentation - Universität Oldenburg

Create successful ePaper yourself
Turn your PDF publications into a flip-book with our unique Google optimized e-Paper software.
<strong>PlugInChain</strong> <strong>documentation</strong><br />
<strong>PlugInChain</strong> for Mathwork’s MATLAB<br />
Version 1.00.0<br />
June 30, 2011<br />
Medizinische Physik<br />
Carl-von-Ossietzky University of <strong>Oldenburg</strong><br />
Marion Wirschins, Thomas Rohdenburg, Tobias May, Stephan D. Ewert<br />
Corresponding author: stephan.ewert@uni-oldenburg.de<br />
Copyright © 2011, Medizinische Physik, Carl-von-Ossietzky <strong>Universität</strong> <strong>Oldenburg</strong>.<br />
Some rights reserved.
1 Introduction .................................................................................................................................... 3<br />
1.1 Directory structure .................................................................................................................... 4<br />
1.2 Basic concept ............................................................................................................................ 4<br />
1.3 Graphical User Interface (GUI) ............................................................................................... 5<br />
1.2.1 Pluginlist panel ...................................................................................................................... 6<br />
1.2.2 <strong>PlugInChain</strong> Framework ...................................................................................................... 7<br />
1.2.3 Plugins .................................................................................................................................... 7<br />
1.2.4 Signal processing control .................................................................................................... 8<br />
1.2.5 Batch processing .................................................................................................................. 8<br />
1.4 Command line functions .......................................................................................................... 9<br />
1.4.1 Initialization of plugins .......................................................................................................... 9<br />
1.4.2 Run processing ................................................................................................................... 10<br />
1.5 Examples of starting the <strong>PlugInChain</strong> ................................................................................. 10<br />
2 The <strong>PlugInChain</strong> framework...................................................................................................... 11<br />
2.1 Basic structure ......................................................................................................................... 11<br />
2.1.1 ConfigStruct ......................................................................................................................... 11<br />
2.1.1.1 GlobalSettings ................................................................................................................. 11<br />
2.1.1.2 Plugin ................................................................................................................................ 11<br />
2.1.2 Signal .................................................................................................................................... 12<br />
2.2 Plugin structure ....................................................................................................................... 14<br />
2.2.1 Initialization .......................................................................................................................... 14<br />
2.2.2 Block size ............................................................................................................................. 15<br />
2.2.3 _init function......................................................................................................................... 15<br />
2.2.4 _main function ..................................................................................................................... 16<br />
2.3 Plugin lists ................................................................................................................................ 16<br />
2.3.1 Use existing plugin lists ..................................................................................................... 17<br />
2.3.2 Create new plugin lists ....................................................................................................... 17<br />
2.3.3 Assessing the history of loaded plugin lists .................................................................... 18<br />
3 Plugins .......................................................................................................................................... 19<br />
3.1 Use plugins .............................................................................................................................. 19<br />
3.2 Change plugins ....................................................................................................................... 19<br />
3.3 Write new plugins ................................................................................................................... 19<br />
3.3.1 Example 1 - IIR low-pass filter .......................................................................................... 20<br />
3.3.2 Example 2 - Adaptation loops ........................................................................................... 22<br />
3.3.3 Useful features .................................................................................................................... 25<br />
3.4 <strong>PlugInChain</strong> rules ................................................................................................................... 25<br />
3.5 GlobalSettings of the pluginchain ......................................................................................... 26<br />
3.5.1 Audiotory Profile .................................................................................................................. 26<br />
3.5.2 Performance parameters ................................................................................................... 26<br />
4 Quickstart ..................................................................................................................................... 28<br />
2
1 Introduction<br />
The ‘<strong>PlugInChain</strong>’ is a modular signal processing framework for research and development in<br />
MATLAB. It offers the functionality to build and to configure processing chains of individual<br />
signal-processing modules which are termed ‘plugins’ in the following. A plugin may contain<br />
fundamental or advanced signal processing, e.g., a linear filtering. A chain of individual plugins<br />
is defined by a simple text file, a ‘pluginlist’, and can be edited and executed via a graphical<br />
user interface or can be directly executed via the MATLAB command window. The user<br />
can refer to existing signal-processing functionality in the form of plugins and pluginlist and<br />
can built more complex signal-processing chains without knowing all the implementational<br />
details and without necessarily programming new own plugins.<br />
The <strong>PlugInChain</strong> offers frame-based signal-processing with arbitrary frame size. It provides a<br />
well defined interface between the plugins and the easily accessible and extendable structure<br />
of the plugins. Plugins can have configuration parameters that can be controlled via the pluginlist.<br />
In this way, it is possible to initialize a plugin with different settings without changing<br />
its source code. In order to store complete signal processing chains, only the pluginlist file<br />
(including the related configuration parameters) is necessary.<br />
Users are permitted to create custom plugins and plugin lists or derive them from included<br />
examples and to distribute their own creations in any form under any license independent of<br />
the <strong>PlugInChain</strong>. The plugin and pluginlist structure and the included examples are therefore<br />
licensed under Creative Commons Attribution 3.0 Unported (CC BY 3.0) while the remaining<br />
<strong>PlugInChain</strong> is licensed under Creative Commons Attribution-NonCommercial-NoDerivs 3.0<br />
Unported (CC BY-NC-ND 3.0).<br />
The <strong>PlugInChain</strong> package is available at http://medi.uni-oldenburg.de/pluginchain or on demand<br />
per email from the corresponding author stephan.ewert@uni-oldenburg.de.<br />
After downloading this zip-archive, unzip the included folder ‘pluginchain’ to your harddisk,<br />
e.g., your Matlab working directory. Alternatively, create a directory for the <strong>PlugInChain</strong> with<br />
a name of choice and unzip the contents of the folder ‘pluginchain’ in this zip-archive there<br />
(the folder structure of ‘pluginchain’ is shown in Fig. 2.2). Third-party or custom plugins<br />
should be placed in the subfolder ‘pluginchain/plugins’.<br />
This section will give a general overview about the functionality of the <strong>PlugInChain</strong>. The plugin<br />
structure and the use of plugin lists will be explained in more detail in section 2. Section 3<br />
presents some more detailed information about how to use and to create plugins. The PlugIn-<br />
Chain is, in principle, suited to process any type of data but is commonly used by the authors<br />
to process audio material. This <strong>documentation</strong> thus often refers to signals or audio data, without<br />
implying a limitation of the <strong>PlugInChain</strong>.<br />
This work was supported by the Bundesministerium für Bildung und Forschung (BMBF)<br />
“Modellbasierte Hörsysteme”.<br />
3
1.1 Directory structure<br />
After extracting the <strong>PlugInChain</strong> package you should find a folder structure as presented in<br />
Fig. 2.2<br />
In the working directory 1 (‘pluginchain’), the starting routines (pluginchain.m and pluginchaingui.m)<br />
for the <strong>PlugInChain</strong>, the additional help function makelist.m, some pictures for<br />
the GUI and a ‘ReadMe.txt’ file are located. The main routines of the <strong>PlugInChain</strong> are located<br />
in the subfolder ‘base’. All available plugins are stored in the subfolder ‘plugins’ (some plugins<br />
need extra databases or files that usually are stored in their own subfolder within the<br />
folder ‘plugins’). All general tools which may be used by the core routine or by several plugins<br />
are stored in ‘pluginchain_tools’. The folder ‘pluginlists’ contains the plugin lists configuration<br />
files for using plugins or special signal processing chains of plugins with the PlugIn-<br />
Chain. Additional audio files may be stored in the folder ‘waves’. Some special demo files for<br />
a special use of the <strong>PlugInChain</strong> can be found in ‘demo’. The <strong>documentation</strong> files are located<br />
in the folder ‘docs’. In the subfolder ‘html’ (beside some pictures for the html <strong>documentation</strong><br />
file) some MATLAB-generated <strong>documentation</strong> of m-files are located.<br />
Figure 2.2: Folder structure of the <strong>PlugInChain</strong> package.<br />
1.2 Basic concept<br />
The functionality of the <strong>PlugInChain</strong> structure is outlined in Fig.1.1. The main function coordinates<br />
the processing without having any knowledge about the particular plugins. The<br />
processing steps of the <strong>PlugInChain</strong> can be divided into three phases, namely<br />
1. Initialize pluginchain main file with loaded plugin list<br />
2. Initialize all plugins<br />
3. Run (frame-based) processing routines of all plugins.<br />
1 The <strong>PlugInChain</strong> working directory can be visualized by the MATLAB command pwd<br />
4
Figure 1.1: <strong>PlugInChain</strong> structure.<br />
The first step initializes the <strong>PlugInChain</strong> by loading the desired plugin list and building up the<br />
graphical user interface, if required. In the plugin initialization phase, all relevant variables<br />
are initialized and stored in the plugin ‘Settings’ structure. After every plugin is initialized<br />
successfully, the actual (frame-based) processing of the input signal is accomplished. Each<br />
plugin works independent of the other plugins, it is just necessary that the algorithm of a plugin<br />
can work with signal type produced by the prior plugin. The incoming data is managed by<br />
the framework and stored in separate arrays, so that each plugin can run with an arbitrary<br />
frame size. The <strong>PlugInChain</strong> can be controlled either from a Graphical User Interface (GUI)<br />
or from the command line.<br />
1.3 Graphical User Interface (GUI)<br />
The Graphical User Interface was designed to make the use of the <strong>PlugInChain</strong> more comfortable.<br />
It has two different modes – the usual User mode for using and programming plugins<br />
and a developer mode that adds some functionality for editing the files of the <strong>PlugInChain</strong><br />
framework itself.<br />
The GUI-based version of the <strong>PlugInChain</strong> is started by typing<br />
pluginchaingui(‘pluginlist’,‘ListName.cfg’);<br />
in the MATLAB command window (from the folder where the <strong>PlugInChain</strong> is installed). This<br />
command automatically initializes the <strong>PlugInChain</strong> and starts the GUI with the specified pluginlist<br />
‘ListName.cfg’. The appearing graphical user interface is shown in Fig. 1.2 and is divided<br />
into three different control panels.<br />
1. Plugin list<br />
2. Plugins<br />
3. Signal processing items (Reset, Initialize, batchprocessing)<br />
5
If the function pluginchaingui is called without an input argument or if the specified pluginlist<br />
does not exist, the GUI is opened with a default pluginlist or the last loaded list displaying<br />
a warning message.<br />
It is possible to start pluginchaingui in developer mode:<br />
pluginchaingui([…],‘Developermode’,1).<br />
This requires the source code (m-files, not only executables) of the <strong>PlugInChain</strong> and will add<br />
additional buttons to the GUI to open the m-files of the framework directly in the MATLAB<br />
editor. The buttons are arranged in an additional control panel directly beneath the Pluginlist<br />
panel.<br />
In the following, the different panels will be described in more detail.<br />
Figure 1.2: Graphical User Interface (GUI) of the <strong>PlugInChain</strong>.<br />
1.2.1 Pluginlist panel<br />
The first panel shows the loaded pluginlist, which defines any number of cascaded plugins<br />
and optional configuration parameters for them. A pluginlist can be loaded by clicking with<br />
the right mouse button on the plugin list name display. The current plugin list can be edited<br />
with the adjacent button Edit and is shown on the upper right-hand side of Fig. 1.2.<br />
The first uncommented line of the pluginlist contains the string ‘GlobalSettings’. After that,<br />
all plugins are listed (in every line only one plugin name). The signal processing flow is de-<br />
6
termined by the order of the plugins. Optionally, configuration parameters for the plugins are<br />
specified in the pluginlist, otherwise the default values defined in the plugin itself are taken.<br />
To comment out a line the usual MATLAB sign ‘%’ is used.<br />
To define configuration parameters for a plugin or the ‘GlobalSettings’, the following syntax<br />
has to be used:<br />
- plugin name (or GlobalSettings), new line<br />
- Line with only opening bracket ‘(‘, new line<br />
- expression for the configuration of the plugin e.g. ‘blocksize=1024;’, new line<br />
(new line for each parameter)<br />
- Line with only closing bracket ‘)’.<br />
This is demonstrated in the following example.<br />
GlobalSettings<br />
(<br />
% blockSize = 1024;<br />
)<br />
readData<br />
(<br />
command = ‘wavread’;<br />
targetname = ‘mywavfile.wav’<br />
)<br />
Filterbank<br />
Resampler<br />
plotData<br />
The first uncommented line in the file comprises GlobalSettings, the following user parameter<br />
blockSize in line 3 is commented out. For the first plugin in the list readData there<br />
are two user parameters set. They define that the reading option is ‘wavread’ and specify the<br />
source for signal file to be loaded. For the last three plugins no configuration parameters are<br />
defined.<br />
It is also possible to use plugins multiple times. For example, the pluginlist may use the plugin<br />
‘plotData’ two times, first after loading the audio data and second after transforming the<br />
signal. Every ‘instance’ of a plugin gets its own configuration parameters, so that every time<br />
the plugin ‘plotData’ appears in the list, it may have other configuration parameters.<br />
1.2.2 <strong>PlugInChain</strong> Framework<br />
In developer mode, the second section of the GUI contains the buttons for editing the PlugIn-<br />
Chain files. It is recommended not to edit the files of the <strong>PlugInChain</strong> framework, except if it<br />
is necessary to define new parameters in the GlobalSettings of the <strong>PlugInChain</strong>.<br />
1.2.3 Plugins<br />
All plugins which belong to the loaded pluginlist (also named ‘configuration file’) are described<br />
in detail in section three. One can access the configuration parameters of a plugin by<br />
7
pressing the edit button for the pluginlist. This will open the file ‘Pluginlistname.cfg’ in the<br />
MATLAB editor. In the current example, ‘Pluginlist.cfg’ is shown in the editor in the upper<br />
right-hand side of Fig. 1.2. It was accessed by pressing the button edit just right of the field<br />
displaying the loaded pluginlist.<br />
The buttons on the right hand side of the listed plugins enable control over the initialization<br />
file *_init.m and the processing main file *_main.m. They are only needed for developing new<br />
plugins and to provide quick access for editing the plugin files. In the current example, the<br />
main file of the plugin ‘plotData_main.m’ is shown on the lower right-hand side of Fig. 1.2..<br />
It was accessed by pressing the button Main right of the field displaying the plugin ‘plotData’.<br />
The plugin structure and corresponding files will be discussed in more detail in section 3.<br />
1.2.4 Signal processing control<br />
The button Start can be used to start the signal processing of the <strong>PlugInChain</strong>. First, all plugins<br />
are initialized by calling the function pluginname_init.m of all plugins from the frameworks<br />
base function pluginchain_init.m. The first plugin ‘readData’ is reading during initialization<br />
phase the needed parameters for building up the ‘signal’ structure (e.g. from the header<br />
of a wav-file). The processing of the input signal is then performed by calling the function<br />
pluginname_main.m of each plugin from the frameworks processing file pluginchain_process.m,<br />
whereas the function readData_main.m reads the signal data and stores it in<br />
the ‘signal’ structure of the <strong>PlugInChain</strong>. The execution of the <strong>PlugInChain</strong> can be stopped by<br />
pressing the button Stop. Note that under MATLAB this is only possible between different<br />
processing steps and will not break a long calculation.<br />
1.2.5 Batch processing<br />
Each plugin is initialized with loading the configuration parameters from the configuration<br />
file (see lower right-hand side of Fig. 1.2). So far, a parameter was assigned exactly one value.<br />
If the <strong>PlugInChain</strong> should process data with several different values for a specific configuration<br />
parameter, a ‘batch variable’ can be used. A batch variable can be defined by appending<br />
the character # at the end of the parameter name. For example the configuration parameter<br />
myVariable=0.3 can be defined as a batch variable myVariable# = {0.3,0.4,0.5}, whereby<br />
its multiple values (alphanumerical) need brackets ‘{}‘ and are stored in a cell array.<br />
It's also possible to use MATLAB code to initialize parameters. The batch processing can, e.g.<br />
be really useful if several audio files should be processed. Assume that the text file ‘batch.txt’<br />
contains a list of audio files as shown in Fig. 1.3.<br />
1: ./waves/PeterHahne_kurz.wav<br />
2: ./waves/PeterHahne.wav<br />
3: ./waves/TestMeddis.wav<br />
4: ./waves/testsinmod.wav<br />
Figure 1.3: Text file batch.txt containing a list of audio files.<br />
Typing the following line in the configuration file<br />
targetname# = textread('batch.txt',[char(37),'s'],'delimiter','\n');<br />
loads the file batch.txt into the batch variable targetname#.<br />
8
The current iteration can be controlled in the GUI. Batch processing only takes place, if the<br />
checkbox (at the bottom right in Fig. 1.2) is activated. The batch processing number (upper<br />
field for batch processing in Fig. 1.2) in the GUI for the ‘current batch processing item” is set<br />
automatically to the length of the batch variable. If no batch variable is defined it is set to 1. If<br />
more than one configuration parameter is defined as batch variable, they must all have the<br />
same number of iterations.<br />
1.4 Command line functions<br />
The <strong>PlugInChain</strong> can be also executed from MATLAB'S command line. There are several ways<br />
to do this. The recommended way is to use the starting function<br />
pluginchain(‘pluginListname.cfg’);<br />
from the folder where you installed the <strong>PlugInChain</strong>. Note, that the command line mode<br />
(without GUI) function always needs a valid plugin list file as input argument. Only the function<br />
‘pluginchaingui.m’ allows the user to start it without input argument, as long as a default<br />
plugin list exists.<br />
The following three commands that are called by the pluginchain command can also be<br />
directly started from the directory ‘base’:<br />
[Signal, ConfigStruct] = pluginchain_main(‘pluginListname.cfg’);<br />
[Signal, ConfigStruct] = pluginchain_init(Signal, ConfigStruct);<br />
[Signal, ConfigStruct] = pluginchain_process(Signal, ConfigStruct);<br />
The first input parameter ‘pluginListname.cfg’ contains the desired plugin list (string).<br />
The output parameters are two MATLAB structures, namely the Signal and the ConfigStruct<br />
structure. The signal structure is meant to contain the data which is processed. After initializing<br />
the <strong>PlugInChain</strong>, the Signal structure contains just the signal header describing the four<br />
different signal domains (time, channel frequency and modulation frequency domain). The<br />
ConfigStruct structure contains as the first sub-structure the GlobalSettings, and as<br />
second a structure for the plugins which are overwritten when initializing the plugins. The<br />
ConfigStruct contains e.g. information about the current plugin list and parameters that are<br />
globally and must be available for the plugins. The hierarchical design of these MATLAB<br />
structures will be described in more detail in Sec. 2.1.2 and Sec. 2.1.1, respectively.<br />
The direct execution of pluginchain_main.m, pluginchain_init.m, pluginchain_process.m can<br />
be useful, if direct access to the Signal and the ConfigStruct structure is required, e.g., to<br />
edit or overload the data in the Signal structure or to retrieve the data from the Signal structure<br />
for further use.<br />
1.4.1 Initialization of plugins<br />
In order to initialize the <strong>PlugInChain</strong>, the two structures are passed to the initialization function<br />
[Signal, ConfigStruct]= pluginchain_init(Signal, ConfigStruct);.<br />
9
All settings which are necessary to process the audio material are initialized and stored for<br />
every plugin in the Plugin structure as a sub-structure of ConfigStruct. The <strong>PlugInChain</strong><br />
GlobalSettings stores information about the plugin list, paths and some other needed control<br />
parameters.<br />
1.4.2 Run processing<br />
The block-based processing of the input signal can be started by<br />
[Signal,ConfigStruct]=pluginchain_process(Signal, ConfigStruct);.<br />
Note that the input arguments of the function pluginchain_process.m require the initialized<br />
Signal and the initialized ConfigStruct structure (contains the plugins as well as the ‘GlobalSettings’).<br />
If no block processing is needed it is recommended to process the whole signal in one, because<br />
it’s much faster and therefore is chosen as the default constellation.<br />
The actual progress is reported by a waitbar showing the percentage of completed processing.<br />
It can be turned off by redefining the value in the GlobalSettings as<br />
‘showProgessbar = false’.<br />
The processed signal is stored in the Signal structure. But depending on the last plugin of the<br />
actual plugin list, the output also can be<br />
• stored to a wavefile,<br />
• stored to a file,<br />
• plotted into a figure<br />
just to name a few examples.<br />
1.5 Examples of starting the <strong>PlugInChain</strong><br />
In the directory where all files and folders for the <strong>PlugInChain</strong> are stored, two functions are<br />
available to run the <strong>PlugInChain</strong> without or with GUI:<br />
‘pluginchain.m’ (without GUI) and<br />
‘pluginchaingui.m’. (with GUI)<br />
For the pluginchaingui function most parameters are optional. If used, they always must appear<br />
in pairs of variable name and variable value. In the following the possible commands are<br />
shortly described:<br />
1. pluginchaingui();<br />
Starts the PluginChain with GUI in the directory ‘base’ with the default plugin list.<br />
2. pluginchaingui (‘pluginlist’,‘pluginlistname.cfg’)<br />
Starts the <strong>PlugInChain</strong> with GUI using the specified plugin list ‘pluginlistname.cfg’,<br />
as long as not specified GlobalSettings.guidefault = false.<br />
3. pluginchaingui (‘pluginlist’,‘pluginlistname.cfg’,’gui’,’true’)<br />
Starting the <strong>PlugInChain</strong> with GUI loading the plugin list ‘pluginlistname.cfg’, the last<br />
two arguments are optional.<br />
10
4. pluginchaingui(‘pluginlist’,‘pluginlistname.cfg’,’Developermode’,1)<br />
Starts the <strong>PlugInChain</strong> with GUI in ‘Developer mode’ with the plugin list ‘pluginlistname.cfg’.<br />
5. pluginchain(‘pluginlistname.cfg’)<br />
Starts the <strong>PlugInChain</strong> without GUI with the plugin list ‘pluginlistname.cfg’.<br />
Note, that the command line mode (without GUI) function always needs a valid plugin list file<br />
as input argument. Only the function ‘pluginchaingui’ allows the user to start it without input<br />
argument, as long as a default plugin list exists.<br />
2 The <strong>PlugInChain</strong> framework<br />
2.1 Basic structure<br />
The <strong>PlugInChain</strong> framework relies on two structures in the MATLAB workspace:<br />
ConfigStruct and Signal.<br />
2.1.1 ConfigStruct<br />
ConfigStruct is a structure that contains all required information for the processing except<br />
for the data that is to be processed. Besides the home directory path, it contains a substructure<br />
GlobalSettings and a Plugin substructure for each plugin.<br />
2.1.1.1 GlobalSettings<br />
Here all information required by the framework itself or information that has to be available<br />
for several (not specified) plugins is stored. Beside some processing parameters and control<br />
flags, it contains the plugin list, all required paths and the auditory profile (if used). Furthermore,<br />
the parameters for frame-based and batch processing and GUI control are defined here.<br />
Some of these values can change during processing.<br />
2.1.1.2 Plugin<br />
For each plugin in the plugin list, a substructure Plugin(k) exists in ConfigStruct. The<br />
index ‘k’ numbers the substructures in the order as they appear in the plugin list. Each Plugin(k)<br />
substructure consists of the following five fields:<br />
Plugin(k).name = 'pluginname'<br />
.version = '2'<br />
.Settings = [1x1 struct]<br />
.delay = 0<br />
.userSettings = [1x1 struct]<br />
11
The plugin name corresponds to the name of the main-file of the plugin and is read out automatically<br />
from the plugin list. The sub-field version is intended to keep track of the development<br />
stage of a plugin. An appropriate history located in the initialization file of the plugin<br />
should document important changes. The structure Settings contains the information and<br />
parameters for the plugin. This can be plugin-specific parameters like a sampling rate, a block<br />
size or filter coefficients. All relevant variables which are required for the signal processing<br />
step of each plugin are stored in the Settings structure. During processing, only the data, the<br />
GlobalSettings and the Settings structure of the corresponding plugin are passed to the<br />
processing function of the plugin. The field delay determines if the plugin introduces a time<br />
delay. In the last field userSettings, the plugin specific configuration as defined in the currently<br />
loaded plugin list is stored.<br />
After the plugin initialization phase, a structure Plugin(k) with an individual Settings substructure<br />
exists for each plugin in the plugin list. For the plugin list ’pluginlist.cfg ‘, shown in<br />
the upper right-hand side of Fig. 1.2, the ConfigStruct structure contains the following six<br />
elements<br />
home = '….\Plugin\workspace\WorkingCopyMain\base'<br />
name = 'ConfigStruct'<br />
version = '2'<br />
delay = 0<br />
GlobalSettings = [1x1 struct]<br />
Plugin = [1x3 struct]<br />
Where the Plugin structures look like as follows<br />
name = <br />
Settings = <br />
version = '2.0'<br />
delay = 0<br />
userSettings = [1x1 struct]<br />
2.1.2 Signal<br />
The Signal structure contains the data itself and metadata, e.g. about the domain. The convention<br />
of storing data assumes the following four dimensions (which can be partly singular):<br />
Signal.data = [Time x Audio channel x Frequency channel x Modulation frequency<br />
channel]<br />
The metadata corresponding to each of the signal dimension is stored in the four dimensional<br />
structure Signal.Dimension with the following fields:<br />
Signal.Dimension(1).name = 'Time'<br />
.length = 2048<br />
.argvec = {1/fs 0}<br />
The field name describes the actual domain. The other fields length, argvec are domaindependent<br />
and specify the size and the sampling rate. If one uses the plugin ‘readData’ it initializes<br />
the signal with a further field units for each domain.<br />
For the default plugin list ‘pluginlist.cfg’ which is shown on the upper right-hand side of Fig.<br />
1.2, the Signal structure after the plugin initialization phase looks like this:<br />
12
Signal.Dimension(1).name = 'Time'<br />
.length = 1<br />
.argvec = {[0.0938] [0]}<br />
.units = 's'<br />
Signal.Dimension(2).name = 'Channel'<br />
.length = 1<br />
.argvec = {[]}<br />
.units = []<br />
Signal.Dimension(3).name = 'Frequency'<br />
.length = 4096<br />
.argvec = {[3.9063] [0]}<br />
.units = 'Hz'<br />
Signal.Dimension(4).name = ''<br />
.length = 0<br />
.argvec = 0<br />
.units = []<br />
The field argvec of the signal domain 'Time' consists of two values. The first value<br />
represents the sampling period and the second value determines the current (processing) position<br />
within the signal in seconds. This value is still zero as no data is loaded during the initialization<br />
phase. Note that the Signal structure contains in Signal.data at every point in time<br />
only the data of the actual domain (demonstrated in the following example). After loading the<br />
first audio frame to the Signal structure, the structure dimensions would become<br />
Signal = data: [150012x1 double]<br />
Dimension: [1x4 struct]<br />
with the following domain descriptions<br />
Signal.Dimension(1).name = 'Time'<br />
.length = 150012<br />
.argvec = {[6.2500e-005] [9.3758]}<br />
.units = 's'<br />
Signal.Dimension(2).name = 'Channel'<br />
.length = 1<br />
.argvec = {[]}<br />
.units = []<br />
Signal.Dimension(3).name = 'Frequency'<br />
.length = 1<br />
.argvec = {[3.9063][0]}<br />
.units = 'Hz'<br />
Signal.Dimension(4).name = ''<br />
.length = 1<br />
.argvec = 0<br />
.units = []<br />
After appending a plugin that, e.g., transforms a time signal into the frequency domain (and<br />
can only be further processed by a frequency-based plugin), the four-dimensional signal structure<br />
would look like this:<br />
Signal = data: [1x1x4096 double]<br />
Dimension: [1x4 struct]<br />
with the following domain description<br />
13
Signal.Dimension(1).name = 'Time'<br />
.length = 1<br />
.argvec = {[6.25e-005] [9.3758]}<br />
.units = 's'<br />
Signal.Dimension(2).name = 'Channel'<br />
.length = 1<br />
.argvec = {[]}<br />
.units = []<br />
Signal.Dimension(3).name = 'Frequency'<br />
.length = 4096<br />
.argvec = {[3.9063] [0]}<br />
.units = 'Hz'<br />
Signal.Dimension(4).name = ''<br />
.length = 0<br />
.argvec = 0<br />
.units = []<br />
Now the actual domain of the signal structure is no longer Time but Frequency, therefore the<br />
size of the frequency domain is set to the number of frequency bins and the size of the time<br />
domain is set to one.<br />
2.2 Plugin structure<br />
A plugin minimally consists of the following two MATLAB files:<br />
1. Initialisation function plugInName_init.m<br />
2. Main (processing) function plugInName_main.m<br />
2.2.1 Initialization<br />
All variables needed for the processing step are initialized or calculated in the initialization<br />
function plugInName_init.m. The function is called from the framework’s initialization function<br />
with the following syntax<br />
[Signal, Plugin, GlobalSettings] =plugInName_init(Signal, Plugin, GlobalSettings);<br />
Whereas<br />
• Signal is the four dimensional Signal structure (see 2.1.2)<br />
• Plugin is the plugin-number-specific substructure Plugin(k) (see 2.1.1)<br />
General information about the current data, e.g. the sampling rate fs or the block size block-<br />
Size is stored in the settings substructure GlobalSettings of ConfigStruct.<br />
14
2.2.2 Block size<br />
Each plugin of the <strong>PlugInChain</strong> can theoretically run on a different block size. The block size<br />
must be defined in the initialization function. If a plugin requires a specific block size, the<br />
variable Settings.blockSize should be initialized accordingly. Otherwise, the global block<br />
size should be used as a default value<br />
Settings.blockSize = GlobalSettings.blockSize;<br />
Frame based processing is deactivated by using a block size of zero. Accordingly, any plugin<br />
that cannot handle frame-based processing, has to have a Settings.blockSize = 0 statement.<br />
The necessary framing and buffering of the data is managed by the <strong>PlugInChain</strong><br />
framework itself. If the data length is not compatible with one appearing block size, there remains<br />
some unprocessed part of the signal in the storage and the output will be shorter than<br />
the input. Sometimes it may therefore be helpful to work with zero padding if block sizes and<br />
the whole signal size do not fit. In this case the default value<br />
GlobalSettings.zeroPadding = false;<br />
has to be changed to ‘true’ by defining it in the plugin list. With activated zero padding, the<br />
processing framework adds zeros to the input signal. The length of this is determined by the<br />
block size of the first plugin following the ‘readData’-plugin.<br />
2.2.3 _init function<br />
To control the whole parameter set of a plugin without changing the source code in the corresponding<br />
plugin, the configuration file (‘pluginListName.cfg’) can be used to overwrite the<br />
specific values for each plugin. Fig.2.1. shows a source code snippet of the _init file. The default<br />
settings of the plugin are defined in line 4 - 7. Afterwards, the parameter from the configuration<br />
file is loaded (line 11 - 12). The variable Settings.dBFS2SPL may be changed in<br />
*.cfg-file, therefore Settings.scale_fac needs to be calculated (or recalculated if set) in<br />
line 17-18. It should be noted that only variables which are defined in the _init function are<br />
considered to be valid user parameters. Only these can be overwritten with values from the<br />
configuration file. If one wants to use parameters of the GlobalSettings in the _init function<br />
they should be defined as default values.<br />
1: % ----------------------------------------------------------------------<br />
2: % default settings<br />
3: % ----------------------------------------------------------------------<br />
4: Settings.blockSize = 0;<br />
5: Settings.order = 512;<br />
6: Settings.dBFS2SPL = 96;<br />
7: Settings.fs = 44100;<br />
8: % ----------------------------------------------------------------------<br />
9: % reading the user parameters set in the configuration file<br />
10: % ---------------------------------------------------------------------<br />
11: Settings = applyUserSettings(Settings, Plugin.userSettings);<br />
12: % ---------------------------------------------------------------------<br />
13: if isfield(GlobalSettings,'dBFS2SPL')<br />
14: if GlobalSettings.dBFS2SPL ~= Settings.dBFS2SPL<br />
15
15: warning(['dBFS2SPL of Master is not equivalent to PlugIn!'])<br />
16: scale = GlobalSettings.dBFS2SPL - Settings.dBFS2SPL;<br />
17: Settings.scale_fac = 10^(scale/20);<br />
18: GlobalSettings.dBFS2SPL = Settings.dBFS2SPL;<br />
19: end<br />
20: end<br />
Figure 2.1: Part of the initialization file.<br />
Furthermore, routines which check consistency between plugins or necessary conditions for<br />
the signal processing by the main file may also be located here.<br />
If the plugin changes any signal dimension or the scaling of the signal, the initialization file<br />
has to transfer this information back to the <strong>PlugInChain</strong> by setting the new signal dimension<br />
or the new scaling in to the GlobalSettings or the Signal structure. For scaling the signal,<br />
the value of dB SPL is taken to account. If the scaling is affected by the plugin, it has to<br />
change the parameter of<br />
GlobalSettings.dBFS2SPL<br />
in the way, that this parameter at any time gives the value in dB SPL that equates to a signal<br />
amplitude of 1 in MATLAB.<br />
2.2.4 _main function<br />
The _main function of the plugin is called from the block processing part of the <strong>PlugInChain</strong><br />
(pluginchain_process.m). The plugin’s _main function does the actual processing of the input<br />
data. Therefore, it gets as input parameter the collected data, the Plugin structure which<br />
should contain all necessary variables from the main function and the GlobalSettings.<br />
Usually, all signal processing is placed in the _main file, however, it is also possible to call<br />
further functions from here.<br />
Routines which check consistency and monitor the proper functioning of the plugin should be<br />
located in the initialization file, so that a possible error occurs before calculation starts. But if<br />
there exists special dependencies of the actual processed numerical values (e.g. only positive<br />
or real numbers can be handled), further check routines can be located in the _main file.<br />
2.3 Plugin lists<br />
The plugin list is a text (ASCII) file which can be used to define a processing chain of plugins<br />
to yield more complex algorithms. Any number of available plugins can be concatenated whereby<br />
the listed order determines the signal flow. Note that the input signal is transformed from<br />
a plugin and passed to the next one. Thus, the signal domain of the output of a plugin must be<br />
consistent with the required input signal domain of the following plugin.<br />
The first Line of every plugin list defines the GlobalSettings.<br />
The plugin list ‘pluginlist.cfg´ shown in Fig. 2.3., contains the following code:<br />
16
1: GlobalSettings<br />
2: (<br />
3: blockSize = 2000;<br />
4: silentMode = 0;<br />
5: )<br />
6: readData<br />
7: (<br />
8: )<br />
9: plotData<br />
10: olatime2freq<br />
11: (<br />
12: blockSize=1500;<br />
13: )<br />
Figure 2.3: File of the plugin list pluginlist.cfg.<br />
It’s possible also to use plugins multiple times, e.g. the plugin ‘plotData’. Each plugin can<br />
have individual settings.<br />
2.3.1 Use existing plugin lists<br />
Existing plugin lists can be easily loaded by using either the GUI or a command line instruction<br />
(see section 1.3 and 1.4).<br />
2.3.2 Create new plugin lists<br />
New plugin lists can be easily derived from existing ones or can be written from scratch. It is<br />
possible to simply copy, rename and edit an existing plugin list with a conventional text editor.<br />
Alternatively, the function makelist.m (located in the working directory ‘pluginchain’) can<br />
be called from the MATLAB command window. The makelist GUI will appear (depicted in<br />
Fig. 2.4.). The function scans the <strong>PlugInChain</strong> folder ‘plugins” for all available plugins and<br />
lists them on the left side. The marked plugin can be either added or removed from the active<br />
plugin list by pressing the buttons add and remove, respectively. The name of the plugin list<br />
can be edited on the upper right side. By pressing the button create the composed plugin list<br />
can be stored to hard disc. If the desired plugin list name is already in use, the file can be<br />
overwritten by using the button overwrite.<br />
17
Figure 2.4: The makelist GUI to automatically generate new plugin lists.<br />
Note that the current makelist function does not supply any consistency check about the specific<br />
plugin requirements in terms of the signal domain (time domain, frequency domain ...).<br />
2.3.3 Assessing the history of loaded plugin lists<br />
If the <strong>PlugInChain</strong> is started without a specified (and valid) plugin list as argument, it attempts<br />
to open the last loaded plugin list. If this is no longer available, a warning will be displayed<br />
stating that the last list was not found and that the default plugin list will be loaded.<br />
From the <strong>PlugInChain</strong> GUI (as shown in Fig. 2.5) the history of all used plugin lists can be<br />
accessed by pressing simultaneous the shift button on the keyboard and the right mouse button<br />
while pointing with the mouse on the plugin list display (Shift + right mouse). In this<br />
manner a plugin list also can be directly loaded by selecting it from the history list.<br />
Figure 2.5: <strong>PlugInChain</strong> history of the past used plugin lists.<br />
18
3 Plugins<br />
This section gives an overview about how to work with and how to edit plugins.<br />
3.1 Use plugins<br />
As shown in Section 2.2 all available plugins can be used to form complex algorithms. During<br />
the initialization phase all relevant parameters are calculated for each plugin based on the default<br />
settings. All user parameter can be modified in the plugin list as described briefly in 2.2.<br />
The main advantage of configuring the plugins in the plugin list is that plugins can be used<br />
with different parameter sets without changing the source code of the corresponding plugin.<br />
This also allows the configuration of proprietary plugins that might only be available in machine<br />
readable code.<br />
3.2 Change plugins<br />
The user is able to add new functionality to the <strong>PlugInChain</strong> by changing and extending existing<br />
plugins. This can be especially worthwhile if available routines already provide similar<br />
tasks. In order to do so, both plugin files namely the initialization function and the main function<br />
of an existing plugin can be duplicated using the new plugin name. Afterwards, the initialization<br />
and the processing routine of the new plugin can be modified.<br />
3.3 Write new plugins<br />
Besides changing existing plugins, it is also possible to create a new plugin by using the template<br />
function template2function.m. It is located in the folder ‘pluginchain_tools” and creates<br />
templates for a new plugin. This function sets up the source code for the two required plugin<br />
functions ( _init and _main) with identity processing.<br />
template2function('template01','newPlugInName');<br />
The first input argument specifies the used template. The second input parameter determines<br />
the name of the new plugin. These new files are stored in the directory ‘plugins’. If the template<br />
function is called with any third input argument, both new functions are opened in the<br />
MATLAB editor. It is also possible to use any existing plugin as template, but the user is in this<br />
case strongly advised to check if everything is correctly exported and that no variable is<br />
named like the plugin itself.<br />
In the following, examples are given how to create new plugins by using the template function.<br />
Two plugins will be presented for different signal representations. There are two different<br />
template functions to be used in the shown manner for the different signal representations<br />
– template01 (time domain) and template02 (frequency domain). But they only differ in the<br />
check routines for the used signal domain.<br />
If your plugin starts any external process that has to be stopped, your own function to stop this<br />
process, e.g. ‘mystopfunc’ should be defined within the file ‘mypluginname_init.m’ and following<br />
setting should be defined:<br />
19
Settings.ExitFunction =@mystopfunc;<br />
The <strong>PlugInChain</strong> will call the exit function when signal processing ends or if the <strong>PlugInChain</strong><br />
is aborted. An optional boolean flag exists for defining different behavior for usual process<br />
end and aborted processing. If aborted or stopped by occurrence of errors, the <strong>PlugInChain</strong><br />
performs the function with optional parameter ‘true’ (abort-flag = true) and optional parameter<br />
‘false’ otherwise (abort-flag = false). The <strong>PlugInChain</strong> checks your function for<br />
number of input arguments to decide if the flag is needed.<br />
If your function executes different code for cases of aborted and proper end of process (or e.g.<br />
only if process aborted) you just write your ‘mystopfunc’ with two input parameters, whereat<br />
the second parameter is the aborted-flag. This looks like<br />
function plugin = mystopfunc (plugin, abort)<br />
…..<br />
if abort<br />
….<br />
else<br />
….<br />
end<br />
end<br />
or if no difference for the type of processing end is needed:<br />
function plugin = mystopfunc (plugin)<br />
…..<br />
end<br />
3.3.1 Example 1 - IIR low-pass filter<br />
As a first example, this section will explain how to use the template function to generate an<br />
infinite impulse response (IIR) low-pass filter in the time domain. By calling<br />
template2function('template01','filterLowPass',1)<br />
the two files<br />
- filterLowPass_main.m<br />
- filterLowPass_init.m<br />
are generated and directly opened in the MATLAB editor.<br />
1. _init function<br />
The actual filter design is done in the initialization function filterLowPass_init.m. Note that all<br />
variables which are needed for the processing step must be stored in the structure Settings to<br />
be available in the function filterLowPass_main.m.<br />
20
1: function [Signal,Plugin,GlobalSettings]=filterLowPass_init(Signal,Plugin,GlobalSettings)<br />
2: %FILTERLOWPASS_INIT initialization function for matlab pluginchain<br />
3: % usage:<br />
4: % function [Signal, Plugin, GlobalSettings] = filterLowPass_init(Signal, Plugin, GlobalSettings)<br />
[…]<br />
13: %<br />
14: Plugin.version = '1.0';<br />
15: Plugin.delay = 0;<br />
16: Settings.dependencies = {''}; % please enter the file dependencies manually<br />
17: % -------------------------------------------------------------------------<br />
18: % default settings<br />
19: % -------------------------------------------------------------------------<br />
20: Settings.filterOrder = 4; % filter order<br />
21: Settings.cutoffFreq = 1000; % cutoff frequency<br />
22: % -------------------------------------------------------------------------<br />
23: % reading user parameter (do not edit)<br />
24: % (user settings read from plugin list are stored in Plugin.userSettings)<br />
25: % -------------------------------------------------------------------------<br />
26: Settings = applyUserSettings(Settings, Plugin.userSettings);<br />
27: % -------------------------------------------------------------------------<br />
28: % internal settings and parameters that need to be recalculated<br />
29: % -------------------------------------------------------------------------<br />
30: fs = GlobalSettings.fs; % Get sampling frequency<br />
31: chns = GlobalSettings.channels; % Get the number of channels<br />
32: wn = Settings.cutoffFreq/fs*2; % Normalized cutoff frequency<br />
33: % Create low-pass filter coefficients<br />
34: [Settings.b,Settings.a] = butter(Settings.filterOrder,wn,'low');<br />
35: % Initialize filter states<br />
36: Settings.states = zeros(Settings.filterOrder,chns);<br />
37:<br />
38: % -------------------------------------------------------------------------<br />
39: % write Settings to Plugin struct<br />
40: % -------------------------------------------------------------------------<br />
41: Plugin.Settings = Settings;<br />
Figure 3.1: Initialisation function of the IIR low-pass filter.<br />
The filter order Settings.filterOrder and the cutoff frequency of the filter Settings.cutoffFreq<br />
should be controllable by the user and their default values are assigned.<br />
All the parameters which are dependent on the user parameters (like the normalized cutoff<br />
frequency wn of the filter) are calculated after reading and applying the Plugin.userSettings.<br />
The filter design is done in line 34 of Fig. 3.1 by using the MATLAB<br />
function ‘butter’. After creating the filter coefficients, the memory for the inner filter states<br />
are allocated in line 36. This is required for frame-based processing which is allowed by the<br />
plugin as no specific blockSize is defined in the settings. In order to guarantee a proper calculation<br />
of the filter characteristics independent of the actual sampling rate of the processed<br />
file, the sampling rate is taken from the GlobalSettings.fs, which will be set by the signalreading<br />
plugin to the actual value (line 30). This value corresponds to one over the sampling<br />
period which is stored in the first cell array element of the Signal.Dimension(1).argvec.<br />
All parameters which are required for the processing step are stored into the plugin settings<br />
structure Plugin.Settings for later usage.<br />
2. _main function<br />
The actual filtering is performed in the processing function filterLowPass_main.m which is<br />
shown in Fig. 3.2. Here the MATLAB function ‘filter’ is used to filter the input signal data.<br />
The calculated filter coefficients from the initialization file which are stored in the settings<br />
structure of the plugin are passed by the framework of the <strong>PlugInChain</strong> to the processing<br />
function with the second input argument Plugin. Sometimes it might be convenient to copy<br />
21
the input parameters into new variables to shorten the names, this was done here by storing<br />
Plugin.Settings in the new variable Set.<br />
The main function is called for every chunk of data delivered as long as the complete input<br />
signal is processed. To ensure correct operation of the IIR filter across frames, the inner filter<br />
states need to be stored for the next frame.<br />
1: function [Signal,Plugin,GlobalSettings]=filterLowPass_main(Signal,Plugin,GlobalSettings)<br />
2: %FILTERLOWPASS_MAIN processing function for matlab pluginchain<br />
3: % usage:<br />
4: % function[Signal,Plugin,GlobalSettings]=filterLowPass_main(Signal,Plugin,GlobalSettings)<br />
[…]<br />
13: % insert your function here:<br />
14: Set = Plugin.Settings; %shorten the names<br />
15: in=Signal.data;<br />
16: [out,Set.states] = filter(Set.b,Set.a,in,Set.states);<br />
17: Signal.data=out;<br />
18: Plugin.Settings=Set;<br />
19: return<br />
Figure 3.2: Main function of the IIR low-pass filter.<br />
3.3.2 Example 2 - Adaptation loops<br />
An example of a plugin which is working on a multidimensional signal is the adaptation loop<br />
plugin. This plugin is part of a computational model of the auditory periphery (Dau et al 1996,<br />
1997) and mimics the temporal processing of the auditory system. Therefore, it is usually<br />
used after a ‘gammatone’ filterbank and a ‘haircell’ model.<br />
1. _init function<br />
First the default settings concerning the variables blockSize, tau, fs, nStages, minimum and<br />
limit are initialized (line 21-27 in Fig. 3.3). Afterwards, the user-dependent settings (defined<br />
in the plugin list) are loaded from Plugin.userSettings (line 29). Note that only settings<br />
that are defined before loading the user settings are overwritten. The adaptation loops require<br />
a specific scaling of the input signal and the value for dBFS2SPL is therefore set in line 34. If<br />
the signal was scaled differently before, rescaling is necessary (line 35-42). All internal parameters<br />
which are based on the user defined parameters are then calculated in lines 48-69 and<br />
are stored in the Settings structure for later access (line 73).<br />
Finally, a check routine is provided to only enable the further processing stage if the signal<br />
header contains the correct signal domain. This is useful in order to easily detect the origin of<br />
errors during the processing. The required signal domain is for the adaptation loop plugin is<br />
'Time' (line 82-85). If this plugin would e.g. be used after a Fourier transformation, the plugin<br />
would set the error flag errOccured to ‘true’ (line 83). If any error occurred during the<br />
initialization phase, the <strong>PlugInChain</strong> would stop and report the corresponding error messages.<br />
1: function [Signal,Plugin,GlobalSettings]=adaptationloop_init(Signal,Plugin,GlobalSettings)<br />
2: %ADAPTATIONLOOP_INIT initialisation function for matlab pluginchain<br />
3: % usage:<br />
4: % function [Signal,Plugin,GlobalSettings]=adaptationloop_init(Signal,Plugin,GlobalSettings)<br />
[…]<br />
13: %<br />
15: Plugin.version = '1.1';<br />
22
16: Plugin.delay = 0;<br />
17: Settings.dependencies = {''}; % please enter the file dependencies manually<br />
18: % -------------------------------------------------------------------------<br />
19: % default value is taken from GlobalSettings<br />
20: % -------------------------------------------------------------------------<br />
21: Settings.blockSize = GlobalSettings.blockSize;<br />
22: Settings.tau = [0.005; 0.05; 0.129; 0.253; 0.5];<br />
23: % time constants for each loop<br />
24: Settings.fs = GlobalSettings.fs;<br />
25: Settings.nStages = length(Settings.tau);<br />
26: Settings.minimum = 1e-5;<br />
27: Settings.limit = 0; % SK: taken from PEMO-Version<br />
28: % reading user parameter (do not edit)<br />
29: Settings = applyUserSettings(Settings, Plugin.userSettings);<br />
30: % check level<br />
31: % -------------------------------------------------------------------------<br />
32: % if level of signal is not equivalent to HRTF, signal is set to HRTF for<br />
33: % processing and afterwards rescaled.<br />
34: Settings.dBFS2SPL = 100; % This scaling is needed!<br />
35: if isfield(GlobalSettings,'dBFS2SPL')<br />
36: if GlobalSettings.dBFS2SPL ~= Settings.dBFS2SPL<br />
37: warning(['dBFS2SPL of Master is not equivalent to PlugIn!'])<br />
38: scale = GlobalSettings.dBFS2SPL - Settings.dBFS2SPL;<br />
39: Settings.scale_fac = 10^(scale/20);<br />
40: GlobalSettings.dBFS2SPL = Settings.dBFS2SPL;<br />
41: end<br />
42: end<br />
43: % -------------------------------------------------------------------------<br />
44: % internal settings and parameters that need to be recalculated<br />
45: % -------------------------------------------------------------------------<br />
48: ta = 1/GlobalSettings.fs;<br />
49: chns = GlobalSettings.channels;<br />
50: freq = Signal.Dimension(3).length;<br />
51: modfreq = Signal.Dimension(4).length;<br />
52: % Loop over the number of stages<br />
53: for iStage = 1:Settings.nStages<br />
54: Settings.a1(iStage) = exp(-ta/Settings.tau(iStage));<br />
55: Settings.b0(iStage) = 1-Settings.a1(iStage);<br />
56: Settings.divisor(iStage,1:chns,1:freq) = Settings.minimum^(2^-iStage);<br />
57: if Settings.limit>1 % limitation enabled: calc values for exp fcn [SK]<br />
58: maxvalue = (1 - Settings.divisor(iStage,1,1)^2) * Settings.limit - 1;<br />
59: Settings.expfcn.fac(iStage) = maxvalue * 2;<br />
60: Settings.expfcn.expfac(iStage) = -2/maxvalue;<br />
61: Settings.expfcn.offset(iStage) = maxvalue - 1;<br />
62: clear maxvalue<br />
63: end<br />
64: end<br />
65: if size(Settings.divisor,4) == 1<br />
66: Settings.divisor = repmat(Settings.divisor,[1,1,1,modfreq]);<br />
67: end<br />
68: Settings.correction = Settings.divisor(Settings.nStages);<br />
69: Settings.factor = 100/(1-Settings.correction);<br />
70: % -------------------------------------------------------------------------<br />
71: % write Settings to Plugin struct<br />
72: % -------------------------------------------------------------------------<br />
73: Plugin.Settings = Settings;<br />
74: % -------------------------------------------------------------------------<br />
75: % check values<br />
76: % -------------------------------------------------------------------------<br />
77: errOccurred = false;<br />
78: errMessage = '';<br />
79: % -------------------------------------------------------------------------<br />
80: % provide check-routines here:<br />
81: % -------------------------------------------------------------------------<br />
82: if ~strcmp(Signal.Dimension(1).name,'Time')<br />
83: errOccurred = true;<br />
23
84: errMessage = 'no time-signal detected';<br />
85: end<br />
86: % -------------------------------------------------------------------------<br />
87: if errOccurred<br />
88: %disp(repmat('-',1,80));disp(errMessage);disp(repmat('-',1,80));<br />
89: GlobalSettings.ok = false;<br />
90: GlobalSettings.errMessage = char(strcat(Plugin.name, ' : ', sprintf('%s\n'),...<br />
91: errMessage));<br />
92: disp(repmat('-',1,80));<br />
93: disp(char(strcat(Plugin.name,':',' ')));<br />
94: disp(errMessage);<br />
95: disp(repmat('_',1,80));<br />
96: end<br />
97: % -------------------------------------------------------------------------<br />
98: return % go back to main function<br />
99: % -------------------------------------------------------------------------<br />
Figure 3.3: Initialization function of the adaptation loops.<br />
2. _main function<br />
The adaptation loops operate on the time signal (first dimension of inData) for any size of the<br />
other dimensions. Therefore, the size of the signal is determined in line 23. In the following,<br />
two cases are differentiated for shorten the calculation time. If the value for Settings.limit<br />
is 1) a<br />
slightly different calculation (line 46-54) is needed whereas the loops in principle remain the<br />
same (line 43-58). The modified data is stored in the output variable out in line 59.<br />
Although the plugin is designed to deal with multidimensional data, it can of course also be<br />
used outside the context of the PEMO model and be applied on a pure time domain signal.<br />
1: function [outData,Plugin,GlobalSettings]=adaptationloop_main(inData,Plugin,GlobalSettings)<br />
2: %ADAPTATIONLOOP_MAIN processing function for matlab pluginchain<br />
3: % usage:<br />
4: % function [outData,Plugin,GlobalSettings]=adaptationloop_main(inData,Plugin,GlobalSettings)<br />
[…]<br />
12: % some new variables to shorten names in calculation<br />
13: outData=inData;<br />
14: in=inData.data;<br />
15: Set=Plugin.Settings;<br />
16: % level correction forward (if required)<br />
17: % ---------------------------------------------------------------------<br />
18: if isfield(Set,'scale_fac')<br />
19: in = in .* Set.scale_fac;<br />
20: end<br />
21: % insert your function here:<br />
22: out = in;<br />
23: [T,C,F,M] = size(out);<br />
24: out = max(out, Set.minimum);<br />
25: if Set.limit
36: end<br />
37: out(t,Cidx,Fidx,Midx) = (tmp-Set.correction)*Set.factor;<br />
38: end<br />
39: else % limitation enabled<br />
40: Midx = 1:M;<br />
41: Cidx = 1:C;<br />
42: Fidx = 1:F;<br />
43: for t=1:T<br />
44: tmp = out(t,Cidx,Fidx,Midx);<br />
45: for iStage = 1:Set.nStages<br />
46: tmp=tmp./Set.divisor(iStage,Cidx,Fidx,Midx);<br />
47: tmpGreater1 = (tmp > 1);<br />
48: tmpNotGreater1 = (tmp
• Supply plugin check routines.<br />
Every plugin should check, e.g., if the transferred signal dimension or signal domain<br />
matches the plugin requirements and provide corresponding error messages.<br />
• Support modularity<br />
If the plugin changes any signal dimension, the _init should modify the signal descriptor<br />
appropriately to ensure proper initialization of the following plugins.<br />
3.5 GlobalSettings of the pluginchain<br />
The GlobalSettings contain besides general parameters like blocksize and path information<br />
some special variables that are used as Flags. Some of them are required for the workflow<br />
of the <strong>PlugInChain</strong> while others are user parameters to control performance.<br />
3.5.1 Auditory Profile<br />
Sometimes it is useful to work with an auditory profile. In this case you use the data from<br />
GlobalSettings.Audioprofile. There exists a ‘full” version where all data for a client is<br />
loaded from a database (if existing) and a monaural version with variables<br />
- Audiogram (Array contains Frequency and the corresponding hearing loss) and<br />
- Cat_Loudness (Array contains Frequency and corresponding categorical loudness<br />
value).<br />
To load these auditory profiles from a local existing MATLAB database, the value of<br />
Global.Settings.AudioProfileFlag has to be set to 1 and the Client identity and the type<br />
of audiogram has to be defined with<br />
- GlobalSettings.ClientId = 'ClientNumber' (f.e. 'TT123456')<br />
and<br />
- GlobalSettings.sAudID = 'slope' (or other in data base defined values).<br />
The monaural version is also available without using the database and the corresponding default<br />
values can be changed via the plugin list.<br />
For working with auditory profiles it might be useful to use the GUI controlled tool for editing<br />
these profiles. It is available in the folder ‘pluginchain_tools\audiogramtools\matlab’ and<br />
started with the command<br />
Clientbd();.<br />
3.5.2 Performance parameters<br />
The frame-based (block) processing is performed by the <strong>PlugInChain</strong> framework and might<br />
require some computational overhead. If the processing of individual plugins is not forcing an<br />
individual block size, it is generally recommended to set the blockSize in the plugin on the<br />
GlobalSettings.blockSize. Processing time can be considerably shortened if all plugins<br />
use the same block size. To process the whole data at once without using block processing,<br />
one should define:<br />
26
GlobalSettings.blockSize = 0;<br />
In this case, the first plugin ‘readData’ (this or an equivalent other plugin is required in first<br />
place to read the signal data) changes the value in this case to the size of specified input signal.<br />
The default value for the GlobalSettings.blockSize is set to zero. If you want to use<br />
frame-based processing with the same block sizes for all used plugins, it is useful to change<br />
this parameter in the plugin list to the required value (e.g. GlobalSettings.blockSize=1024;)<br />
and then define for all plugins<br />
Settings.blockSize = GlobalSettings.blockSize.<br />
In every other case of frame-based processing it is advised to use the default value.<br />
The sampling rate and the number of channels also can be defined in the GlobalSettings:<br />
GlobalSettings.fs = 0;<br />
GlobalSettings.channels = 0;<br />
If they (or one of them) remain on default value ‘0’, it is set in first step by the plugin ‘read-<br />
Data’ to the sampling rate or number of channels of the signal.<br />
If any plugin is changing the actual value it is required to change GlobalSettings appropriately<br />
in its _init file. If any value for sampling rate or channels is defined for the Global-<br />
Settings in the plugin list, it has to agree with the used incoming signal data. Otherwise it<br />
will produce an error and processing is stopped.<br />
WARNING:<br />
If you write and use your own plugin to read any data instead of ‘readData’, your plugin has<br />
to do more than just reading data. It has to supply the PluginChain with the functionality of<br />
initializing the signal structure and setting several values in the GlobalSettings.<br />
If Simulations should be performed with the <strong>PlugInChain</strong>, there exists the possibility of storing<br />
the data automatically. Therefore the variable (with default value ‘false’) must be set on<br />
true:<br />
GlobalSettings.saveSimulation = true;.<br />
There also exists the possibility to hide the progress bar while processing. To do this one has<br />
to define in the plugin list<br />
GlobalSettings.showProgressBar = 0;.<br />
Some plugins need to act on a specific signal level. Therefore GlobalSettings.dBFS2SPL<br />
defines the level of dB an amplitude of 1 will correspond to. Each plugin might have other<br />
scaling factors, but must in this case transform the signal and retransform afterwards or<br />
change the value of dBFS2SPL in the GlobalSettings correctly (see Example 2).<br />
27
4 Quickstart<br />
This section will give you a short description how to start working with the <strong>PlugInChain</strong> environment.<br />
Start your MATLAB software. If you have installed all files, you should find the folder<br />
'pluginchain'. Change your working directory in MATLAB to this folder. Type into command<br />
line<br />
pluginchaingui('pluginlist','Examplelist1.cfg','gui','true')<br />
Now the GUI will open with the loaded plugin list 'Examplelist1.cfg '. It should look like Fig.<br />
4.1<br />
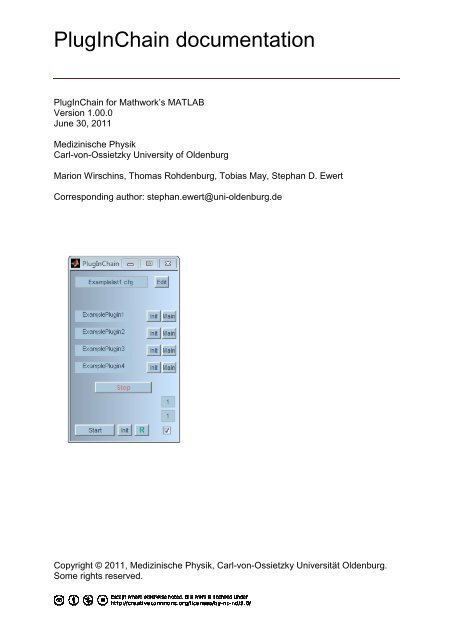
Figure 4.1: <strong>PlugInChain</strong> GUI for loaded plugin list ‘Examplelist1.cfg’.<br />
The plugin list contains 4 plugins, named ‘examplePlugin1 -4’. The first plugin reads the signal<br />
data. The second plots it, the third is a low pass filter and the last plugin again plots the<br />
processed signal.<br />
Start the processing by pressing the button Start in the left of the bottom of the GUI.<br />
The plugin ‘examplePlugin2’ will open a window ‘Fig.2’ (because Fig.1 is the GUI) and display<br />
the signal and ‘examplePlugin4’ will also open a window ‘Fig.3’ and again display the<br />
actual signal data.<br />
You now can open the plugin list ‘examplelist1.cfg’ by clicking the edit button on the right<br />
side of the displayed plugin list name in the top of the GUI. It will open the file in the MAT-<br />
LAB editor. It should look like shown in Fig. 4.2.<br />
If you like you may explore its function by changing some things in the list to see what happens.<br />
In line 9 the variable ‘targetname’ specifies the wave file from which the signal is been<br />
read. If you have any other wave file in the search path (it is recommended to store them in<br />
28
the folder ‘waves’, especially because you can use files there without declaring an additional<br />
path) you may change the input file by changing the value of ‘targetname’.<br />
If you want to try block processing, do just change blockSize of ‘examplePlugin3’ by now.<br />
Figure 4.2: File of the plugin list ‘Examplelist1.cfg’<br />
If you have changed anything in the list (e.g. delete examplePlugin2 from list to see what<br />
happens) you must store the file. The GUI will be refreshed when you press the button reset.<br />
Again, initialize all plugins by clicking on Init or start the processing by clicking on start.<br />
The button Init and Main in the right hand of each plugin name are only required for programming<br />
plugins.<br />
The three buttons right sided of R in Fig. 4.1 are only required for batch processing and will<br />
not be discussed here.<br />
The next step is now to change the loaded plugin list. You can do so by clicking with the<br />
‘right mouse button’ onto the field where the name of the loaded plugin list is displayed (in<br />
top of the GUI). It will open up a file-open menu window where all *.cfg – files in the folder<br />
‘pluginlists’ are displayed and can be chosen for opening. See also fig. 4.3.<br />
At least one further plugin list ‘pluginlist.cfg’ will exist. Click on a file and then ‘open’ (depending<br />
on the language of your operating system) to load the list into the <strong>PlugInChain</strong>. The<br />
GUI will refresh and display now the plugin names of the new list. You now can use this list<br />
in the same way as in the example before.<br />
29
The next step is to build a new list of your own. You surely can copy a list file and edit the<br />
content directly, but there is an easier way to do this, if you only want to use existing plugins.<br />
The function ‘makelist’ is a tool with graphical interface that gives you the possibility to<br />
choose from the existing plugins in the folder ‘plugins’. See Fig. 4.4 for an overview.<br />
Fig. 4.3: File selection menu<br />
30
Fig.4.4: makelist GUI<br />
Try with building up for example a new list where you use ‘examplePlugin1”, ‘examplePlugin3”,<br />
‘examplePlugin2” and choose a name like ‘Examplenew.cfg’. Load your new plugin<br />
list into the PluginChain in one of the above described ways and test it.<br />
Available plugins<br />
For the <strong>PlugInChain</strong> are different packages of plugins available. For an overview about the<br />
available plugins the user is referred to the <strong>documentation</strong> for these features in the folder<br />
‘docs’.<br />
31