Getting Started with SPIM Installation and Graphic Interface ...
Getting Started with SPIM Installation and Graphic Interface ...
Getting Started with SPIM Installation and Graphic Interface ...

Create successful ePaper yourself
Turn your PDF publications into a flip-book with our unique Google optimized e-Paper software.
<strong>Getting</strong> <strong>Started</strong> <strong>with</strong> <strong>SPIM</strong><br />
The rest of this appendix contains a complete <strong>and</strong> rather detailed description of <strong>SPIM</strong>. Many details<br />
should never concern you; however, the sheer volume of information can obscure the fact that <strong>SPIM</strong> is a<br />
simple, easy-to-use program. This section contains a quick tutorial on <strong>SPIM</strong> that should enable you to load,<br />
debug, <strong>and</strong> run simple MIPS programs.<br />
<strong>SPIM</strong> comes in multiple versions. One version, called spim, is a comm<strong>and</strong>-line-driven program <strong>and</strong><br />
requires only an alphanumeric terminal to display it. It operates like most programs of this type:you type a<br />
line of text, hit the enter key, <strong>and</strong> spim executes your comm<strong>and</strong>.<br />
A fancier version, called xspim, runs in the X-windows environment of the Unix system <strong>and</strong> therefore<br />
requires a bit-mapped display to run it. xspim, however, is a much easier program to learn <strong>and</strong> use because<br />
its comm<strong>and</strong>s are always visible on the screen <strong>and</strong> because it continually displays the machine’s registers.<br />
Another version, PCSpim, is compatible <strong>with</strong> Windows 3.1, Windows 95, <strong>and</strong> Windows NT. The Unix, Windows,<br />
<strong>and</strong> DOS versions of <strong>SPIM</strong> are available through www.mkp.com/cod2e.htm. This section of the document<br />
describes PCSpim, the Windows version of <strong>SPIM</strong> under Windows 95.<br />
<strong>Installation</strong> <strong>and</strong> <strong>Graphic</strong> <strong>Interface</strong> Description<br />
To install the Windows version of <strong>SPIM</strong>, you can download the installation file, spimwin.exe, through<br />
www.mkp.com/cod2e.htm. Execute the installation file <strong>and</strong> follow the installation procedure. In Windows 95,<br />
you can simply activate the icon associated <strong>with</strong> the file just like any Windows program, or you can select<br />
Start->Run <strong>and</strong> type in the directory path <strong>and</strong> filename. The installation program will execute <strong>and</strong> inform<br />
you when the installation process is complete. When the installation is complete, a group folder <strong>with</strong> executable<br />
file, help files, <strong>and</strong> uninstaller program is created.<br />
To start PCSpim for Windows, you simply activate the icon labeled PCSpim for Windows like any other<br />
Windows program. For example, in Windows 95, you can use select Start->Programs->PCSpim for Windows<br />
->PCSpim for Windows from the Windows 95 task bar. In Windows 3.1, you can select the application<br />
from the File Manager.<br />
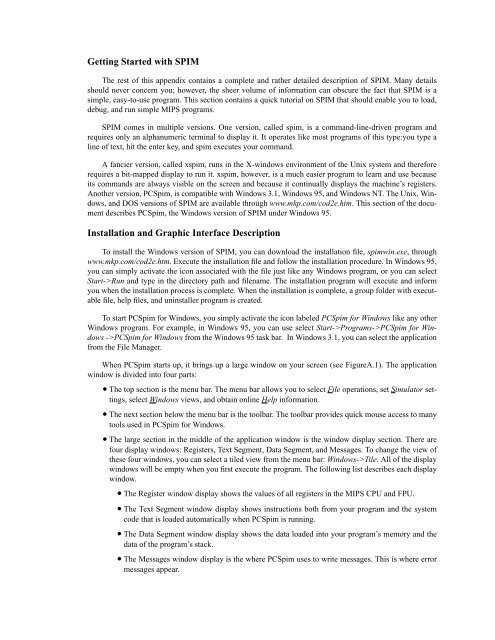
When PCSpim starts up, it brings up a large window on your screen (see FigureA.1). The application<br />
window is divided into four parts:<br />
• The top section is the menu bar. The menu bar allows you to select File operations, set Simulator settings,<br />
select Windows views, <strong>and</strong> obtain online Help information.<br />
• The next section below the menu bar is the toolbar. The toolbar provides quick mouse access to many<br />
tools used in PCSpim for Windows.<br />
• The large section in the middle of the application window is the window display section. There are<br />
four display windows: Registers, Text Segment, Data Segment, <strong>and</strong> Messages. To change the view of<br />
these four windows, you can select a tiled view from the menu bar: Windows->Tile. All of the display<br />
windows will be empty when you first execute the program. The following list describes each display<br />
window.<br />
• The Register window display shows the values of all registers in the MIPS CPU <strong>and</strong> FPU.<br />
• The Text Segment window display shows instructions both from your program <strong>and</strong> the system<br />
code that is loaded automatically when PCSpim is running.<br />
• The Data Segment window display shows the data loaded into your program’s memory <strong>and</strong> the<br />
data of the program’s stack.<br />
• The Messages window display is the where PCSpim uses to write messages. This is where error<br />
messages appear.
Figure A.1. PCSpim’s window interface<br />
• The Status bar section is at the bottom of the application window. The status bar provides information<br />
<strong>and</strong> the current settings of the simulator.<br />
<strong>SPIM</strong> Comm<strong>and</strong>-Line Options<br />
The Windows version of <strong>SPIM</strong> accepts the following comm<strong>and</strong>-line options:<br />
-bare Simulate a bare MIPS machine <strong>with</strong>out pseudoinstructions or the additional addressing<br />
modes provided by the assembler. Implies quiet.
-asm Simulate the virtual MIPS machine provided by the assembler. This is the default.<br />
-pseudo Allow the input assembly code to contain pseudoinstructions. This is the default.<br />
-nopseudo Do not allow pseudoinstructions in the input assembly code.<br />
-notrap Do not load the st<strong>and</strong>ard exception h<strong>and</strong>ler <strong>and</strong> start-up code. This exception h<strong>and</strong>ler<br />
h<strong>and</strong>les exceptions. When an exception occurs, <strong>SPIM</strong> jumps to location 80000080 hex ,<br />
which must contain code to service the exception. In addition, this file contains startup<br />
code that invokes the routine main. Without the start-up routine, <strong>SPIM</strong> begins execution<br />
at the instruction labeled __start.<br />
-trap Load the st<strong>and</strong>ard exception h<strong>and</strong>ler <strong>and</strong> start-up code. This is the default.<br />
-noquiet Print a message when an exception occurs. This is the default.<br />
-quiet Do not print a message at exceptions.<br />
-nomapped_io Disable the memory-mapped I/O facility. This is the default.<br />
-mapped_io Enable the memory-mapped I/O facility. Programs that use <strong>SPIM</strong> syscalls to read<br />
from the terminal cannot also use memory-mapped I/O.<br />
-file Load <strong>and</strong> execute the assembly code in the file.<br />
-execute Load <strong>and</strong> execute the code in the MIPS executable filea.out. This comm<strong>and</strong> is only<br />
available when <strong>SPIM</strong> runs on a system containing a MIPS processor.<br />
-s size Sets the initial size of memory segment seg to be size bytes. The memory segments<br />
are named:text, data, stack, ktext, <strong>and</strong> kdata. The text segment contains instructions<br />
from a program. The data segment holds the program’s data. The stack segment holds<br />
its runtime stack. In addition to running a program, <strong>SPIM</strong> also executes system code<br />
that h<strong>and</strong>les interrupts <strong>and</strong> exceptions. This code resides in a separate part of the<br />
address space called the kernel. The ktext segment holds this code’s instructions, <strong>and</strong><br />
kdata holds its data. There is no kstack segment since the system code uses the same<br />
stack as the program. For example, the pair of arguments -sdata 2000000 starts the<br />
user data segment at 2,000,000 bytes.<br />
-l size Sets the limit on how large memory segment seg can grow to be size bytes. The memory<br />
segments that can grow are data, stack, <strong>and</strong> kdata.<br />
Loading <strong>and</strong> Running a Program<br />
Let’s see how to load <strong>and</strong> run a program. The first thing to do is to select the open file icon from the<br />
toolbar. Alternatively, you can select from the menu bar: File->Open. A file open dialog box will appear for<br />
you to select the appropriate assembly file. Select the appropriate assembly file <strong>and</strong> click on the button<br />
labeled Open in the dialog box. If simulator settings are not correct for the file, <strong>and</strong> it fails to load, PCSpim<br />
will provide you an opportunity to change simulator settings <strong>and</strong> automatically reload the file.<br />
If you change your mind, click on the button labeled Cancel, <strong>and</strong> PCSpim removes the dialog box.<br />
When you load an assembly file, PCSpim removes dialog box, then loads your program <strong>and</strong> redraws the<br />
screen to display its instructions <strong>and</strong> data. If you have not done so, change the view of the four display windows<br />
to a tiled format by selecting from the menu bar: Windows->Tile. You should be able to see the program<br />
in the Text segment window display.<br />
Each instruction in the Text segment window display is shown on a line that looks like
[0x00400000] 0x8fa40000 lw $4, 0 ($29); 89: lw $a0, 0($sp)<br />
The first number on the line, in square brackets, is the hexadecimal memory address of the instruction.<br />
The second number is the instruction’s numerical encoding, again displayed as a hexadecimal number. The<br />
third item is the instruction’s mnemonic description. Everything following the semicolon is the actual line<br />
from your assembly file that produced the instruction. The number 89 is the line number in that file. Sometimes<br />
nothing is on the line after the semicolon. This means that the instruction was produced by <strong>SPIM</strong> as<br />
part of translating a pseudoinstruction.<br />
To run your program, click on the Go button in the toolbar. Alternatively, you can select Simulator->Go<br />
from the menu bar. Your program will begin execution. If you want to stop the execution of your program,<br />
select Simulator->Break from the menu bar. Alternatively, you can type Control-C when PCSpim application<br />
window is in focus. A dialog box will appear <strong>and</strong> ask if you want to continue execution. Select No to<br />
break the execution. Before doing anything, you can look at memory <strong>and</strong> registers contents in the Register<br />
display window to find out what your program was doing. When you underst<strong>and</strong> what happened, you can<br />
either continue the program by selecting Simulator->Continue or stop your program by selecting Simulator-<br />
>Break from the menu bar.<br />
If your program reads or writes from the terminal, PCSpim pops up another window called the console.<br />
All characters that your program writes appear on the console, <strong>and</strong> everything that you type as input to your<br />
program should be typed in this window.<br />
Suppose your program does not do what you expect. What can you do? <strong>SPIM</strong> has two features that help<br />
debug your program. The first, <strong>and</strong> perhaps the most useful, is single-stepping, which allows you to run your<br />
program an instruction at a time. Select Simulator->Single_Step to execute only one instruction. Alternatively,<br />
you can press the F10 function key to single step. Each time you step through a program, PCSpim will<br />
execute the next instruction in your program, updates the display, <strong>and</strong> returns control to you. You can also<br />
choose the number of instructions in your program to step by selecting Simulator->Multiple_Step instead of<br />
single stepping through your program. A dialog box will appear <strong>and</strong> ask you the number of instructions to<br />
step.<br />
What do you do if your program runs for a long time before the bug arises? You could single-step until<br />
you get to the bug, but that can take a long time, <strong>and</strong> it is easy to get so bored <strong>and</strong> inattentive that you step<br />
past the problem. A better alternative is to use a breakpoint, which tells PCSpim to stop your program immediately<br />
before it executes a particular instruction. Select Simulator->Breakpoints from the menu bar. The<br />
PCSpim program pops up a dialog box window <strong>with</strong> two boxes. The top box is for you to enter breakpoint<br />
address <strong>and</strong> the second box is a list of active breakpoints. Type in the first box the address of the instruction<br />
at which you want to stop. Or, if the instruction has a global label, you can just type the name of the label.<br />
Labeled breakpoints are a particularly convenient way to stop at the first instruction of a procedure. To actually<br />
set the breakpoint, <strong>and</strong> click on the button labeled Add. When you are done adding breakpoints, click on<br />
the button labeled Close. You can then run your program.<br />
When the simulator is about to execute the breakpointed instruction, PCSpim pops up a dialog box <strong>with</strong><br />
the instruction’s address <strong>and</strong> asks if you want to continue the execution. The Yes button continues running<br />
your program <strong>and</strong> the No button stops your program. If you want to delete a breakpoint, you can select Simulator->Breakpoints<br />
from the menu bar, click on the address in the dialog box, <strong>and</strong> click on the button<br />
labeled Remove.<br />
Single-stepping <strong>and</strong> setting breakpoints will probably help you find a bug in your program quickly. How<br />
do you fix it? Go back to the editor that you used to create your program <strong>and</strong> change your source file. After<br />
you have made the changes to your source file, simply reload it into PCSpim for Windows by choosingSimulator->Reload<br />
from the menu bar. This causes PCSpim to clear its memory <strong>and</strong> registers <strong>and</strong><br />
return the processor to the state it was in when PCSpim first started. Once the simulator has reinitialized<br />
itself, it will reload your recently modified file.
Figure A.2. PCSpim simulator setting dialog box<br />
PCSpim performs other functions that are occasionally useful. When you are more comfortable <strong>with</strong><br />
PCSpim, you should look at the description in the online help to see what they do <strong>and</strong> how they can save you<br />
time <strong>and</strong> effort. You can view the online help available <strong>with</strong> the simulator by selecting Help->Help_topics<br />
from the menu bar.<br />
Simulator Setting<br />
PCSpim has a graphical interface to view the current setting of the simulator (see FigureA.2). When<br />
you start PCSpim, you do not have to enter <strong>with</strong> any comm<strong>and</strong> line parameters. However, you should check<br />
your simulator settings either on PCSpim’s status bar or the simulator setting dialog box before you load<br />
your program. To view or change PCSpim settings in the simulator setting dialog box, select Simulator-<br />
>Settings from the menu bar.<br />
It is very important to set the simulator in the correct setting for your program. PCSpim determines how<br />
to load <strong>and</strong> how your program executes from these settings, so an incorrect setting may cause errors when<br />
you run your program. If the simulator setting is incorrect <strong>and</strong> the program is unable to load correctly,<br />
PCSpim allows you to change the simulator settings <strong>and</strong> reload your program. If you want to change<br />
PCSpim settings after you load your program, you should reload your program by selecting Simulator-<br />
>Reload from the menu bar.<br />
The following paragraphs describes the operation of each of the settings in the simulator setting dialog<br />
box shown in Figure A.2. Most of the functions are similar to <strong>SPIM</strong>, its counterparts in the terminal interface<br />
version <strong>with</strong>out the graphical interface.<br />
• Display<br />
You can select to view the register contents in decimal or hexidecimal notation. If the check boxes for<br />
general registers or floating point registers are selected, a check mark will appear <strong>and</strong> the register contents<br />
will be displayed in hexidecimal notation.<br />
• Save window positions
When selected, PCSpim for Windows will record the position of its windows when you exit, <strong>and</strong> restore<br />
them to the same location the next time you run PCSpim.<br />
• Bare machine<br />
When selected, you can simulate a bare MIPS machine <strong>with</strong>out pseudoinstructions or the additional<br />
addressing modes provided by the assembler.<br />
• Allow pseudo instructions<br />
If this setting is selected, pseudoinstructions are allowed in your program; otherwise, if the setting is not<br />
selected, they are not allowed.<br />
• Load trap file<br />
If this setting is selected, the st<strong>and</strong>ard exception h<strong>and</strong>ler <strong>and</strong> start-up code is loaded. When an exception<br />
occurs, <strong>SPIM</strong> jumps to location 80000080hex, which must contain code to service the exception. In<br />
addition, the trap h<strong>and</strong>ler contains start-up code that invokes the routine main. Without the start-up routine,<br />
<strong>SPIM</strong> begins execution at the instruction labeled __start. The default trap file comes <strong>with</strong> PCSpim,<br />
but you can choose another using Browse button.<br />
• Mapped I/O<br />
If this setting is selected, the memory-mapped I/O facility is enabled. Programs that use <strong>SPIM</strong> syscalls to<br />
read from the terminal cannot also use memory-mapped I/O.<br />
• Quiet<br />
When this setting is enabled, PCSpim does not print a message at exceptions; otherwise, a message is<br />
printed when an exception occurs.