UCSF MEDICAL CENTER - UCSF Radiation Oncology
UCSF MEDICAL CENTER - UCSF Radiation Oncology
UCSF MEDICAL CENTER - UCSF Radiation Oncology

You also want an ePaper? Increase the reach of your titles
YUMPU automatically turns print PDFs into web optimized ePapers that Google loves.
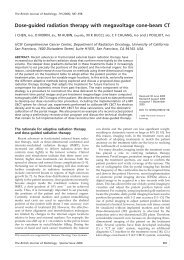
PURPOSE<br />
<strong>UCSF</strong> <strong>MEDICAL</strong> <strong>CENTER</strong><br />
DEPARTMENT OF RADIATION ONCOLOGY<br />
PROCEDURE MANUAL TO SET UP 2D/3D IMAGING<br />
BY THE THERAPIST IN MOSAIQ/SYNGO<br />
Initialization, scheduling, tranfer, acquisition and association of Electronic Portal<br />
Imaging (EPI) and Cone Beam CT (CBCT) imaging in Mosaiq/Syngo by therapist. Verify<br />
the plan and chart. Complete a RTT ‘New Start Checklist’.<br />
CRITICAL POINTS<br />
The files have to be received 24 hours prior to the patient’s dry run. If not, an incident<br />
report (IR) has to be filled out.<br />
PROCEDURE<br />
In Mosaiq<br />
I. COMPLETE THE RTT CHECKLIST AFTER APPROVING PLAN IN D&I<br />
II. INITIALIZE AND SCHEDULING EPI AND<br />
CBCT IN MOSAIQ<br />
• Select Patient, click on ‘RO Treat’ and<br />
.<br />
• Choose ‘Insert Sessions’,<br />
• Insert prescription, site and start date,<br />
• Click on ,<br />
Note: Special scheduling (like every other day) might be<br />
required.<br />
• In ‘Insert Sessions’ choose Prescription, Field,<br />
Range, Days (choose from Mon-Fri) and click<br />
‘Schedule Fields to be Treated in These Session’,<br />
this will open up the ‘Schedule Fields’ tab.<br />
• Pick each of the required fields and click on ‘Add’ then ‘OK’. Each field must be selected in the sequence you want<br />
to treat. Always add CB and EPI (orthogonal site set-up) at that time. Click OK.<br />
• Hit Schedule Field Button.<br />
Go to and it’s done.<br />
<strong>UCSF</strong> Department of <strong>Radiation</strong> <strong>Oncology</strong> Page 1 of 8 8/23/11
II. ACQUISITION OF EPI AND CBCT IN MOSAIQ/SYNGO<br />
PATIENT WITH CBCT FIELDS<br />
Once the prescription is approved by the physician,<br />
• Go to and click on ,<br />
• Click on ‘Continue’ to Acknowledge,<br />
• On the ‘Treatment Delivery Table’, right click<br />
(RC) on the CBCT field and choose ‘Load<br />
Reference Data’ from the menu. This will send the<br />
CT images over to Syngo. This is done only once.<br />
• Click ‘Cancel’ on the verification screen.<br />
• ‘Send Plan’<br />
Note for therapists: This operation takes up to five minutes (5 min.). To be preformed<br />
prior to patient on the table.<br />
Note for physicists: Never ‘Load the reference data’ in QA mode.<br />
Read and Acknowledge (override if needed) in the treatment Readiness Check window<br />
Click . The treatment fields are sent to Syngo.<br />
In Syngo<br />
A will appear next to the MVCBCT field (means can’t be downloaded),<br />
• Click on ,<br />
• RC on the CBCT field and choose ‘Imaging Options’,<br />
• Select the appropriate protocol from the drop down menu (see Appendix<br />
A for details). Could change patient size if needed and click OK.<br />
• Click on to Apply change for treatment.<br />
• Check the box next to CBCT for acquisition,<br />
<strong>UCSF</strong> Department of <strong>Radiation</strong> <strong>Oncology</strong> Page 2 of 8 8/23/11
• Click on ‘Treat’ in the very bottom LHS (Linac<br />
console needs to be in remote mode. If not press F7).<br />
Operate machine control console as usual.<br />
When the CBCT is acquired, the reference image is<br />
automatically loaded.<br />
• Left click the MPR Image Thickness icon<br />
and right click to set the tickness to 3 mm. Click<br />
OK,<br />
• Click on the blending tool and adjust each<br />
image as you wish (left side is CBCT and right is<br />
Planning CT). Slide the bar to Treatment around<br />
70%.<br />
• Zoom if needed ,<br />
• In the Registration tab , click on the manual registration tool . Align the two images manually<br />
(Tutoring tool on how to align prostate patient with GM and H&N patient at:<br />
http://www.radonc.ucsf.edu/links/Video/ConeBeamTutorial/Prostate.htm and<br />
http://www.radonc.ucsf.edu/links/Video/ConeBeamTutorial/Head%26Neck.htm).<br />
<strong>UCSF</strong> Department of <strong>Radiation</strong> <strong>Oncology</strong> Page 3 of 8 8/23/11
• Accept the offset .<br />
In Mosaiq<br />
with Treatment Session window open<br />
• RC anywhere and select Record Third Party<br />
Offset,<br />
• In the window select ‘Offset was applied<br />
during treatment’, and select machine’s name (ex: Artist 3D or Artist 2D) in Source.<br />
Use the following table to enter the moves written in the Syngo workstation, right column of the Offset numbers.<br />
In Syngo<br />
• Click on the ‘apply offsets’ button (first button on the RHS),<br />
• Follow instructions on Syngo screen. Wait until flat panel is automatically parked. The table will move lateral and<br />
longitudinal. Only the couch vertical position in yellow is blinking, then hit F12. This will manually move the table<br />
to the offset vertical position. To continue from the control console, press RAD ON.<br />
• Turn the key back and go to the tab<br />
and then, select the following treatment.<br />
After treatment is done, close patient .<br />
<strong>UCSF</strong> Department of <strong>Radiation</strong> <strong>Oncology</strong> Page 4 of 8 8/23/11
In Mosaiq<br />
If it’s patient’s first day (dry run),<br />
• In Couch Copy window, highlight all the<br />
fields, enter the password and click Copy.<br />
This will copy the table coordinate for now on.<br />
• Click Record and close the two next<br />
windows.<br />
For each CBCT,<br />
• Click and double click the CBCT<br />
just acquired. When open, click on ,<br />
this will bring the Image Information window,<br />
• Click on Site and select the appropriate site. Click<br />
OK,<br />
- Record and complete patient Tx in Mosaiq,<br />
- Use Lantis to capture Chart (Long Hospital),<br />
- Complete Assessment,<br />
- Download the next patient and repeat the same steps.<br />
PATIENT WITH EPI (SET UP) FIELDS<br />
Should be already set-up by dosi.<br />
PATIENT WITH EPI (DOUBLE<br />
EXPOSURE) FIELDS<br />
In Mosaiq<br />
• Go to TX calendar,<br />
• Highlight the field you want to port,<br />
• Click on “Details>>” on the bottom of the far right<br />
panel,<br />
• Select and ,<br />
(this will give you a double exposure)<br />
• Click OK<br />
Then, send plan.<br />
<strong>UCSF</strong> Department of <strong>Radiation</strong> <strong>Oncology</strong> Page 5 of 8 8/23/11
In Syngo<br />
• Click on option edit ,<br />
• Select the field (now it will have a double exposure port<br />
film icon ), right click and choose Imaging Options…<br />
• Select ,<br />
• Change the delta to a larger field size (click Tab on keyboard),<br />
• Select the “Clipping” option.<br />
<strong>UCSF</strong> Department of <strong>Radiation</strong> <strong>Oncology</strong> Page 6 of 8 8/23/11
ARCHIVE IMAGES FROM SYNGO<br />
In Syngo<br />
• Open the patient Browser (click on , or Patient | Browser).<br />
• If the patient received Cone Beams, delete all Cone Beam Projections files before archiving.<br />
In the patient’s folder, select Cone Beam Projections, right click, and select Delete.<br />
• Send to the Archive system,<br />
In Patient Database, select the patient’s folder only.<br />
Click , or click Transfer | Send to…<br />
In the new window ‘Send To’, select Achive and<br />
click .<br />
An icon will appear at the right bottom<br />
of the Syngo screen, saying it’s transferring.<br />
If you click on this icon (or click Transfer | Export to Off-line…), a new<br />
window ‘Network Job Status’ will appear and will keep you informed about the transfer process.<br />
<strong>UCSF</strong> Department of <strong>Radiation</strong> <strong>Oncology</strong> Page 7 of 8 8/23/11
• When the left column ‘Status’ changes from Active to Completed, Delete<br />
the entire patient’s folder.<br />
If for any reason the transfer Failed click the Restart button till it shows<br />
Completed in Status. This will assure that the entire patient’s information is<br />
transferred to the archive system.<br />
Authors Date Version Modifications<br />
Pam Akazawa<br />
Michèle Aubin<br />
Dilini Pinnaduwage<br />
March 30 th 2011 1.0<br />
Original procedure with<br />
Mosaiq 2.0 and Syngo V2.0<br />
Michèle Aubin May 10 th 2011 1.1 Added archiving section<br />
Michèle Aubin<br />
Olivier Morin<br />
Dilini Pinnaduwage<br />
Angela Carlson, Sherman<br />
Lim, Rainier Llejay, Alex<br />
Meraz, Debbie Stott and<br />
Stuart Suen<br />
June 7 th 2011 1.2<br />
Added double exposure<br />
July 15 th 2011 1.3 Critical details<br />
Olivier Morin August 3 rd 2011 1.4 Third party shifts table<br />
REVIEWED BY:<br />
___________________________________ ___________________________________<br />
<strong>UCSF</strong> Department of <strong>Radiation</strong> <strong>Oncology</strong> Page 8 of 8 8/23/11