Abit Fatal1ty AN9 32X Manual - TigerDirect.com
Abit Fatal1ty AN9 32X Manual - TigerDirect.com
Abit Fatal1ty AN9 32X Manual - TigerDirect.com

You also want an ePaper? Increase the reach of your titles
YUMPU automatically turns print PDFs into web optimized ePapers that Google loves.
To install this motherboard:<br />
1. Locate all the screw holes on<br />
the motherboard and the<br />
chassis base.<br />
2. Place all the studs or spacers<br />
needed on the chassis base<br />
and have them tightened.<br />
3. Face the motherboard’s I/O<br />
ports toward the chassis’s rear<br />
panel.<br />
4. Line up all the motherboard’s<br />
screw holes with those studs or<br />
spacers on the chassis.<br />
5. Install the motherboard with<br />
screws and have them<br />
tightened.<br />
Face the chassis’s rear panel.<br />
※ To prevent shorting the PCB circuit, please REMOVE the metal studs or spacers if<br />
they are already fastened on the chassis base and are without mounting-holes<br />
on the motherboard to align with.<br />
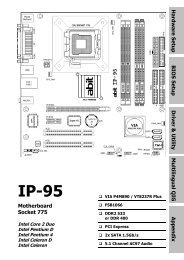
2.3 Checking Jumper Settings<br />
For a 2-pin jumper, plug the jumper cap on both pins will make it CLOSE (SHORT). Remove the<br />
jumper cap, or plug it on either pin (reserved for future use) will leave it at OPEN position.<br />
SHORT OPEN OPEN<br />
For 3-pin jumper, pin 1~2 or pin 2~3 can be shorted by plugging the jumper cap in.<br />
2-2<br />
Pin 1~2 SHORT Pin 2~3 SHORT