6220 Hand-Held Computer User's Guide - Intermec
6220 Hand-Held Computer User's Guide - Intermec
6220 Hand-Held Computer User's Guide - Intermec

You also want an ePaper? Increase the reach of your titles
YUMPU automatically turns print PDFs into web optimized ePapers that Google loves.
<strong>6220</strong> <strong>Hand</strong>-<strong>Held</strong> <strong>Computer</strong><br />
USER’S GUIDE<br />
" " " " " " " " " " " " " " " " " " " " " " " " " " " "<br />
PN: 961-028-104<br />
Revision D<br />
January 2000
" NOTICE The information contained herein is proprietary and is provided solely for the<br />
purpose of allowing customers to operate and service <strong>Intermec</strong> manufactured<br />
equipment and is not to be released, reproduced, or used for any other purpose<br />
without written permission of <strong>Intermec</strong>.<br />
Disclaimer of Warranties. The sample source code included in this document is<br />
presented for reference only. The code does not necessarily represent complete,<br />
tested programs. The code is provided “AS IS WITH ALL FAULTS.” ALL<br />
WARRANTIES ARE EXPRESSLY DISCLAIMED, INCLUDING THE<br />
IMPLIED WARRANTIES OF MERCHANTABILITY AND FITNESS FOR A<br />
PARTICULAR PURPOSE.<br />
We welcome your comments concerning this publication. Although every effort has<br />
been made to keep it free of errors, some may occur. When reporting a specific<br />
problem, please describe it briefly and include the book title and part number, as<br />
well as the paragraph or figure number and the page number.<br />
Send your comments to:<br />
<strong>Intermec</strong> Technologies Corporation<br />
Publications Department<br />
550 Second Street SE<br />
Cedar Rapids, IA 52401<br />
ANTARES, INTERMEC, NORAND, NOR*WARE, PEN*KEY, TRAKKER, and<br />
TRAKKER ANTARES are registered trademarks of <strong>Intermec</strong> Technologies<br />
Corporation.<br />
© 1999 <strong>Intermec</strong> Technologies Corporation. All rights reserved.<br />
This publication printed on recycled paper.<br />
Acknowledgments<br />
Microclean II is a registered trademark of Foresight International.<br />
Microsoft, MS, and MS-DOS, and Windows, are registered trademarks and Visual<br />
Basic for Windows, and Windows for Pen are trademarks of Microsoft Corporation.
CONTENTS<br />
" " " " " " " " " " " " " " " " " " " " " " " " " " " "<br />
SECTION 1<br />
General Information<br />
About this User’s <strong>Guide</strong> . . . . . . . . . . . . . . . . . . . . . . . . . . . . . . 1-1<br />
Unpacking and Inspecting . . . . . . . . . . . . . . . . . . . . . . . . . . . . 1-2<br />
<strong>Hand</strong>-<strong>Held</strong> <strong>Computer</strong> Description . . . . . . . . . . . . . . . . . . . . . 1-3<br />
<strong>Hand</strong>-<strong>Held</strong> <strong>Computer</strong> Keyboard . . . . . . . . . . . . . . . . . . . 1-6<br />
Key Descriptions . . . . . . . . . . . . . . . . . . . . . . . . . . . . . . . . . . . . 1-9<br />
ON Key . . . . . . . . . . . . . . . . . . . . . . . . . . . . . . . . . . . . . . . . . 1-9<br />
YES (Enter) Key . . . . . . . . . . . . . . . . . . . . . . . . . . . . . . . . . 1-9<br />
NO Key . . . . . . . . . . . . . . . . . . . . . . . . . . . . . . . . . . . . . . . . . 1-9<br />
Period [.] Key . . . . . . . . . . . . . . . . . . . . . . . . . . . . . . . . . . . . 1-9<br />
Clear Key . . . . . . . . . . . . . . . . . . . . . . . . . . . . . . . . . . . . . . . 1-9<br />
Page Up or Down Keys . . . . . . . . . . . . . . . . . . . . . . . . . . . 1-9<br />
EXIT Key . . . . . . . . . . . . . . . . . . . . . . . . . . . . . . . . . . . . . . . 1-10<br />
Minus [--] Key . . . . . . . . . . . . . . . . . . . . . . . . . . . . . . . . . . . 1-10<br />
Numeric Keys . . . . . . . . . . . . . . . . . . . . . . . . . . . . . . . . . . . 1-10<br />
Alphabetic Keys . . . . . . . . . . . . . . . . . . . . . . . . . . . . . . . . . . 1-10<br />
Backspace Key . . . . . . . . . . . . . . . . . . . . . . . . . . . . . . . . . . . 1-10<br />
Shift Key . . . . . . . . . . . . . . . . . . . . . . . . . . . . . . . . . . . . . . . . 1-10<br />
Arrow Keys . . . . . . . . . . . . . . . . . . . . . . . . . . . . . . . . . . . . . . 1-11<br />
Display . . . . . . . . . . . . . . . . . . . . . . . . . . . . . . . . . . . . . . . . . . 1-11<br />
Backlight and Display Contrast Adjustment . . . . . . . . 1-12<br />
Battery . . . . . . . . . . . . . . . . . . . . . . . . . . . . . . . . . . . . . . . . . . 1-12<br />
Memory . . . . . . . . . . . . . . . . . . . . . . . . . . . . . . . . . . . . . . . . . 1-13<br />
Reset Switch . . . . . . . . . . . . . . . . . . . . . . . . . . . . . . . . . . . . . . . . 1-15<br />
<strong>Hand</strong>-<strong>Held</strong> <strong>Computer</strong> Specifications . . . . . . . . . . . . . . . . . . .<br />
1-16<br />
<strong>6220</strong> <strong>Hand</strong>-<strong>Held</strong> <strong>Computer</strong> User’s <strong>Guide</strong> i
CONTENTS<br />
SECTION 2<br />
<strong>Hand</strong>-<strong>Held</strong> <strong>Computer</strong> Operation<br />
Introduction . . . . . . . . . . . . . . . . . . . . . . . . . . . . . . . . . . . . . . . . . 2-1<br />
Getting Started . . . . . . . . . . . . . . . . . . . . . . . . . . . . . . . . . . 2-1<br />
Installing the Backup Battery . . . . . . . . . . . . . . . . . . . . . . . . 2-3<br />
Measuring Battery Pack Capacity . . . . . . . . . . . . . . . . . . . . . 2-4<br />
Main Battery Installation . . . . . . . . . . . . . . . . . . . . . . . . . . . . 2-5<br />
Charging Your Batteries . . . . . . . . . . . . . . . . . . . . . . . . . . . . . 2-6<br />
Turning On the Backlight and Adjusting the<br />
Display Contrast . . . . . . . . . . . . . . . . . . . . . . . . . . . . . . . . . 2-6<br />
Turning On the Backlight . . . . . . . . . . . . . . . . . . . . . . . . . 2-6<br />
Adjusting the Screen Contrast . . . . . . . . . . . . . . . . . . . . 2-7<br />
Installing PC Cards . . . . . . . . . . . . . . . . . . . . . . . . . . . . . . . . . . 2-7<br />
Removing PC Cards . . . . . . . . . . . . . . . . . . . . . . . . . . . . . . . . . . 2-8<br />
Using PC Cards to Load Your Programs . . . . . . . . . . . . . . . 2-9<br />
Drives . . . . . . . . . . . . . . . . . . . . . . . . . . . . . . . . . . . . . . . . . . 2-9<br />
Using ATA Cards to Boot Your <strong>Computer</strong> . . . . . . . . . . . . . . 2-9<br />
Booting . . . . . . . . . . . . . . . . . . . . . . . . . . . . . . . . . . . . . . . . . 2-9<br />
Installing Modem Card . . . . . . . . . . . . . . . . . . . . . . . . . . . . . . . 2-10<br />
Downloading Programs into Your <strong>Hand</strong>-<strong>Held</strong> <strong>Computer</strong> . 2-11<br />
SECTION 3<br />
Routine Care and Maintenance<br />
Introduction . . . . . . . . . . . . . . . . . . . . . . . . . . . . . . . . . . . . . . . . . 3-1<br />
Low Battery Indication . . . . . . . . . . . . . . . . . . . . . . . . . . . . . . . 3-1<br />
<strong>Hand</strong>strap Replacement . . . . . . . . . . . . . . . . . . . . . . . . . . . . . . 3-2<br />
Cleaning Your <strong>Hand</strong>-<strong>Held</strong> <strong>Computer</strong> . . . . . . . . . . . . . . . . . . 3-3<br />
Case and Display . . . . . . . . . . . . . . . . . . . . . . . . . . . . . . . . 3-3<br />
Surface Connectors . . . . . . . . . . . . . . . . . . . . . . . . . . . . . . . 3-3<br />
Keyboard . . . . . . . . . . . . . . . . . . . . . . . . . . . . . . . . . . . . . . . .<br />
3-4<br />
ii <strong>6220</strong> <strong>Hand</strong>-<strong>Held</strong> <strong>Computer</strong> User’s <strong>Guide</strong>
SECTION 4<br />
Troubleshooting<br />
CONTENTS<br />
Introduction . . . . . . . . . . . . . . . . . . . . . . . . . . . . . . . . . . . . . . . . . 4-1<br />
Troubleshooting Table . . . . . . . . . . . . . . . . . . . . . . . . . . . . . . . . 4-2<br />
Diagnostic . . . . . . . . . . . . . . . . . . . . . . . . . . . . . . . . . . . . . . . 4-5<br />
Repair Service . . . . . . . . . . . . . . . . . . . . . . . . . . . . . . . . . . . . . . . 4-6<br />
APPENDIX A<br />
Connector Pin-Outs<br />
15-Pin Female D-Sub Connector . . . . . . . . . . . . . . . . . . . . . . A-1<br />
12-Pin Surface Contact Connector . . . . . . . . . . . . . . . . . . . . . A-2<br />
4-Pin RJ11 Connector . . . . . . . . . . . . . . . . . . . . . . . . . . . . . . . . A-3<br />
APPENDIX B<br />
PEN*KEY R Utilities Program<br />
Entry Point . . . . . . . . . . . . . . . . . . . . . . . . . . . . . . . . . . . . . . . . . B-1<br />
Pop-Up Menus . . . . . . . . . . . . . . . . . . . . . . . . . . . . . . . . . . . . . . B-1<br />
Drop-Down Lists . . . . . . . . . . . . . . . . . . . . . . . . . . . . . . . . . . . . B-2<br />
Alphanumeric Fields . . . . . . . . . . . . . . . . . . . . . . . . . . . . . . . . . B-3<br />
Title Screen . . . . . . . . . . . . . . . . . . . . . . . . . . . . . . . . . . . . . . . . . B-4<br />
Language Selection . . . . . . . . . . . . . . . . . . . . . . . . . . . . . . . . . . B-5<br />
Communications Menu . . . . . . . . . . . . . . . . . . . . . . . . . . . . . . . B-6<br />
Option 1 BEGIN COMM SESSION . . . . . . . . . . . . . . . . B-7<br />
Option 2 COMM SETTING . . . . . . . . . . . . . . . . . . . . . . . B-17<br />
Option 3 UNIT ID . . . . . . . . . . . . . . . . . . . . . . . . . . . . . . . . B-21<br />
Option 4 NETWORK PARAMETERS . . . . . . . . . . . . . . B-21<br />
Option 4 MODEM PARAMETERS . . . . . . . . . . . . . . . . . B-23<br />
Option 5 NETWORK INTERFACE . . . . . . . . . . . . . . . . B-27<br />
Option 5 PHONE NUMBER . . . . . . . . . . . . . . . . . . . . . . B-28<br />
Option 9 ADVANCED UTILITIES . . . . . . . . . . . . . . . . .<br />
B-29<br />
<strong>6220</strong> <strong>Hand</strong>-<strong>Held</strong> <strong>Computer</strong> User’s <strong>Guide</strong> iii
CONTENTS<br />
FIGURES<br />
Figure 1-1 <strong>Hand</strong>-<strong>Held</strong> <strong>Computer</strong> Front View . . . . . . . . . . . 1-3<br />
Figure 1-2 <strong>Hand</strong>-<strong>Held</strong> <strong>Computer</strong> Back View . . . . . . . . . . . . 1-4<br />
Figure 1-3 <strong>Hand</strong>-<strong>Held</strong> <strong>Computer</strong> Top View . . . . . . . . . . . . . 1-5<br />
Figure 1-4 <strong>Hand</strong>-<strong>Held</strong> <strong>Computer</strong> Bottom View . . . . . . . . . . 1-5<br />
Figure 1-5 <strong>Hand</strong>-<strong>Held</strong> <strong>Computer</strong> With 30-Key Keyboard 1-7<br />
Figure 1-6 <strong>Hand</strong>-<strong>Held</strong> <strong>Computer</strong> With 56-Key Keyboard 1-8<br />
Figure 1-7 Top End Reset Switch Access Point . . . . . . . . . . 1-15<br />
Figure 2-1 Installing Back Up Battery . . . . . . . . . . . . . . . . . 2-3<br />
Figure 2-2 Main Battery Pack Capacity Contacts . . . . . . . 2-4<br />
Figure 2-3 Installing Main Battery Pack . . . . . . . . . . . . . . . 2-5<br />
Figure 2-4 Installing PC Cards . . . . . . . . . . . . . . . . . . . . . . . . 2-8<br />
Figure 2-5 Installing Modem Card . . . . . . . . . . . . . . . . . . . . 2-10<br />
Figure 3-1 Replacing The <strong>Hand</strong>strap . . . . . . . . . . . . . . . . . . 3-2<br />
Figure 3-2 Removing The Keyboard . . . . . . . . . . . . . . . . . . . 3-4<br />
TABLES<br />
Table 4-1 Basic Troubleshooting . . . . . . . . . . . . . . . . . . . . . . . 4-2<br />
GLOSSARY<br />
INDEX<br />
iv <strong>6220</strong> <strong>Hand</strong>-<strong>Held</strong> <strong>Computer</strong> User’s <strong>Guide</strong>
Section 1<br />
General Information<br />
" " " " " " " " " " " " " " " " " " " " " " " " " " " "<br />
About this User’s <strong>Guide</strong><br />
This user’s guide is divided into four sections and two appendixes.<br />
Section 1<br />
Contains general information about the components of your<br />
<strong>6220</strong> <strong>Hand</strong>-<strong>Held</strong> <strong>Computer</strong>. This includes telling you how<br />
the user guide is organized, a summary of the sections, and<br />
the specifications for your hand-held computer.<br />
Section 2<br />
Tells you how to prepare for using your hand-held computer.<br />
Section 3<br />
Contains information for maintaining your hand-held computer.<br />
Maintenance includes recharging the main battery<br />
pack, replacing the backup battery and handstrap, and<br />
cleaning the hand-held computer.<br />
Section 4<br />
Steps you through some procedures to use when troubleshooting<br />
your hand-held computer. This section does not<br />
contain all troubleshooting that can be done by an authorized<br />
Customer Support Specialist, but does contain in-<br />
<strong>6220</strong> <strong>Hand</strong>-<strong>Held</strong> <strong>Computer</strong> User’s <strong>Guide</strong> 1-1
Plugging in the Chips SECTION 1<br />
formation to aid you in determining the level of assistance<br />
you may need.<br />
Appendix A<br />
Contains the pin-outs for the external connectors of your<br />
hand-held computer. This section is not usually needed for<br />
day to day tasks but more to provide technical assistance<br />
for interfacing to other manufacturer’s products.<br />
Appendix B<br />
Contains the Utilities Program screens. This is system level<br />
information for your system administration people when<br />
defining and setting parameters to support your application.<br />
Unpacking and Inspecting<br />
The following procedures explain what to do when your<br />
hand-held computer arrives, and what to do if it has been<br />
damaged in shipping:<br />
1. Remove the hand-held computer from its shipping container<br />
and inspect for any visible damage.<br />
2. If your hand-held computer was damaged in shipping,<br />
record the model number, part number, and serial<br />
number. The model and part numbers can be found on<br />
the back side of the hand-held computer, the serial<br />
number is located on the inside of the case.<br />
1-2 <strong>6220</strong> <strong>Hand</strong>-<strong>Held</strong> <strong>Computer</strong> User’s <strong>Guide</strong><br />
3. Save all paperwork pertaining to shipment, and immediately<br />
notify the transport company of the damaged<br />
item(s). Follow their instructions for filing a<br />
claim on the damaged items.<br />
Authorized repair of products is available only at Service<br />
Centers. Unauthorized repair voids any and all warranties.<br />
Contact your Sales Representative for additional instructions.
SECTION 1 General Information<br />
<strong>Hand</strong>-<strong>Held</strong> <strong>Computer</strong> Description<br />
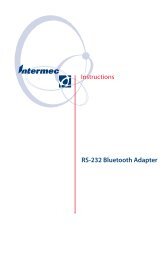
Figure 1-1 and Figure 1-2 on pages 1-3 and 1-4 show you<br />
the location of the key components for your hand-held computer.<br />
1. Display<br />
2. Keyboard<br />
Figure 1-1<br />
<strong>Hand</strong>-<strong>Held</strong> <strong>Computer</strong> Front View<br />
<strong>6220</strong> <strong>Hand</strong>-<strong>Held</strong> <strong>Computer</strong> User’s <strong>Guide</strong> 1-3<br />
1<br />
2
General Information SECTION 1<br />
1-4 <strong>6220</strong> <strong>Hand</strong>-<strong>Held</strong> <strong>Computer</strong> User’s <strong>Guide</strong><br />
4<br />
1. PC card and backup battery retaining door (top screws)<br />
2. PC card and backup battery retaining door (bottom screws)<br />
3. Main battery pack compartment latch knob<br />
4. <strong>Hand</strong>strap<br />
Figure 1-2<br />
<strong>Hand</strong>-<strong>Held</strong> <strong>Computer</strong> Back View<br />
3<br />
1<br />
2
SECTION 1 General Information<br />
2<br />
1. Phone jack (optional)<br />
2. 15-pin female connector<br />
Figure 1-3<br />
<strong>Hand</strong>-<strong>Held</strong> <strong>Computer</strong> Top View<br />
1. 12-pin surface contact connector<br />
Figure 1-4<br />
<strong>Hand</strong>-<strong>Held</strong> <strong>Computer</strong> Bottom View<br />
<strong>6220</strong> <strong>Hand</strong>-<strong>Held</strong> <strong>Computer</strong> User’s <strong>Guide</strong> 1-5<br />
1<br />
1
General Information SECTION 1<br />
<strong>Hand</strong>-<strong>Held</strong> <strong>Computer</strong> Keyboard<br />
Your hand-held computer provides two different keyboard<br />
options. Both keyboard models provide special function keys<br />
that can be reprogrammed to meet your particular application<br />
needs. Figure 1-5 on page 1-7 and Figure 1-6 on page<br />
1-8 detail the 30 and 56 key keyboards.<br />
1-6 <strong>6220</strong> <strong>Hand</strong>-<strong>Held</strong> <strong>Computer</strong> User’s <strong>Guide</strong><br />
" For the 30 key keyboard, function and numeric keys<br />
are single keystrokes.<br />
" For the 56 key keyboard, alphabetical characters and<br />
numeric keys are single keystrokes. .<br />
" Shown below are the keyboard descriptions that describe<br />
the callouts for Figure 1-5 and Figure 1-6.<br />
Key Descriptions (30 Key)<br />
1. Function (F1 -F4) keys<br />
2. Window scrolling keys<br />
3. Page down key<br />
4. Numeric keys (0 -9)<br />
5. YES (Enter) key<br />
6. NO key<br />
7. Yellow shift key<br />
8. Backspace key<br />
9. Clear key<br />
10. EXIT key<br />
11. Page up key<br />
12. ON key<br />
13. Space key<br />
Key Descriptions (56 Key)<br />
1. Function (F1 -F4) keys<br />
2. Alphabetic keys<br />
3. Window scrolling keys<br />
4. Page down key<br />
5. Numeric keys (0 -9)<br />
6. YES (Enter) key<br />
7. NO key<br />
8. Yellow shift key<br />
9. Backspace key<br />
10. Clear key<br />
11. EXIT key<br />
12. Page up key<br />
13. Space key<br />
14. ON key
SECTION 1 General Information<br />
10<br />
11<br />
9<br />
6<br />
8<br />
7<br />
12<br />
13<br />
Figure 1-5<br />
<strong>Hand</strong>-<strong>Held</strong> <strong>Computer</strong> With 30-Key Keyboard<br />
5<br />
<strong>6220</strong> <strong>Hand</strong>-<strong>Held</strong> <strong>Computer</strong> User’s <strong>Guide</strong> 1-7<br />
2<br />
3<br />
4<br />
1
General Information SECTION 1<br />
10<br />
12<br />
11<br />
9<br />
7<br />
8<br />
14<br />
13<br />
Figure 1-6<br />
<strong>Hand</strong>-<strong>Held</strong> <strong>Computer</strong> With 56-Key Keyboard<br />
1-8 <strong>6220</strong> <strong>Hand</strong>-<strong>Held</strong> <strong>Computer</strong> User’s <strong>Guide</strong><br />
6<br />
1<br />
4<br />
5<br />
3<br />
2
SECTION 1 General Information<br />
Key Descriptions<br />
This section describes how the shift keys work and the differences<br />
between a 30 and 56 key keyboard. Your particular<br />
keyboard may have an overlay that has additional options<br />
other than those described in this section. Refer to your application<br />
operation manual for descriptions of those keys.<br />
The following descriptions cover both the 30-key and 56-key<br />
<strong>6220</strong> <strong>Hand</strong>-<strong>Held</strong> <strong>Computer</strong>s.<br />
ON Key<br />
Use the ON key to suspend or resume operation. The ON<br />
key, does not really “turn it on” because your computer is<br />
not really Off. It is just in a suspend mode to conserve battery<br />
power.<br />
YES (Enter) Key<br />
Use the YES key to answer “Yes” to display prompts and to<br />
enter data.<br />
NO Key<br />
Use the NO key to answer “No” to display prompts.<br />
Period [.] Key<br />
Use the period [.] key as a period or a decimal point.<br />
Clear Key<br />
Use the Clear key to delete data being entered.<br />
Page Up or Down Keys<br />
Use the Page Up or Down keys to step forward or backward<br />
in your program.<br />
<strong>6220</strong> <strong>Hand</strong>-<strong>Held</strong> <strong>Computer</strong> User’s <strong>Guide</strong> 1-9
General Information SECTION 1<br />
EXIT Key<br />
Use the Exit key to exit a program or portion of an application.<br />
Minus [-] Key<br />
Use the minus [--] key to enter negative values or dashes in<br />
character fields.<br />
Numeric Keys<br />
Use the numeric keys as you would those on a calculator.<br />
Numeric values are single keystroke operations.<br />
Alphabetic Keys<br />
Your 56 key hand-held computer provides the full alphabet.<br />
Alphabetic characters are single keystroke operations with<br />
this keyboard. Alphabetic characters can be entered on the<br />
30 key keyboard by using the yellow shift key.<br />
Backspace [ SP] Key<br />
Use the backspace key to back the cursor up one character<br />
at a time. Holding this key down will cause the cursor to<br />
continuously move backwards until you stop or you run out<br />
of space.<br />
Shift Key<br />
Using the yellow shift key, temporarily shifts the function of<br />
the keyboard. The shifted functions are yellow colored legends<br />
above the normal single keystroke keys.<br />
1-10 <strong>6220</strong> <strong>Hand</strong>-<strong>Held</strong> <strong>Computer</strong> User’s <strong>Guide</strong>
SECTION 1 General Information<br />
Arrow Keys<br />
The arrow keys move the cursor in the direction of the arrow.<br />
Display<br />
The display shows status messages, keyed-in entries, customer<br />
or product lists, calculations, and prompts for responses.<br />
The optional touch screen can be used with a stylus pencil,<br />
or by using your finger to choose functions, accept signature<br />
capture, or enter data.<br />
B CAUTION: Do not use an ink pen or anything else that is sharp on the<br />
touch screen. This will damage it.<br />
<strong>6220</strong> <strong>Hand</strong>-<strong>Held</strong> <strong>Computer</strong> User’s <strong>Guide</strong> 1-11
General Information SECTION 1<br />
Backlight and Display Contrast<br />
Adjustment<br />
Your hand-held computer display contains a backlight for<br />
operating in dark conditions. Although it greatly improves<br />
operating in dark conditions it does shorten your battery<br />
run time. Your hand-held computer will shut the backlight<br />
off when there is no activity. Section 2 explains how to turn<br />
on the backlight and adjust the contrast of the display.<br />
Battery<br />
Main Battery Pack<br />
This hand-held computer uses a rechargeable lithium ion<br />
(Li Ion) battery pack.<br />
Your hand-held computer senses the capacity (run time) left<br />
in your main battery pack before it goes into a low battery<br />
condition.<br />
This user’s guide may occasionally use the term “cycles”<br />
when presenting rechargeable battery instructions. Cycles<br />
are the number of times the rechargeable battery pack can<br />
be drained, and recharged during the life of the battery. The<br />
rechargeable battery design should give you many cycles of<br />
use.<br />
When you press the ON key to suspend operation, your<br />
hand-held computer does not completely turn itself off. The<br />
main battery pack is protecting data and if the pack is completely<br />
charged it will protect the data for about six days.<br />
Backup Battery<br />
When your hand-held computer goes into shutdown mode<br />
because of low battery condition, the data is protected by<br />
the backup battery. Your hand-held computer will not accept<br />
data or process transactions until you deal with the<br />
1-12 <strong>6220</strong> <strong>Hand</strong>-<strong>Held</strong> <strong>Computer</strong> User’s <strong>Guide</strong>
SECTION 1 General Information<br />
low battery condition. A fully charged backup battery will<br />
save data for about 10 hours.<br />
Your hand-held computer contains a rechargeable NiCd<br />
backup battery. Most of the time the backup battery is in a<br />
rest mode, ready to take over data protection instantly<br />
when the main battery cells are in low condition or out of<br />
the hand-held computer.<br />
If you are storing your hand-held computer for a long period<br />
remove all batteries. This will prevent any damage that<br />
could occur to your hand-held computer should the cells develop<br />
a leak.<br />
Memory<br />
This hand-held computer design uses these types of<br />
memory:<br />
" Main Memory DRAM<br />
" Flash ROM<br />
" PC Cards<br />
Main Memory<br />
Your main memory DRAM options are 8 or 16 Megabytes.<br />
Main memory is ordered at the time this product was purchased.<br />
You can upgrade to more memory but you must<br />
send your hand-held computer to your Customer Support<br />
Center. The main memory requires batteries in your handheld<br />
computer to protect it. This memory is protected by the<br />
backup battery during low main battery conditions or when<br />
the main battery pack is removed.<br />
Flash ROM<br />
Your hand-held computer has 2 MB of flash ROM. This<br />
stores the BIOS and DOS firmware. Applications stored in<br />
flash ROM are copied into DRAM for execution. Flash does<br />
not require a battery in your hand-held computer to maintain<br />
its contents.<br />
<strong>6220</strong> <strong>Hand</strong>-<strong>Held</strong> <strong>Computer</strong> User’s <strong>Guide</strong> 1-13
General Information SECTION 1<br />
PC Cards<br />
Different brands of PC cards can be used in your hand-held<br />
computer. Memory cards are available in a variety of sizes<br />
and types. Check with your Sales Representative or System<br />
Engineer for specific options.<br />
Your hand-held computer provides two PC memory card<br />
slots. These slots can be used for storage of data, much like<br />
a floppy disk drive on a PC. PC card slots can also be used<br />
for modems, radios, and other options as they become available.<br />
You can use a Type II card in each drive at the same time. If<br />
using a Type III card, it only works in drive A (closest to<br />
display). However, you cannot use a Type III and a Type II<br />
card at the same time. Type III cards include some types of<br />
disk drives and radios.<br />
1-14 <strong>6220</strong> <strong>Hand</strong>-<strong>Held</strong> <strong>Computer</strong> User’s <strong>Guide</strong>
SECTION 1 General Information<br />
Reset Switch<br />
In the rare event that your hand-held computer fails to respond<br />
to your input, it may be necessary to “reset.” Avoid<br />
using the reset switch as this increases the chances that<br />
data will be lost. Only use the reset switch after trying all<br />
other solutions. Refer to the Troubleshooting Table in Section<br />
4 and try those solutions before resetting your computer.<br />
The Reset switch access is located behind the 15-pin connector.<br />
To access use a straightened large paper clip, insert<br />
one end in the reset switch hole.<br />
1<br />
1. Reset switch location<br />
Figure 1-7<br />
Top End Reset Switch Access Point<br />
<strong>6220</strong> <strong>Hand</strong>-<strong>Held</strong> <strong>Computer</strong> User’s <strong>Guide</strong> 1-15
General Information SECTION 1<br />
<strong>Hand</strong>-<strong>Held</strong> <strong>Computer</strong> Specifications<br />
Size: 9.5 inches (24.13 cm) long<br />
Temperature:<br />
1-16 <strong>6220</strong> <strong>Hand</strong>-<strong>Held</strong> <strong>Computer</strong> User’s <strong>Guide</strong><br />
3.25 inches (8.26 cm) wide<br />
2.875 inches (7.30 cm) tall<br />
Operating: 4 to +140_F (--20 to +60_C)<br />
Storage: -22 to +158_F (--30 to +70_C ) excluding batteries<br />
-4 to + 140_ F (-20 to + 60_ C) with batteries<br />
Weight: 30 ounces (850.5 g)<br />
Humidity: 5 to 95% noncondensing<br />
Static<br />
Protection: 17 kV, (air discharge) 8 kV (direct injected)<br />
Power source:<br />
Main battery: Li Ion battery pack<br />
Backup battery:<br />
Charging rate:<br />
+32 to 122° F<br />
(0 to +50_C)<br />
Nickel cadmium (NiCd)<br />
Below 0_C: Trickle charge<br />
Communication:<br />
Normal charge main battery (fully charge 2.5<br />
hours)<br />
backup battery charge time is 10 hours<br />
Interface: RS-232 and RS-485<br />
Ethernet (optional)<br />
IRDA (optional)<br />
Protocol: Norand Proprietary Communications Protocol<br />
(NPCP), Xmodem, Ymodem
SECTION 1 General Information<br />
System Components:<br />
Flash: 2048 KB<br />
DRAM: 8 or 16 MB<br />
Card Options: Two PC memory card slots; one Type II, and one<br />
Type III, or both can use Type II cards<br />
Processor: AMD Elan SC400, 99 Mhz.<br />
Display:<br />
Type: VGA compatible LCD (standard)<br />
touch screen (optional)<br />
Size: 160 (wide) by 200 (long) pixel portrait orientation<br />
<strong>6220</strong> <strong>Hand</strong>-<strong>Held</strong> <strong>Computer</strong> User’s <strong>Guide</strong> 1-17
General Information SECTION 1<br />
1-18 <strong>6220</strong> <strong>Hand</strong>-<strong>Held</strong> <strong>Computer</strong> User’s <strong>Guide</strong>
Section 2<br />
<strong>Hand</strong>-<strong>Held</strong> <strong>Computer</strong> Operation<br />
" " " " " " " " " " " " " " " " " " " " " " " " " " " "<br />
Introduction<br />
This section tells you how to:<br />
" Install the main and backup batteries<br />
" “Power-up” your hand-held computer<br />
" Install optional memory cards<br />
" Connect to peripheral devices<br />
Getting Started<br />
Unpack your <strong>6220</strong> <strong>Hand</strong>-<strong>Held</strong> <strong>Computer</strong> and inspect it for<br />
signs of physical damage that may have occurred in shipment<br />
or storage.<br />
Fully charge the batteries in your hand-held computer before<br />
using them. Put the computer on a charging source for<br />
at least 10 hours to ensure that the backup battery and<br />
main battery pack are completely charged.<br />
When you start using your hand-held computer or any time<br />
that all power has been completely removed, you are “cold<br />
booting” your hand-held computer. The method you use depends<br />
on your application.<br />
For example you may download (transfer from the host<br />
computer to your hand-held computer) the application and<br />
data. Or, you may use PC cards to load the application and<br />
data.<br />
<strong>6220</strong> <strong>Hand</strong>-<strong>Held</strong> <strong>Computer</strong> User’s <strong>Guide</strong> 2-1
<strong>Hand</strong>-<strong>Held</strong> <strong>Computer</strong> Operation SECTION 2<br />
Depending on the method you are using, the result will be<br />
the same but the steps you go through may vary from the<br />
way this user’s guide presents the material.<br />
2-2 <strong>6220</strong> <strong>Hand</strong>-<strong>Held</strong> <strong>Computer</strong> User’s <strong>Guide</strong>
SECTION 2 <strong>Hand</strong>-<strong>Held</strong> <strong>Computer</strong> Operation<br />
Installing the Backup Battery<br />
" NOTE: Backup battery must be installed before using your computer for the<br />
first time.<br />
" NOTE: Remove backup battery before storing your computer for longer than<br />
a week.<br />
Refer to Figure 1-2 when completing steps 1 and 2.<br />
1. Use a flat blade screwdriver to loosen the four quarterturn<br />
screws of the PC Card and Backup Battery Door.<br />
2. Drape the door off to the side free of the compartment.<br />
Refer to Figure 2-1 when completing these steps.<br />
3. Using a nonmetallic object (i.e. pen) push the connector<br />
on the battery pack down into the socket.<br />
4. Push the battery down into the compartment<br />
5. Replace compartment door.<br />
Figure 2-1<br />
Installing Back Up Battery<br />
<strong>6220</strong> <strong>Hand</strong>-<strong>Held</strong> <strong>Computer</strong> User’s <strong>Guide</strong> 2-3
<strong>Hand</strong>-<strong>Held</strong> <strong>Computer</strong> Operation SECTION 2<br />
Measuring Battery Pack Capacity<br />
= LED on<br />
= LED off<br />
2<br />
2-4 <strong>6220</strong> <strong>Hand</strong>-<strong>Held</strong> <strong>Computer</strong> User’s <strong>Guide</strong><br />
1. Touch finger across first two contacts<br />
2. Capacity is displayed from right to left.<br />
The higher the capacity the more LEDs light.<br />
one LED = less than 25% capacity;<br />
two LEDs = 25 -50% capacity;<br />
three LEDs = 50 -75% capacity;<br />
four LEDs = more than 75%<br />
Figure 2-2<br />
Main Battery Pack Capacity Contacts<br />
1
SECTION 2 <strong>Hand</strong>-<strong>Held</strong> <strong>Computer</strong> Operation<br />
Main Battery Installation<br />
Place your hand-held computer face down on a flat surface.<br />
Prop the top end up to avoid pressing any keys.<br />
1. Use a flat blade screwdriver or a coin to turn the latch<br />
in the direction of the open padlock icon.<br />
2. Take hold of the handstrap near the compartment<br />
door and slide down toward the end of the computer<br />
3. Lift the strap and door away from the compartment.<br />
4. Hold the battery pack with the contacts face down and<br />
install the battery pack into the compartment.<br />
5. Reinstall the batter compartment door and turn the<br />
latch to line up with the closed padlock icon.<br />
6. Fully charge your hand-held computer before using it.<br />
The initial charge should be at least 10 hours to ensure<br />
that both the main and backup batteries are fully<br />
charged.<br />
1<br />
4<br />
Figure 2-3<br />
Installing Main Battery Pack<br />
2<br />
5<br />
<strong>6220</strong> <strong>Hand</strong>-<strong>Held</strong> <strong>Computer</strong> User’s <strong>Guide</strong> 2-5<br />
3
<strong>Hand</strong>-<strong>Held</strong> <strong>Computer</strong> Operation SECTION 2<br />
Charging Your Batteries<br />
Fully charge the battery pack before using your hand-held<br />
computer for the first time. Initial charge time to completely<br />
charge the main battery pack and backup battery should<br />
be at least 10 hours. After the initial charge, charging time<br />
takes 2.5 hours for the main pack and about 10 hours for<br />
the backup battery.<br />
You can charge your NiCd batteries either in your<br />
hand-held computer or in a stand alone charger. The<br />
following devices provide charging for the main and backup<br />
batteries while they are in the hand-held computer:<br />
" Multidock<br />
" Single dock<br />
" Printers<br />
" Wall charger<br />
Turning On the Backlight and Adjusting<br />
the Display Contrast<br />
Turning On the Backlight<br />
2-6 <strong>6220</strong> <strong>Hand</strong>-<strong>Held</strong> <strong>Computer</strong> User’s <strong>Guide</strong><br />
1. Press the yellow shift key and then the backlight [ ]<br />
key. The backlight default setting is for the maximum<br />
brightness.<br />
2. To adjust the brightness of the backlight, press and<br />
hold the yellow shift key and then press and hold either<br />
the up [ ] or the down [ ] keys.<br />
" NOTE: There are 5 steps for the backlight brightness and 51 steps for the<br />
screen contrast.
SECTION 2 <strong>Hand</strong>-<strong>Held</strong> <strong>Computer</strong> Operation<br />
Adjusting the Screen Contrast<br />
Installing PC Cards<br />
1. Press and hold the yellow shift key and then press and<br />
hold either the up [ ] or down [ ] contrast keys.<br />
2. Continue to do this until you reach the contrast level<br />
you want.<br />
1. Use a flat blade screwdriver to loosen the four quarterturn<br />
screws of the PC card door (see Figure 2-4 on<br />
page 2-8).<br />
2. Drape the door off to the side of the compartment.<br />
3. Flip the card holder up to gain access to the card slots.<br />
4. Slide the card, connector-end first into the slot.<br />
" NOTE: You can use either Type ll or Type lll cards. However, if you are using<br />
both a Type ll and a Type lll card, then the Type ll card must go in the<br />
bottom slot and the Type lll in the top slot.<br />
" NOTE: The PC cards are keyed to fit only one way. If they do not seat completely<br />
this indicates that it is installed upside down.<br />
5. Flip the holder back down into the compartment and<br />
reinstall the compartment door.<br />
When a “boot” card is inserted, you must press the reset<br />
button to get your computer to recognize the card in the<br />
drive. To reset insert a straightened paper clip into the<br />
switch hole.<br />
<strong>6220</strong> <strong>Hand</strong>-<strong>Held</strong> <strong>Computer</strong> User’s <strong>Guide</strong> 2-7
<strong>Hand</strong>-<strong>Held</strong> <strong>Computer</strong> Operation SECTION 2<br />
4<br />
Removing PC Cards<br />
2-8 <strong>6220</strong> <strong>Hand</strong>-<strong>Held</strong> <strong>Computer</strong> User’s <strong>Guide</strong><br />
1. Compartment door<br />
2. Top card slot<br />
3. Bottom card slot (shown wiht Type ll PC card in slot)<br />
4. Reset button<br />
Figure 2-4<br />
Installing PC Cards<br />
To remove a PC Card from the holder simply pull out on the<br />
card.<br />
2<br />
3<br />
1
SECTION 2 <strong>Hand</strong>-<strong>Held</strong> <strong>Computer</strong> Operation<br />
Using PC Cards to Load Your Programs<br />
Drives<br />
" Drive C, DOS system ATA card<br />
" Drive E, Non--system ATA card<br />
" Drive C, RAM (if formatted)—power required to protect<br />
contents<br />
" Drive D, ROM files in flash—no power needed<br />
Using ATA Cards to Boot Your <strong>Computer</strong><br />
Booting<br />
In order to boot your hand-held computer using an ATA<br />
card, the card in the drive must be formatted. If the ATA<br />
card is formatted as a DOS system ATA, it will boot as drive<br />
C. Otherwise, use Pen*Key Utilities to select drive E as<br />
your boot drive.<br />
If you have selected a boot drive such as C or E that no longer<br />
should be selected as the boot drive, press and hold F4<br />
while you reset your computer. You will then boot to drive<br />
D, Pen*Key Utilities can then be used to select a different<br />
boot drive if necessary.<br />
<strong>6220</strong> <strong>Hand</strong>-<strong>Held</strong> <strong>Computer</strong> User’s <strong>Guide</strong> 2-9
<strong>Hand</strong>-<strong>Held</strong> <strong>Computer</strong> Operation SECTION 2<br />
Installing Modem Card<br />
1. Use a flat blade screwdriver to loosen the four quarterturn<br />
screws of the PC card door (see Figure 2-4 on<br />
page 2-8).<br />
2. Drape the door off to the side of the compartment.<br />
3. Flip the card holder up to gain access to the card slots.<br />
4. Slide the modem card, connector-end first into the slot.<br />
" NOTE: The modem card is keyed to fit only one way. If they do not seat<br />
completely this indicates that it is installed upside down.<br />
Connector<br />
Cable<br />
5. Connect the modem cable to the card and plug into the<br />
connector (see Figure 2-5).<br />
6. Push the card holder back down into your computer<br />
and reattach the card door.<br />
1 2<br />
2-10 <strong>6220</strong> <strong>Hand</strong>-<strong>Held</strong> <strong>Computer</strong> User’s <strong>Guide</strong><br />
Figure 2-5<br />
Installing Modem Card
SECTION 2 <strong>Hand</strong>-<strong>Held</strong> <strong>Computer</strong> Operation<br />
Downloading Programs into Your<br />
<strong>Hand</strong>-<strong>Held</strong> <strong>Computer</strong><br />
Using Pen*Key Utilities to download programs into your<br />
hand-held computer may require you placing your computer<br />
into a dock. You can also download using an optional internal<br />
modem.<br />
Install and charge the main and backup batteries before<br />
downloading any programs.<br />
1. Turn your hand-held computer on by pushing the ON<br />
button.<br />
2. Insert your computer into the dock or connect the modem.<br />
The first screen you see will show you general<br />
information, program version, and copyright data.<br />
3. Press the [YES] key and continue.<br />
4. This next screen will follow:<br />
<strong>6220</strong> <strong>Hand</strong>-<strong>Held</strong> <strong>Computer</strong> User’s <strong>Guide</strong> 2-11
<strong>Hand</strong>-<strong>Held</strong> <strong>Computer</strong> Operation SECTION 2<br />
PEN*KEY UTILITIES<br />
COMMUNICATIONS<br />
1. BEGIN COMM SESSION<br />
2. COM x-comm set -- x<br />
3. UNIT ID ZZZZZZX<br />
4. X -- mdm type -- x<br />
xprotx xbpsx xfx<br />
5. PHONE NUMBER<br />
ZZZZZZZZZZZZZX<br />
9. ADVANCED UTILITIES<br />
2-12 <strong>6220</strong> <strong>Hand</strong>-<strong>Held</strong> <strong>Computer</strong> User’s <strong>Guide</strong><br />
[NO]QUIT<br />
5. The default setting (BEGIN COMM SESSION) will be<br />
highlighted.<br />
" If this is the setting you want, press the [YES] key and<br />
continue.<br />
" If you want to change the communications parameters<br />
to something other than the default:<br />
" Press the number of the menu option you want,<br />
or<br />
" Use the arrow keys to highlight the desired selection<br />
6. Press the [YES] key.<br />
At this point go to Appendix B for the Pen*Key Utilities<br />
Programs procedures.
Section 3<br />
Routine Care and Maintenance<br />
" " " " " " " " " " " " " " " " " " " " " " " " " " " "<br />
Introduction<br />
Your <strong>6220</strong> <strong>Hand</strong>-<strong>Held</strong> <strong>Computer</strong> is designed to withstand<br />
normal use in harsh environments. Occasional maintenance<br />
is required to ensure trouble-free operation. The procedures<br />
in this section should help keep your hand-held computer in<br />
good working condition.<br />
Maintenance procedures included in this section provides<br />
instructions on identifying Low Battery conditions, replacing<br />
the handstrap, and cleaning your hand-held computer.<br />
Low Battery Indication<br />
When you press the ON key to resume operation and it does<br />
not respond at all, this usually indicates a low main battery<br />
condition. Insert your hand-held computer in a printer or<br />
other charging source and your hand-held computer will<br />
turn on.<br />
If it does not respond when inserted in the equipment that<br />
provides charging, another problem could exist. Refer to the<br />
Troubleshooting section for solutions.<br />
<strong>6220</strong> <strong>Hand</strong>-<strong>Held</strong> <strong>Computer</strong> User’s <strong>Guide</strong> 3-1
Routine Care and Maintenance SECTION 3<br />
<strong>Hand</strong>strap Replacement<br />
2<br />
To replace the handstrap follow these steps.<br />
3-2 <strong>6220</strong> <strong>Hand</strong>-<strong>Held</strong> <strong>Computer</strong> User’s <strong>Guide</strong><br />
1. Remove the top and bottom screws holding the handstrap<br />
in place.<br />
2. Position the Battery Compartment latch knob in the<br />
unlock position.<br />
3. Lift the handstrap off and replace with a new one.<br />
1. Screws holding handstrap<br />
2. Battery compartment latch knob<br />
Figure 3-1<br />
Replacing The <strong>Hand</strong>strap<br />
1<br />
1
SECTION 3 Routine Care and Maintenance<br />
Cleaning Your <strong>Hand</strong>-<strong>Held</strong> <strong>Computer</strong><br />
Periodic cleaning helps maintain the appearance and reliability<br />
of your hand-held computer. When cleaning your<br />
hand-held computer, inspect the keyboard, handstrap, covers,<br />
display, connectors, and peripheral products for obvious<br />
signs of damage or wear.<br />
B CAUTION: Do not use any abrasive cleaning compounds, ketonic solvents<br />
(acetone or ketone) or aromatic solvents (toluene or xylene) to<br />
clean any part of your hand-held computer. These solutions will<br />
cause permanent damage to your hand-held computer.<br />
Never pour cleaners directly on the hand-held computer.<br />
Instead put the cleaner on a soft cloth and gently wipe the<br />
case.<br />
Case and Display<br />
We recommend cleaning the exterior of your hand-held computer<br />
using a soft cloth dampened with:<br />
" MICRO-CLEAN II cleanser, made by Foresight International,<br />
Inc. 4887 F Street, Omaha, NE<br />
68127-0205 (telephone number 1-800-637-1344)<br />
" Glass cleaners or isopropyl alcohol<br />
Surface Connectors<br />
If surface connectors become dirty or tarnished, clean them<br />
with a cotton swab dipped in alcohol. It may also be<br />
necessary to lightly burnish them with a pencil eraser.<br />
Check the connectors on the docks or printers to ensure<br />
they are clean.<br />
<strong>6220</strong> <strong>Hand</strong>-<strong>Held</strong> <strong>Computer</strong> User’s <strong>Guide</strong> 3-3
Routine Care and Maintenance SECTION 3<br />
Keyboard<br />
If necessary, use a dry toothbrush to dislodge accumulated<br />
dust or grime around the keyboard keys. Three screws<br />
secure the keyboard to the case. Unscrew those to remove<br />
the keyboard and do more cleaning if necessary.<br />
3-4 <strong>6220</strong> <strong>Hand</strong>-<strong>Held</strong> <strong>Computer</strong> User’s <strong>Guide</strong><br />
3<br />
1 -3. Screws holding keyboard<br />
Figure 3-2<br />
Removing The Keyboard<br />
2<br />
1
Section 4<br />
Troubleshooting<br />
" " " " " " " " " " " " " " " " " " " " " " " " " " " "<br />
Introduction<br />
Should you encounter difficulties in routine operation,<br />
printing, or communications, there are a few things you<br />
may be able to do to correct the problem.<br />
" Refer to your applications (software user) manual for<br />
printing and telecommunication procedures.<br />
" Ensure that electrical and mechanical connections are<br />
secure and undamaged.<br />
<strong>6220</strong> <strong>Hand</strong>-<strong>Held</strong> <strong>Computer</strong> User’s <strong>Guide</strong> 4-1
Troubleshooting SECTION 4<br />
Troubleshooting Table<br />
This Troubleshooting table lists conditions you might see<br />
and offers some basic remedies:<br />
4-2 <strong>6220</strong> <strong>Hand</strong>-<strong>Held</strong> <strong>Computer</strong> User’s <strong>Guide</strong><br />
Table 4-1<br />
Basic Troubleshooting<br />
Condition Solution<br />
Low Battery Recharge main Li Ion pack.<br />
When The ON Key<br />
Is Pressed The Display<br />
Is Blank.<br />
Batteries Will Not<br />
Charge<br />
Charge immediately! Data loss is imminent.<br />
If the application is displayed<br />
when charge is applied both the main<br />
and backup batteries were too low to run<br />
the computer but the data has been<br />
maintained.<br />
If your computer resets itself when<br />
charge is applied and returns to the Advanced<br />
Utilities program, the data was<br />
lost. You may need to reload the application.<br />
This problem can occur if the battery<br />
pack drops below a certain voltage. Do<br />
these two things:<br />
* Replace with new charged battery<br />
pack.<br />
* Reboot computer.<br />
Printer Not Ready * Check to make sure there is power to<br />
printer.<br />
* Check cable connections.<br />
* Check for paper jam.<br />
* Check to make sure there is paper in<br />
paper compartment.<br />
Will Not Turn On<br />
When The ON Key<br />
Is Pressed<br />
* Ensure that there is a main battery<br />
installed.<br />
* Ensure that the main battery is<br />
charged.<br />
* Adjust contrast.
SECTION 4 Troubleshooting<br />
Table 4-1 (continued)<br />
Basic Troubleshooting<br />
Condition Solution<br />
<strong>Hand</strong>-<strong>Held</strong><br />
<strong>Computer</strong> will Not<br />
Turn On When<br />
Placed In A Dock<br />
<strong>Hand</strong>-<strong>Held</strong><br />
<strong>Computer</strong> Shuts<br />
Down During Use<br />
<strong>Hand</strong>-<strong>Held</strong><br />
<strong>Computer</strong> Resets<br />
When You Replace<br />
Or Check The<br />
Main Battery<br />
<strong>Hand</strong>-<strong>Held</strong><br />
<strong>Computer</strong> Goes To<br />
Sleep Immediately<br />
After It Has Been<br />
Removed From<br />
The Charger<br />
* Ensure the dock is plugged in.<br />
* Reseat hand-held computer into dock<br />
to ensure proper connection.<br />
* Adjust the contrast setting, it may be<br />
turned Off.<br />
* You may have a very low battery. Try<br />
recharging the main battery.<br />
The backup battery may not be fully<br />
charged, allow 14 hours to completely<br />
recharge the backup battery.<br />
* Ensure that the battery pack is<br />
installed properly in the battery<br />
compartment.<br />
* Ensure that none of the contacts in the<br />
battery compartment are bent.<br />
* Ensure that there is no foreign<br />
material (dust, dirt, or plastic shavings,<br />
etc.) on the battery pack or battery<br />
contacts.<br />
* Press the ON key. If your computer<br />
does not resume, the battery still is low.<br />
Recharge for at least 30 minutes or try<br />
another battery pack.<br />
<strong>6220</strong> <strong>Hand</strong>-<strong>Held</strong> <strong>Computer</strong> User’s <strong>Guide</strong> 4-3
Troubleshooting SECTION 4<br />
4-4 <strong>6220</strong> <strong>Hand</strong>-<strong>Held</strong> <strong>Computer</strong> User’s <strong>Guide</strong><br />
Table 4-1 (continued)<br />
Basic Troubleshooting<br />
Condition Solution<br />
<strong>Hand</strong>-<strong>Held</strong><br />
<strong>Computer</strong> Does<br />
Not Suspend<br />
<strong>Hand</strong>-<strong>Held</strong><br />
<strong>Computer</strong> Takes A<br />
Long Time To Boot<br />
Up After A Reset<br />
* The unit will not turn off when it is<br />
connected to a charging device.<br />
* The unit may not turn off when it is<br />
processing data or in radio<br />
communications.<br />
This is OK if connected to a charger or<br />
placed in a dock. If this is not the case,<br />
and either of these conditions continues<br />
for a long period of time, contact<br />
customer support personnel, as this will<br />
run down the batteries.<br />
Normal time is between 10--45 seconds.<br />
If it takes longer than that, contact<br />
customer support personnel.
SECTION 4 Troubleshooting<br />
Table 4-1 (continued)<br />
Basic Troubleshooting<br />
Condition Solution<br />
<strong>Hand</strong>-<strong>Held</strong><br />
<strong>Computer</strong> Does<br />
Not Start Up<br />
<strong>Hand</strong>-<strong>Held</strong><br />
<strong>Computer</strong> Displays<br />
A Bad Tcom<br />
Message<br />
* Ensure that the battery pack is<br />
installed properly in the battery<br />
compartment.<br />
* Ensure that the battery compartment<br />
is operational (no bent contacts, no<br />
foreign materials, etc.).<br />
* Remove any PC cards and reset your<br />
computer. If your computer beeps after<br />
the reset but does nothing else, the flash<br />
may be corrupted. You will need a<br />
Master-Mode Boot card to reflash your<br />
computer.<br />
* The unit may not be making full<br />
contact with the dock. Try reseating the<br />
unit in the dock.<br />
* The dock may not be properly<br />
connected to the host. Make sure there is<br />
a connection. TCOM errors may happen<br />
when telephone service is lost, or for<br />
reasons not related to the physical<br />
connection.<br />
If these basic solutions do not solve your problem, there<br />
could be a number of reasons. Additional things to do are:<br />
" Refer to the software documentation written for your<br />
application. This documentation contains troubleshooting<br />
information.<br />
" Call the 24-hour Customer Response Hot-Line at<br />
1-800-755-5505.<br />
Diagnostic<br />
Your hand-held computer performs a power on self test<br />
whenever it is reset. It will alert you if it fails by beeping or<br />
displaying information about the problem. Your hand-held<br />
<strong>6220</strong> <strong>Hand</strong>-<strong>Held</strong> <strong>Computer</strong> User’s <strong>Guide</strong> 4-5
Troubleshooting SECTION 4<br />
Repair Service<br />
computer also contains some diagnostic data which may be<br />
useful for your Customer Support Specialist in helping define<br />
and debug a problem.<br />
Authorized repair of equipment is available only at our Service<br />
Centers. Unauthorized repair voids any and all warrnaties.<br />
4-6 <strong>6220</strong> <strong>Hand</strong>-<strong>Held</strong> <strong>Computer</strong> User’s <strong>Guide</strong><br />
" Contact your sales representative for additional information.<br />
" Call the Customer Response Center to determine<br />
where to ship the product.<br />
" Be sure to carefully pack the unit and include a description<br />
of the problem and the measures you took to<br />
correct it. If possible, include any printout (if applicable)<br />
or write down displayed error messages to illustrate<br />
the problem.
Appendix A<br />
Connector Pin-Outs<br />
" " " " " " " " " " " " " " " " " " " " " " " " " " " "<br />
15-Pin Female D-Sub Connector<br />
Pin Signal Function<br />
1<br />
2 *<br />
3<br />
4<br />
5<br />
6<br />
7*<br />
8<br />
9<br />
10<br />
11<br />
12<br />
13<br />
14<br />
15<br />
RI<br />
DTR/TXD COM2<br />
RTS<br />
TXD<br />
RXD<br />
CTS<br />
DSR/RXD COM2<br />
CHARGE_EXT<br />
GND<br />
DCD<br />
Not Used<br />
Not Used<br />
Not Used<br />
Not Used<br />
SW_V+<br />
RS-232 Ring Indicator<br />
RS-232 Data Terminal Ready<br />
RS-232 Request To Send<br />
RS-232 Transmitted Data<br />
RS-232 Received Data<br />
RS-232 Clear To Send<br />
RS-232 Data Set Ready<br />
External Charge Voltage input<br />
Ground, Signal<br />
RS-232 Data Carrier Detect<br />
Switched 5.0 volt peripheral power<br />
* Pin 2 and 7 are multiplexed. If the three wire COM2 is selected then<br />
the /signal applies.<br />
<strong>6220</strong> <strong>Hand</strong>-<strong>Held</strong> <strong>Computer</strong> User’s <strong>Guide</strong> A-1
Connector Pin-Outs<br />
12-Pin Surface Contact Connector<br />
Pin Signal Function<br />
1<br />
2<br />
3<br />
4<br />
5<br />
6*<br />
7*<br />
8<br />
9<br />
10<br />
11<br />
12<br />
GND<br />
TPON<br />
485- & TPOP<br />
TXD<br />
RTS<br />
DTR/TXD COM2<br />
DSR/RXD COM2<br />
CTS<br />
RXD<br />
485+ & TPIP<br />
TPIN<br />
CHARGE_DOCK<br />
A-2 <strong>6220</strong> <strong>Hand</strong>-<strong>Held</strong> <strong>Computer</strong> User’s <strong>Guide</strong><br />
Ground (rightmost side)<br />
Ethernet Output<br />
RS-485 I/O and Ethernet Output<br />
RS-232 Transmitted Data<br />
RS-232 Request To Send<br />
RS-232 Data Terminal Ready<br />
RS-232 Data Set Ready<br />
RS-232 Clear To Send<br />
RS-232 Received Data<br />
RS-485 I/O and Ethernet Input<br />
Ethernet Input<br />
Dock Charge Voltage (leftmost side)<br />
* Pin 6 and 7 are multiplexed. If the three wire COM2 is selected then<br />
the /signal applies.<br />
APPENDIX A
APPENDIX A Connector Pin-Outs<br />
4-Pin RJ11 Connector<br />
Pin Signal Function<br />
1<br />
2<br />
3<br />
4<br />
Not used<br />
TIP<br />
RING<br />
Not used<br />
Modem TIP<br />
Modem RING<br />
<strong>6220</strong> <strong>Hand</strong>-<strong>Held</strong> <strong>Computer</strong> User’s <strong>Guide</strong> A-3
Connector Pin-Outs<br />
A-4 <strong>6220</strong> <strong>Hand</strong>-<strong>Held</strong> <strong>Computer</strong> User’s <strong>Guide</strong><br />
APPENDIX A
Appendix B<br />
PEN*KEY R Utilities Program<br />
" " " " " " " " " " " " " " " " " " " " " " " " " " " "<br />
Entry Point<br />
Screen Title<br />
Pop-Up Menus<br />
The PEN*KEY R Utilities Program provides basic functions<br />
required to prepare your <strong>Hand</strong>-<strong>Held</strong> <strong>Computer</strong>s for use.<br />
PEN*KEY UTILITIES<br />
PSROMOC Vx.xx<br />
COPYRIGHT 1994--1999<br />
INTERMEC<br />
TECHNOLOGIES<br />
CORPORATION.<br />
ALL RIGHTS RESERVED<br />
[YES]CONTINUE<br />
This screen appears after cold-booting the computer.<br />
Key Description<br />
" Screen Title: (dark bar at the top) contains the<br />
application name, such as “PEN*KEY UTILITIES”,<br />
and the specific screen name, such as “MODEM<br />
PARAMETERS.”<br />
" Key Description: (dark bar at the bottom) contains<br />
“action” keys. Movement keys, such as arrows, are not<br />
shown.<br />
Pop-Up menus appear after a menu option. Press the number<br />
of an option you want to select; or press theYorB<br />
<strong>6220</strong> <strong>Hand</strong>-<strong>Held</strong> <strong>Computer</strong> User’s <strong>Guide</strong> B-1
PEN*KEY R Utilities Program<br />
Drop-Down Lists<br />
B-2 <strong>6220</strong> <strong>Hand</strong>-<strong>Held</strong> <strong>Computer</strong> User’s <strong>Guide</strong><br />
APPENDIX B<br />
keys to scroll through the list and press the [YES] key to<br />
enter. Select one option each time.<br />
Press the [NO] key to exit a pop-up menu.<br />
The following is an example of a pop-up menu screen.<br />
CHANGE UNIT ID<br />
UNIT ID 2233233<br />
WORKGROUP<br />
6200IPL<br />
[F4]RESET FACTORY<br />
[NO]QUIT<br />
Drop-down lists provide suboptions under a pop-up menu.<br />
Press the number of a suboption, or press theYorBkeys<br />
to scroll through the list and press the [YES] key to select.<br />
Select one suboption each time.<br />
Press the [NO] key to exit a drop-down list.<br />
The following is an example of a drop-down list.<br />
1. NETWORK. . .<br />
2. MODEM/DIRECT<br />
3. ACCESSORY CARD<br />
4. HANDHELD<br />
5. REMOTE OPS<br />
6. INTERSERVER
APPENDIX B PEN*KEY R Utilities Program<br />
Alphanumeric Fields<br />
NETWORK PARAMETERS<br />
SERVER NAME<br />
I.U.N. INCORPORATED<br />
SERVER IP ADDRESS<br />
123.123.123.123<br />
CLIENT IP ADDRESS<br />
123.123.123.123<br />
ROUTER<br />
0. 0. 0. 0<br />
SUBNET MASK<br />
0. 0. 0. 0<br />
[NO]QUIT<br />
If your computer has a numeric keyboard, enter alphanumeric<br />
data by pressing theAand"keys to scroll back and<br />
forth through the set of alphanumeric characters. After a<br />
character is selected, press the [YES] key to enter that<br />
character. Press [YES] again to move to the next field.<br />
If your computer has an alphanumeric keyboard, press the<br />
characters, then press the [YES] key to move to the next<br />
field.<br />
Press [YES] to save the entries and exit the menu. Press<br />
the [NO] key to exit without saving the entries.<br />
<strong>6220</strong> <strong>Hand</strong>-<strong>Held</strong> <strong>Computer</strong> User’s <strong>Guide</strong> B-3
PEN*KEY R Utilities Program<br />
Title Screen<br />
B-4 <strong>6220</strong> <strong>Hand</strong>-<strong>Held</strong> <strong>Computer</strong> User’s <strong>Guide</strong><br />
APPENDIX B<br />
When you reboot or reset your computer, the Title Screen<br />
appears:<br />
PEN*KEY UTILITIES<br />
PSROMOC Vx.xx<br />
COPYRIGHT 1994--1999<br />
INTERMEC<br />
TECHNOLOGIES<br />
CORPORATION.<br />
ALL RIGHTS RESERVED<br />
[YES]CONTINUE<br />
Press the [YES] key to continue.
APPENDIX B PEN*KEY R Utilities Program<br />
Language Selection<br />
" NOTE: The PEN*KEY Utilities Program checks files for available language<br />
options. If no language resource files exist, you do not see this<br />
menu.<br />
If your application requires non-English languages, the<br />
Language Selection menu appears. English is the first option,<br />
followed by up to nine additional options:<br />
PEN*KEY UTILITIES<br />
LANGUAGE SELECTION<br />
1. ENGLISH<br />
2.<br />
3.<br />
4.<br />
5.<br />
6.<br />
7.<br />
8.<br />
9.<br />
0.<br />
[NO]QUIT<br />
Press the number of a language, or press theYorBkeys<br />
to scroll through the list, then press the [YES] key to enter.<br />
Press the [NO] key to exit this menu.<br />
<strong>6220</strong> <strong>Hand</strong>-<strong>Held</strong> <strong>Computer</strong> User’s <strong>Guide</strong> B-5
PEN*KEY R Utilities Program<br />
Communications Menu<br />
" NOTE: The default is the NPCP RS-485 communication.<br />
B-6 <strong>6220</strong> <strong>Hand</strong>-<strong>Held</strong> <strong>Computer</strong> User’s <strong>Guide</strong><br />
APPENDIX B<br />
" NOTE: If your computer does not support any of the features listed, the following<br />
pop-up menu appears. Press the [YES] key to continue:<br />
COMMUNICATIONS<br />
FEATURE<br />
NOT SUPPORTED<br />
[YES]CONTINUE<br />
The Communications Menu appears after the Title Screen:<br />
PEN*KEY UTILITIES<br />
COMMUNICATIONS<br />
1. BEGIN COMM SESSION<br />
2. COMM SETTING<br />
NRINET<br />
3. UNIT ID<br />
4. NETWORK PARAMETERS<br />
SERVER NAME<br />
CLIENT IP ADDRESS<br />
0.0.0.0<br />
ROUTER<br />
0.0.0.0<br />
SUBNET MASK<br />
0.0.0.0<br />
9. ADVANCED UTILITIES<br />
[NO]QUIT
APPENDIX B PEN*KEY R Utilities Program<br />
Option 1 BEGIN COMM SESSION<br />
If you select this option, the computer repeatedly attempts<br />
communication until successful or you press the [NO] key.<br />
" NOTE: If you press the [NO] key, this verification window appears:<br />
ARE YOU SURE YOU<br />
WANT TO STOP<br />
COMMUNICATIONS<br />
NOW?<br />
[YES]STOP<br />
[NO]RESUME<br />
" NOTE: This window may not appear immediately. For most communication<br />
settings, a session cannot be interrupted once it has started, so the<br />
[NO] key is not processed until the next session is attempted.<br />
<strong>6220</strong> <strong>Hand</strong>-<strong>Held</strong> <strong>Computer</strong> User’s <strong>Guide</strong> B-7
PEN*KEY R Utilities Program<br />
B-8 <strong>6220</strong> <strong>Hand</strong>-<strong>Held</strong> <strong>Computer</strong> User’s <strong>Guide</strong><br />
APPENDIX B<br />
BEGIN COMM SESSION with NETWORK<br />
If you select this option and Option 2. COMM SETTINGS<br />
is set to NETWORK, this Communication Status menu appears:<br />
PEN*KEY UTILITIES<br />
COMMUNICATIONS<br />
COMM SETTINGS:<br />
NRINET<br />
SERVER NAME<br />
CLIENT IP ADDRESS<br />
0.0.0.0<br />
ROUTER<br />
0.0.0.0<br />
SIGNING ON<br />
STATUS: 20<br />
[NO]STOP COMM<br />
While SIGNING ON is onscreen, STATUS: may appear<br />
with the status of the attempted connection. Refer to<br />
Session Status on page B-12 for meaning.<br />
Following a successful session, PEN*KEY Utilities executes<br />
the downloaded application. If the necessary program files<br />
are not found, this message window appears:<br />
MISSING SYSTEM<br />
FILES<br />
[YES]CONTINUE
APPENDIX B PEN*KEY R Utilities Program<br />
If the session is unsuccessful, LAST SESSION appears with<br />
the failure status, such as “T803.”<br />
PEN*KEY UTILITIES<br />
COMMUNICATIONS<br />
COMM SETTINGS:<br />
NRINET<br />
SERVER NAME<br />
CLIENT IP ADDRESS<br />
0.0.0.0<br />
ROUTER<br />
0.0.0.0<br />
SIGNING ON<br />
STATUS: 20<br />
LAST SESSION T803<br />
INVALID HOST NAME<br />
OR IP ADDRESS<br />
[NO]STOP COMM<br />
<strong>6220</strong> <strong>Hand</strong>-<strong>Held</strong> <strong>Computer</strong> User’s <strong>Guide</strong> B-9
PEN*KEY R Utilities Program<br />
B-10 <strong>6220</strong> <strong>Hand</strong>-<strong>Held</strong> <strong>Computer</strong> User’s <strong>Guide</strong><br />
APPENDIX B<br />
BEGIN COMM SESSION with MODEM/DIRECT<br />
If you select this option and Option 2. COMM SETTINGS<br />
is set to MODEM/DIRECT, this Communication Status<br />
menu appears:<br />
PEN*KEY UTILITIES<br />
COMMUNICATIONS<br />
COMM SETTINGS:<br />
MODEM/DIRECT<br />
MODEM TYPE<br />
NM2400/NM2400A<br />
PROTOCOL BPS FMT<br />
TTY 2400 8N1<br />
AUTO ANSWER<br />
NO<br />
CONFIGURING<br />
LAST SESSION: T289<br />
NO RESPONSE FROM<br />
MODEM<br />
[NO]STOP COMM<br />
" NOTE: The computer may stay at the “CONFIGURING” screen for about 20<br />
seconds if a modem is not detected.<br />
If the session is unsuccessful, LAST SESSION appears with<br />
the failure status, such as “T289.”
APPENDIX B PEN*KEY R Utilities Program<br />
BEGIN COMM SESSION with ACCESSORY CARD<br />
If you select this option and Option 2. COMM SETTINGS<br />
is set to ACCESSORY CARD, the system attempts to<br />
execute the application from a PC card. If the “MISSING<br />
SYSTEM FILES” message appears, press the [YES] key to<br />
continue.<br />
BEGIN COMM SESSION with INTERSERVER<br />
If you select this option and Option 2. COMM SETTINGS<br />
is set to INTERSERVER, this Communication Status menu<br />
appears:<br />
Transfer:<br />
Press the [NO] key to exit this screen.<br />
<strong>6220</strong> <strong>Hand</strong>-<strong>Held</strong> <strong>Computer</strong> User’s <strong>Guide</strong> B-11
PEN*KEY R Utilities Program<br />
B-12 <strong>6220</strong> <strong>Hand</strong>-<strong>Held</strong> <strong>Computer</strong> User’s <strong>Guide</strong><br />
APPENDIX B<br />
Session Status<br />
The first single character code (“T”) is the session status,<br />
which applies to all COMM SETTINGS. There are five statuses<br />
possible:<br />
" G Good session<br />
" T Unexpected end of transmission<br />
" H Incorrect file header encountered<br />
" F File error encountered<br />
" L Telecommunications aborted before first file<br />
header received<br />
The three digit number (“289”) indicates the specific protocol<br />
error. These error codes apply when COMM SETTINGS<br />
is set to NPCP RS-485 or NPCP RS-232:<br />
" 0 No error<br />
" 1 MININET.EXE not installed<br />
" 6 User aborted communications by pressing<br />
[NO]<br />
" 11 Invalid parameter specified in control file<br />
" NOTE: The following values indicate an error returned by MININET.EXE.<br />
100 is added to the error returned by MININET.EXE to avoid conflict<br />
with other defined errors.<br />
101 Illegal buffer length<br />
103 Invalid command<br />
105 Command timed out<br />
106 Message incomplete<br />
108 Illegal local session number<br />
109 No resource available<br />
110 Session closed<br />
111 Command canceled<br />
113 Duplicate name in local name table<br />
114 Name table is full<br />
115 Name is deregistered, command complete
APPENDIX B PEN*KEY R Utilities Program<br />
117 Local session table full<br />
118 Session open rejected<br />
119 Invalid name number<br />
120 No answer<br />
121 Name not found<br />
122 Name in use on remote adapter<br />
123 Name deleted<br />
124 Session ended abnormally<br />
125 Name conflict<br />
126 Incompatible remote device<br />
133 Network interface is busy<br />
134 Too many commands outstanding<br />
135 Invalid LAN adapter number<br />
136 Command completed while cancel occurring<br />
138 Command not valid to cancel<br />
164-179 Unusual network condition<br />
180-354 Adapter malfunction<br />
These error codes apply when COMM SETTINGS is set to<br />
MODEM/DIRECT and PROTOCOL is set to TTY:<br />
0 No error<br />
6 [NO] key pressed, aborting communications<br />
11 Invalid parameter specified in control file<br />
23 End of transmission<br />
101 Line lost<br />
102 Parity error<br />
103 Character gap too long<br />
104 Data loss<br />
105 Excessive NAKs (negative acknowledgements)<br />
106 Block count error<br />
107 Block check error<br />
108 Block framing error<br />
109 Control character error<br />
2xx Modem error<br />
xx Hayes response code, or code defined by<br />
program:<br />
03 No carrier<br />
04 Command not recognized<br />
<strong>6220</strong> <strong>Hand</strong>-<strong>Held</strong> <strong>Computer</strong> User’s <strong>Guide</strong> B-13
PEN*KEY R Utilities Program<br />
B-14 <strong>6220</strong> <strong>Hand</strong>-<strong>Held</strong> <strong>Computer</strong> User’s <strong>Guide</strong><br />
06 No dial tone<br />
07 Dialed number is busy<br />
08 No answer<br />
86 Error sending command to<br />
modem<br />
87 Expected numeric response not<br />
numeric<br />
88 Invalid response format<br />
89 No significant response from<br />
modem<br />
97 COM port disabled by system<br />
due to low battery or removal of<br />
PC card modem.<br />
98 Unrecognized English response<br />
99 Memory allocation error<br />
APPENDIX B<br />
" NOTE: For response codes not listed above, if you purchased this modem<br />
from the Norand Mobile Systems Division of <strong>Intermec</strong> Technologies<br />
Corporation, contact our Customer Response Center at<br />
1-800-755-5505 (U.S.A. or Canada) or 1-425-356-1799.<br />
If this modem is not from the Norand Mobile Systems Division, contact<br />
your modem supplier.<br />
These error codes apply when COMM SETTINGS is set to<br />
NOVELL NETWARE:<br />
" 0 No error<br />
" 6 User aborted communications by pressing<br />
[NO] key.<br />
" 100 Connection to host failed. Verify network<br />
connection, verify that PENKEY login name<br />
exists on host.<br />
" 101 Could not access include file. Verify existence<br />
of include file on host.<br />
" 102 Could not allocate needed memory.
APPENDIX B PEN*KEY R Utilities Program<br />
These error codes apply when COMM SETTINGS is set to<br />
NRINET:<br />
" 0 No error<br />
" 6 User aborted communications by pressing<br />
[NO] key.<br />
" 800 PC TCP/IP kernel is missing.<br />
" 801 Invalid client IP address. Make sure the entry<br />
for CLIENT IP ADDRESS is correct, or make<br />
sure the DHCP server is running.<br />
" 802 Invalid Service or Service Type, or invalid port<br />
number.<br />
" 803 Invalid host name or IP Address. Make sure<br />
the entry for SERVER NAME is correct, and<br />
that the server is running.<br />
" 804 Could not create socket. Check all cables and<br />
network connections.<br />
" 806 Block sent was incomplete or block received<br />
was incomplete.<br />
" 807 Client and server negotiation failed.<br />
" 808 Server specified an unsupported block size.<br />
" 809 Invalid buffer pointer.<br />
" 810 All server connections are already in use. Try<br />
again later.<br />
" 811 Timeout while sending data. Connection to<br />
remote machine dropped. Make sure the host<br />
is still running, and check all cables and<br />
network connections.<br />
" 812 Timeout while receiving data. Connection to<br />
remote machine dropped. Make sure the host<br />
is still running, and check all cables and<br />
network connections.<br />
<strong>6220</strong> <strong>Hand</strong>-<strong>Held</strong> <strong>Computer</strong> User’s <strong>Guide</strong> B-15
PEN*KEY R Utilities Program<br />
B-16 <strong>6220</strong> <strong>Hand</strong>-<strong>Held</strong> <strong>Computer</strong> User’s <strong>Guide</strong><br />
APPENDIX B<br />
" 813 An attempt to send data to the server failed due<br />
to a closed connection. Ensure the server is still<br />
running, check all cables and network<br />
connections.<br />
" 814 An attempt to receive data from the server failed<br />
due to a closed connection. Ensure the server is<br />
still running, check all cables and network<br />
connections.<br />
" 815 Could not access the network attach information.<br />
" 816 An error occurred reading the network attach<br />
information.<br />
" 817 Server did not respond to the connect request.<br />
Ensure the server is still running, check all<br />
cables and network connections.<br />
" 818 An error occurred reading the TCP/IP kernel<br />
information.<br />
" 935 Operation would block.<br />
" 939 Destination address required.<br />
" 940 Message too long.<br />
" 948 Address already in use.<br />
" 950 Network is down.<br />
" 951 Network is unreachable.<br />
" 952 Network dropped connection or reset.<br />
" 954 Connection reset by peer.<br />
" 955 No buffer space available.<br />
" 960 Connection timed out.<br />
" 961 Connection refused.<br />
" 962 Too many levels of symbolic links.<br />
" 963 File name is too long.<br />
" 964 Host is down.<br />
" 965 Host is unreachable.<br />
" 966 Directory not empty.
APPENDIX B PEN*KEY R Utilities Program<br />
These error codes apply when COMM SETTINGS is set to<br />
TFTP:<br />
" 0 No error.<br />
" 1 TCP/IP kernel is not loaded.<br />
" 6 User aborted communications by pressing<br />
[NO] key.<br />
" 100 TCP/IP kernel is missing.<br />
" 101 Invalid client IP address. Ensure the entry for<br />
CLIENT IP ADDRESS is correct or ensure the<br />
DHCP server is running.<br />
" 201 TFTP.EXE failed.<br />
" 202 TFTP.EXE not found.<br />
" 203 Unknown server.<br />
" 204 Remote file name is invalid.<br />
" 205 Local file name is invalid.<br />
" 206 File not found on server.<br />
" 207 Timeout.<br />
Option 2 COMM SETTING<br />
If you select this option, the Communications Settings dropdown<br />
list appears:<br />
1. NETWORK. . .<br />
2. MODEM/DIRECT<br />
3. ACCESSORY CARD<br />
4. HANDHELD<br />
5. REMOTE OPS<br />
6. INTERSERVER<br />
Press the number of a communications settings or press the<br />
Y orBkeys to scroll through the list, then press the [YES]<br />
key to enter.<br />
<strong>6220</strong> <strong>Hand</strong>-<strong>Held</strong> <strong>Computer</strong> User’s <strong>Guide</strong> B-17
PEN*KEY R Utilities Program<br />
B-18 <strong>6220</strong> <strong>Hand</strong>-<strong>Held</strong> <strong>Computer</strong> User’s <strong>Guide</strong><br />
APPENDIX B<br />
Suboption 1 NETWORK<br />
If you select this suboption, a drop-down list appears with<br />
various networks:<br />
1. NETWORK. . .<br />
1. NPCP RS485<br />
2. NPCP RS232<br />
3. NRINET<br />
4. TFTP<br />
5. NOVELL NETWARE<br />
Press the number of a network or press theYorBkeys to<br />
scroll through the list, then press the [YES] key to enter.<br />
The computer returns to the Communications Menu with<br />
the selected network assigned to Option 2. COMM<br />
SETTING. See a sample menu on page B-6.<br />
Press the [NO] key to exit this drop-down list. The computer<br />
takes you to the Communications Menu.
APPENDIX B PEN*KEY R Utilities Program<br />
Suboption 2 MODEM/DIRECT<br />
If you select this suboption, the computer returns to the<br />
Communications Menu with the MODEM/DIRECT option<br />
assigned to Option 2. COMM SETTING:<br />
PEN*KEY UTILITIES<br />
COMMUNICATIONS<br />
1. BEGIN COMM SESSION<br />
2. COMM SETTING<br />
MODEM/DIRECT<br />
3. UNIT ID<br />
4. MODEM PARAMETERS<br />
MODEM TYPE<br />
NM2400/NM2400A<br />
PROTOCOL BPS FMT<br />
TTY 2400 8N1<br />
AUTO ANSWER<br />
NO<br />
5. PHONE NUMBER<br />
9...131369282<br />
9. ADVANCED UTILITIES<br />
<strong>6220</strong> <strong>Hand</strong>-<strong>Held</strong> <strong>Computer</strong> User’s <strong>Guide</strong> B-19
PEN*KEY R Utilities Program<br />
B-20 <strong>6220</strong> <strong>Hand</strong>-<strong>Held</strong> <strong>Computer</strong> User’s <strong>Guide</strong><br />
APPENDIX B<br />
Suboption 3 ACCESSORY CARD<br />
Suboption 6 INTERSERVER<br />
If you select either of these suboptions, the computer returns<br />
to the Communications Menu with ACCESSORY<br />
CARD or INTERSERVER assigned to Option 2. COMM<br />
SETTING.<br />
PEN*KEY UTILITIES<br />
COMMUNICATIONS<br />
1. BEGIN COMM SESSION<br />
2. COMM SETTING<br />
ACCESSORY CARD<br />
3. UNIT ID<br />
9. ADVANCED UTILITIES<br />
Suboption 4 HANDHELD<br />
Suboption 5 REMOTE OPS<br />
These suboptions are not supported at this time.
APPENDIX B PEN*KEY R Utilities Program<br />
Option 3 UNIT ID<br />
If you select this option, the Change Unit ID pop-up menu<br />
appears:<br />
CHANGE UNIT ID<br />
UNIT ID 2233233<br />
WORKGROUP<br />
6200IPL<br />
[F4]RESET FACTORY<br />
[NO]QUIT<br />
Enter up to eight characters to change the Unit ID. Use the<br />
[←SP] key to backspace and use the [CLR] to restore the<br />
previous ID. Press the [YES] key to save the new ID and<br />
return to the Communications Settings menu. Press the<br />
[F4] key to reset the ID to factory default. Press [NO] to<br />
exit this pop-up menu.<br />
Option 4 NETWORK PARAMETERS<br />
Network Parameters appears as Option 4 when Option 2.<br />
COMM SETTINGS is set to one of these three NETWORK<br />
options: NRINET, TFTP, or NOVELL NETWARE.<br />
<strong>6220</strong> <strong>Hand</strong>-<strong>Held</strong> <strong>Computer</strong> User’s <strong>Guide</strong> B-21
PEN*KEY R Utilities Program<br />
B-22 <strong>6220</strong> <strong>Hand</strong>-<strong>Held</strong> <strong>Computer</strong> User’s <strong>Guide</strong><br />
APPENDIX B<br />
NETWORK PARAMETERS with NRINET or TFTP<br />
If you select this option and Option 2. COMM SETTINGS<br />
is set to NRINET or TFTP, this Network Parameters pop-up<br />
menu appears:<br />
NETWORK PARAMETERS<br />
SERVER NAME<br />
SERVER IP ADDRESS<br />
0. 0. 0. 0<br />
CLIENT IP ADDRESS<br />
0. 0. 0. 0<br />
ROUTER<br />
0.<br />
SUBNET MASK<br />
0. 0. 0<br />
0.<br />
[NO]QUIT<br />
0. 0. 0<br />
If you have an alphanumeric keyboard, press the characters<br />
to the host name, then press the [YES] key to save the<br />
entry and move to the next field.<br />
If you have a numeric keyboard, use theAand"keys to<br />
scroll back and forth through the given set of alphanumeric<br />
characters. After a character is selected, press the [YES]<br />
key to enter that character. Press [YES] again to move to<br />
the next field. Press theYorBkeys to move between<br />
fields.<br />
Press [YES] to save the entries and exit the Network Parameters<br />
menu. Press the [NO] key to exit without saving<br />
the entries.
APPENDIX B PEN*KEY R Utilities Program<br />
NETWORK PARAMETERS with NOVELL NETWARE<br />
If you select this option and Option 2. COMM SETTINGS<br />
is set to NOVELL NETWARE, this frame type drop-down<br />
list appears:<br />
1. 802.2<br />
2. ETHERNET II<br />
3. 802.3 RAW<br />
4. 802.2 W/ SNAP<br />
Press the number of a frame type, or press theYorBkeys<br />
to scroll through the list and press the [YES] key to enter.<br />
Press the [NO] key to exit this drop-down list without<br />
changing the frame type.<br />
Option 4 MODEM PARAMETERS<br />
Modem Parameters appears as Option 4 when Option 2.<br />
COMM SETTINGS is set to MODEM/DIRECT.<br />
If you select this option, the Modem Parameters pop-up<br />
menu appears.<br />
MODEM PARAMETERS<br />
1. MODEM TYPE<br />
NM2400/NM2400A<br />
2. PROTOCOL TTY<br />
3. BPS RATE 2400<br />
4. DATA FORMAT 8N1<br />
5. AUTO ANSWER NO<br />
[NO]DONE<br />
Press the number of a modem parameters option, or press<br />
theYorBkeys to scroll through the list, then press the<br />
[YES] button to enter.<br />
Suboption 1 MODEM TYPE<br />
If you select this suboption, a drop-down list appears with<br />
supported modem types. Press theYorBkeys to scroll<br />
through the list, then press the [YES] button to enter.<br />
<strong>6220</strong> <strong>Hand</strong>-<strong>Held</strong> <strong>Computer</strong> User’s <strong>Guide</strong> B-23
PEN*KEY R Utilities Program<br />
B-24 <strong>6220</strong> <strong>Hand</strong>-<strong>Held</strong> <strong>Computer</strong> User’s <strong>Guide</strong><br />
APPENDIX B<br />
" If you select drop-option OTHER EXTERNAL or<br />
OTHER INTERNAL, the Modem Init String pop-up<br />
menu appears:<br />
MODEM INIT STRING<br />
ATE0V0Q0&M0&S1&C1&<br />
D2&R/QX0L1<br />
[F2]TEST STRING<br />
[YES]OK [NO]QUIT<br />
a. Enter the initialization string of the modem you are<br />
using. Refer to your modem’s reference manual for<br />
information.<br />
" NOTE: UseAand"keys on numeric keyboards to scroll the alphanumeric<br />
character set.<br />
" NOTE: If you leave this menu blank, a string is not saved.<br />
b. Press the [YES] key to enter the string or press<br />
[NO] to exit this pop-up menu.
APPENDIX B PEN*KEY R Utilities Program<br />
" NOTE: Testing the modem initialization string is optional.<br />
" To test the modem string, do the following:<br />
a. Press the [F2] key. The computer replies with<br />
“PLEASE WAIT” and tests the string:<br />
MODEM INIT STRING<br />
ATE0V0Q0&M0&S1&C1&<br />
D2&R/QX0L1<br />
PLEASE WAIT . . .<br />
[F2]TEST STRING<br />
[YES]OK [NO]QUIT<br />
Momentarily, the computer displays the modem’s<br />
response:<br />
MODEM INIT STRING<br />
ATE0V0Q0&M0&S1&C1&<br />
D2&R/QX0L1<br />
RESULT: 97<br />
[F2]TEST STRING<br />
[YES]OK [NO]QUIT<br />
" NOTE: Zero indicates the modem was successfully configured. Any other<br />
value indicates an error. See page B-13 for a list of modem errors. If<br />
you purchased this modem from the Norand Mobile Systems Division,<br />
contact our Customer Response Center at 1-800-755-5505<br />
(U.S.A. or Canada) or 1-425-356-1799.<br />
Modem string errors are most likely to be mistakes that can be corrected<br />
by checking the instructions that came with the modem. If that<br />
does not work then contact the manufacturer of the modem you are<br />
using.<br />
b. Press the [YES] key to update the modem initialization<br />
string. The computer returns to the Modem<br />
Parameters pop-up menu with OTHER EXTERNAL<br />
or OTHER INTERNAL assigned.<br />
<strong>6220</strong> <strong>Hand</strong>-<strong>Held</strong> <strong>Computer</strong> User’s <strong>Guide</strong> B-25
PEN*KEY R Utilities Program<br />
B-26 <strong>6220</strong> <strong>Hand</strong>-<strong>Held</strong> <strong>Computer</strong> User’s <strong>Guide</strong><br />
APPENDIX B<br />
Suboption 2 PROTOCOL<br />
If you select this suboption, a drop-down list of various protocols<br />
appears:<br />
1. TTY<br />
2. YMODEM<br />
Press the number of a protocol, or press theYorBkeys to<br />
scroll through the list, then press the [YES] key to enter.<br />
The computer returns to the Modem Parameters pop-up<br />
menu with the selected protocol assigned.<br />
Press the [NO] key to exit this drop-down list.<br />
Suboption 3 BPS RATE<br />
If you select this suboption, the BPS Rate drop-down list<br />
appears with various bits per second (BPS) rates:<br />
1. 1200<br />
2. 2400<br />
3. 4800<br />
4. 9600<br />
5. 19200<br />
6. 38400<br />
7. 57600<br />
8. 115200<br />
Press the number of a BPS rate, or press theYorBkeys<br />
to scroll through the list, then press the [YES] key to enter.<br />
The computer returns to the Modem Parameters pop-up<br />
menu with the selected BPS rate assigned.<br />
Press the [NO] key to exit this drop-down list.
APPENDIX B PEN*KEY R Utilities Program<br />
Suboption 4 DATA FORMAT<br />
If you select this suboption, the Data Format drop-down list<br />
appears:<br />
1. 8N1<br />
2. 7E1<br />
Press the number of a data format, or press theYorB<br />
keys to scroll through the list, then press the [YES] key to<br />
enter. The computer returns to the Modem Parameters popup<br />
menu with the selected data format assigned.<br />
Press the [NO] key to exit this drop-down list.<br />
Suboption 5 AUTO ANSWER<br />
This suboption is not supported at this time.<br />
Option 5 NETWORK INTERFACE<br />
Network Interface appears as Option 5 when Option 2.<br />
COMM SETTINGS is set to NRINET, TFTP, or NOVELL<br />
NETWARE.<br />
If you select this option, the Network Interface drop-down<br />
list appears:<br />
1. ETHERNET<br />
2. RS485<br />
Press the number of a network interface, or press theYor<br />
B keys to scroll through the list, then press the [YES] key<br />
to enter. The computer returns to the Communications<br />
menu with the selected network interface assigned.<br />
<strong>6220</strong> <strong>Hand</strong>-<strong>Held</strong> <strong>Computer</strong> User’s <strong>Guide</strong> B-27
PEN*KEY R Utilities Program<br />
Option 5 PHONE NUMBER<br />
B-28 <strong>6220</strong> <strong>Hand</strong>-<strong>Held</strong> <strong>Computer</strong> User’s <strong>Guide</strong><br />
APPENDIX B<br />
Phone Number appears as Option 5 when Option 2. COMM<br />
SETTINGS is set to MODEM/DIRECT.<br />
If you select this option, the Phone Number pop-up menu<br />
appears:<br />
PHONE NUMBER<br />
9...13193693282<br />
[ . ]DIALING PAUSE<br />
[YES]OK [NO]QUIT<br />
Enter up to 16 characters. Use the [←SP] key to backspace;<br />
use the [CLR] to reset to the previous phone number, and<br />
press [.] to insert a dialing pause command (“,”).<br />
Press the [YES] key to save the new phone number and return<br />
to the Communications Settings menu.<br />
Press the [NO] key to exit this pop-up menu.
APPENDIX B PEN*KEY R Utilities Program<br />
Option 9 ADVANCED UTILITIES<br />
If you select this option, the Advanced Utilities menu appears:<br />
PEN*KEY UTILITIES<br />
ADVANCED UTILITIES<br />
1. SET DATE/TIME<br />
2. BATTERY STATUS<br />
3. FORMAT RAM DRIVE<br />
4. FORMAT RAM CARD<br />
5. SET BOOT DRIVE<br />
Press the number of an advanced utility option, or press the<br />
Y orBkeys to scroll through the list, then press the [YES]<br />
key to enter.<br />
" NOTE: Suboption 4 FORMAT RAM CARD appears only if the FOR-<br />
MAT.COM program is in the PATH.<br />
<strong>6220</strong> <strong>Hand</strong>-<strong>Held</strong> <strong>Computer</strong> User’s <strong>Guide</strong> B-29
PEN*KEY R Utilities Program<br />
Suboption 1 SET DATE/TIME<br />
B-30 <strong>6220</strong> <strong>Hand</strong>-<strong>Held</strong> <strong>Computer</strong> User’s <strong>Guide</strong><br />
APPENDIX B<br />
If you select this suboption, the Set Date/Time pop-up menu<br />
appears:<br />
SET DATE/TIME<br />
DATE: 01/20/80<br />
TIME: 23:12:04<br />
[NO]QUIT<br />
Enter numbers for the month, day, year (1980--2079), hour,<br />
minute, and second (up to 23:59:59). Press the [YES] key<br />
after each entry. An incorrect entry causes the computer to<br />
default to the initial number. Press the [NO] key to exit<br />
this pop-up menu.<br />
Suboption 2 BATTERY STATUS<br />
Use this suboption to check battery status, and to condition<br />
these batteries. The Battery Status screen appears when<br />
you select this suboption:<br />
PEN*KEY UTILITIES<br />
BATTERY STATUS<br />
MAIN PACK CHARGING<br />
VOLTAGE 7.37<br />
BACKUP<br />
VOLTAGE 2.94<br />
LAST COND 10/10/98<br />
CAPACITY 23:59<br />
CHARGER 12.00<br />
[F2]CONDITION BATT<br />
[NO]QUIT
APPENDIX B PEN*KEY R Utilities Program<br />
" MAIN PACK: Status of the main battery pack:<br />
" “OK” Battery operating properly.<br />
" “LOW” Power running low, needs<br />
recharging.<br />
" “CRITICAL” Power dangerously low,<br />
recharge soon or lose all data.<br />
" “CHARGING” Main battery pack recharging.<br />
" “MISSING” Main battery pack not loaded<br />
or detected.<br />
" VOLTAGE: Amount of operational battery<br />
voltage.<br />
" LAST COND: Date when battery was last<br />
conditioned. “??/??/??” if unknown.<br />
" CAPACITY: Estimated time battery is<br />
operational after complete charge.<br />
“??:??” if unknown.<br />
" CHARGER: Amount of voltage supplied by<br />
external charge source.<br />
To start a conditioning cycle for the <strong>6220</strong> <strong>Computer</strong> backup<br />
battery, press [F2] to access this menu:<br />
1. BACKUP<br />
[NO]QUIT<br />
<strong>6220</strong> <strong>Hand</strong>-<strong>Held</strong> <strong>Computer</strong> User’s <strong>Guide</strong> B-31
PEN*KEY R Utilities Program<br />
B-32 <strong>6220</strong> <strong>Hand</strong>-<strong>Held</strong> <strong>Computer</strong> User’s <strong>Guide</strong><br />
APPENDIX B<br />
Select option 1. MAIN PACK to condition the main battery<br />
pack; or select option 2. BACKUP to condition the backup<br />
battery. The Battery Conditioning screen appears with the<br />
status of the battery selected:<br />
PEN*KEY UTILITIES<br />
BATTERY CONDITIONING<br />
BACKUP<br />
VOLTAGE 2.90<br />
DISCHARGING 23:59<br />
NO ERRORS<br />
" DISCHARGING: The displayed time is the elapsed<br />
time in the current conditioning state, not the total<br />
conditioning time. Elapsed time is tracked only until<br />
conditioning is complete or has failed. The following<br />
conditioning states may be displayed:<br />
" “INITIALIZING” System is initializing<br />
" “DISCHARGING” Battery is discharging<br />
" “CHARGING” Battery is charging<br />
" “COMPLETE” Battery conditioning<br />
complete<br />
" “FAILED” Battery conditioning failed
APPENDIX B PEN*KEY R Utilities Program<br />
" NO ERRORS The status of the battery conditioning<br />
cycle. If the battery conditioning fails, one of the following<br />
messages appears:<br />
" “OLD POWER SUPPLY<br />
NOT SUPPORTED”<br />
" “CANNOT CONDITION<br />
BOTH MAIN AND BKUP”<br />
" “CHARGE LOST DURING<br />
CONDITION CYCLE”<br />
" “CHARGE NOT ENABLED”<br />
" “TEMPERATURE TOO<br />
HOT OR COLD”<br />
" “POWER FAILURE”<br />
" “SYSTEM SUSPENDED”<br />
" “NO BATTERY”<br />
" “INIT FAILED<br />
NOT SUPPORTED”<br />
" “ERROR #NNN”<br />
Unknown error code meaning occurred.<br />
" NOTE: [YES] CONTINUE does not appear until the conditioning cycle is<br />
complete.<br />
A condition cycle cannot be stopped by any means except<br />
when the charge is removed or when there is a power failure.<br />
Menu Option 1 BACKUP<br />
" NOTE: The backup battery conditioning cycle takes up to 22.5 hours to complete<br />
when the backup battery is fully charged at the beginning of the<br />
cycle.<br />
A condition cycle cannot be stopped by any means except<br />
removing the charge, when there is a power failure, or in<br />
extreme temperatures. Conditioning is not allowed and is<br />
<strong>6220</strong> <strong>Hand</strong>-<strong>Held</strong> <strong>Computer</strong> User’s <strong>Guide</strong> B-33
PEN*KEY R Utilities Program<br />
B-34 <strong>6220</strong> <strong>Hand</strong>-<strong>Held</strong> <strong>Computer</strong> User’s <strong>Guide</strong><br />
APPENDIX B<br />
stopped when temperatures fall below 0 ° C (32 ° F) or rise<br />
above 40 ° C (104 ° F).<br />
Considerations<br />
As battery conditioning removes charge from the batteries,<br />
take care to keep the computer on charge once you start a<br />
conditioning cycle or if a condition cycle stops due to error.<br />
If the computer is removed from charge during a condition<br />
cycle, the computer may suffer data loss or reset itself depending<br />
on the battery condition. Also, as the state of the<br />
batteries is unknown, improper functioning of the backup<br />
battery system may occur and result in improper computer<br />
behavior and data loss if the computer is used for data processing<br />
purposes before the batteries can be fully recharged.<br />
Due to the risk involved in conditioning, remove important<br />
data from the computer before you start a condition cycle. If<br />
anything goes wrong, this data can be restored.<br />
If errors are reported during the condition cycle, the condition<br />
cycle terminates. If this occurs, the battery being conditioned<br />
should charge completely or be replaced with a<br />
charged battery before you use it. It takes two hours for the<br />
main battery to charge and 12.5 hours for the backup battery<br />
to charge. To reduce chances of condition cycle errors,<br />
keep the computer on charge until the cycle is complete and<br />
only cycle the batteries in temperatures below 30 ° C (86 ° F).<br />
Suboption 3 FORMAT RAM DRIVE<br />
If you select this suboption, the Format RAM Drive pop-up<br />
menu appears:<br />
FORMAT RAM DRIVE<br />
0MB 0KB<br />
[YES]OK [NO]QUIT<br />
Enter the total MB and KB for the RAM drive.
APPENDIX B PEN*KEY R Utilities Program<br />
" NOTE: A zero in both fields deletes the RAM drive.<br />
Press the [YES] key after each entry. A pop-up verification<br />
appears:<br />
FORMAT RAM DRIVE<br />
ALL DATA ON<br />
EXISTING RAM DRIVE<br />
WILL BE DESTROYED!<br />
OK TO CONTINUE?<br />
[YES]OK [NO]QUIT<br />
Press the [YES] key to continue. Press the [NO] key to exit<br />
the menu.<br />
<strong>6220</strong> <strong>Hand</strong>-<strong>Held</strong> <strong>Computer</strong> User’s <strong>Guide</strong> B-35
PEN*KEY R Utilities Program<br />
Suboption 4 FORMAT RAM CARD<br />
B-36 <strong>6220</strong> <strong>Hand</strong>-<strong>Held</strong> <strong>Computer</strong> User’s <strong>Guide</strong><br />
APPENDIX B<br />
" NOTE: This suboption appears only if the FORMAT.COM program is in the<br />
PATH. The 512KB flash does not include FORMAT.COM.<br />
" NOTE: If the computer was booted from a RAM card drive, that drive is not<br />
displayed in the menu.<br />
Press the number of the RAM card drive, or press theYor<br />
B keys to scroll through the list, then press the [YES] key<br />
to enter. A pop-up verification window appears:<br />
FORMAT RAM CARD<br />
ALL DATA ON<br />
RAM CARD<br />
WILL BE DESTROYED!<br />
OK TO CONTINUE?<br />
[YES]OK [NO]QUIT<br />
Press the [YES] key to continue. Press the [NO] key to exit<br />
the menu.
APPENDIX B PEN*KEY R Utilities Program<br />
Suboption 5 SET BOOT DRIVE<br />
If you select this suboption, the Set Boot Drive pop-up<br />
menu appears:<br />
SET BOOT DRIVE<br />
3. C<br />
4. D:<br />
5. E:<br />
[NO]QUIT<br />
" NOTE: The current default drive is highlighted.<br />
Press the number of a boot drive, or press theYorBkeys<br />
to scroll through the list, then press the [YES] key to enter.<br />
The computer returns to the Advanced Utilities menu.<br />
Press the [NO] key to exit this pop-up menu.<br />
<strong>6220</strong> <strong>Hand</strong>-<strong>Held</strong> <strong>Computer</strong> User’s <strong>Guide</strong> B-37
PEN*KEY R Utilities Program<br />
B-38 <strong>6220</strong> <strong>Hand</strong>-<strong>Held</strong> <strong>Computer</strong> User’s <strong>Guide</strong><br />
APPENDIX B
Glossary<br />
" " " " " " " " " " " " " " " " " " " " " " " " " " " "<br />
ATA Card<br />
A credit-card-sized device, which has been specially<br />
designed to meet the needs of small computers, and can be<br />
inserted and removed from a PC Card slot. In the<br />
PEN*KEY products, it is generally a flash storage card,<br />
modem, radio, etc. (See also: Flash Card, SanDisk,<br />
Spinning Media, or Hardcard)<br />
Boot Default Drive<br />
The drive from which the computer will boot. By default, it<br />
is the flash drive D: but another drive (RAM drive or card<br />
slot) may be selected.<br />
Bootable ATA<br />
Dock<br />
The ability to run the CONFIG.SYS and AUTOEXEC.BAT<br />
from an ATA card. In some older versions of flash, the<br />
CONFIG.SYS from the flash drive had to be run to load the<br />
drivers for the ATA card. With Bootable ATA the<br />
CONFIG.SYS and AUTOEXEC.BAT are run from the ATA<br />
card without loading any drivers.<br />
A device in which one or more hand-held computers may be<br />
placed for charging and communication.<br />
DOS (Disk Operating System)<br />
A program or set of programs that tells a disk-based<br />
computer system to schedule and supervise work, manage<br />
computer resources, and operate and control its peripheral<br />
devices.<br />
Download<br />
The transmission of data from a host computer to a mobile<br />
computer.<br />
<strong>6220</strong> <strong>Hand</strong>-<strong>Held</strong> <strong>Computer</strong> User’s <strong>Guide</strong> Glossary-1
GLOSSARY<br />
Ethernet<br />
Flash<br />
Flash Card<br />
Function<br />
Host Address<br />
Host <strong>Computer</strong><br />
Host Controller<br />
A general term indicating both 802.3 and DIX Ethernet<br />
(also called Ethernet 2.0). See also: 802.3<br />
A technology for nonvolatile memory storage. A special<br />
type of EEPROM that can be erased and reprogrammed.<br />
A memory storage PC Card that meets the ATA standard.<br />
(See also: ATA Card, SanDisk, Spinning Media, or<br />
Hardcard)<br />
A collection of declarations and statements returning a<br />
value that can be called by name.<br />
The part of an internet address that designates which node<br />
on the (sub)network is being addressed. Also called host<br />
number.<br />
A large computer that serves many users, such as a PC,<br />
minicomputer, or mainframe.<br />
A 4980 Controller that is functioning as a host to a<br />
secondary controller.<br />
Host Port (com4980)<br />
A port that can connect to a host or a 4980 Network<br />
Controller.<br />
Host System (com4980)<br />
The Unix system that the COM4980 Package runs on.<br />
LAN (Local Area Network)<br />
A group of network devices in which each device can<br />
communicate through a wired or wireless link. The wired<br />
link may have several segments joined by repeaters and<br />
Glossary-2 <strong>6220</strong> <strong>Hand</strong>-<strong>Held</strong> <strong>Computer</strong> User’s <strong>Guide</strong>
Modem<br />
GLOSSARY<br />
bridges. The LAN is characterized by the relatively short<br />
distance it is designed to cover, a high speed of operation,<br />
and relatively low error rates. The geographic scope of<br />
LANs is limited to thousands of feet or closely-spaced<br />
building complexes.<br />
A communication device that enables a computer to<br />
transmit information over a telephone line.<br />
Modem Baud Rate<br />
The speed of the modem connection. The higher the<br />
number the faster the rate.<br />
Modem Device Name<br />
The name of the communications port, for example: COM1,<br />
AUX2, HOST3, or DIGI4.<br />
Modem Settings<br />
The command strings required by your modem.<br />
MS-DOS (Microsoft Disk Operating System)<br />
A master control program for 16-bit, Intel-based system.<br />
One of the more common operating systems on PC systems.<br />
Multicast Address<br />
A form of broadcast address through which copies of the<br />
frame are delivered to a subset of all possible destinations<br />
with a common multicast address.<br />
Multi-Link (Mlink)<br />
A software product that allows for transmitting data from a<br />
terminal to a PC-compatible computer.<br />
Multi-tasking<br />
Network<br />
A computer’s ability to run more than one application at the<br />
same time.<br />
A computer data communications system which<br />
interconnects computer systems at various sites. A network<br />
<strong>6220</strong> <strong>Hand</strong>-<strong>Held</strong> <strong>Computer</strong> User’s <strong>Guide</strong> Glossary-3
GLOSSARY<br />
NMSD<br />
may include any combination of LANs, MANs, or WANs.<br />
See also: LAN, WAN, internet.<br />
(ADK) A computer network or terminals connected by<br />
means of (wires or radio transmissions) using software that<br />
enables them to exchange information.<br />
NORAND Mobile Systems Division of <strong>Intermec</strong><br />
Technologies Corporation.<br />
NPCP (NORAND ® Portable Communications Protocol)<br />
NPCP, a NORAND proprietary protocol, provides session,<br />
network, and datalink services for NORAND HHCs in the<br />
NORAND LAN environment used with printers and data<br />
communications.<br />
OEM (Original Equipment Manufacturer)<br />
A term that identifies certain hardware vendors who<br />
produce PC hardware for a system built by another<br />
company.<br />
On Key<br />
PC Card<br />
PC Card Icon<br />
This key is found on some units. It will not turn the unit<br />
“On” or “Off” but it will suspend/resume operation.<br />
A device that fits in the card slots of an <strong>Intermec</strong> or other<br />
computer. In some PEN*KEY computers, the smaller type<br />
II card occupies one slot, while a type III card blocks the<br />
second slot. The card may be used for data storage, modem,<br />
printer, wireless, or other purposes.<br />
Generally, PC Card is used in reference to devices, whereas<br />
PCMCIA is a reference to the standard.<br />
An icon located in the System Tray, which indicates a PC<br />
Card is plugged into the PC Card slot. (See also: System<br />
Tray)<br />
Glossary-4 <strong>6220</strong> <strong>Hand</strong>-<strong>Held</strong> <strong>Computer</strong> User’s <strong>Guide</strong>
GLOSSARY<br />
PCMCIA (Personal <strong>Computer</strong> Memory Card International<br />
Association)<br />
An industry group responsible for creation of the standard<br />
for devices (slightly larger than a credit card) for small<br />
computers, such as laptop and hand-held computers.<br />
Formerly, devices were referred to as PCMCIA cards, but<br />
are now generally referred to as PC Cards, while PCMCIA<br />
is a reference to the standard.<br />
PEN*KEY Utilities<br />
A program that provides the basic functions needed to<br />
prepare the PEN*KEY for use, including program load and<br />
data communications.<br />
Plug and Play<br />
Port<br />
Protocol<br />
The combination of BIOS, operating system, and peripheral<br />
device components that provides an environment that<br />
configures itself, thereby avoiding potential hardware<br />
conflicts for the operating system by polling the peripheral<br />
devices, assessing their requirements, and determining and<br />
implementing optimal settings for each device.<br />
The physical hardware communication port.<br />
(SNMP) Physically, an access point to a computer,<br />
multiplexer device, or network. Logically, a pointer to a<br />
TCP/IP application.<br />
A formal description of message formats and the rules<br />
computers must follow to exchange those messages.<br />
ROM (Read Only Memory)<br />
Contains information that cannot be reprogrammed by the<br />
user. A user can write some variables to ROM; such as<br />
software, boot segment, data segment, and baud rate.<br />
RS-232 C (Recommended Standard 232)<br />
An Electronic Industries Association standard interface<br />
between data terminal equipment (DTE) and data<br />
<strong>6220</strong> <strong>Hand</strong>-<strong>Held</strong> <strong>Computer</strong> User’s <strong>Guide</strong> Glossary-5
GLOSSARY<br />
SanDisk<br />
Scroll<br />
Serial Interface<br />
Serial Lid<br />
Stylus<br />
circuit-terminating equipment (DCE) with serial binary<br />
data interchange.<br />
A brand of flash memory card. (See also: ATA Card, Flash<br />
Card, Spinning Media, or Hardcard)<br />
To move through text or graphics (up, down, left, or right) to<br />
see parts of the window not shown onscreen.<br />
An interface in which the terminal or computer sends single<br />
bits of information to the other device, one after another.<br />
A cap for the 6100 <strong>Computer</strong> which contains various<br />
communications capabilities.<br />
A pen-shaped device, used for input on a touch screen by<br />
tapping or sliding.<br />
UPC (Universal Product Code)<br />
A bar code symbology used throughout the grocery and<br />
retail industries.<br />
Upload<br />
Wireless<br />
The transmission of data from a mobile computer to a host<br />
computer.<br />
The transmission of data using radio waves.<br />
The wireless access point provides store-and-forward<br />
operation (a hop) with each frame transmitted twice over<br />
the wireless media to reach its destination. Because frames<br />
are transmitted twice, the amount of wireless traffic over<br />
the radio network doubles.<br />
In general, the throughput of a wireless access point has<br />
about half the effective bandwidth of a wired bridge,<br />
Glossary-6 <strong>6220</strong> <strong>Hand</strong>-<strong>Held</strong> <strong>Computer</strong> User’s <strong>Guide</strong>
GLOSSARY<br />
because all frames received on the radio channel must be<br />
forwarded on the same channel. Therefore, using a wireless<br />
access point exchanges performances for ease of<br />
installation.<br />
Wireless Stations<br />
An inclusive term that refers to network terminals and<br />
computers equipped with wireless NICs. Network<br />
terminals include the INTERMEC RT1100 Radio Terminal,<br />
RT1700 Radio Terminal, and RT5900 Radio Terminal, and<br />
the TRAKKER ANTARES products. Wireless computers<br />
include the JANUS Terminal, PEN*KEY 6400 <strong>Computer</strong>,<br />
and PEN*KEY 6550 <strong>Computer</strong>.<br />
<strong>6220</strong> <strong>Hand</strong>-<strong>Held</strong> <strong>Computer</strong> User’s <strong>Guide</strong> Glossary-7
GLOSSARY<br />
Glossary-8 <strong>6220</strong> <strong>Hand</strong>-<strong>Held</strong> <strong>Computer</strong> User’s <strong>Guide</strong>
INDEX<br />
" " " " " " " " " " " " " " " " " " " " " " " " " " " "<br />
A<br />
Adjusting backlight brightness,<br />
2-6<br />
Adjusting contrast of the<br />
display, 1-12<br />
Adjusting the display screen<br />
contrast, 2-6<br />
Alpha keys, 1-10<br />
Alphabetic keys, 1-10<br />
Arrow keys, 1-11<br />
B<br />
Backlight, 1-12<br />
Backspace key, 1-10<br />
Backup battery, 1-13<br />
conditioning, <strong>6220</strong>, B-33<br />
installing, 2-3<br />
nicad, 1-13<br />
Batteries, 1-12<br />
backup, 1-12, 1-13<br />
installing, 2-3<br />
nicad, 1-13<br />
main, 1-12<br />
care, 3-1<br />
cycles, 1-12<br />
installing, 2-5<br />
low battery indication, 3-1<br />
lithium Ion, 1-12<br />
Batteries will not charge, 4-2<br />
Battery<br />
backup, conditioning, <strong>6220</strong>,<br />
B-33<br />
status, utilities menu, B-30<br />
Boot drive statement, 2-9<br />
C<br />
Charging backup battery, 2-6<br />
Charging main battery, 2-6<br />
Cleaning<br />
case, 3-3<br />
contact surfaces, 3-3<br />
display, 3-3<br />
hand-held computer, 3-3<br />
keyboard, 3-3<br />
Cleaning contact surfaces, 3-3<br />
Cleaning keyboard, 3-4<br />
Clear key, 1-9<br />
<strong>Computer</strong> displays bad Tcom<br />
message, 4-5<br />
<strong>Computer</strong> does not respond, 4-4,<br />
4-5<br />
<strong>Computer</strong> does not turn on<br />
when put into dock, 4-3<br />
<strong>Computer</strong> goes to sleep after<br />
taking it off charger, 4-3<br />
<strong>Computer</strong> quits while using it,<br />
4-3<br />
<strong>Computer</strong> resets when you<br />
replace main battery, 4-3<br />
<strong>Computer</strong> takes a long time to<br />
boot up, 4-4<br />
Conditioning, batteries, backup,<br />
B-33<br />
Connectors, A-1<br />
12-pin surface contact field,<br />
A-2<br />
15-pin female D-sub, A-1<br />
4-pin RJ-11 connector, A-3<br />
Contrast adjustment, 1-12<br />
D<br />
Diagnostic EEPROM, 4-5<br />
See also troubleshooting<br />
Display options<br />
touch screen, 1-11<br />
without touch screen, 1-11<br />
Downloading programs, 2-11<br />
E<br />
Enter key, 1-9<br />
Exit key, 1-10<br />
H<br />
<strong>Hand</strong> strap replacement, 3-2<br />
<strong>Hand</strong>-held computer cleaning,<br />
3-3<br />
I<br />
Installing memory cards, 2-7<br />
Installing PC memory cards, 2-7<br />
K<br />
Key descriptions<br />
alphabetic, 1-10<br />
arrow keys, 1-11<br />
backspace, 1-10<br />
clear, 1-9<br />
exit key, 1-10<br />
minus, 1-10<br />
no, 1-9<br />
numeric, 1-10<br />
on key, 1-9<br />
page down, 1-9<br />
page up, 1-9<br />
period, 1-9<br />
shift, 1-10<br />
yellow shift, 1-10<br />
yes, 1-9<br />
Keyboard descriptions, 1-9<br />
Keyboard features<br />
30-key keypad, 1-6<br />
56-key keypad, 1-6<br />
Keypad options<br />
30-key keypad, 1-6<br />
56-key keypad, 1-6<br />
<strong>6220</strong> <strong>Hand</strong>-<strong>Held</strong> <strong>Computer</strong> User’s <strong>Guide</strong> Index-1
INDEX<br />
L<br />
Booting computer, 2-9<br />
Loading programs, 2-9<br />
Low battery, 4-2<br />
M<br />
Main battery compartment door,<br />
2-5<br />
Main battery pack installation,<br />
2-5<br />
Measuring battery pack<br />
capacity, 2-4<br />
Memory card<br />
installing, 2-7<br />
removing, 2-8<br />
types<br />
type II, 1-14<br />
type III, 1-14<br />
Memory types<br />
flash ROM, 1-13<br />
main, 1-13<br />
RAM, 1-13<br />
Minus key, 1-10<br />
N<br />
NO key, 1-9<br />
Number keys, 1-10<br />
Numeric keys, 1-10<br />
O<br />
ON key, 1-9<br />
P<br />
Page down, 1-9<br />
Page up, 1-9<br />
PC memory card<br />
installing, 2-7<br />
removing, 2-8<br />
PC memory cards, 1-13<br />
types<br />
type II, 1-14<br />
type III, 1-14<br />
Period key, 1-9<br />
Pressing ON key, blank display,<br />
4-2<br />
Pressing ON key, computer will<br />
not respond, 4-2<br />
Index-2 <strong>6220</strong> <strong>Hand</strong>-<strong>Held</strong> <strong>Computer</strong> User’s <strong>Guide</strong><br />
R<br />
Removing memory cards, 2-8<br />
Removing PC memory cards, 2-8<br />
Repair service, 4-6<br />
nicad, 1-13<br />
Replacing hand strap, 3-2<br />
Reset switch location, 1-15<br />
Resume operation, 1-9<br />
S<br />
Shift key, 1-10<br />
Shift keys, yellow, 1-10<br />
Specifications, 1-16<br />
Suspend operation, 1-9<br />
T<br />
Touch screen display, 1-11<br />
Troubleshooting. See diagnostic<br />
EEPROM<br />
Troubleshooting table. See diagnostic<br />
EEPROM<br />
Turning on the backlight, 2-6<br />
Boot <strong>Computer</strong>, Using ATA<br />
cards, 2-9<br />
Type II card slot<br />
drive C<br />
DOS ATA card, 2-9<br />
RAM, 2-9<br />
drive D, ROM, 2-9<br />
drive E, 2-9<br />
U<br />
Unpacking and inspecting, 1-2<br />
Utilities program, B-1<br />
communications menu, B-6<br />
communications menu<br />
options<br />
ADVANCED UTILITIES,<br />
B-29<br />
BEGIN COMM SESSION,<br />
B-7<br />
COMM SETTING, B-17<br />
MODEM PARAMETERS,<br />
B-23<br />
NETWORK INTERFACE,<br />
B-27<br />
PHONE NUMBER, B-28<br />
UNIT ID, B-21<br />
communications menu suboptions<br />
ACCESSORY CARD, B-20<br />
AUTO ANSWER, B-27<br />
BATTERY STATUS, B-30<br />
BPS RATE, B-26<br />
DATA FORMAT, B-27<br />
FORMAT RAM CARD,<br />
B-36<br />
FORMAT RAM DRIVE,<br />
B-34<br />
HANDHELD, B-20<br />
INTERSERVER, B-20<br />
MODEM TYPES, B-23<br />
MODEM/DIRECT, B-19<br />
NETWORK, B-18<br />
OTHER EXTERNAL, B-24<br />
OTHER INTERNAL, B-24<br />
PROTOCOL, B-26<br />
REMOTE OPS, B-20<br />
SET BOOT DRIVE, B-37<br />
SET DATE/TIME, B-30<br />
language selection, B-5<br />
network parameters<br />
with NOVELL NETWARE,<br />
B-23<br />
with NRINET or TFTP,<br />
B-22<br />
title screen, B-4<br />
Y<br />
YES key, 1-9