CONTRIBUTION TO GEOMETRIC MORPHOMETRICS ...
CONTRIBUTION TO GEOMETRIC MORPHOMETRICS ...
CONTRIBUTION TO GEOMETRIC MORPHOMETRICS ...

You also want an ePaper? Increase the reach of your titles
YUMPU automatically turns print PDFs into web optimized ePapers that Google loves.
74<br />
Ber. Inst. Erdwiss. K.-F.-Univ. Graz ISSN 1608-8166 Band 13 Graz 2008<br />
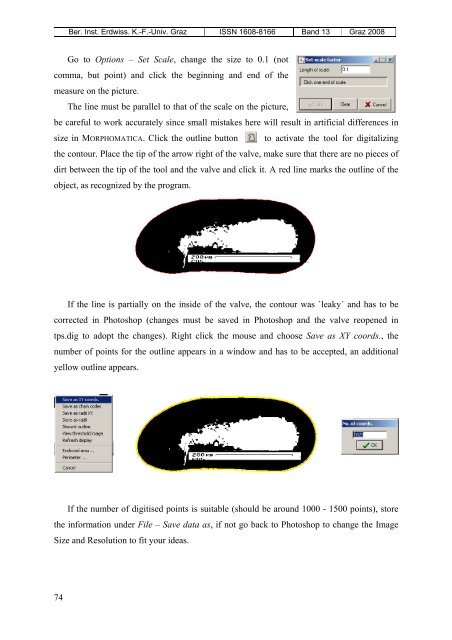
Go to Options – Set Scale, change the size to 0.1 (not<br />
comma, but point) and click the beginning and end of the<br />
measure on the picture.<br />
The line must be parallel to that of the scale on the picture,<br />
be careful to work accurately since small mistakes here will result in artificial differences in<br />
size in MORPHOMATICA. Click the outline button to activate the tool for digitalizing<br />
the contour. Place the tip of the arrow right of the valve, make sure that there are no pieces of<br />
dirt between the tip of the tool and the valve and click it. A red line marks the outline of the<br />
object, as recognized by the program.<br />
If the line is partially on the inside of the valve, the contour was `leaky´ and has to be<br />
corrected in Photoshop (changes must be saved in Photoshop and the valve reopened in<br />
tps.dig to adopt the changes). Right click the mouse and choose Save as XY coords., the<br />
number of points for the outline appears in a window and has to be accepted, an additional<br />
yellow outline appears.<br />
If the number of digitised points is suitable (should be around 1000 - 1500 points), store<br />
the information under File – Save data as, if not go back to Photoshop to change the Image<br />
Size and Resolution to fit your ideas.