Disk Pack Migration on Drobo B800i with VMware
Disk Pack Migration on Drobo B800i with VMware
Disk Pack Migration on Drobo B800i with VMware

You also want an ePaper? Increase the reach of your titles
YUMPU automatically turns print PDFs into web optimized ePapers that Google loves.
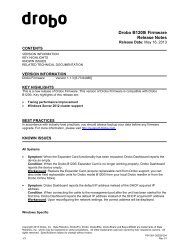
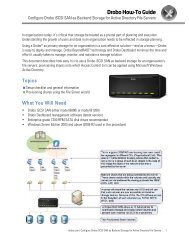
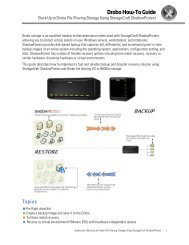
<strong>Drobo</strong> How-To Guide<br />
Migrating a <str<strong>on</strong>g>Disk</str<strong>on</strong>g> <str<strong>on</strong>g>Pack</str<strong>on</strong>g> Between <strong>Drobo</strong> iSCSI SAN Systems<br />
Bey<strong>on</strong>dRAID technology in <strong>Drobo</strong> enables users to quickly migrate the set of disks (referred to as a “disk pack”) in<br />
<strong>on</strong>e <strong>Drobo</strong> to a <strong>Drobo</strong> of the same model. Also, in certain cases, disk pack migrati<strong>on</strong> is supported from a smaller or<br />
older <strong>Drobo</strong> to a larger or newer model.<br />
<str<strong>on</strong>g>Disk</str<strong>on</strong>g> pack migrati<strong>on</strong> may be required when you need to replace a system or when you want to upgrade from an older<br />
model such as <strong>Drobo</strong>Elite to a newer <strong>Drobo</strong> model <strong>B800i</strong>. This document uses the example of migrating a disk pack<br />
from <strong>Drobo</strong>Elite to <strong>Drobo</strong> <strong>B800i</strong>, though these steps can be used to migrate a disk pack for B1200i.<br />
The first secti<strong>on</strong> is universal to disk pack migrati<strong>on</strong> for supported paths. A list of supported paths can be found @<br />
http://www.drobo.com/migrati<strong>on</strong>. If the <strong>Drobo</strong> is an iSCSI SAN model being used for <strong>VMware</strong> primary storage, then<br />
additi<strong>on</strong>al steps are required, as detailed in the other secti<strong>on</strong>s in this document. These steps apply to any SAN<br />
storage where a c<strong>on</strong>troller is changed, though <strong>Drobo</strong> does make it easier than most storage devices to get updated<br />
and return to normal use.<br />
Note: In most cases migrating drives is a <strong>on</strong>e-way operati<strong>on</strong> for supported migrati<strong>on</strong>s from <strong>on</strong>e <strong>Drobo</strong> model to<br />
another. Once a disk pack is migrated, you will no l<strong>on</strong>ger be able to access the data it c<strong>on</strong>tained <strong>with</strong> the older <strong>Drobo</strong>.<br />
Topics<br />
What will you need<br />
Preparing for migrati<strong>on</strong> and moving the disk pack<br />
Preparing to resignature volumes<br />
Mounting VMFS datastores after migrati<strong>on</strong><br />
C<strong>on</strong>necting VMs to their disks<br />
What You Will Need<br />
• Source <strong>Drobo</strong> system and the new target system<br />
• The most recent firmware installed <strong>on</strong> both <strong>Drobo</strong> devices<br />
• The latest versi<strong>on</strong> <strong>Drobo</strong> Dashboard management software, minimum versi<strong>on</strong> 2.0 or higher<br />
To download the latest versi<strong>on</strong> of firmware and <strong>Drobo</strong> Dashboard for your device, visit<br />
http://www.drobo.com/support/updates.php.<br />
drobo.com | Migrating a <str<strong>on</strong>g>Disk</str<strong>on</strong>g> <str<strong>on</strong>g>Pack</str<strong>on</strong>g> between <strong>Drobo</strong> iSCSI SAN systems 1
<strong>Drobo</strong> How-To Guide<br />
Migrating a <str<strong>on</strong>g>Disk</str<strong>on</strong>g> <str<strong>on</strong>g>Pack</str<strong>on</strong>g> Between <strong>Drobo</strong> iSCSI SAN Systems<br />
Preparing for <str<strong>on</strong>g>Migrati<strong>on</strong></str<strong>on</strong>g> and Moving the <str<strong>on</strong>g>Disk</str<strong>on</strong>g> <str<strong>on</strong>g>Pack</str<strong>on</strong>g><br />
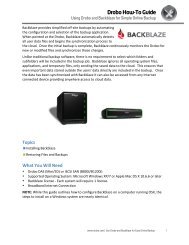
STEP 1<br />
STEP 2<br />
Shut down the existing<br />
<strong>Drobo</strong> system. In <strong>Drobo</strong><br />
Dashboard, select<br />
Tools > Shutdown<br />
(circled in red).<br />
Ensure that all lights<br />
<strong>on</strong> the <strong>Drobo</strong> are off<br />
before performing the<br />
next step.<br />
Now, simply remove<br />
all of the drives from<br />
the source <strong>Drobo</strong>.<br />
Since <strong>Drobo</strong> is slot<br />
independent, you d<strong>on</strong>’t<br />
need to keep track of<br />
which drives came out<br />
of which slots when<br />
you re-insert them into<br />
the destinati<strong>on</strong> <strong>Drobo</strong>.<br />
drobo.com | Migrating a <str<strong>on</strong>g>Disk</str<strong>on</strong>g> <str<strong>on</strong>g>Pack</str<strong>on</strong>g> between <strong>Drobo</strong> iSCSI SAN systems 2
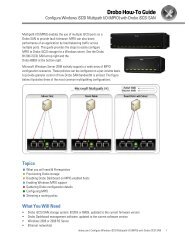
STEP 3<br />
<strong>Drobo</strong> How-To Guide<br />
Migrating a <str<strong>on</strong>g>Disk</str<strong>on</strong>g> <str<strong>on</strong>g>Pack</str<strong>on</strong>g> Between <strong>Drobo</strong> iSCSI SAN Systems<br />
The IP address and other device settings such as the name are retained <strong>with</strong>in the disk pack, so the destinati<strong>on</strong><br />
system will appear <strong>with</strong> the same name and IP address as it had in the source <strong>Drobo</strong><br />
Insert the disks from<br />
source <strong>Drobo</strong> into the<br />
new <strong>Drobo</strong> in any order.<br />
Verify that all cables <strong>on</strong><br />
the destinati<strong>on</strong> <strong>Drobo</strong><br />
are plugged in and<br />
power up the unit.<br />
<strong>Drobo</strong> Dashboard<br />
automatically discovers<br />
the system.<br />
drobo.com | Migrating a <str<strong>on</strong>g>Disk</str<strong>on</strong>g> <str<strong>on</strong>g>Pack</str<strong>on</strong>g> between <strong>Drobo</strong> iSCSI SAN systems 3
Preparing to Resignature Volumes<br />
<strong>Drobo</strong> How-To Guide<br />
Migrating a <str<strong>on</strong>g>Disk</str<strong>on</strong>g> <str<strong>on</strong>g>Pack</str<strong>on</strong>g> Between <strong>Drobo</strong> iSCSI SAN Systems<br />
When a LUN is presented to an ESX/ESXi host, it gets a signature in the form of a Universally Unique Identifier<br />
(UUID). This UUID uses the MAC address of the physical port and thus must be updated when the physical MAC<br />
address changes after a disk pack migrati<strong>on</strong>. This process using the <strong>VMware</strong> command line will find “dead paths”<br />
and update them as necessary.<br />
STEP 1<br />
Open a terminal sessi<strong>on</strong> to the ESX/ESXi Server host and log in as root. If for any reas<strong>on</strong> you are unable to c<strong>on</strong>nect to<br />
an ESX/ESXi Server host via an SSH sessi<strong>on</strong>, refer to the <strong>VMware</strong> KB article “Unable to c<strong>on</strong>nect to an ESX host using<br />
Secure Shell (SSH) (1003807)” @ http://kb.vmware.com/kb/1003807.<br />
STEP 2<br />
Run the command:<br />
esxcfg-mpath -L<br />
|grep dead<br />
This will return any “dead paths” that may have resulted from the disk pack migrati<strong>on</strong> due to a change in Universal<br />
Unique ID (UUID). The ESX host uses a unique identifier to reference the volume. The name you specify when you<br />
create a VMFS volume is a user-defined device name that is a symbolic link to the UUID of the VMFS volume (d<strong>on</strong>e to<br />
solve the problem of changing the device name). When you change the volume name you are changing <strong>on</strong>ly the userdefined<br />
device name and not the volume UUID.<br />
drobo.com | Migrating a <str<strong>on</strong>g>Disk</str<strong>on</strong>g> <str<strong>on</strong>g>Pack</str<strong>on</strong>g> between <strong>Drobo</strong> iSCSI SAN systems 4
STEP 3<br />
<strong>Drobo</strong> How-To Guide<br />
Migrating a <str<strong>on</strong>g>Disk</str<strong>on</strong>g> <str<strong>on</strong>g>Pack</str<strong>on</strong>g> Between <strong>Drobo</strong> iSCSI SAN Systems<br />
To perform ESX/ESXi<br />
host rescan, run the<br />
command esxcfg-<br />
rescan vmhbaxx<br />
where xx is the unique<br />
ID, in this example, 33.<br />
If any syntax is returned, it means that there is a dead path and you must reboot the ESX/ESXi host. If reboot is not<br />
required, proceed to the next step.<br />
STEP 4<br />
To verify the all pathsdown<br />
(APD) state due<br />
to a dead path, run<br />
grep -ir "APD"<br />
vmkerne<br />
The APD state is a c<strong>on</strong>diti<strong>on</strong> in which no working path exists to a storage device (LUN). In this case, it is a result of<br />
migrating the disk pack from <strong>Drobo</strong>Elite to <strong>Drobo</strong> <strong>B800i</strong>. Reboot the ESX/ESXi host, ensuring that no VM is active<br />
before rebooting.<br />
drobo.com | Migrating a <str<strong>on</strong>g>Disk</str<strong>on</strong>g> <str<strong>on</strong>g>Pack</str<strong>on</strong>g> between <strong>Drobo</strong> iSCSI SAN systems 5
<strong>Drobo</strong> How-To Guide<br />
Migrating a <str<strong>on</strong>g>Disk</str<strong>on</strong>g> <str<strong>on</strong>g>Pack</str<strong>on</strong>g> Between <strong>Drobo</strong> iSCSI SAN Systems<br />
Mounting VMFS Datastores after <str<strong>on</strong>g>Migrati<strong>on</strong></str<strong>on</strong>g><br />
As part of the disk pack migrati<strong>on</strong> process, LUNs from the <strong>Drobo</strong> will appear to <strong>VMware</strong> as snapshots. VMFS<br />
datastores <strong>on</strong> your existing volumes detected by <strong>VMware</strong> as snapshot LUNs can be mounted using <strong>on</strong>e of the<br />
following opti<strong>on</strong>s:<br />
• Resignature the VMFS datastore and mount it <strong>on</strong> the selected host. Subsequent VMFS refresh is required <strong>on</strong><br />
other hosts to see this newly resignatured datastore.<br />
• Keep the existing signature of the VMFS datastore and mount it <strong>on</strong> the selected host, also known as “force<br />
mounting” a VMFS datastore.<br />
The steps in this secti<strong>on</strong> describe the sec<strong>on</strong>d opti<strong>on</strong>, keeping signature(s) of the VMFS datastore(s).<br />
STEP 1<br />
C<strong>on</strong>nect directly to the ESX host service c<strong>on</strong>sole, logging in as root<br />
STEP 2<br />
NOTE: The “Can mount” value must be “Yes” before you can proceed to the next step.<br />
STEP 3<br />
List the volume and<br />
capture the UUID. Run<br />
the command:<br />
esxcfg-volume –<br />
l<br />
Record the UUID porti<strong>on</strong> of the output to be used in the next step. In this example, <strong>on</strong>e of the UUIDs is 4cbf6c94-<br />
57b4c7f3-42bf-002219d4fc7f.<br />
STEP 4<br />
Run the command: esxcfg-volume -M <br />
Where is the value recorded in Step 3.<br />
NOTE: If you do not wish the volume mount to persist after reboot, use the –m switch instead.<br />
drobo.com | Migrating a <str<strong>on</strong>g>Disk</str<strong>on</strong>g> <str<strong>on</strong>g>Pack</str<strong>on</strong>g> between <strong>Drobo</strong> iSCSI SAN systems 6
C<strong>on</strong>necting VMs to Their <str<strong>on</strong>g>Disk</str<strong>on</strong>g>s<br />
<strong>Drobo</strong> How-To Guide<br />
Migrating a <str<strong>on</strong>g>Disk</str<strong>on</strong>g> <str<strong>on</strong>g>Pack</str<strong>on</strong>g> Between <strong>Drobo</strong> iSCSI SAN Systems<br />
In any case in which the datastore fails to map to the VM after migrati<strong>on</strong>, use the following procedure to remap the<br />
VMX files.<br />
STEP 1<br />
C<strong>on</strong>nect directly to the ESX host service c<strong>on</strong>sole, logging in as root.<br />
STEP 2<br />
List path and names of registered VM .vmx files <strong>on</strong> the current host. Run the command: vmware-cmd -l<br />
STEP 3<br />
Register the virtual machine from the ESX command line using:<br />
vmware-cmd -s register<br />
/vmfs/volumes///.<br />
vmx<br />
Where:<br />
• represents the datastore name<br />
• represents the directory c<strong>on</strong>taining the virtual machine files<br />
• represents the name of the virtual machine files.<br />
The following is an example:<br />
vmware-cmd -s register /vmfs/volumes/Storage1/vm1/vm1.vmx<br />
A return code =1 signals success.<br />
Here is an example of using the VIM command:<br />
#vim-cmd solo/registervm /vmfs/vol/datastore/dir/vm.vmx<br />
Using the directory in the example above:<br />
#vim-cmd solo/registerv /vmfs/volumes/Storage1/vm1/vm1.vmx<br />
<strong>Drobo</strong> 2460 North First Street, Suite 100, San Jose, CA www.drobo.com 1.866.97.DROBO<br />
Copyright 2012 <strong>Drobo</strong>, Inc. Data Robotics, <strong>Drobo</strong>, <strong>Drobo</strong>Ellite, <strong>Drobo</strong>Pro, Bey<strong>on</strong>dRAID, and Smart Volumes are trademarks of<br />
<strong>Drobo</strong>, Inc., which may be registered in some jurisdicti<strong>on</strong>s. All other trademarks used are owned by their respective owners.<br />
All rights reserved. Specificati<strong>on</strong>s subject to change <strong>with</strong>out notice. HT-0028-01 April 2012<br />
drobo.com | Migrating a <str<strong>on</strong>g>Disk</str<strong>on</strong>g> <str<strong>on</strong>g>Pack</str<strong>on</strong>g> between <strong>Drobo</strong> iSCSI SAN systems 7