XRS 9470 Manual - Cobra Electronics
XRS 9470 Manual - Cobra Electronics
XRS 9470 Manual - Cobra Electronics

You also want an ePaper? Increase the reach of your titles
YUMPU automatically turns print PDFs into web optimized ePapers that Google loves.
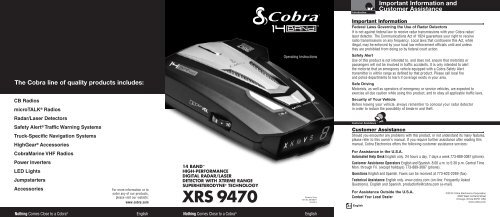
The <strong>Cobra</strong> line of quality products includes:<br />
CB Radios<br />
microTALK ® Radios<br />
Radar/Laser Detectors<br />
Safety Alert ® Traffic Warning Systems<br />
Truck-Specific Navigation Systems<br />
HighGear ® Accessories<br />
<strong>Cobra</strong>Marine VHF Radios<br />
Power Inverters<br />
LED Lights<br />
Jumpstarters<br />
Accessories<br />
For more information or to<br />
order any of our products,<br />
please visit our website:<br />
www.cobra.com<br />
Nothing Comes Close to a <strong>Cobra</strong> ® English<br />
14 BAND <br />
HIGH-PERFORMANCE<br />
DIGITAL RADAR/LASER<br />
DETECTOR WITH XTREME RANGE<br />
SUPERHETERODYNE ® TECHNOLOGY<br />
<strong>XRS</strong> <strong>9470</strong><br />
Operating Instructions<br />
Printed in China<br />
Part No. 480-663-P<br />
Version B<br />
Nothing Comes Close to a <strong>Cobra</strong> ® English<br />
Introduction<br />
A1<br />
English<br />
Important Information and<br />
Customer Assistance<br />
Important Information<br />
•<br />
Federal Laws Governing the Use of Radar Detectors<br />
It is not against federal law to receive radar transmissions with your <strong>Cobra</strong> radar/<br />
laser detector. The Communications Act of 1924 guarantees your right to receive<br />
radio transmissions on any frequency. Local laws that contravene this Act, while<br />
illegal, may be enforced by your local law enforcement officials until and unless<br />
they are prohibited from doing so by federal court action.<br />
Safety Alert<br />
Use of this product is not intended to, and does not, ensure that motorists or<br />
passengers will not be involved in traffic accidents. It is only intended to alert<br />
the motorist that an emergency vehicle equipped with a <strong>Cobra</strong> Safety Alert<br />
transmitter is within range as defined by that product. Please call local fire<br />
and police departments to learn if coverage exists in your area.<br />
Safe Driving<br />
Motorists, as well as operators of emergency or service vehicles, are expected to<br />
exercise all due caution while using this product, and to obey all applicable traffic laws.<br />
Security of Your Vehicle<br />
Before leaving your vehicle, always remember to conceal your radar detector<br />
in order to reduce the possibility of break-in and theft.<br />
Customer Assistance<br />
Customer Assistance<br />
•<br />
Should you encounter any problems with this product, or not understand its many features,<br />
please refer to this owner’s manual. If you require further assistance after reading this<br />
manual, <strong>Cobra</strong> <strong>Electronics</strong> offers the following customer assistance services:<br />
For Assistance in the U.S.A.<br />
Automated Help Desk English only. 24 hours a day, 7 days a week 773-889-3087 (phone).<br />
Customer Assistance Operators English and Spanish. 8:00 a.m. to 5:30 p.m. Central Time<br />
Mon. through Fri. (except holidays) 773-889-3087 (phone).<br />
Questions English and Spanish. Faxes can be received at 773-622-2269 (fax).<br />
Technical Assistance English only. www.cobra.com (on-line: Frequently Asked<br />
Questions). English and Spanish. productinfo@cobra.com (e-mail).<br />
For Assistance Outside the U.S.A.<br />
Contact Your Local Dealer<br />
©2010 <strong>Cobra</strong> <strong>Electronics</strong> Corporation<br />
6500 West Cortland Street<br />
Chicago, Illinois 60707 USA<br />
www.cobra.com
Introduction<br />
A2 English<br />
Controls, Indicators<br />
and Connections<br />
Controls, Indicators and Connections<br />
Windshield Bracket<br />
Release Button<br />
12V DC<br />
Power Jack<br />
On-Off/Volume Control<br />
Allows you to adjust the<br />
volume of the tone alerts.<br />
Dim Button<br />
Allows you to adjust the UltraBright<br />
Data Display brightness for easy<br />
reading. (Also turns VG-2 and<br />
Spectre I & IV+ alerts On and Off.*)<br />
* Press and hold for four seconds to<br />
access these functions.<br />
Windshield<br />
Bracket<br />
Mount<br />
Speaker<br />
Mute Button<br />
For manual mute or auto<br />
mute of audio alerts. (Also<br />
turns Voice Alert On and Off.*)<br />
LaserEye<br />
For 360° detection<br />
of laser signals.<br />
Audio Jack<br />
City Button<br />
For City or Highway<br />
modes to reduce false<br />
alerts. (Also turns Ku<br />
alerts On and Off.*)<br />
IntelliMute Button<br />
Engine RPM sensing mute function<br />
which reduces false alerts. Button<br />
turns IntelliMute On and Off. (Also<br />
enters IntelliMute setting mode.*)<br />
WARNING<br />
Modifications or parts substitutions not approved<br />
by <strong>Cobra</strong> <strong>Electronics</strong> Corporation may violate<br />
FCC Rules and void your authority to operate<br />
this equipment.<br />
•<br />
Introduction<br />
Display<br />
Display and Product Features<br />
X K Ka V S L<br />
Radar, VG-2,<br />
Signal<br />
Spectre I & IV+ and Strength,<br />
Safety Indicators Pop, Laser,<br />
City/Highway<br />
and IntelliMute Pro<br />
Mode Indicators<br />
Signal Strength 1 (weakest) to 5 (strongest)<br />
Product Features<br />
Xtreme Range<br />
Superheterodyne ® Technology<br />
With super-fast sweep circuitry,<br />
<strong>XRS</strong> provides extra detection range<br />
and the best possible advance warning<br />
to even the fastest radar guns<br />
Detection and Separate Alerts For:<br />
Radar signals (X, K, Ka and Ku bands,<br />
with signal strength indicated), Laser<br />
signals, Safety Alert signals, VG-2<br />
signals, Spectre I & IV+ signals<br />
LaserEye ®<br />
For 360° detection of laser signals<br />
Instant-On Ready<br />
Detects radar guns with “instant-on”<br />
(very fast) speed monitoring capabilities<br />
Pop Detection<br />
Detects the latest super-fast instant-on<br />
single pulse radar guns<br />
Tone Alert or Voice Alert ®<br />
With adjustable volume<br />
IntelliMute<br />
Indicator<br />
NOTE: In This <strong>Manual</strong><br />
When steady,<br />
the display will<br />
be shown:<br />
When blinking,<br />
the display will<br />
be shown:<br />
X & K will light<br />
simultaneously<br />
when indicating<br />
Ku detection:<br />
X K Ka V S c<br />
X K Ka V S c<br />
X K Ka V S c<br />
UltraBright Data Display<br />
Easy-to-read with adjustable brightness<br />
City or Highway<br />
Modes to reduce false alerts<br />
Alert Programming<br />
Easy setting of radar bands to be monitored<br />
Safety Alert ®<br />
Traffic warning system distinguishes<br />
important safety alerts from other<br />
K band signals<br />
<strong>Manual</strong> Mute or Auto Mute<br />
A mute function of audio alerts<br />
IntelliMute ®<br />
A mute function reduces false audio alerts<br />
by sensing engine RPMs<br />
IntelliMute ® Pro<br />
Prevents detection by radar detector detectors<br />
(RDDs) when traveling at slower speeds<br />
Mounting<br />
Mounts easily on windshield or dashboard<br />
This booklet describes the simple steps for mounting and setting up your detector. It also provides helpful<br />
information about how radar and laser guns are used and how you can interpret the alerts you receive.<br />
Nothing Comes Close to a <strong>Cobra</strong> ® A3<br />
•<br />
Customer Assistance<br />
Accessories Order Info and<br />
Trademark Acknowledgement<br />
Ordering From U.S.A.<br />
Call 773-889-3087 for pricing or visit www.cobra.com.<br />
For Credit Card Orders<br />
Call 773-889-3087 [Press one from the main menu] 8:00 a.m. to 5:30 p.m. Central Time,<br />
Monday through Friday.<br />
Make Check or Money Order Payable To<br />
<strong>Cobra</strong> <strong>Electronics</strong>, Attn: Accessories Dept.,<br />
6500 West Cortland Street, Chicago, IL 60707 U.S.A.<br />
To Order Online<br />
Please visit our website: www.cobra.com.<br />
Item# Description<br />
420-030-N-001 Straight 12V Power Cord<br />
420-026-N-001 Coiled 12V Power Cord<br />
545-159-N-001 Windshield Mounting Bracket<br />
CLP-2B Dual Port Power Adapter<br />
Trademark Acknowledgement<br />
•<br />
<strong>Cobra</strong> ® , DigiView ® , EasySet ® , Extra Sensory Detection ® , IntelliMute ® , IntelliMute Pro ® ,<br />
IntelliShield ® , LaserEye ® , Nothing Comes Close to a <strong>Cobra</strong> ® , Safety Alert ® Traffic Warning System,<br />
Strobe Alert ® , VG-2 Alert ® , Xtreme Range Superheterodyne ® and the snake design<br />
are registered trademarks of <strong>Cobra</strong> <strong>Electronics</strong> Corporation, USA.<br />
<strong>Cobra</strong> <strong>Electronics</strong> Corporation, 14 Band, 15 Band, Extreme Bright DataGrafix,<br />
IntelliLink, Revolution Series, SmartPower, Spectre Alert, Super-Xtreme Range<br />
Superheterodyne, S-<strong>XRS</strong>, UltraBright, and Voice Alert are trademarks of <strong>Cobra</strong><br />
<strong>Electronics</strong> Corporation, USA.<br />
Opticom is a trademark of 3M Corporation. Instaclear ® for Ford is a registered trademark of Ford<br />
Motor Company, Inc. Electriclear ® for GM is a registered trademark of General Motors Corporation.<br />
LTI Laser and LTI 20-20 are trademarks of Laser Technology, Inc. Kustom Laser, Kustom<br />
Laser 340 and ProLaser II are trademarks of Kustom Signals, Inc. SpeedLaser is a trademark<br />
of Laser Atlanta. Bee III and Pop are a trademarks of MPH Industries. Stalker LIDAR is a<br />
trademark of Applied Concepts, Inc. Spectre I and Spectre IV are trademarks of Stealth Micro<br />
Systems Pty. Ltd. Interceptor VG-2 is a trademark of TechniSonic Industries LTD. Tomar ® is a<br />
registered trademark of TOMAR <strong>Electronics</strong>, Inc.<br />
Nothing Comes Close to a <strong>Cobra</strong> ® 25
Introduction<br />
Contents<br />
Introduction<br />
Important Information ............................................................................... A1<br />
Customer Assistance ................................................................................. A1<br />
Controls, Indicators and Connections ........................................................ A2<br />
Display ....................................................................................................... A3<br />
Product Features ........................................................................................ A3<br />
Your Detector<br />
Installation ................................................................................................... 2<br />
Getting Started ............................................................................................. 5<br />
Auxiliary Audio Jack ................................................................................. 5<br />
Settings ........................................................................................................ 6<br />
Highway/City Mode ................................................................................... 6<br />
UltraBright Data Display Brightness ......................................................... 7<br />
Muting an Alert ......................................................................................... 8<br />
Auto Mute Mode ....................................................................................... 8<br />
IntelliMute ................................................................................................. 9<br />
IntelliMute Pro ......................................................................................... 12<br />
Voice/Tone Setting .................................................................................. 13<br />
VG-2 and Spectre I & IV+ Alert Settings ................................................. 13<br />
Radar Alert and Pop Alert Settings ...........................................................14<br />
Detection ..................................................................................................... 15<br />
Signals Detected ...................................................................................... 15<br />
Audio Alerts ............................................................................................. 15<br />
Visual Display .......................................................................................... 15<br />
Instant-On Detection ................................................................................ 18<br />
Responding to Alerts ............................................................................... 18<br />
Understanding Radar and Laser ................................................................. 19<br />
Maintenance ................................................................................................ 20<br />
Specifications .............................................................................................. 21<br />
Warranty<br />
Limited 1-Year Warranty ............................................................................. 22<br />
Customer Assistance<br />
Product Service .......................................................................................... 23<br />
Optional Accessories .................................................................................. 24<br />
Accessories Order Info ............................................................................... 25<br />
Trademark Acknowledgement ..................................................................... 25<br />
Nothing Comes Close to a <strong>Cobra</strong> ® 1
Your Detector<br />
Installation<br />
2 English<br />
Installation<br />
Where to Mount Your Unit<br />
You will get optimum performance from your detector if you Mount it at a<br />
point approximately in the center of the vehicle, as low as possible on the<br />
front windshield without obstructing the unit’s view of the road either to<br />
the front or rear. Make sure the unit is level with the road. You can also<br />
mount it directly on the dashboard.<br />
The unit’s lens must not be blocked and the LaserEye should have a clear<br />
view out the back window to allow 360° detection.<br />
Radar and laser<br />
signals pass<br />
through glass but<br />
not through other<br />
materials and<br />
objects. Objects<br />
that can block or<br />
weaken incoming signals include:<br />
g The LaserEye Should Have a Clear View<br />
Windshield wiper blades<br />
g Mirrored sun screens<br />
Windshield Mounting Dashboard Mounting<br />
g Dark tinting at the top of the windshield<br />
g Heated windshields currently available on some vehicles<br />
(Instaclear for Ford, Electriclear for GM.) Consult your dealer<br />
to see if you have this option.<br />
•<br />
Your Detector<br />
Windshield Mounting<br />
Installation<br />
1. Attach the rubber<br />
cups to the bracket.<br />
2. Make sure the rubber cups and your windshield are clean.<br />
3. Push the bracket firmly<br />
onto the windshield.<br />
4. Attach the detector to<br />
the bracket. Check the<br />
angle of the unit.<br />
5. To adjust the angle if<br />
necessary, gently push or<br />
pull on the bracket to bend<br />
it. DO NOT use the detector<br />
to bend the bracket.<br />
6. Plug the power cord<br />
into the detector.<br />
7. Plug the cigarette lighter<br />
adapter on the power<br />
cord into your vehicle’s<br />
cigarette lighter.<br />
8. You can temporarily remove the detector whenever you<br />
wish by pressing the bracket release button and sliding<br />
it off the bracket.<br />
Nothing Comes Close to a <strong>Cobra</strong> ®<br />
3
Your Detector<br />
Dashboard Mounting<br />
4 English<br />
Installation<br />
1. Place the detector on the dashboard to find a location<br />
where the unit has a clear, level view of the road.<br />
The angle can NOT be adjusted after mounting.<br />
2. Remove the paper backing<br />
from one side of the hookand-loop<br />
fastener.<br />
3. Attach the pad to the<br />
dashboard at your chosen<br />
location and remove the<br />
other paper backing.<br />
4. Attach the detector to the<br />
hook-and-loop fastener.<br />
You can remove and<br />
reattach the unit as<br />
often as you like.<br />
5. Plug the power cord<br />
into the detector.<br />
6. Plug the cigarette lighter<br />
adapter on the power<br />
cord into your vehicle’s<br />
cigarette lighter.<br />
Your Detector<br />
Getting Started<br />
Power On<br />
X K Ka V S h<br />
Getting Started<br />
To Turn On the Unit and Adjust the Audio Volume<br />
Rotate the On-Off/<br />
Volume control<br />
clockwise (away<br />
from you).<br />
On-Off/<br />
Volume Control<br />
Rotate clockwise<br />
(away from you)<br />
Tone Voice Visual Display<br />
Three beeps Testing, then<br />
three beeps<br />
System Ready, then<br />
Voice Alert<br />
h appears in the<br />
display indicating<br />
that the power<br />
is On<br />
NOTE<br />
In some vehicles, power is supplied to the cigarette lighter even while the ignition<br />
is Off. If this is the case with your vehicle, you should turn Off or unplug your<br />
detector when parking for lengthy periods.<br />
Auxiliary Audio Jack<br />
The Auxiliary Audio Jack can be used to connect external speakers in<br />
environments with high ambient noise levels. The internal speaker will<br />
be disconnected. (This uses a mini stereo audio connector.)<br />
Auxiliary<br />
Audio Jack<br />
Nothing Comes Close to a <strong>Cobra</strong> ®<br />
•<br />
•<br />
5
Your Detector<br />
6 English<br />
Settings<br />
Settings<br />
When changing the Settings on your detector, please keep in mind:<br />
g Buttons can have multiple functions.<br />
g Depending on your choice of Voice Alert or Tone Alert mode, you will<br />
hear either voice messages or tones confirming changes in settings.<br />
g All settings will be stored in memory when the power is<br />
turned Off and recalled when the power is turned back On.<br />
Highway/City Mode<br />
Setting your detector to City mode delays all X band audio alerts until<br />
the signal strength reaches Level 3. (A single beep will sound when the<br />
signal is first detected.) This will reduce false alerts while you are driving<br />
in, or near, urban areas where there are many sources for conflicting<br />
X band signals such as microwave towers and automatic door openers.<br />
To change settings, follow the procedure listed below, which indicates<br />
what you will see and hear (either in Voice Alert or Tone Alert mode)<br />
as you complete each step. The factory setting is Highway mode.<br />
X K Ka V S h<br />
City Mode<br />
X K Ka V S c<br />
To Change From Highway Mode to City Mode<br />
Press and release<br />
the City button.<br />
Press and<br />
release<br />
Tone Voice Visual Display<br />
One beep City c appears<br />
in the display<br />
To Change From City Mode Back to Highway Mode<br />
Press and release<br />
the City button again.<br />
Tone<br />
Two beeps<br />
Voice<br />
Highway<br />
Visual Display<br />
h appears<br />
in the display<br />
•<br />
Your Detector<br />
Dim Button<br />
Press and release<br />
Settings<br />
UltraBright Data Display Brightness<br />
You can choose from three settings for Brightness of the display.<br />
You can cycle through the settings by repeatedly pushing the Dim button.<br />
The factory setting is Bright.<br />
Bright<br />
Press and<br />
Dark release Dim<br />
button<br />
Dim<br />
To Change the Brightness to Dim<br />
Press and release<br />
the Dim button<br />
once.<br />
Tone<br />
One beep<br />
Voice<br />
Dim<br />
Visual Display<br />
Display dims<br />
To Change the Brightness to Dark<br />
Press and release<br />
the Dim button<br />
again.<br />
To Change the Brightness to Bright<br />
Press and release<br />
the Dim button a<br />
third time.<br />
Tone Voice Visual Display<br />
One beep Dark Display remains<br />
dim (no visual<br />
alerts will be seen)<br />
Tone Voice Visual Display<br />
Two beeps Bright Display returns<br />
to full brightness<br />
Nothing Comes Close to a <strong>Cobra</strong> ® 7
Your Detector<br />
8 English<br />
Mute Button<br />
Press and release<br />
Settings<br />
Muting an Alert<br />
Your detector allows you to quickly turn Off an audio Alert by momentarily<br />
pressing the Mute button. If you press the Mute button a second time<br />
during the Alert, the audio Alert will be turned back On.<br />
Auto Mute Mode<br />
Auto Mute will automatically reduce the audio volume of all alerts<br />
after four seconds for as long as the signal is detected. The factory<br />
setting for Auto Mute is On.<br />
To Turn Auto Mute On<br />
Press and release<br />
the Mute button<br />
again while no<br />
alert is occurring.<br />
Tone<br />
Two beeps<br />
Voice<br />
Auto Mute On<br />
Visual Display<br />
None<br />
To Turn Auto Mute Off<br />
Press and release<br />
the Mute button<br />
while no alert<br />
is occurring.<br />
Tone<br />
One beep<br />
Voice<br />
Auto Mute Off<br />
Visual Display<br />
None<br />
Your Detector<br />
Settings<br />
IntelliMute<br />
IntelliMute is a unique feature that allows you to avoid alerts you don’t need<br />
to hear because you are stopped or moving slowly. By sensing the “revs”<br />
(RPMs) of your engine, IntelliMute knows when you are at low speed and<br />
automatically mutes audio radar alerts.<br />
Before IntelliMute will work, you must set an activation point for your engine’s<br />
revs (see page 10). Whenever the revs are below that point, IntelliMute will<br />
begin muting. The activation point will be stored in memory and recalled<br />
each time the power is turned On. The factory setting is IntelliMute Off.<br />
NOTE<br />
IntelliMute may not work with some vehicles because it cannot sense<br />
the engine’s revs. In such cases, you can reduce unwanted audio alerts<br />
by using Auto Mute and City mode when appropriate.<br />
To Turn IntelliMute On<br />
Press and release<br />
the IntelliMute<br />
button.<br />
IntelliMute Button<br />
Press and release<br />
Tone Voice Visual Display<br />
Two beeps IntelliMute On Dot appears next to<br />
the large character<br />
on the right<br />
To Turn IntelliMute Off<br />
Press and release<br />
the IntelliMute<br />
button again.<br />
Tone<br />
One beep<br />
Voice<br />
IntelliMute Off<br />
Visual Display<br />
Dot disappears<br />
Nothing Comes Close to a <strong>Cobra</strong> ® 9
Your Detector<br />
10 English<br />
Settings<br />
What to Remember While Using IntelliMute<br />
IntelliMute works with both City and Auto Mute modes.<br />
Whenever your engine revs are below the activation point, the dot next to<br />
the large character on the right side of the display will remain lit. Above the<br />
activation point, the dot will blink twice every two seconds.<br />
Below Activation Point<br />
X K Ka V S c<br />
Above Activation Point<br />
X K Ka V S c<br />
If, for any reason, the unit stops sensing your engine’s revs, IntelliMute<br />
will indicate an error and automatically turn Off.<br />
The rev point you set will be stored in the unit’s memory when power is<br />
turned Off and recalled each time the power is turned On.<br />
NOTE<br />
The rev point must be reset if you use your detector in a different vehicle.<br />
NOTE<br />
When initially choosing your IntelliMute activation point, a setting<br />
of approximately 300 to 600 RPMs above idle is recommended.<br />
You can reset the activation point at any time to fit your individual<br />
preferences and driving style.<br />
Setting the IntelliMute Activation Point<br />
Your detector must be installed in your vehicle.<br />
CAUTION<br />
Do not attempt to set the rev point while driving.<br />
Your vehicle should be parked and idling.<br />
IntelliMute must be turned On before setting the activation point. Depending<br />
on whether the unit is in Tone Alert or Voice Alert mode, you will hear a series<br />
of beeps or voice messages as you follow the steps on the next page.<br />
Your Detector<br />
IntelliMute Button<br />
Press and release<br />
To Set the IntelliMute Activation Point<br />
Press and hold Tone Voice Visual Display<br />
the IntelliMute<br />
button for two<br />
seconds.<br />
Two beeps Set Engine Revs None<br />
Rev your engine to<br />
the level you wish<br />
to set (recommend<br />
slightly above idle)<br />
and hold revs steady<br />
for two seconds.<br />
At the desired<br />
rev level, press<br />
and release the<br />
IntelliMute<br />
button.<br />
Settings<br />
None None Three bars will<br />
flash in succession<br />
1 2 3<br />
Three beeps IntelliMute Set All three bars flash<br />
three times<br />
1 2 3<br />
NOTE<br />
If the unit is unable to sense usable pulses within three<br />
seconds or if you do not set a rev point within 20 seconds<br />
of beginning these steps, IntelliMute will indicate an error<br />
and automatically turn Off.<br />
Tone Voice Visual Display<br />
Four beeps IntelliMute Error,<br />
followed by<br />
E appears<br />
IntelliMute Off X K Ka V S E<br />
Nothing Comes Close to a <strong>Cobra</strong> ®<br />
11
Your Detector<br />
12 English<br />
Settings<br />
IntelliMute Pro<br />
IntelliMute Pro prevents detection by radar detector detectors (RDDs) such as<br />
VG-2, Spectre I and Spectre IV+ when traveling at slower speeds. It is intended<br />
for use by experienced users only.<br />
When IntelliMute Pro is turned On, and engine RPMs are below the IntelliMute<br />
activation point, your detector’s radar detection circuits are turned Off to<br />
prevent detection by RDDs.<br />
Before IntelliMute Pro can be turned On, you must have turned On and Set the<br />
IntelliMute activation point. (See pages 9 through 11.)<br />
CAUTION<br />
When IntelliMute Pro is On, NO radar signals will be detected and<br />
NO alerts will be given at RPMs below the IntelliMute activation point.<br />
To Turn IntelliMute Pro On<br />
While no signal<br />
is being detected,<br />
press and hold both<br />
the IntelliMute<br />
and City buttons<br />
for four seconds.<br />
Tone<br />
Two beeps<br />
Voice<br />
IntelliMute Pro On<br />
Visual Display<br />
c or h will blink<br />
To Turn IntelliMute Pro Off<br />
Press and hold both<br />
the IntelliMute and<br />
City buttons for<br />
four seconds.<br />
IntelliMute Button<br />
City Button<br />
Press and hold both<br />
buttons simultaneously<br />
IntelliMute Pro On<br />
X K Ka V S c<br />
Tone Voice Visual Display<br />
One beep IntelliMute Pro Off c or h will show<br />
steady<br />
Your Detector<br />
Voice/Tone Setting<br />
You can set your detector to sound alerts with either a Voice or a Tone. You<br />
can change settings by using the Mute button. In Voice Alert mode, you will<br />
first hear several tones, then a voice message announcing the type of signal<br />
detected, followed by more tones. In Tone Alert mode, you will hear the tones<br />
only. The factory setting<br />
To Change From Voice Alert to Tone Alert<br />
While no signal Tone Voice Visual Display<br />
is being detected,<br />
One beep Tone Alert None<br />
press and hold<br />
the Mute button<br />
for two seconds.<br />
To Change From Tone Alert Back to Voice Alert<br />
While no signal<br />
is being detected,<br />
press and hold the<br />
Mute button for<br />
two seconds again.<br />
Tone<br />
None<br />
Voice<br />
Voice Alert<br />
Visual Display<br />
None<br />
VG-2 and Spectre I & IV+ Alert Settings<br />
Police use radar detector detectors (RDDs) to spot users of radar detectors.<br />
Your detector is able to identify signals from VG-2, Spectre I and Spectre IV+<br />
RDDs and can provide alerts when any of these or similar devices are in use<br />
near your vehicle.<br />
Your detector can be spotted by Spectre IV+ RDDs, but is invisible to VG-2<br />
and Spectre I RDDs. You can choose whether you want to be alerted to VG-2<br />
and Spectre I & IV+ RDD signals. The factory setting for VG-2 and Spectre I &<br />
IV+ alerts is Off.<br />
To Turn VG-2 and Spectre I & IV+ Alerts On and Off<br />
While no signal<br />
is being detected,<br />
press and hold the<br />
Dim button for<br />
four seconds.<br />
Settings<br />
Tone Voice Visual Display<br />
On = Two Beeps Spectre VG-2 On V will blink twice<br />
in the display<br />
Off = One Beep<br />
Spectre VG-2 Off V will blink once<br />
in the display<br />
Nothing Comes Close to a <strong>Cobra</strong> ® 13
Your Detector<br />
14 English<br />
Settings<br />
Radar Alert Settings<br />
The detector allows you to choose whether it will show alerts on the X, K<br />
and Ku bands. The factory settings are: X Band and K Band On; Ku Band Off.<br />
To Turn X Band On and Off<br />
While no signal<br />
is being detected,<br />
press and hold both<br />
the Dim and Mute<br />
buttons for four<br />
seconds.<br />
To Turn K Band On and Off<br />
While no signal is<br />
being detected,<br />
press and hold both<br />
the Mute and City<br />
buttons for four<br />
seconds.<br />
To Turn Ku Band* On and Off<br />
While no signal is<br />
being detected,<br />
press and hold the<br />
City button for four<br />
seconds.<br />
Tone Voice Visual Display<br />
X On = Two beeps X On X will blink twice<br />
in the display<br />
X Off = One beep<br />
Tone Voice Visual Display<br />
K On = Two beeps K On<br />
K will blink twice<br />
in the display<br />
K Off = One beep K Off<br />
K will blink once<br />
in the display<br />
Tone Voice Visual Display<br />
Ku On = Two beeps Ku On X and K will blink<br />
twice in the display<br />
Ku Off = One beep<br />
X Off X will blink once<br />
in the display<br />
Ku Off X and K will blink<br />
once in the display<br />
Pop Alert<br />
The Pop Mode Radar Gun is a single-pulse Doppler radar that is a feature<br />
of a K and Ka (Bee III Ka radar gun) band Instant-On radar gun. It uses<br />
a single, short-time pulse to measure the target vehicle’s speed.<br />
The Pop mode receiver senses Pop singles beyond the effective range of<br />
Pop radar guns. As the Pop mode receiver is so sensitive, you should limit<br />
the use of Pop Detect mode to highway and rural driving.<br />
Pop Alert will alert you to Pop radar signals. During the alert, the unit<br />
continues to detect other signals. The factory setting is Pop Detect Off.<br />
Your Detector<br />
Pop Alert (continued)<br />
Settings and Detection<br />
To Turn Pop Alert On and Off<br />
While no signal is<br />
being detected,<br />
press and hold both<br />
the Dim and City<br />
buttons for four<br />
seconds.<br />
Detection<br />
The tables on the following pages show you the types of Signals your detector<br />
will detect, as well as the voice and visual alerts it provides for each of them.<br />
In Voice Alert mode you will first hear several tones, then a voice message<br />
announcing the type of signal detected, followed by more tones. In Tone Alert<br />
mode, you will hear the tones only.<br />
In both Voice Alert and Tone Alert modes, a distinctly different alert tone is<br />
used for each type of signal detected (including separate tones for each laser<br />
signal). For X, K, Ka and Ku band radar signals, the tones will repeat faster as<br />
you approach the signal source. The repeat rate of the tones gives you useful<br />
information about the signal detected. (See responding to alerts on page 18.)<br />
An indication of the type of signal detected will appear in the UltraBright<br />
data Display. During X, K, Ka and Ku alerts, a number will also appear,<br />
indicating the strength of the signal detected. (1 = weakest, 5 = strongest)<br />
X Signal Detected<br />
Tone Voice Visual Display<br />
Pop On = Two beeps Pop On P will blink twice<br />
in the display<br />
Pop Off = One beep<br />
Pop Off P will blink once<br />
in the display<br />
K Signal Detected Ka Signal Detected Ku Signal Detected<br />
X K Ka V S 2 X K Ka V S 3 X K Ka V S 5 X K Ka V S 4<br />
Nothing Comes Close to a <strong>Cobra</strong> ® 15
Detection<br />
Your Detector Your Detector<br />
During pop alerts, the letter P will<br />
appear; and during laser alerts,<br />
the letter L will appear, instead of<br />
the signal strength indication.<br />
During VG-2 or Spectre I or IV+<br />
alerts, the letter V will appear.<br />
It will be steady during VG-2<br />
and blink during Spectre I or IV+.<br />
During Safety Alert, the letter<br />
S will appear.<br />
Radar Signals, Voice and Visual Displays<br />
Type of Signal Voice Visual Display<br />
X Band Radar X Alert X and Signal Strength<br />
K Band Radar K Alert K and Signal Strength<br />
Ka Band Radar Ka Alert Ka and Signal Strength<br />
Ku Band Radar Ku Alert X K and Signal Strength<br />
Pop Radar Mode Pop Alert P is Steady<br />
16 English<br />
X Signal Detected<br />
Safety Alert Signal Detected<br />
X K Ka V S c<br />
X K Ka V S 2 X K Ka V S 3 X K Ka V S 5 X K Ka V S 4<br />
POP Alert Signal Detected<br />
X K Ka V S P<br />
POP Signal Detected<br />
X K Ka V S P<br />
VG-2 Alert Signal<br />
Detected<br />
X K Ka V S c<br />
Laser Signal Detected<br />
X K Ka V S L<br />
Spectre I or IV+ Alert<br />
Signal Detected<br />
X K Ka V S c<br />
K Signal Detected Ka Signal Detected Ku Signal Detected<br />
Laser Signal Detected<br />
X K Ka V S L<br />
Detection<br />
Laser Signals, Voice and Visual Displays<br />
Type of Signal Voice Visual Display<br />
LTI 20-20* Laser L is Steady<br />
LTI Laser* Laser L is Steady<br />
Kustom Signals Laser 340* Laser L is Steady<br />
Kustom Signals Laser* Laser L is Steady<br />
Stalker LIDAR* Laser L is Steady<br />
Laser Atlanta SpeedLaser/Kustom Signals-ProLaser II*<br />
* Your detector provides 360° detection of these signals.<br />
Laser L is Steady<br />
Safety Alert Signals, Voice and Visual Displays<br />
Type of Signal Voice Visual Display<br />
Emergency Vehicles Emergency Vehicle Approaching S is Steady<br />
Road Hazards Road Hazard Ahead S is Steady<br />
Trains Train Approaching S is Steady<br />
Safety Alert Signal Detected<br />
X K Ka V S c<br />
VG-2 and Spectre I or IV+ Alert Signals, Voice and Visual Displays<br />
Type of Signal Voice Visual Display<br />
Interceptor VG-2 VG-2 Alert V is Steady<br />
Spectre I or IV+ Spectre Alert V Blinks<br />
VG-2 Alert Signal Detected<br />
X K Ka V S c<br />
NOTE<br />
Beep rate changes with different laser alerts.<br />
NOTE<br />
There are different tones for each Safety Alert.<br />
Spectre I or IV+ Alert<br />
Signal Detected<br />
X K Ka V S c<br />
NOTE<br />
There are different<br />
tones for each alert.<br />
Nothing Comes Close to a <strong>Cobra</strong> ® 17
Your Detector<br />
18 English<br />
Detection<br />
Instant-On Detection<br />
Your detector is designed to detect Instant-On speed monitoring signals,<br />
which can suddenly appear at full strength.<br />
NOTE<br />
You should take appropriate action immediately<br />
whenever an instant-on alert is given.<br />
Description Interpretation<br />
Tone repeats slowly at<br />
first, then speeds up<br />
rapidly.<br />
Tone sounds one<br />
time only.<br />
Tone instantly begins<br />
repeating rapidly.<br />
Tone repeats slowly as you<br />
approach a hill or bridge,<br />
then speeds up sharply as<br />
you reach it.<br />
Tone repeats slowly<br />
for a short period.<br />
Recommended<br />
Response<br />
Probably police radar. FULL ALERT<br />
Probably a false alarm,<br />
but possibly pulsed radar,<br />
VG-2, or Spectre I or IV+<br />
nearby.<br />
Radar, VG-2 or Spectre I<br />
or IV+ nearby has been<br />
activated suddenly.<br />
Probably police<br />
radar beyond the<br />
hill or bridge.<br />
Any type of laser alert. Laser alerts are<br />
never false alarms.<br />
Exercise caution<br />
FULL ALERT<br />
FULL ALERT<br />
Probably a false alarm. Exercise caution<br />
Any Safety Alert. You are nearing an<br />
emergency vehicle, railroad<br />
crossing, or road hazard<br />
(construction, accident, etc.).<br />
FULL ALERT<br />
Exercise caution<br />
Your Detector<br />
Understanding Radar and Laser<br />
Understanding Radar and Laser<br />
•<br />
Radar Speed Monitoring Systems<br />
Three band frequencies have been approved by the Federal Communications<br />
Commission (FCC) for use by speed monitoring radar equipment:<br />
X band 10.525 GHz<br />
K band 24.150 GHz<br />
Ka band 33.400 – 36.00 GHz<br />
Your detector detects signals in all three radar bands, plus Ku band (13.435 GHz),<br />
which is an approved frequency used in parts of Europe and Asia.<br />
VG-2 and Spectre I & IV+<br />
VG-2 and Spectre I & IV+ are radar detector detectors (RDDs) that work by<br />
detecting low-level signals emitted by most radar detectors. Your detector<br />
does not emit signals that can be spotted by VG-2 and Spectre I RDDs.<br />
However, your detector can be spotted by Spectre IV+ RDDs. Your unit<br />
detects signals from these or similar devices and will alert you when such<br />
a device is in use near your vehicle.<br />
Safety Alert Traffic Warning System<br />
FCC-approved Safety Alert transmitters emit microwave radar signals that<br />
indicate the presence of a safety-related concern. Depending on the frequency<br />
of the signal emitted, it can indicate a speeding emergency vehicle or train,<br />
or a stationary road hazard.<br />
Because these microwave signals are within the K band frequency, most<br />
conventional radar detectors will detect Safety Alert signals as standard<br />
K band radar. Your detector, however, is designed to differentiate between<br />
standard K band and Safety Alert signals, and give separate alerts for each.<br />
Safety Alert technology is relatively new. Safety Alert transmitters can<br />
be found in limited numbers in all 50 states, but the number is growing.<br />
Depending on your location, you may not receive these alerts regularly<br />
and may often encounter emergency vehicles, trains and road hazards<br />
without being alerted. As the number of transmitters increases,<br />
these alerts will become more common.<br />
When you receive such an alert, please watch for emergency vehicles ahead<br />
of you, on cross streets and behind you. If you see an emergency vehicle<br />
approaching, please pull over to the right side of the road and allow it to pass.<br />
Nothing Comes Close to a <strong>Cobra</strong> ® 19
Your Detector<br />
20 English<br />
Understanding Radar and Laser<br />
and Maintenance<br />
LIDAR (Laser)<br />
The correct name for the technology that most people refer to as<br />
laser is actually LIDAR, which stands for Light Detection and Ranging.<br />
LIDAR operates much like radar. Its signal spreads out like a radar signal, though<br />
not as widely. Unlike radar, LIDAR must have a clear line of sight to its target<br />
vehicle throughout the entire measurement interval. Obstructions such as sign<br />
posts, utility poles, tree branches, etc., will prevent valid speed measurement.<br />
Some common questions about LIDAR include:<br />
g Does weather have any affect on LIDAR?<br />
Yes. Rain, snow, smoke, fog or airborne dust particles will reduce the<br />
effective range of LIDAR and can, if dense enough, prevent its operation.<br />
g Can LIDAR operate through glass?<br />
Yes. Newer LIDAR guns can obtain readings through most types of glass.<br />
However, the laser pulse also can be received through glass to trigger<br />
an alarm by your detector.<br />
g Can LIDAR operate while in motion?<br />
No. Because LIDAR operates by line of sight, the person using it cannot<br />
drive the vehicle, aim and operate the gun all at the same time.<br />
g Is LIDAR legal to use?<br />
Yes. It is legal in all 50 states.<br />
Maintenance<br />
•<br />
Maintenance of Your Radar Detector<br />
Your detector is designed and built to give you years of trouble-free performance<br />
without the need for service. No routine Maintenance is required.<br />
If your unit does not appear to be operating properly, please follow these<br />
troubleshooting steps:<br />
g Make sure the power cord is properly connected.<br />
g Make sure the socket of your vehicle’s cigarette lighter is clean and<br />
free of corrosion.<br />
g Make sure the power cord’s cigarette lighter adapter is firmly seated<br />
in your cigarette lighter.<br />
g Check the power cord fuse. (Unscrew the ribbed end cap of the<br />
cigarette lighter adapter and examine the fuse. If required, replace<br />
it with a 2-amp fuse only.)<br />
Your Detector<br />
Specifications<br />
Band and Frequencies<br />
Specifications<br />
Band Frequencies<br />
X Band 10.525 ± 0.050 GHz<br />
K Band 24.125 ± 0.125 GHz<br />
Ka Band 34.700 ± 1.300 GHz<br />
Ku Band 13.435 ± 0.035 GHz<br />
VG-2 11.500 ± 0.250 GHz<br />
Laser 910 ± 50nm 100 PPS<br />
910 ± 50nm 125 PPS<br />
910 ± 50nm 130 PPS<br />
910 ± 50nm 200 PPS<br />
910 ± 50nm 238 PPS<br />
910 ± 50nm 340 PPS<br />
Spectre I 13.300 ± 0.200 GHz<br />
Spectre IV/IV+ Not Disclosed<br />
Safety Alert 24.070 ± 0.010 GHz<br />
Traffic Warning 24.110 ± 0.010 GHz<br />
System 24.190 ± 0.010 GHz<br />
24.230 ± 0.010 GHz<br />
This radar detector is covered by one or more of the following U.S. patents:<br />
5,497,148; 5,594,432; 5,612,685; 6,078,279; 6,094,148. Additional patents<br />
may be listed inside the product or pending.<br />
Nothing Comes Close to a <strong>Cobra</strong> ® 21
22 English<br />
Warranty<br />
Limited 1-Year Warranty<br />
For Products Purchased in the U.S.A.<br />
<strong>Cobra</strong> <strong>Electronics</strong> Corporation warrants that its <strong>Cobra</strong> Radar/Laser<br />
Detectors, and the com po nent parts thereof, will be free of defects in<br />
workmanship and materials for a period of one year from the date of first<br />
consumer purchase. This war ran ty may be enforced by the first consumer<br />
pur chas er, pro vid ed that the product is utilized within the U.S.A.<br />
<strong>Cobra</strong> will, without charge, repair or replace, at its option, de fec tive<br />
Radar/Laser Detectors, products or com po nent parts upon de liv ery to the<br />
<strong>Cobra</strong> Factory Service Department, ac com pa nied by proof of the date of first<br />
consumer pur chase, such as a du pli cat ed copy of a sales receipt.<br />
You must pay any initial shipping charges required to ship the product for<br />
warranty service, but the return charges will be at <strong>Cobra</strong>’s expense, if the<br />
product is repaired or replaced under warranty.<br />
This warranty gives you specific rights, and you may also have other rights<br />
which vary from state to state.<br />
Exclusions: This limited warranty does not apply:<br />
1. To any product dam aged by accident.<br />
2. In the event of misuse or abuse of the product or as a result<br />
of un au tho rized alterations or repairs.<br />
3. If the serial number has been altered, defaced or re moved.<br />
4. If the owner of the product resides outside the U.S.A.<br />
All implied warranties, including war ran ties of mer chant abil i ty and fitness for<br />
a par tic u lar purpose are limited in duration to the length of this warranty.<br />
<strong>Cobra</strong> shall not be liable for any incidental, con se quen tial or oth er dam ag es;<br />
including, without lim i ta tion, damages re sult ing from loss of use or cost of<br />
in stal la tion.<br />
Some states do not allow limitations on how long an implied warranty lasts<br />
and/or do not allow the ex clu sion or limitation of incidental or con se quen tial<br />
dam ag es, so the above lim itations may not apply to you.<br />
•<br />
Customer Assistance<br />
Product Service<br />
Product Service<br />
For any questions about operating or installing this new <strong>Cobra</strong> product, or if<br />
parts are missing…PLEASE CALL COBRA FIRST…do not return this<br />
product to the store. See customer assistance on page A1.<br />
If this product should require factory service, please call <strong>Cobra</strong> first at<br />
773-889-3087 BEFORE sending the product. This will ensure the fastest<br />
turnaround time on any repair.<br />
If <strong>Cobra</strong> asks that the product be sent to its factory, the following must be<br />
furnished to have the product serviced and returned:<br />
1. Send the complete unit, including power cord. (It is not necessary<br />
to include the mounting bracket.)<br />
2. For warranty repair, enclose some form of proof-of-purchase,<br />
such as a photocopy or carbon copy of a sales receipt. If you<br />
send the original receipt, it cannot be returned.<br />
3. Enclose a typed or clearly written description of the problem<br />
you are having with your unit, plus the name and address where<br />
you want the unit returned.<br />
4. Pack the unit securely to prevent damage during transit. If possible,<br />
use the original packing materials.<br />
5. Ship prepaid and insured using a traceable carrier such as United<br />
Parcel Service (UPS), Federal Express or Insured Priority mail with<br />
delivery confirmation. Ship to: <strong>Cobra</strong> Factory Service, <strong>Cobra</strong> <strong>Electronics</strong><br />
Corporation, 6500 West Cortland Street, Chicago, IL 60707 U.S.A.<br />
6. Please allow three to four weeks before contacting us about the status<br />
of your service. Call 773-889-3087 for assistance. If your unit is under<br />
warranty, it will either be repaired or replaced upon receipt, depending<br />
on the model. If your unit is out of warranty, you will receive a letter<br />
informing you of the repair or replacement charge.<br />
Nothing Comes Close to a <strong>Cobra</strong> ® 23<br />
•
Customer Assistance<br />
24 English<br />
Optional Accessories<br />
Optional Accessories<br />
You can find quality <strong>Cobra</strong> products and accessories<br />
at your local <strong>Cobra</strong> dealer, or in the U.S.A., you can<br />
order directly from <strong>Cobra</strong>. See ordering info on page 25.<br />
Straight 12V DC Power Cord<br />
Includes plug and fuse<br />
Item # 420-030-N-001<br />
Coiled 12V DC Power Cord<br />
Includes plug and fuse<br />
Item # 420-026-N-001<br />
Windshield Mounting Bracket<br />
Includes suction cups<br />
Item # 545-159-N-001<br />
Dual Port Power Adapter<br />
Includes adjustable plug<br />
(up to 90˚) and fuse<br />
Item # CLP-2B<br />
•