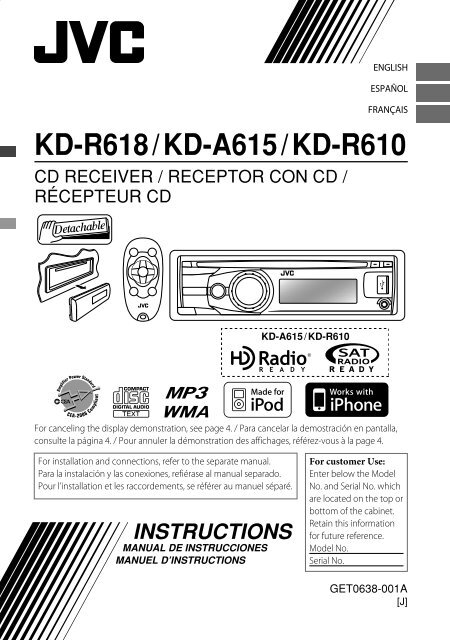
kd-r618 / kd-a615 / kd-r610 instructions - Sonic Electronix
kd-r618 / kd-a615 / kd-r610 instructions - Sonic Electronix
kd-r618 / kd-a615 / kd-r610 instructions - Sonic Electronix

Create successful ePaper yourself
Turn your PDF publications into a flip-book with our unique Google optimized e-Paper software.
ENGLISH<br />
ESPAÑOL<br />
FRANÇAIS<br />
KD-R618 / KD-A615 / KD-R610<br />
CD RECEIVER / RECEPTOR CON CD /<br />
RÉCEPTEUR CD<br />
For canceling the display demonstration, see page 4. / Para cancelar la demostración en pantalla,<br />
consulte la página 4. / Pour annuler la démonstration des affichages, référez-vous à la page 4.<br />
For installation and connections, refer to the separate manual.<br />
Para la instalación y las conexiones, refiérase al manual separado.<br />
Pour l’installation et les raccordements, se référer au manuel séparé.<br />
INSTRUCTIONS<br />
MANUAL DE INSTRUCCIONES<br />
MANUEL D’INSTRUCTIONS<br />
KD-A615 / KD-R610<br />
For customer Use:<br />
Enter below the Model<br />
No. and Serial No. which<br />
are located on the top or<br />
bottom of the cabinet.<br />
Retain this information<br />
for future reference.<br />
Model No.<br />
Serial No.<br />
GET0638-001A<br />
[J]
INFORMATION (For U.S.A.)<br />
This equipment has been tested and found to comply with the limits for a Class B digital device,<br />
pursuant to Part 15 of the FCC Rules. These limits are designed to provide reasonable protection<br />
against harmful interference in a residential installation. This equipment generates, uses, and can<br />
radiate radio frequency energy and, if not installed and used in accordance with the <strong>instructions</strong>,<br />
may cause harmful interference to radio communications. However, there is no guarantee that<br />
interference will not occur in a particular installation. If this equipment does cause harmful<br />
interference to radio or television reception, which can be determined by turning the equipment<br />
off and on, the user is encouraged to try to correct the interference by one or more of the<br />
following measures:<br />
– Reorient or relocate the receiving antenna.<br />
– Increase the separation between the equipment and receiver.<br />
– Connect the equipment into an outlet on a circuit different from that to which the receiver is<br />
connected.<br />
– Consult the dealer or an experienced radio/TV technician for help.<br />
Caution:<br />
Changes or modifications not approved by JVC could void the user’s authority to operate the<br />
equipment.<br />
IMPORTANT FOR LASER PRODUCTS<br />
1. CLASS 1 LASER PRODUCT<br />
2. CAUTION: Do not open the top cover. There are no user serviceable parts inside the unit; leave<br />
all servicing to qualified service personnel.<br />
3. CAUTION: (For U.S.A.) Visible and/or invisible class II laser radiation when open. Do not stare<br />
into beam.<br />
(For Canada) Visible and/or invisible class 1M laser radiation when open. Do not<br />
view directly with optical instruments.<br />
4. REPRODUCTION OF LABEL: CAUTION LABEL, PLACED OUTSIDE THE UNIT.<br />
2 ENGLISH<br />
[European Union only]<br />
Warning:<br />
If you need to operate the unit while driving,<br />
be sure to look around carefully or you may be<br />
involved in a traffic accident.<br />
For safety...<br />
• Do not raise the volume level too much, as<br />
this will block outside sounds, making driving<br />
dangerous.<br />
• Stop the car before performing any<br />
complicated operations.<br />
Temperature inside the car...<br />
If you have parked the car for a long time in<br />
hot or cold weather, wait until the temperature<br />
in the car becomes normal before operating<br />
the unit.
How to read this manual<br />
The following icons/symbols are used to<br />
indicate:<br />
Press and hold the button(s)<br />
[Hold] until the desired operation<br />
begins.<br />
Turn the control dial.<br />
( XX)<br />
Turn the control dial<br />
to make a selection,<br />
then press to confirm.<br />
Reference page number<br />
Menu setting item<br />
Continued on the next page<br />
How to attach/detach the control<br />
panel<br />
How to reset your unit<br />
Your preset adjustments<br />
will also be erased (except<br />
the registered Bluetooth<br />
device). ( 11)<br />
How to forcibly eject a disc<br />
[Hold]<br />
• You can forcibly eject the loaded disc even<br />
if the disc is locked. To lock/unlock the disc,<br />
9.<br />
• Be careful not to drop the disc when it ejects.<br />
• If this does not work, reset your unit.<br />
Thank you for purchasing a JVC product.<br />
Please read all <strong>instructions</strong> carefully before<br />
operation, to ensure your complete<br />
understanding and to obtain the best possible<br />
performance from the unit.<br />
CONTENTS<br />
3 How to read this manual<br />
3 How to attach/detach the control<br />
panel<br />
3 How to reset your unit<br />
3 How to forcibly eject a disc<br />
4 Canceling the display<br />
demonstration<br />
4 Setting the clock<br />
5 Preparing the remote controller<br />
(RM-RK50)<br />
6 Basic operations<br />
7 Listening to the radio<br />
9 Listening to a disc<br />
10 Listening to the USB device<br />
11 Using Bluetooth ® devices<br />
13 Using a Bluetooth mobile phone<br />
14 Using a Bluetooth audio player<br />
16 Listening to the HD Radio <br />
Broadcast<br />
18 Listening to the satellite radio<br />
20 Listening to the iPod/iPhone<br />
22 Listening to the other external<br />
components<br />
23 Selecting a preset sound mode<br />
24 Menu operations<br />
31 More about this unit<br />
35 Maintenance<br />
36 Troubleshooting<br />
42 Specifications<br />
ENGLISH<br />
3
Canceling the display demonstration<br />
1 Turn on the power.<br />
2<br />
3<br />
Setting the clock<br />
1 Turn on the power.<br />
2<br />
(Initial setting)<br />
3 Select .<br />
4 Select .<br />
5 Adjust the hour.<br />
6 Adjust the minute.<br />
7 Finish the procedure.<br />
4 ENGLISH<br />
[Hold]<br />
[Hold]<br />
(Initial setting)<br />
4 Select .<br />
5<br />
6 Finish the procedure.
Preparing the remote controller (RM-RK50)<br />
When you use the remote controller for the first<br />
time, pull out the insulation sheet.<br />
Insulation sheet<br />
For USA-California Only:<br />
This product contains a CR Coin Cell Lithium<br />
Battery which contains Perchlorate Material—<br />
special handling may apply.<br />
See www.dtsc.ca.gov/hazardouswaste/<br />
perchlorate<br />
If the effectiveness of the remote controller<br />
decreases, replace the battery.<br />
Replacing the lithium coin battery<br />
CR2025<br />
Caution:<br />
• Danger of explosion if battery is incorrectly<br />
replaced. Replace only with the same or<br />
equivalent type.<br />
• Battery shall not be exposed to excessive heat<br />
such as sunshine, fire, or the like.<br />
Warning (to prevent accidents and<br />
damage):<br />
• Do not install any battery other than CR2025<br />
or its equivalent.<br />
• Do not leave the remote controller in a place<br />
(such as dashboards) exposed to direct<br />
sunlight for a long time.<br />
• Store the battery in a place where children<br />
cannot reach.<br />
• Do not recharge, short, disassemble, heat the<br />
battery, or dispose of it in a fire.<br />
• Do not leave the battery with other metallic<br />
materials.<br />
• Do not poke the battery with tweezers or<br />
similar tools.<br />
• Wrap the battery with tape and insulate when<br />
throwing away or saving it.<br />
KD-R618/KD-A615 is equipped with the<br />
steering wheel remote control function.<br />
Before operating, connect an exclusive remote<br />
adapter (not supplied) which matches your car<br />
to the steering wheel remote input terminal on<br />
the rear of the unit.<br />
• For details, refer also to the <strong>instructions</strong><br />
supplied with the remote adapter.<br />
ENGLISH<br />
5
Basic operations<br />
Ejects the disc Loading slot Display window USB (Universal Serial Bus) input jack<br />
Detaches the panel<br />
6 ENGLISH<br />
Control dial<br />
Auxiliary<br />
input jack<br />
When you press or hold the following button(s)...<br />
Main unit<br />
Remote<br />
controller<br />
General operation<br />
Turns on.<br />
• When the power is on, pressing /I/ATT on the remote controller<br />
also mutes the sound or pauses. Press<br />
muting or resume playback.<br />
Turns off if pressed and held.<br />
/I/ATT again to cancel<br />
Selects the available sources (if the power is turned on).<br />
• If the source is ready, playback also starts.<br />
Adjusts the volume level.<br />
Remote sensor<br />
• DO NOT expose to bright sunlight.<br />
— Selects items.<br />
• Mutes the sound while listening to a source. If the source is “CD,”<br />
“USB” or “USB-IPOD,” playback pauses. Press the control dial again<br />
—<br />
to cancel muting or resume playback.<br />
• Confirms selection.<br />
Selects the sound mode.<br />
• Enters tone level adjustment directly ( 23) if pressed and held<br />
EQ/BASS-TRE on the main unit.
Main unit<br />
Manual search<br />
“M” flashes, then press<br />
the button repeatedly.<br />
When an FM stereo broadcast is<br />
hard to receive<br />
1<br />
2<br />
Remote<br />
controller<br />
General operation<br />
—<br />
• Enters setting directly ( 29).<br />
• Enters setting directly ( 30) if pressed and held.<br />
— Returns to the previous menu.<br />
—<br />
Listening to the radio<br />
~ ] “FM” or “AM”<br />
[Hold]<br />
[Hold]<br />
] ] ]<br />
<br />
Reception improves, but stereo effect<br />
will be lost.<br />
To restore the stereo effect, repeat the same<br />
procedure to select .<br />
Power off : Checks the current clock time.<br />
Power on : Changes the display information.<br />
Ÿ<br />
“ST” lights up when receiving an FM stereo broadcast<br />
with sufficient signal strength.<br />
Automatic presetting (FM)—<br />
SSM (Strong-station Sequential Memory)<br />
You can preset up to 18 stations for FM.<br />
While listening to a station...<br />
1<br />
2<br />
[Hold]<br />
] ] ]<br />
/ /<br />
<br />
“SSM” flashes and local stations with<br />
the strongest signals are searched and<br />
stored automatically.<br />
To preset another 6 stations, repeat the above<br />
procedure by selecting one of the other 6 SSM<br />
setting ranges.<br />
If an HD Radio tuner box is connected ( 16),<br />
you can also search and store 6 stations for AM<br />
by following the above operations.<br />
ENGLISH<br />
7
Manual presetting (FM/AM)<br />
You can preset up to 18 stations for FM and 6<br />
stations for AM.<br />
Ex.: Storing FM station of 92.50 MHz into preset<br />
number “04.”<br />
1<br />
2<br />
3<br />
8 ENGLISH<br />
] “92.50MHz”<br />
“PRESET MODE” flashes.<br />
] Selects preset number “04.”<br />
“P04” flashes and “MEMORY” appears.<br />
Selecting a preset station<br />
1<br />
or<br />
[Hold]<br />
2<br />
Changing the display information<br />
Station name * = Frequency =<br />
Clock = (back to the beginning)<br />
* If no title is assigned to a station, “NO NAME”<br />
appears for a few seconds.<br />
Using the remote controller<br />
5 U / D ∞ : Changes the preset<br />
stations<br />
2 R / F 3 : Searches for stations<br />
Title assignment<br />
You can assign titles up to 30 station<br />
frequencies (FM and AM) using 8 characters<br />
(maximum) for each title.<br />
• If you try to assign titles to more than 30<br />
station frequencies, “NAME FULL” appears.<br />
Delete unwanted titles before assignment.<br />
• When HD Radio tuner box is connected<br />
( 16), this feature will be disabled.<br />
1<br />
2<br />
3<br />
4<br />
5<br />
6<br />
] “FM” or “AM”<br />
] Show the title entry screen.<br />
] Select a character.<br />
[Hold]<br />
] Move to the next (or previous)<br />
character position.<br />
Repeat steps 3 and 4 until you have<br />
finished entering the title.<br />
To erase the entire title, press and hold DISP<br />
after step 2, then press the control dial.<br />
Available characters<br />
A B C D E F G H I<br />
J K L M N O P Q R<br />
S T U V W X Y Z 0<br />
1 2 3 4 5 6 7 8 9<br />
— / < > Space
Listening to a disc<br />
~ ] Turn on the power.<br />
Stopping playback and ejecting<br />
the disc<br />
“NO DISC” appears.<br />
Press / SOURCE to listen to<br />
another playback source.<br />
Prohibiting disc ejection<br />
To cancel the prohibition, repeat the same<br />
procedure.<br />
[Hold]<br />
Selects folder of the MP3/WMA<br />
Selects track<br />
Fast-forwards or<br />
reverses the track<br />
Selecting a track/folder<br />
Ÿ<br />
[Hold]<br />
For MP3/WMA discs, select the desired folder,<br />
then the desired track by repeating the control<br />
dial procedures.<br />
• If the MP3/WMA disc contains many tracks,<br />
you can fast search (±10, ±100, ±1000)<br />
through the disc by turning the control dial<br />
quickly.<br />
• To return to the previous menu, press BACK.<br />
All tracks will be played repeatedly until you change<br />
the source or eject the disc.<br />
Caution on volume setting:<br />
Discs produce very little noise compared<br />
with other sources. Lower the volume before<br />
playing a disc to avoid damaging the speakers<br />
by the sudden increase of the output level.<br />
Selecting the playback modes<br />
You can use only one of the following playback<br />
modes at a time.<br />
1<br />
2<br />
3<br />
[Hold]<br />
] “REPEAT” j “RANDOM”<br />
REPEAT<br />
TRACK RPT : Repeats current track<br />
FOLDER RPT : Repeats current folder<br />
RANDOM<br />
FOLDER RND : Randomly plays all tracks<br />
of current folder, then<br />
tracks of next folders<br />
ALL RND : Randomly plays all tracks<br />
To cancel repeat play or random play, select<br />
“RPT OFF” or “RND OFF.”<br />
ENGLISH<br />
9
Changing the display information<br />
Disc title/Album name/performer (folder<br />
name)* = Track title (file name)* = Current<br />
track number with the elapsed playing time<br />
= Current track number with the clock<br />
time = (back to the beginning)<br />
* If the current disc is an audio CD, “NO NAME”<br />
appears.<br />
If an MP3/WMA file does not have Tag information<br />
or is set to ( 25),<br />
folder name and file name appear.<br />
Listening to the USB device<br />
This unit can play MP3/WMA files stored on a USB mass storage class device.<br />
You can connect a USB mass storage class device such as a USB memory, Digital Audio Player,<br />
etc. to the unit.<br />
• You can also connect an Apple iPod/iPhone to the USB input jack. For details of the operations,<br />
20 – 21.<br />
~ Ÿ USB input jack<br />
] Turn on the power.<br />
Caution on volume setting:<br />
USB devices produce very little noise compared<br />
with other sources. Lower the volume before<br />
playing a USB to avoid damaging the speakers<br />
by sudden increase of the output level.<br />
If you have turned off the power (without<br />
detaching the USB device)...<br />
Pressing / SOURCE turns on the power and<br />
playback starts from where it has been stopped<br />
previously.<br />
• If a different USB device is currently attached,<br />
playback starts from the beginning.<br />
10 ENGLISH<br />
Using the remote controller<br />
5 U / D ∞ : Selects folder of the<br />
MP3/WMA<br />
2 R / F 3 : Selects track<br />
2 R / F 3<br />
[Hold]<br />
: Fast-forwards or<br />
reverses the track<br />
USB memory<br />
All tracks will be played repeatedly until you change the<br />
source or detach the USB device.<br />
Stop playing and detaching the<br />
USB device<br />
Straightly pull it out from the unit.<br />
“NO USB” appears. Press / SOURCE to listen to<br />
another playback source.<br />
You can operate the USB device in the same<br />
way you operate the files on a disc. ( 9)
Cautions:<br />
• Avoid using the USB device if it might hinder<br />
your safety driving.<br />
• Do not pull out and attach the USB device<br />
repeatedly while “READING” is shown on the<br />
display.<br />
• Do not start the car engine if a USB device is<br />
connected.<br />
• This unit may not be able to play the files<br />
depending on the type of USB device.<br />
• Operation and power supply may not work as<br />
intended for some USB devices.<br />
Using Bluetooth ® devices<br />
For Bluetooth operations, it is required to<br />
connect the Bluetooth adapter, KS-BTA200 (not<br />
supplied) to the expansion port on the rear of<br />
this unit.<br />
• Refer to pages i and ii at the end of the<br />
manual to check the countries where you<br />
may use the Bluetooth ® function.<br />
• For details, refer also to the <strong>instructions</strong><br />
supplied with the Bluetooth adapter and the<br />
Bluetooth device.<br />
To use a Bluetooth device through the unit<br />
(“BT-PHONE” and “BT-AUDIO”) for the first time,<br />
you need to establish a Bluetooth wireless<br />
connection between the unit and the device.<br />
• Once the connection is established, it is<br />
registered on the unit even if you reset your<br />
unit. Up to five devices can be registered in<br />
total.<br />
• Only one device can be connected at a time<br />
for each source (“BT-PHONE” and “BT-AUDIO”).<br />
Registration (Pairing) methods<br />
Use either of the following items (“OPEN” or<br />
“SEARCH” ) in the Bluetooth menu to register<br />
and make the unit ready to establish a new<br />
Bluetooth connection with a device.<br />
• You cannot connect a computer to the USB<br />
input terminal of the unit.<br />
• Make sure all important data has been backed<br />
up to avoid losing the data.<br />
• Do not leave a USB device in the car, expose<br />
to direct sunlight, or high temperature to<br />
avoid deformation or cause damages to the<br />
device.<br />
• Some USB devices may not work immediately<br />
after attaching USB device or turn on the<br />
power.<br />
• For more details about USB operations,<br />
32, 33.<br />
“OPEN” : Connection is established by<br />
operating the Bluetooth device.<br />
“SEARCH” : Connection is established by<br />
operating the unit.<br />
Registering using “OPEN”<br />
Preparation: Operate the device to turn on its<br />
Bluetooth function.<br />
1<br />
2<br />
3<br />
] “BT-PHONE” or “BT-AUDIO”<br />
] “NEW DEVICE” ] “OPEN”<br />
] Enter a PIN (Personal Identification<br />
Number) code in to the unit.<br />
You can enter any number you like<br />
(1-digit to 16-digit number).<br />
[Initial: 0000]<br />
• Some devices have their own PIN<br />
code. Enter the specified PIN code in<br />
to the unit.<br />
ENGLISH<br />
11
4<br />
5<br />
12 ENGLISH<br />
Repeat step 3 on page 11 until you<br />
have finished entering the PIN code.<br />
“OPEN..” flashes.<br />
6 Use the Bluetooth device to search and<br />
connect.<br />
On the device to be connected, enter<br />
the same PIN code you have just<br />
entered for this unit. “CONNECTED”<br />
appears.<br />
Now connection is established and you<br />
can use the device through the unit.<br />
The device remains registered even after you<br />
disconnect the device. Use “CONNECT“ (or<br />
activate “AUTO CNNCT”) to connect the same<br />
device from next time on. ( 15)<br />
Registering using<br />
(“SEARCH”/“SPECIAL”)<br />
1<br />
2<br />
3<br />
] “BT-PHONE” or “BT-AUDIO”<br />
] “NEW DEVICE”<br />
] “SEARCH” : To search for available<br />
devices<br />
The unit searches and displays the list<br />
of the available devices. “UNFOUND”<br />
appears if no available device is<br />
detected.<br />
– – – – – or – – – – –<br />
] “SPECIAL” : To connect a special<br />
device<br />
The unit displays the list of the preset<br />
devices.<br />
4<br />
5<br />
] Select a device you want to connect.<br />
For available devices...<br />
] Enter the specific PIN code of the<br />
device to the unit.<br />
• Refer to the <strong>instructions</strong> supplied with<br />
the device to check the PIN code.<br />
Use the Bluetooth device to connect.<br />
Now connection is established and you<br />
can use the device through the unit.<br />
For special device...<br />
Use “OPEN” or “SEARCH” to connect.<br />
Connecting/disconnecting/<br />
deleting a registered device<br />
1<br />
2<br />
3<br />
] “BT-PHONE” or “BT-AUDIO”<br />
] Select a device you want to<br />
connect/disconnect/delete.<br />
] “CONNECT” or “DISCONNECT” : To<br />
connect/disconnect the selected device<br />
– – – – – or – – – – –<br />
] “DELETE” ] “YES” : To delete the<br />
selected device<br />
You can set the unit to connect the Bluetooth<br />
device automatically when the unit is turned<br />
on. ( “AUTO CNNCT,” 15)
Using a Bluetooth<br />
mobile phone<br />
~<br />
Ÿ<br />
] “BT-PHONE”<br />
] Bluetooth menu<br />
! Make a call or setting using<br />
the Bluetooth setting menu.<br />
( 15)<br />
When a call comes in....<br />
The source is automatically changed to<br />
“BT-PHONE.”<br />
• The display will flash in blue. (,<br />
26)<br />
When “AUTO ANSWER” is activated....<br />
The unit answers the incoming calls<br />
automatically. ( 15)<br />
• When “AUTO ANSWER” is deactivated, press<br />
any button (except / SOURCE / / 0) to<br />
answer the incoming call.<br />
• You can adjust the microphone volume level.<br />
( 15)<br />
To end the call<br />
Hold any button (except / SOURCE / / 0).<br />
When a text message comes in....<br />
If the mobile phone is compatible with text<br />
message (notified through JVC Bluetooth<br />
adapter) and “MSG INFO” (message info) is<br />
set to “AUTOMATIC” ( 15), the unit rings to<br />
inform you of the message arrival.<br />
• “RCV MESSAGE” (receiving message) appears<br />
and the display illuminate in blue. (, 26)<br />
Using the remote controller<br />
Making a call<br />
1<br />
2<br />
3<br />
4<br />
5 U / D ∞ / : Answers calls<br />
2 R / F 3 /<br />
SOURCE<br />
5 U / D ∞ / : Rejects calls<br />
2 R / F 3 /<br />
SOURCE<br />
[Hold]<br />
] “BT-PHONE”<br />
] Select “DIAL” menu.<br />
] Select a calling method.<br />
PHONE BOOK* j MISSED* j<br />
NUMBER j VOICE DIAL j<br />
REDIAL*j RECEIVED* j (back to<br />
the beginning)<br />
* Displays only when your mobile phone<br />
is equipped with these functions and is<br />
compatible with this unit.<br />
ENGLISH<br />
13
5<br />
14 ENGLISH<br />
For REDIAL, RECEIVED, MISSED<br />
] Repeat step 4 on page 13 to select<br />
a name (if it is acquired) or a phone<br />
number.<br />
For PHONE BOOK<br />
] Repeat step 4 on page 13 to select a<br />
name or a phone number.<br />
For NUMBER<br />
] Enter a phone number.<br />
] Confirm.<br />
For VOICE DIAL<br />
] Speak the name you want to call<br />
when “SAY NAME” appears.<br />
• If your mobile phone does not support<br />
the voice recognition system, “ERROR”<br />
appears.<br />
• Using voice tags may be difficult in<br />
a noisy environment or during an<br />
emergency.<br />
• To return to the previous menu, press 5.<br />
Using a Bluetooth audio<br />
player<br />
] “BT-AUDIO”<br />
If playback does not start, operate the<br />
Bluetooth audio player to start playback.<br />
Operate the Bluetooth audio player to<br />
pause (if playback does not pause when you<br />
change the source).<br />
Reverse skips/forward<br />
skips<br />
Pauses/starts playback*<br />
* Operation may be different<br />
according to the connected<br />
Bluetooth audio player.<br />
Enter setting menu (Device<br />
list)<br />
For connecting/disconnecting/deleting a<br />
registered device, 12.<br />
Using the remote controller<br />
2 R / F 3 : Reverse skips/forward<br />
skips
Changing the Bluetooth settings<br />
1<br />
2<br />
3<br />
4<br />
5<br />
] “BT-PHONE” or “BT-AUDIO”<br />
] Bluetooth menu<br />
] “SETTINGS”<br />
] Select a setting item.<br />
AUTO CNNCT j AUTO ANSWER * 1<br />
j MSG INFO * 2 j MIC SETTING * 1<br />
j VERSION * 3 j (back to the<br />
beginning)<br />
] Change the setting accordingly. For<br />
setting menu, right column.<br />
* 1 Appears only when a Bluetooth phone is<br />
connected.<br />
* 2 Appears only when a Bluetooth phone is<br />
connected and it is compatible with text<br />
message (notified through JVC Bluetooth<br />
adapter).<br />
* 3 Bluetooth Audio: Shows only “Version.”<br />
Setting menu [Initial: Underlined]<br />
AUTO CNNCT (connect)<br />
When the unit is turned on, the connection is<br />
established automatically with...<br />
OFF: No Bluetooth device.<br />
LAST: The last connected Bluetooth device.<br />
ORDER: The available registered Bluetooth<br />
device found at first.<br />
AUTO ANSWER<br />
Only for the device being connected for<br />
“BT-PHONE.”<br />
ON: The unit answers the incoming calls<br />
automatically.<br />
OFF: The unit does not answer the calls<br />
automatically. Answer the calls<br />
manually.<br />
REJECT: The unit rejects all incoming calls.<br />
MSG INFO (message info)<br />
Only for the device being connected for<br />
“BT-PHONE.”<br />
AUTOMATIC: The unit informs you of the<br />
arrival of a message by ringing<br />
and displaying “RCV MESSAGE”<br />
(receiving message).<br />
• The display illuminate in blue.<br />
(, 26)<br />
MANUAL: The unit does not inform you of<br />
the arrival of a message.<br />
MIC SETTING (microphone setting)<br />
Only for the device being connected for<br />
“BT-PHONE.” Adjust microphone volume<br />
connected to the Bluetooth adapter,<br />
[LEVEL 01/02/03].<br />
VERSION<br />
The Bluetooth software and hardware versions<br />
are shown.<br />
ENGLISH<br />
15
Warning messages<br />
ERROR CNNCT (Error Connection)<br />
The device is registered but the connection<br />
has failed. Use “CONNECT” to connect the<br />
device again. ( 12)<br />
ERROR<br />
Try the operation again. If “ERROR” appears<br />
again, check if the device supports the<br />
function you have tried.<br />
UNFOUND<br />
No available Bluetooth device is detected by<br />
“SEARCH.”<br />
Listening to the HD Radio Broadcast<br />
Before operating, connect HD Radio tuner box,<br />
KT-HD300 (not supplied) to the expansion port<br />
on the rear of the unit.<br />
• For details, refer also to the <strong>instructions</strong><br />
supplied with the HD Radio tuner box.<br />
What is HD Radio Technology?<br />
HD Radio Technology can deliver high-quality<br />
digital sound—AM digital will have FM-like<br />
quality (in stereo) and FM digital will have<br />
CD-like quality—with static-free and clear<br />
reception. Furthermore, stations can offer text<br />
and data, such as artist names and song titles.<br />
16 ENGLISH<br />
LOADING *<br />
The unit is updating the phone book.<br />
PLEASE WAIT<br />
The unit is preparing to use the Bluetooth<br />
function. If the message does not disappear,<br />
turn off and turn on the unit, then connect<br />
the device again (or reset the unit).<br />
RESET 8<br />
Check the connection between the adapter<br />
and this unit.<br />
* Displays only when your mobile phone<br />
is equipped with these functions and is<br />
compatible with this unit.<br />
Bluetooth Information:<br />
If you wish to receive more information about Bluetooth, visit the following JVC web site:<br />
(English website only)<br />
• When the HD Radio tuner box is connected,<br />
it can also receive conventional analog<br />
broadcasts.<br />
• Many HD Radio stations also offer more than<br />
one channel of programming. This service is<br />
called multicasting.<br />
• To find HD Radio stations in your area, visit<br />
.<br />
For basic radio operations, 7, 8.
When receiving...<br />
An HD Radio station<br />
Lights up when digital audio is broadcast<br />
Flashes when analog audio is broadcast<br />
Station Call Sign appears.<br />
HD Radio multicast channels<br />
First four letters of Call Sign<br />
Select your desired channel.<br />
HD1 j HD2 j .... j HD8<br />
j (back to the beginning)<br />
“LINKING” appears while linking to a multicast<br />
channel.<br />
Searching for HD Radio stations<br />
only<br />
[Hold]<br />
“HD” flashes.<br />
Channel number<br />
Changing HD Radio reception<br />
mode<br />
While receiving an HD Radio broadcast, the unit<br />
receives digital or analog audio automatically<br />
due to the receiving condition.<br />
While listening to an HD Radio station...<br />
1<br />
2<br />
[Hold]<br />
] ] ]<br />
/ / <br />
“HD” lights up when holding the digital<br />
reception or flashes when holding the<br />
analog reception.<br />
• If no sound can be heard with ,<br />
change the setting to or<br />
.<br />
• The setting automatically changes to <br />
if you tune in to or change to another station,<br />
or if you turn off the power.<br />
• This setting cannot take effect for the<br />
conventional FM/AM stations.<br />
• If the radio station forces the reception mode<br />
to digital, the HOLD indicator flashes.<br />
Changing the display information<br />
Call Sign * 1 = Frequency =<br />
Title/artist/album name of the<br />
current segment * 2 = Clock =<br />
(back to the beginning)<br />
* 1 “ **** -FM” or “ **** ” appears when no Call Sign<br />
is received.<br />
* 2 “NO TEXT” appears when no text is received.<br />
Using the remote controller<br />
5 U / D ∞ : Changes the preset<br />
stations<br />
2 R / F 3 : Searches for stations<br />
ENGLISH<br />
17
Listening to the satellite radio<br />
Before operating, connect either one of<br />
the following systems (not supplied) to the<br />
expansion port on the rear of this unit.<br />
For listening to a SIRIUS Satellite radio:<br />
• SC-C1 and KS-SRA100<br />
• PnP, SC-VDOC1 and KS-SRA100<br />
For listening to an XM Satellite radio:<br />
• JVC Smart Digital Adapter (XMDJVC100)<br />
• CNP2000UC and CNPJVC1<br />
• For details, refer also to the <strong>instructions</strong><br />
supplied with the other components.<br />
GCI (Global Control Information)<br />
update<br />
• If channels are updated after subscription,<br />
updating starts automatically. “UPDATING”<br />
flashes and no sound can be heard.<br />
• Update takes a few minutes to complete.<br />
• During update, you cannot operate your<br />
satellite radio.<br />
~<br />
Ÿ<br />
18 ENGLISH<br />
] “SIRIUS” or “XM”<br />
] Select a category.<br />
SIRIUS: If you select “ALL,” you can<br />
tune in to all the channels of all<br />
categories.<br />
!<br />
] Select a channel to listen.<br />
Holding the button changes the<br />
channels rapidly.<br />
While searching, invalid and<br />
unsubscribed channels are skipped.<br />
XM: If you do not select a channel<br />
within 15 seconds, category selected<br />
in step Ÿ is canceled. You can select<br />
all channels of all categories now<br />
(including non-categorised channels).<br />
Activate your SIRIUS subscription after<br />
connection<br />
1<br />
] “SIRIUS”<br />
SIRIUS Satellite radio starts updating all<br />
the SIRIUS channels. Once completed,<br />
SIRIUS Satellite radio tunes in to the<br />
preset channel, CH184.<br />
2 Check your SIRIUS ID. ( 25)<br />
3 Contact SIRIUS on the internet at<br />
to<br />
activate your subscription, or you can<br />
call SIRIUS toll-free at 1-888-539-SIRIUS<br />
(7474).<br />
• “SUB UPDT PRESS ANY KEY” scrolls on<br />
the display once subscription has been<br />
completed.
Activate your XM subscription after<br />
connection<br />
• Only Channel 0, 1, and 247 are available<br />
before activation.<br />
1<br />
2<br />
3<br />
] “XM”<br />
XMDirect Tuner Box or XMDirect2<br />
Tuner System starts updating all the<br />
XM channels. “Channel 1” is tuned in<br />
automatically.<br />
Check your XM Satellite radio ID labelled<br />
on the casing of the XMDirect Tuner<br />
Box or XMDirect2 Tuner System, or tune<br />
in to “Channel 0”. ( right column)<br />
Contact XM Satellite radio on<br />
the internet at to activate your<br />
subscription, or you can call 1-800-XM-<br />
RADIO (1-800-967-2346).<br />
• Once completed, the unit tunes in to<br />
one of the available channels (Channel<br />
4 or higher).<br />
Storing channels in memory<br />
You can preset up to 18 channels for both<br />
SIRIUS and XM.<br />
Ex.: Storing channel into preset number “04.”<br />
1 Tune in to a channel you want to store.<br />
(Steps ~ – !, 18.)<br />
2<br />
3<br />
[Hold]<br />
“PRESET MODE” flashes.<br />
] Select preset number “04.”<br />
“P04” flashes.<br />
Selecting SIRIUS/XM preset<br />
station<br />
1<br />
2<br />
Checking the satellite radio ID<br />
While selecting “SIRIUS” or “XM”...<br />
] Select “Channel 0.”<br />
SIRIUS: SIRIUS identification number is<br />
displayed after “Channel 0” is selected.<br />
XM: The display alternately shows “RADIO ID”<br />
and the 8-digit (alphanumeric) ID number.<br />
To cancel the ID number display, select any<br />
channel other than “Channel 0.”<br />
Changing the display information<br />
Category name = Channel name<br />
= Artist name = Composer<br />
name * = Song/program name/<br />
title = Clock = (back to the<br />
beginning)<br />
* Only for SIRIUS Satellite radio.<br />
Using the remote controller<br />
5 U / D ∞ : Changes the<br />
categories<br />
2 R / F 3 : Changes the channels<br />
2 R / F 3<br />
[Hold]<br />
: Changes the channels<br />
rapidly<br />
ENGLISH<br />
19
Listening to the iPod/iPhone<br />
You can connect the iPod/iPhone using the USB 2.0 cable (accessory of the iPod/iPhone) to the<br />
USB input jack on the control panel.<br />
• Disconnecting the iPod/iPhone will stop<br />
playback. Press / SOURCE to listen to another<br />
playback source.<br />
• For details, refer also to the <strong>instructions</strong><br />
supplied with your iPod/iPhone.<br />
Caution:<br />
• Avoid using the iPod/iPhone if it might hinder<br />
your safety while driving.<br />
• Make sure all important data has been backed<br />
up to avoid losing the data.<br />
There are two control terminals:<br />
• Control by this unit.<br />
• Control by the connected<br />
iPod/iPhone.<br />
Preparation: Select the controlling terminal,<br />
or for iPod<br />
playback:<br />
• Press and hold BACK button.<br />
• Make the selection from <br />
setting, 28.<br />
20 ENGLISH<br />
USB input jack<br />
The operations explained below are under<br />
.<br />
~<br />
Ÿ<br />
] “USB-IPOD”<br />
Playback starts automatically.<br />
] Select a song.<br />
[Hold]<br />
Apple iPod/iPhone<br />
USB 2.0 cable (accessory of the iPod/iPhone)<br />
Pauses or resumes<br />
playback<br />
Selects track<br />
Fast-forwards or<br />
reverses the track
Selecting a track from the menu<br />
1<br />
2<br />
3<br />
] Select the desired menu.<br />
PLAYLISTS j ARTISTS j ALBUMS<br />
j SONGS j PODCASTS j<br />
GENRES j COMPOSERS j<br />
AUDIOBOOKS j (back to the<br />
beginning)<br />
] Select the desired track.<br />
Repeat this procedure until the desired<br />
track is selected.<br />
• If the selected menu contains many tracks,<br />
you can fast search (±10, ±100, ±1000)<br />
through the menu by turning the control dial<br />
quickly.<br />
• To return to the previous menu, press BACK.<br />
Selecting the playback modes<br />
1<br />
2<br />
[Hold]<br />
] “REPEAT” j “RANDOM”<br />
3<br />
REPEAT<br />
ONE RPT : Functions the same as<br />
“Repeat One” of the iPod<br />
ALL RPT : Functions the same as<br />
“Repeat All” of the iPod<br />
RANDOM<br />
ALBUM RND : Functions the same as<br />
“Shuffle Albums” of the<br />
iPod<br />
SONG RND : Functions the same as<br />
“Shuffle Songs” of the<br />
iPod<br />
• To cancel repeat play or random play, select<br />
“RPT OFF” or “RND OFF.”<br />
• “ALBUM RND” is not available for some iPod.<br />
• To return to the previous menu, press BACK.<br />
Changing the display information<br />
Album name/performer = Track title =<br />
Current track number with the elapsed<br />
playing time = Current track number with<br />
the clock time = (back to the beginning)<br />
Using the remote controller<br />
2 R / F 3 : Selects track<br />
2 R / F 3<br />
[Hold]<br />
: Fast-forwards or<br />
reverses the track<br />
Notice:<br />
When operating an iPod, some operations<br />
may not be performed correctly or as<br />
intended. In this case, visit the following JVC<br />
web site: <br />
(English website only)<br />
ENGLISH<br />
21
Listening to the other external<br />
components<br />
You can connect an external component to:<br />
• EXT INPUT: Expansion port on the rear of<br />
this unit using the following adapters (not<br />
supplied):<br />
– KS-U57, Line Input Adapter<br />
– KS-U58, AUX Input Adapter<br />
Preparation: Make sure is selected<br />
for the = setting.<br />
( 28)<br />
• AUX IN: AUX (auxiliary) input jack on the<br />
control panel.<br />
Preparation: Make sure is<br />
selected for the = <br />
setting. ( 28)<br />
• For details, refer also to the <strong>instructions</strong><br />
supplied with the adapter or external<br />
components.<br />
22 ENGLISH<br />
~<br />
Connecting an external component to the AUX input jack<br />
3.5 mm (3/16”) stereo mini plug<br />
(not supplied)<br />
] “EXT INPUT” or “AUX IN”<br />
Ÿ Turn on the connected<br />
component and start<br />
playing the source.<br />
!<br />
] Adjust the volume.<br />
⁄ Adjust the sound as you<br />
want. ( 23)<br />
Portable audio player,<br />
etc.
Selecting a preset sound mode<br />
You can select a preset sound mode suitable<br />
for the music genre.<br />
FLAT = NATURAL = DYNAMIC = VOCAL<br />
BOOST = BASS BOOST = USER = (back to<br />
the beginning)<br />
While listening, you can adjust the tone level of<br />
the selected sound mode.<br />
1<br />
2<br />
[Hold]<br />
Adjust the level (–06 to +06) of the<br />
selected tone (BASS / MID / TRE).<br />
The sound mode is automatically stored<br />
and changed to “USER.”<br />
Tone<br />
Sound element<br />
Frequency Level Q<br />
BASS 60 Hz –06 to +06 Q1.0<br />
80 Hz<br />
Q1.25<br />
100 Hz<br />
Q1.5<br />
200 Hz<br />
Q2.0<br />
MIDDLE 0.5 kHz –06 to +06 Q0.75<br />
1.0 kHz<br />
Q1.0<br />
1.5 kHz<br />
2.5 kHz<br />
Q1.25<br />
TREBLE 10.0 kHz<br />
12.5 kHz<br />
15.0 kHz<br />
17.5 kHz<br />
–06 to +06 Q FIX<br />
Storing your own sound mode<br />
You can store your own adjustments in<br />
memory.<br />
1<br />
2<br />
3<br />
[Hold]<br />
] ] / /<br />
<br />
Adjust the sound elements of the<br />
selected tone. ( table on the left)<br />
4 Repeat steps 2 and 3 to adjust other<br />
tones.<br />
The adjustments made will be stored<br />
automatically in “USER.”<br />
The current sound mode changes to “USER”<br />
automatically.<br />
ENGLISH<br />
23
Menu operations<br />
1 2 3<br />
24 ENGLISH<br />
Repeat step 2 if necessary.<br />
• To return to the previous menu,<br />
press BACK.<br />
• To exit from the menu, press DISP<br />
or MENU.<br />
Category Menu item Selectable setting, [Initial: Underlined]<br />
DEMO<br />
CLOCK<br />
PRO EQ<br />
[Hold]<br />
DEMO<br />
Display<br />
demonstration<br />
CLOCK SET<br />
Clock setting<br />
CLOCK ADJ * 1<br />
Clock<br />
adjustment<br />
• DEMO ON<br />
• DEMO OFF<br />
—<br />
[1:00]<br />
• AUTO<br />
• OFF<br />
TIME ZONE * 1, * 2 EASTERN,<br />
ATLANTIC,<br />
NEWFOUND,<br />
ALASKA,<br />
PACIFIC,<br />
MOUNTAIN,<br />
CENTRAL<br />
DST * 1, * 2<br />
Daylight savings<br />
time<br />
• DST ON<br />
• DST OFF<br />
: Display demonstration will be activated<br />
automatically if no operation is done for about<br />
20 seconds.<br />
: Cancels. ( 4)<br />
: Adjust the hour, then the minute. ( 4)<br />
: The built-in clock is automatically adjusted<br />
using the clock data provided via the satellite<br />
radio channel.<br />
: Cancels.<br />
: Select your residential area from one of the time<br />
zones for clock adjustment.<br />
: Activates daylight savings time if your<br />
residential area is subject to DST.<br />
: Cancels.<br />
BASS — : For settings, 23.<br />
MIDDLE<br />
TREBLE<br />
* 1 Displayed only when SIRIUS Satellite radio or XM Satellite radio is connected.<br />
* 2 Displayed only when is set to .
Category Menu item Selectable setting, [Initial: Underlined]<br />
DISPLAY<br />
TUNER<br />
DIMMER • DIMMER AUTO<br />
• DIMMER ON<br />
• DIMMER OFF<br />
: Dims the display when you turn on the<br />
headlights. * 3<br />
: Dims the display and button illumination.<br />
: Cancels.<br />
SCROLL * 4 • SCROLL ONCE : Scrolls the displayed information once.<br />
• SCROLL AUTO : Repeats scrolling (at 5-second intervals).<br />
• SCROLL OFF : Cancels.<br />
Pressing DISP for more than one second can scroll the display<br />
regardless of the setting.<br />
TAG DISPLAY • TAG ON<br />
SSM* 5<br />
Strong-station<br />
Sequential<br />
Memory<br />
AREA<br />
Tuner channel<br />
interval<br />
MONO * 5<br />
Monaural mode<br />
SID * 7<br />
SIRIUS ID<br />
• TAG OFF<br />
• SSM 01 – 06 * 6<br />
• SSM 07 – 12<br />
• SSM 13 – 18<br />
• AREA US<br />
• AREA EU<br />
• AREA SA<br />
• MONO ON<br />
• MONO OFF<br />
: Shows the Tag information while playing MP3/<br />
WMA tracks.<br />
: Cancels.<br />
: For settings, 7.<br />
: When using in North/Central/South America.<br />
AM/FM intervals are set to 10 kHz/200 kHz.<br />
: When using in any other areas. AM/FM intervals<br />
are set to 9 kHz/50 kHz (100 kHz during auto<br />
search).<br />
: When using in South American countries<br />
where FM interval is 100 kHz. AM interval is set<br />
to 10 kHz.<br />
: Activate monaural mode to improve FM<br />
reception, but stereo effect will be lost. ( 7)<br />
: Restore the stereo effect.<br />
— : Your SIRIUS identification number scrolls on the<br />
display 5 seconds after “SID” is selected.<br />
( 19)<br />
If no operation is done for about 60 seconds,<br />
the unit returns to playback mode.<br />
* 3 The illumination control lead connection is required. (See “Installation/Connection Manual.”) This<br />
setting may not work correctly on some vehicles (particularly on those having a control dial for<br />
dimming). In this case, change the setting to any other than .<br />
* 4 Some characters or symbols will not be shown correctly (or will be blanked) on the display.<br />
* 5 Displayed only when the source is “FM” or “HD Radio.”<br />
* 6 If an HD Radio tuner box is connected, you can also search and store the AM stations to<br />
.<br />
* 7 Displayed only when SIRIUS Satellite radio is connected.<br />
ENGLISH<br />
25
Category Menu item Selectable setting, [Initial: Underlined]<br />
TUNER<br />
COLOR<br />
COLOR SETUP<br />
26 ENGLISH<br />
BLEND HOLD * 8<br />
HD Radio<br />
reception mode<br />
IF BAND<br />
Intermediate<br />
frequency band<br />
• AUTO<br />
• DIGITAL<br />
• ANALOG<br />
• AUTO<br />
• WIDE<br />
: Switch between digital and analog audio<br />
automatically. ( 17)<br />
: Tune in to digital audio only.<br />
: Tune in to analog audio only.<br />
BUTTON ZONE COLOR 01 — : For settings, 29.<br />
DISP ZONE<br />
Display zone<br />
COLOR 29, USER<br />
: For settings, 29.<br />
ALL ZONE : For settings, 29.<br />
DAY COLOR • BUTTON ZONE<br />
• DISP ZONE<br />
NIGHT COLOR • BUTTON ZONE<br />
• DISP ZONE<br />
MENU COLOR • ON<br />
• OFF<br />
RING COLOR * 9 • ON<br />
• OFF<br />
: Increases the tuner selectivity to reduce<br />
interference noises between adjacent stations.<br />
(Stereo effect may be lost.)<br />
: Subject to interference noises from adjacent<br />
stations, but sound quality will not be<br />
degraded and the stereo effect will remain.<br />
: For settings, 30.<br />
: For settings, 30.<br />
* 8 Displayed only when HD Radio tuner box is connected.<br />
* 9 Displayed only when Bluetooth adapter, KS-BTA200 is connected.<br />
: Changes the display and buttons (except for<br />
EQ/BASS-TRE / DISP) illumination during menu,<br />
list search and playback mode operations.<br />
: Cancels.<br />
: When a call comes in, the display will flash in<br />
blue.<br />
• The display will change to the original color<br />
when the call is answered or the incoming<br />
call stops.<br />
When the unit receives a text message, the<br />
display only illuminate in blue.<br />
: Cancels.
Category Menu item Selectable setting, [Initial: Underlined]<br />
AUDIO<br />
FADER * 10 R06 – F06<br />
[00]<br />
BALANCE * 11 L06 – R06<br />
[00]<br />
LOUD<br />
Loudness<br />
VOL ADJUST<br />
Volume adjust<br />
L/O MODE<br />
Line output<br />
mode<br />
SUB.W FREQ * 12<br />
Subwoofer cutoff<br />
frequency<br />
SUB.W LEVEL * 12<br />
Subwoofer level<br />
• LOUD ON<br />
• LOUD OFF<br />
VOL ADJ –05 —<br />
VOL ADJ +05<br />
[VOL ADJ 00]<br />
• SUB.W<br />
• REAR<br />
• LOW<br />
• MID<br />
• HIGH<br />
SUB.W 00 —<br />
SUB.W 08<br />
[SUB.W 04]<br />
* 10 If you are using a two-speaker system, set the fader level to “00.”<br />
* 11 This adjustment will not affect the subwoofer output.<br />
* 12 Displayed only when is set to .<br />
: Adjust the front and rear speaker output<br />
balance.<br />
: Adjust the left and right speaker output<br />
balance.<br />
: Boost low and high frequencies to produce a<br />
well-balanced sound at a low volume level.<br />
: Cancels.<br />
: Preset the volume adjustment level of<br />
each source (except FM), compared to the<br />
FM volume level. The volume level will<br />
automatically increase or decrease when you<br />
change the source.<br />
• Before making an adjustment, select the<br />
source you want to adjust.<br />
• “VOL ADJ FIX” appears on the display if “FM”<br />
is selected as the source.<br />
: Select if the REAR LINE OUT terminals are<br />
used for connecting a subwoofer (through<br />
an external amplifier).<br />
: Select if the REAR LINE OUT terminals are<br />
used for connecting the speakers (through<br />
an external amplifier).<br />
: Frequencies lower than 72 Hz are sent to the<br />
subwoofer.<br />
: Frequencies lower than 111 Hz are sent to<br />
the subwoofer.<br />
: Frequencies lower than 157 Hz are sent to<br />
the subwoofer.<br />
: Adjust the subwoofer output level.<br />
ENGLISH<br />
27
Category Menu item Selectable setting, [Initial: Underlined]<br />
AUDIO<br />
SRC SELECT<br />
AUDIOBOOKS<br />
IPOD<br />
SWITCH<br />
28 ENGLISH<br />
BEEP<br />
Keytouch tone<br />
AMP GAIN * 13<br />
Amplifier gain<br />
control<br />
AM * 14<br />
AM station<br />
EXT IN * 15<br />
External input<br />
AUX IN * 16<br />
Auxiliary input<br />
AUDIOBOOKS * 17<br />
Speed control of<br />
“Audiobooks”<br />
IPOD SWITCH * 18<br />
iPod/iPhone<br />
control<br />
• BEEP ON<br />
• BEEP OFF<br />
• LOW POWER<br />
• HIGH POWER<br />
• AM ON<br />
• AM OFF<br />
• EXT ON<br />
• EXT OFF<br />
• AUX ON<br />
• AUX OFF<br />
• NORMAL<br />
• FASTER<br />
• SLOWER<br />
• HEAD MODE<br />
• IPOD MODE<br />
: Activates the keypress tone.<br />
: Deactivates the keypress tone.<br />
: VOLUME 00 – VOLUME 30 (Select if the<br />
maximum power of each speaker is less than<br />
50 W to prevent damaging the speakers.)<br />
: VOLUME 00 – VOLUME 50<br />
: Enable “AM” in source selection.<br />
: Disable “AM” in source selection.<br />
: Enable “EXT IN” in source selection.<br />
: Disable “EXT IN” in source selection.<br />
: Enable “AUX IN” in source selection.<br />
: Disable “AUX IN” in source selection.<br />
: You can select the playback speed of the<br />
“Audiobook” sound file in your iPod.<br />
• Initial selected item depends on your iPod<br />
setting.<br />
: Controls iPod playback through the unit.<br />
: Controls iPod playback through the iPod/<br />
iPhone.<br />
* 13 The volume level automatically changes to “VOLUME 30” if you change to with the<br />
volume level set higher than “VOLUME 30.”<br />
* 14 Displayed only when any source other than “AM” is selected.<br />
* 15 Displayed only when any source other than “EXT IN“ is selected.<br />
* 16 Displayed only when any source other than “AUX IN“ is selected.<br />
* 17 Displayed only when an iPod is connected and playback is controlled from the unit.<br />
* 18 Displayed only when “USB-IPOD” is selected as the source and “IPOD MODE” is available for the<br />
connected iPod/iPhone ( 34).
Selecting the variable buttons and display color illumination<br />
You can select your preferred color for buttons illumination (except for EQ/BASS-TRE / DISP) and<br />
display color separately.<br />
1<br />
2<br />
3<br />
[Hold]<br />
Button zone<br />
or<br />
All zone<br />
] ] /<br />
/ <br />
• Pressing COLOR in step 1 will enter<br />
zone selection menu (BUTTON ZONE /<br />
DISP ZONE / ALL ZONE) directly.<br />
] Select your preferred color from one<br />
of the 29 preset colors or color.<br />
Display zone<br />
4<br />
Repeat steps 2 and 3 to select a<br />
different zone and your preferred color.<br />
• If is selected in step 2,<br />
the buttons and display illumination<br />
changed to the current/selected<br />
color.<br />
You can also change the <br />
color to one of your preferred color by<br />
performing step 3.<br />
5 or<br />
] Exit from the setting.<br />
ENGLISH<br />
29
Creating your own day and night colors—USER<br />
You can create your own colors for and to apply to button zone<br />
and display zone.<br />
• Displayed when is set to .<br />
• Displayed when is set to .<br />
COLOR<br />
SETUP<br />
1<br />
2<br />
3<br />
30 ENGLISH<br />
Menu hierarchy Operation<br />
DAY<br />
COLOR<br />
• BUTTON<br />
ZONE<br />
• DISP ZONE<br />
Follow example below.<br />
Press BACK after step 5, then select DISP ZONE in step 2.<br />
• BUTTON Press BACK after step 5, then select NIGHT COLOR in<br />
NIGHT ZONE step 2.<br />
COLOR<br />
• DISP ZONE<br />
Ex.: Creating color for in .<br />
[Hold]<br />
or<br />
[Hold]<br />
] ] <br />
] <br />
• Pressing COLOR in step 1 will enter<br />
zone selection menu (BUTTON ZONE /<br />
DISP ZONE) directly.<br />
] Select a primary color.<br />
RED j GREEN j BLUE j (back to<br />
the beginning)<br />
4<br />
] Adjust the level of the selected<br />
primary color.<br />
00 to 31<br />
5 Repeat steps 3 and 4 to adjust other<br />
primary colors.<br />
6 or<br />
] Exit from the setting.<br />
If “00” is selected for all the primary colors (as<br />
in step 4) for , nothing appear on<br />
the display.
More about this unit<br />
Basic operations<br />
General<br />
• If you turn off the power while listening to<br />
a track, playback will start from where it had<br />
been stopped previously next time you turn<br />
on the power.<br />
• If no operation is done for about 60 seconds<br />
after pressing MENU button, the operation will<br />
be canceled.<br />
Tuner operations<br />
Storing stations in memory<br />
• During SSM search...<br />
– All previously stored stations are erased and<br />
the stations are stored anew.<br />
– When SSM is over, the station stored in the<br />
lowest preset number will be automatically<br />
tuned in.<br />
• When storing a station manually, the<br />
previously preset station is erased when<br />
a new station is stored in the same preset<br />
number.<br />
Disc/USB operations<br />
Caution for DualDisc playback<br />
• The Non-DVD side of a “DualDisc” does not<br />
comply with the “Compact Disc Digital Audio”<br />
standard. Therefore, the use of Non-DVD side<br />
of a DualDisc on this product may not be<br />
recommended.<br />
General<br />
• This unit has been designed to reproduce<br />
CDs/CD Texts, and CD-Rs (Recordable)/CD-<br />
RWs (Rewritable) in audio CD (CD-DA), MP3<br />
and WMA formats.<br />
• If you change the source while listening to a<br />
disc, playback stops. Next time you select “CD”<br />
as the playback source, playback will start<br />
from where it had been stopped previously.<br />
• When a disc is inserted upside down,<br />
“PLEASE” and “EJECT” appear alternately on<br />
the display. Press 0 to eject the disc.<br />
• If the ejected disc is not removed within<br />
15 seconds, it is automatically inserted into<br />
the loading slot again to protect it from dust.<br />
Playback starts automatically.<br />
• MP3 and WMA “tracks” (words “file” and<br />
“track” are used interchangeably) are recorded<br />
in “folders.”<br />
• While fast-forwarding or reversing on an MP3<br />
or WMA disc, you can only hear intermittent<br />
sounds.<br />
Playing a CD-R or CD-RW<br />
• Use only “finalized” CD-Rs or CD-RWs.<br />
• This unit can only play back files of the same<br />
type as those detected first if a disc includes<br />
both audio CD (CD-DA) files and MP3/WMA<br />
files.<br />
• This unit can play back multi-session discs;<br />
however, unclosed sessions will be skipped<br />
while playing.<br />
• Some CD-Rs or CD-RWs may not play back on<br />
this unit because of their disc characteristics,<br />
or for the following reasons:<br />
– Discs are dirty or scratched.<br />
– Moisture condensation has occurred on the<br />
lens inside the unit.<br />
– The pickup lens inside the unit is dirty.<br />
– The files on the CD-R/CD-RW are written<br />
using the “Packet Write” method.<br />
– There are improper recording conditions<br />
(missing data, etc.) or media conditions<br />
(stained, scratched, warped, etc.).<br />
• CD-RWs may require a longer readout time<br />
since the reflectance of CD-RWs is lower than<br />
that of regular CDs.<br />
ENGLISH<br />
31
• Do not use the following CD-Rs or CD-RWs:<br />
– Discs with stickers, labels, or a protective seal<br />
stuck to the surface.<br />
– Discs on which labels can be directly printed<br />
by an ink jet printer.<br />
Using these discs under high temperature<br />
or high humidity may cause malfunctions or<br />
damage to the unit.<br />
Playing an MP3/WMA disc<br />
• This unit can play back MP3/WMA files with<br />
the extension code or <br />
(regardless of the letter case—upper/lower).<br />
• This unit can show the names of albums,<br />
artists (performer), and Tag (Version 1.0, 1.1,<br />
2.2, 2.3, or 2.4) for MP3 files and for WMA files.<br />
• This unit can display only one-byte characters.<br />
No other characters can be correctly<br />
displayed.<br />
• This unit can play back MP3/WMA files<br />
meeting the conditions below:<br />
– Bit rate of MP3/WMA: 32 kbps — 320 kbps<br />
– Sampling frequency of MP3:<br />
32 kHz, 44.1 kHz, 48 kHz (for MPEG-1)<br />
16 kHz, 22.05 kHz, 24 kHz (for MPEG-2)<br />
– Sampling frequency of WMA:<br />
22.05 kHz, 32 kHz, 44.1 kHz, 48 kHz<br />
– Disc format: ISO 9660 Level 1/Level 2,<br />
Romeo, Joliet, Windows extension<br />
• The maximum number of characters for<br />
file/folder names vary depending on the<br />
disc format used (includes 4 extension<br />
characters— or ).<br />
– ISO 9660 Level 1: up to 12 characters<br />
– ISO 9660 Level 2: up to 31 characters<br />
– Romeo: up to 64 characters<br />
– Joliet: up to 32 characters<br />
– Windows extension: up to 64 characters<br />
• This unit can recognize a total of 512 files, 255<br />
folders, and 8 hierarchical levels.<br />
• This unit can play back files recorded in VBR<br />
(variable bit rate).<br />
Files recorded in VBR have a discrepancy<br />
in the elapsed time display, and do not<br />
show the actual elapsed time. In particular,<br />
this difference becomes noticeable after<br />
performing the search function.<br />
32 ENGLISH<br />
• This unit cannot play back the following files:<br />
– MP3 files encoded in MP3i and MP3 PRO<br />
format.<br />
– MP3 files encoded in an inappropriate<br />
format.<br />
– MP3 files encoded with Layer 1/2.<br />
– WMA files encoded in lossless, professional,<br />
and voice format.<br />
– WMA files which are not based upon<br />
Windows Media® Audio.<br />
– WMA files copy-protected with DRM.<br />
– Files which have data such as AIFF, ATRAC3,<br />
etc.<br />
• The search function works but search speed is<br />
not constant.<br />
Playing MP3/WMA tracks from a USB<br />
device<br />
• While playing from a USB device, the playback<br />
order may differ from other players.<br />
• This unit may be unable to play back some<br />
USB devices or some files due to their<br />
characteristics or recording conditions.<br />
• Depending on the shape of the USB devices<br />
and connection ports, some USB devices may<br />
not be attached properly or the connection<br />
might be loose.<br />
• Connect one USB mass storage class device to<br />
the unit at a time. Do not use a USB hub.<br />
• If the connected USB device does not have<br />
the correct files, “CANNOT PLAY” appears.<br />
• This unit can show Tag (Version 1.0, 1.1, 2.2,<br />
2.3, or 2.4) for MP3 files and for WMA files.<br />
• This unit can play back MP3/WMA files<br />
meeting the conditions below:<br />
– Bit rate of MP3/WMA: 32 kbps — 320 kbps<br />
– Sampling frequency of MP3:<br />
32 kHz, 44.1 kHz, 48 kHz (for MPEG-1)<br />
16 kHz, 22.05 kHz, 24 kHz (for MPEG-2)<br />
– Sampling frequency of WMA:<br />
22.05 kHz, 32 kHz, 44.1 kHz, 48 kHz
• This unit can play back MP3 files recorded in<br />
VBR (variable bit rate).<br />
• The maximum number of characters for:<br />
– Folder names : 32 characters<br />
– File names : 32 characters<br />
– MP3 Tag : 64 characters<br />
– WMA Tag : 32 characters<br />
• This unit can recognize a total of 5 000 files,<br />
255 folders (255 files per folder including<br />
folder without unsupported files), and of 8<br />
hierarchies.<br />
• This unit does not support SD card reader.<br />
• This unit cannot recognize a USB device<br />
whose rating is other than 5 V and exceeds<br />
500 mA.<br />
• USB devices equipped with special functions<br />
such as data security functions cannot be<br />
used with the unit.<br />
• Do not use a USB device with 2 or more<br />
partitions.<br />
• This unit may not recognized a USB device<br />
connected through a USB card reader.<br />
• This unit may not play back files in a USB<br />
device properly when using a USB extension<br />
cord.<br />
• This unit cannot play back the following files:<br />
– MP3 files encoded in MP3i and MP3 PRO<br />
format.<br />
– MP3 files encoded in an inappropriate<br />
format.<br />
– MP3 files encoded with Layer 1/2.<br />
– WMA files encoded in lossless, professional,<br />
and voice format.<br />
– WMA files which are not based upon<br />
Windows Media® Audio.<br />
Bluetooth operations<br />
• While driving, do not perform complicated<br />
operation such as dialing the numbers, using<br />
phone book, etc. When you perform these<br />
operations, stop your car in a safe place.<br />
• Some Bluetooth devices may not be<br />
connected to this unit depending on the<br />
Bluetooth version of the device.<br />
• This unit may not work for some Bluetooth<br />
devices.<br />
• Connecting condition may vary depending<br />
on the circumstances around you.<br />
• When the unit is turned off, the device is<br />
disconnected.<br />
HD Radio reception<br />
• HD Radio broadcasting can normally<br />
be received in the USA, and it may also<br />
be received in countries where limited<br />
broadcasting has already begun.<br />
• During SSM search...<br />
– All stations including conventional FM/AM<br />
stations are searched and stored for the<br />
selected band.<br />
Satellite radio<br />
• To know more about SIRIUS Satellite radio or<br />
to sign up, visit .<br />
• For the latest channel listings and<br />
programming information, or to sign up for<br />
XM Satellite radio, visit .<br />
ENGLISH<br />
33
iPod/iPhone operations<br />
• You can control the following types of iPods/<br />
iPhone:<br />
– iPod with video (5th Generation) * 1<br />
– iPod classic * 1, * 2<br />
– iPod nano<br />
– iPod nano (2nd Generation)<br />
– iPod nano (3rd Generation) * 1, * 2<br />
– iPod nano (4th Generation) * 1, * 2<br />
– iPod nano (5th Generation) * 1, * 2<br />
– iPod touch * 1, * 2<br />
– iPod touch (2nd Generation) * 1, * 2<br />
– iPhone/iPhone 3G/iPhone 3GS * 1, * 2<br />
* 1 It is not possible to browse video files on the<br />
“Videos” menu.<br />
* 2 is available ( 20).<br />
• Microsoft and Windows Media are either registered trademarks or trademarks of Microsoft<br />
Corporation in the United States and/or other countries.<br />
• The Bluetooth word mark and logos are owned by the Bluetooth SIG, Inc. and any use of such<br />
marks by Victor Company of Japan, Limited (JVC) is under license. Other trademarks and trade<br />
names are those of their respective owners.<br />
• HD Radio and the HD Radio Ready logo are proprietary trademarks of iBiquity Digital Corp.<br />
• “SIRIUS” and the SIRIUS dog logo are registered trademarks of SIRIUS Satellite Radio Inc.<br />
• XM and its corresponding logos are registered trademarks of XM Satellite Radio Inc.<br />
• “SAT Radio,” the SAT Radio logo and all related marks are trademarks of SIRIUS Satellite Radio<br />
Inc., and XM Satellite Radio, Inc.<br />
• “Made for iPod” means that an electronic accessory has been designed to connect specifically<br />
to iPod and has been certified by the developer to meet Apple performance standards.<br />
• “Works with iPhone” means that an electronic accessory has been designed to connect<br />
specifically to iPhone and has been certified by the developer to meet Apple performance<br />
standards.<br />
• Apple is not responsible for the operation of this device or its compliance with safety and<br />
regulatory standards.<br />
• iPod is a trademark of Apple Inc., registered in the U.S. and other countries.<br />
• iPhone is a trademark of Apple Inc.<br />
34 ENGLISH<br />
• If the iPod does not play correctly, please<br />
update your iPod software to the latest<br />
version. For details about updating your iPod,<br />
visit .<br />
• When you turn on this unit, the iPod is<br />
charged through this unit.<br />
• iPod shuffle cannot be used with this unit.<br />
• The song order displayed on the selection<br />
menu of this unit may differ from that of the<br />
iPod.<br />
• The text information may not be displayed<br />
correctly:<br />
– Some characters such as accented letters<br />
cannot be shown correctly on the display.<br />
– Communication between the iPod and the<br />
unit is not stable.<br />
• If the text information includes more than 11<br />
characters, it scrolls on the display.<br />
This unit can display up to 64 characters.
Maintenance<br />
How to clean the connectors<br />
Frequent detachment will deteriorate the<br />
connectors.<br />
To minimize this possibility, periodically wipe<br />
the connectors with a cotton swab or cloth<br />
moistened with alcohol, being careful not to<br />
damage the connectors.<br />
Connectors<br />
Moisture condensation<br />
Moisture may condense on the lens inside the<br />
unit in the following cases:<br />
• After starting the heater in the car.<br />
• If it becomes very humid inside the car.<br />
Should this occur, the unit may malfunction.<br />
In this case, eject the disc and leave the unit<br />
turned on for a few hours until the moisture<br />
has evaporated.<br />
How to handle discs<br />
Center holder<br />
When removing a disc<br />
from its case, press down<br />
the center holder of the case<br />
and lift the disc out, holding<br />
it by the edges.<br />
• Always hold the disc by the edges. Do not<br />
touch its recording surface.<br />
When storing a disc in its case, gently insert<br />
the disc around the center holder (with the<br />
printed surface facing up).<br />
• Make sure to store discs in cases after use.<br />
To keep discs clean<br />
A dirty disc may not play<br />
correctly. If a disc does become<br />
dirty, wipe it with a soft cloth<br />
in a straight line from center to<br />
edge.<br />
• Do not use any solvents (for example,<br />
conventional record cleaner, spray, thinner,<br />
benzine, etc.) to clean discs.<br />
To play new discs<br />
New discs may have some<br />
rough spots around the inner<br />
and outer edges. If such a disc<br />
is used, this unit may reject the<br />
disc.<br />
To remove these rough spots, rub the edges<br />
with a pencil or ball-point pen, etc.<br />
Do not use the following discs:<br />
Single CD—8 cm<br />
Warped disc<br />
(3-3/16”) disc<br />
Sticker and sticker<br />
residue<br />
Unusual shape<br />
Transparent or<br />
semitransparent<br />
parts on its recording<br />
area<br />
Stick-on label<br />
C-thru Disc<br />
(semitransparent<br />
disc)<br />
ENGLISH<br />
35
Troubleshooting<br />
General<br />
FM/AM<br />
Disc playback<br />
36 ENGLISH<br />
Symptom Remedy/Cause<br />
Sound cannot be heard from the<br />
speakers.<br />
“PROTECT” appears on the display<br />
and no operations can be done.<br />
The unit does not work at all. Reset the unit. ( 3)<br />
• Adjust the volume to the optimum level.<br />
• Make sure the unit is not muted/paused ( 6).<br />
• Check the cords and connections.<br />
Check to be sure the terminals of the speaker leads<br />
are covered with insulating tape properly, then<br />
reset the unit ( 3).<br />
If “PROTECT” does not disappear, consult your JVC<br />
car audio dealer or a company supplying kits.<br />
“AUX IN” cannot be selected. Check the = setting.<br />
( 28)<br />
Nothing appear on the display. Check the color settings. ( 30)<br />
SSM automatic presetting does<br />
not work.<br />
Static noise while listening to the<br />
radio.<br />
Store stations manually.<br />
Connect the antenna firmly.<br />
“AM” cannot be selected. Check the = setting. ( 28)<br />
Disc cannot be played back. Insert the disc correctly.<br />
• CD-R/CD-RW cannot be played<br />
back.<br />
• Tracks on the CD-R/CD-RW<br />
cannot be skipped.<br />
Disc can neither be played back<br />
nor ejected.<br />
Disc sound is sometimes<br />
interrupted.<br />
• Insert a finalized CD-R/CD-RW.<br />
• Finalize the CD-R/CD-RW with the component<br />
which you used for recording.<br />
• Unlock the disc. ( 9)<br />
• Eject the disc forcibly. ( 3)<br />
• Stop playback while driving on rough roads.<br />
• Change the disc.<br />
• Check the cords and connections.<br />
“NO DISC” appears on the display. Insert a playable disc into the loading slot.<br />
“PLEASE” and “EJECT“ appear<br />
alternately on the display.<br />
Press 0, then insert a disc correctly.
MP3/WMA playback<br />
Symptom Remedy/Cause<br />
Disc cannot be played back. • Use a disc with MP3/WMA tracks recorded in a format<br />
compliant with ISO 9660 Level 1, Level 2, Romeo, or<br />
Joliet.<br />
• Add the extension code or to the file<br />
names.<br />
Noise is generated. Skip to another track or change the disc. (Do not add<br />
the extension code or to non-MP3 or<br />
WMA tracks.)<br />
A longer readout time is<br />
required (“READING” keeps<br />
flashing on the display).<br />
Tracks do not play back in the<br />
order you have intended them<br />
to play.<br />
The elapsed playing time is not<br />
correct.<br />
“NO FILE” appears on the<br />
display.<br />
“NOT SUPPORT” appears on the<br />
display and track skips.<br />
The correct characters are not<br />
displayed (e.g. album name).<br />
Do not use too many hierarchical levels and folders.<br />
The playback order is determined when the files are<br />
recorded.<br />
This sometimes occurs during playback. This is caused<br />
by how the tracks are recorded on the disc.<br />
Selected folder is an empty folder* 1 . Select another<br />
folder that contains MP3/WMA tracks.<br />
Skip to the next track encoded in an appropriate format<br />
or to the next non-copy-protected WMA track.<br />
This unit can only display letters (upper case), numbers,<br />
and a limited number of symbols. ( 8)<br />
* 1 Folder that is physically empty or folder that contains data but does not contain valid MP3/WMA<br />
track.<br />
ENGLISH<br />
37
USB device playback<br />
Bluetooth * 2<br />
38 ENGLISH<br />
Symptom Remedy/Cause<br />
Noise is generated. The track played back is not an MP3/WMA track. Skip to<br />
another file. (Do not add the extension code or<br />
to non-MP3 or WMA tracks.)<br />
“READING” keeps flashing on<br />
the display.<br />
“NO FILE” appears on the<br />
display.<br />
“NOT SUPPORT” appears on the<br />
display and track skips.<br />
Tracks/folders are not played<br />
back in the order you have<br />
intended.<br />
• “CANNOT PLAY” flashes on<br />
the display.<br />
• “NO USB” appears on the<br />
display.<br />
• The unit cannot detect the<br />
USB device.<br />
While playing a track, sound is<br />
sometimes interrupted.<br />
Correct characters are not<br />
displayed (e.g. album name).<br />
Bluetooth device does not<br />
detect the unit.<br />
The unit does not detect the<br />
Bluetooth device.<br />
• Readout time varies depending on the USB device.<br />
• Do not use too many hierarchy or folders.<br />
• Turn off the power then on again.<br />
• Reattach the USB device again.<br />
Check whether the selected folder, the connected USB<br />
device, or the iPod/iPhone contains a playable file.<br />
Skip to the next track encoded in an appropriate format<br />
or to the next non-copy-protected WMA track.<br />
The playback order is determined by the write-in time<br />
stamp. The first track/folder written into the USB device<br />
will be the first track/folder for playback.<br />
• Attach a USB device that contains tracks encoded in<br />
an appropriate format.<br />
• Reattach the USB device again.<br />
The MP3/WMA tracks have not been properly copied<br />
into the USB device.<br />
Copy MP3/WMA tracks again into the USB device, and<br />
try again.<br />
This unit can only display letters (upper case),<br />
numbers, and a limited number of symbols. ( 8)<br />
The unit can be connected with one Bluetooth mobile<br />
phone and one Bluetooth audio device at a time.<br />
While connecting a device, this unit cannot be detected<br />
from another device. Disconnect currently connected<br />
device and search again.<br />
• Check the Bluetooth setting of the device.<br />
• Search from the Bluetooth device. After the device<br />
detects the unit, select “OPEN” on the unit to connect<br />
the device. ( 11)<br />
* 2 For Bluetooth operations, refer also to the <strong>instructions</strong> supplied with the Bluetooth Adapter.
Bluetooth * 2<br />
HD Radio reception<br />
Symptom Remedy/Cause<br />
The unit does not make pairing<br />
with the Bluetooth device.<br />
• Enter the same PIN code for both the unit and target<br />
device.<br />
• Select the device name from “SPECIAL,” then try to<br />
connect again. ( 12)<br />
• Try to pair/connect from the Bluetooth device.<br />
Echo or noise occurs. Adjust the microphone unit position.<br />
Phone sound quality is poor. • Reduce the distance between the unit and the<br />
Bluetooth mobile phone.<br />
• Move the car to a place where you can get a better<br />
signal reception.<br />
The sound is interrupted or<br />
skipped during playback of a<br />
Bluetooth audio device.<br />
The connected audio device<br />
cannot be controlled.<br />
Sound quality changes when<br />
receiving HD Radio stations.<br />
• Reduce the distance between the unit and the<br />
Bluetooth audio device.<br />
• Disconnect the device connected for “BT-PHONE.”<br />
• Turn off, then turn on the unit.<br />
• (When the sound is not yet restored,) connect the<br />
device again.<br />
Check whether the connected audio device supports<br />
AVRCP (Audio/Video Remote Control Profile).<br />
Fix the reception mode either to or<br />
. ( 17, 26)<br />
No sound can be heard. • is selected when receiving all digital<br />
broadcast of HD Radio station. Select or<br />
. ( 17, 26)<br />
• is selected when receiving weak digital<br />
signals or receiving conventional radio broadcast.<br />
Select or . ( 17, 26)<br />
“RESET 8” appears on the<br />
display.<br />
Reconnect this unit and the HD Radio tuner box<br />
correctly, then reset the unit.<br />
ENGLISH<br />
39
Satellite Radio<br />
40 ENGLISH<br />
Symptom Remedy/Cause<br />
“CALL 1-888-539-SIRIUS TO SUBSCRIBE”<br />
scrolls on the display while listening to<br />
the SIRIUS Satellite radio.<br />
No sound can be heard. “UPDATING”<br />
appears on the display.<br />
“ACQUIRING” or “NO SIGNAL” appears<br />
on the display.<br />
“NO ANTENNA” or “ANTENNA”appears<br />
on the display.<br />
“NO CHANNEL” appears on the display<br />
for about 5 seconds, then returns<br />
to the previous channel or default<br />
channel while listening to the SIRIUS<br />
Satellite radio.<br />
Starts subscribing to SIRIUS Satellite radio.<br />
( 18)<br />
The unit is updating the channel information<br />
and it takes a few minutes to complete.<br />
Move to an area where signals are stronger.<br />
Connect the antenna firmly.<br />
No broadcast on the selected channel.<br />
Select another channel or continue listening to<br />
the previous channel or default channel.<br />
Blank display appears. No text information for the selected channel.<br />
“CH---” or “CH UNAVAIL” appears on<br />
the display for about 2 seconds, then<br />
returns to the previous channel while<br />
listening to the XM Satellite radio.<br />
“OFF AIR” appears on the display while<br />
listening to the XM Satellite radio.<br />
“LOADING” appears on the display<br />
while listening to the XM Satellite<br />
radio.<br />
• “RESET 8” appears on the display.<br />
• Satellite radio does not work at all.<br />
Selected channel is no longer available or is<br />
unauthorized.<br />
Select another channel or continue listening to<br />
the previous channel.<br />
Selected channel is not broadcasting at this<br />
time.<br />
Select another channel or continue listening to<br />
the previous channel.<br />
The unit is loading the channel information and<br />
audio.<br />
Text information are temporarily unavailable.<br />
Reconnect this unit and the satellite radio<br />
correctly and reset this unit.
iPod/iPhone<br />
Symptom Remedy/Cause<br />
The iPod does not turn on or does not<br />
work.<br />
• Check the connecting cable and its<br />
connection.<br />
• Update the firmware version of the iPod/<br />
iPhone.<br />
• Charge the battery of the iPod/iPhone.<br />
• Reset the iPod/iPhone.<br />
• Check whether setting is<br />
appropriate ( 28).<br />
The sound is distorted. Deactivate the equalizer either on this unit or<br />
the iPod/iPhone.<br />
A lot of noise is generated. Turn off (uncheck) the “VoiceOver” feature of the<br />
iPod. For details, visit .<br />
Playback stops. The headphones are disconnected during<br />
playback. Restart the playback operation<br />
( 20).<br />
“CANNOT PLAY” appears on the<br />
display.<br />
No tracks are stored. Import tracks to the iPod/<br />
iPhone.<br />
“RESTRICTED” appears on the display. Check whether the connected iPod/iPhone is<br />
compatible with this unit ( 34).<br />
JVC bears no responsibility for any loss of data in an iPod/iPhone and/or USB mass storage class<br />
device while using this System.<br />
ENGLISH<br />
41
Specifications<br />
AUDIO AMPLIFIER SECTION<br />
TUNER SECTION<br />
42 ENGLISH<br />
Power Output: 20 W RMS × 4 Channels<br />
at 4 Ω and ≤ 1% THD+N<br />
Signal-to-Noise Ratio: 80 dBA (reference: 1 W<br />
into 4 Ω)<br />
Load Impedance: 4 Ω (4 Ω to 8 Ω allowance)<br />
Tone Control Range: Bass: ±12 dB (60 Hz, 80 Hz, 100 Hz, 200 Hz)<br />
Q1.0, Q1.25, Q1.5, Q2.0<br />
Middle: ±12 dB (0.5 kHz, 1.0 kHz, 1.5 kHz,<br />
2.5 kHz)<br />
Q0.75, Q1.0, Q1.25<br />
Treble: ±12 dB (10.0 kHz, 12.5 kHz, 15.0 kHz,<br />
17.5 kHz)<br />
Q (Fixed)<br />
Frequency Response: 40 Hz to 20 000 Hz<br />
Line-Out/subwoofer-Out Level/<br />
Impedance:<br />
KD-R618/<br />
KD-A615:<br />
5.0 V/20 kΩ load (full scale)<br />
KD-R610: 2.5 V/20 kΩ load (full scale)<br />
Output Impedance: 1 kΩ<br />
Other Terminal: AUX (auxiliary) input jack, USB input jack, Antenna<br />
input, Expansion port, Steering wheel remote<br />
input (for KD-R618/KD-A615)<br />
Frequency Range: FM: with channel interval set to<br />
100 kHz or 200 kHz<br />
87.5 MHz to 107.9 MHz<br />
with channel interval set to<br />
50 kHz<br />
87.5 MHz to 108.0 MHz<br />
AM: with channel interval set to<br />
10 kHz<br />
530 kHz to 1 710 kHz<br />
with channel interval set to<br />
9 kHz<br />
531 kHz to 1 602 kHz<br />
FM Tuner: Usable Sensitivity: 9.3 dBf (0.8 μV/75 Ω)<br />
50 dB Quieting Sensitivity: 16.3 dBf (1.8 μV/75 Ω)<br />
Alternate Channel Selectivity<br />
(400 kHz):<br />
65 dB<br />
Frequency Response: 40 Hz to 15 000 Hz<br />
Stereo Separation: 40 dB<br />
AM Tuner: Sensitivity: 20 μV<br />
Selectivity: 40 dB
CD PLAYER SECTION<br />
USB SECTION<br />
GENERAL<br />
Type: Compact disc player<br />
Signal Detection System: Non-contact optical pickup<br />
(semiconductor laser)<br />
Number of Channels: 2 channels (stereo)<br />
Frequency Response: 5 Hz to 20 000 Hz<br />
Dynamic Range: 96 dB<br />
Signal-to-Noise Ratio: 98 dB<br />
Wow and Flutter: Less than measurable limit<br />
MP3 Decoding Format: (MPEG1/2 Audio Layer 3) Max. Bit Rate: 320 kbps<br />
WMA (Windows Media® Audio) Decoding Format: Max. Bit Rate: 320 kbps<br />
USB Standard: USB 1.1, USB 2.0<br />
Data Transfer Rate (Full Speed): Max. 12 Mbps<br />
Compatible Device: Mass storage class<br />
Compatible File System: FAT 32/16/12<br />
Playable Audio Format: MP3/WMA<br />
Max. Current: DC 5 V 500 mA<br />
Power Requirement: Operating Voltage: DC 14.4 V (11 V to 16 V allowance)<br />
Grounding System: Negative ground<br />
Allowable Operating Temperature: 0°C to +40°C (32°F to 104°F)<br />
Dimensions (W × H × D):<br />
(approx.)<br />
Installation Size: 182 mm × 52 mm × 160 mm<br />
(7-3/16” × 2-1/16” × 6-5/16”)<br />
Panel Size: 188 mm × 58 mm × 6 mm<br />
(7-7/16” × 2-5/16” × 1/4”)<br />
Mass: 1.3 kg (2.9 lbs) (excluding accessories)<br />
Design and specifications are subject to change without notice.<br />
If a kit is necessary for your car, consult your telephone directory for the nearest car audio speciality<br />
shop.<br />
ENGLISH<br />
43
Having TROUBLE with operation?<br />
Please reset your unit<br />
Refer to page of How to reset your unit<br />
Still having trouble??<br />
USA ONLY<br />
Call 1-800-252-5722<br />
http://www.jvc.com<br />
We can help you!<br />
EN, SP, FR<br />
© 2009 Victor Company of Japan, Limited<br />
1209DTSMDTJEIN
GET0638-002A<br />
[J]<br />
KD-R618/KD-A615/KD-R610<br />
Installation/Connection Manual<br />
Manual de instalación/conexión<br />
Manuel d’installation/raccordement<br />
• To prevent short circuits:<br />
– Disconnect the battery’s negative terminal and make all electrical<br />
connections before installing the unit.<br />
– Cover the terminals of the UNUSED leads with insulating tape.<br />
• Be sure to ground this unit to the car’s chassis again after installation.<br />
• Replace the fuse with one of the specified rating.<br />
• Connect speakers with a maximum power of more than 50 W<br />
(impedance of 4 Ω to 8 Ω). Otherwise, change the <br />
setting. (See page 28 of the INSTRUCTIONS.)<br />
• The heat sink becomes very hot after use. Be<br />
careful not to touch it when removing this<br />
unit.<br />
ENGLISH / ESPAÑOL / FRANÇAIS<br />
You need the installation kits which corresponds to your car. / Check the battery system in your car / Verifique el sistema de batería<br />
Necesitará los kits de instalación que corresponden con su vehículo. de su vehículo / Vérifiez le système de batterie de votre voiture<br />
/ Vous avez besoin des kits d’installation correspondants à votre voiture.<br />
12 V DC, NEGATIVE ground / 12 V CC, NEGATIVO a masa / 12 V CC, masse NÉGATIVE<br />
Heat sink / Sumidero térmico / Dissipateur de chaleur<br />
PRECAUTIONS on power supply and speaker<br />
connections<br />
• DO NOT connect the speaker leads of the power cord to the car<br />
battery; otherwise, the unit will be seriously damaged.<br />
• BEFORE connecting the speaker leads of the power cord to the<br />
speakers, check the speaker wiring in your car.<br />
The following illustration shows a typical installation. If you have any<br />
questions or require information regarding installation kits, consult<br />
your JVC car audio dealer or a company supplying kits.<br />
In-dash mounting / Montaje en el tablero / Montage encastré<br />
* 1<br />
When installing the unit without using the sleeve / Instalación de la<br />
unidad sin utilizar la cubierta / Lors de l’installation de l’appareil<br />
scans utiliser de manchon<br />
Flat head screws—M5 × 8 mm (M5 × 3/8")<br />
/ Tornillos de cabeza plana—M5 × 8 mm<br />
(M5 × 3/8 pulgada) / Vis à tête plate—<br />
M5 × 8 mm (M5 × 3/8 pouces) * 2<br />
Pocket / Compartimiento / Poche<br />
• The fuse blows. ] Are the red and black leads connected correctly?<br />
• Power cannot be turned on. ] Is the yellow lead connected?<br />
• No sound from the speakers. ] Is the speaker output lead shortcircuited?<br />
• “PROTECT” appears on the display and no operation can be<br />
done. ] Is the speaker output lead short-circuited or touches the<br />
chassis of the car/head unit? ; Have you reset your unit?<br />
• Sound is distorted. ] Is the speaker output lead grounded? ; Are<br />
the “–” terminals of L and R speakers grounded in common?<br />
• Noise interfere with sounds. ] Is the rear ground terminal<br />
connected to the car’s chassis using shorter and thicker cords?<br />
• This unit becomes hot. ] Is the speaker output lead grounded? ;<br />
Are the “–” terminals of L and R speakers grounded in common?<br />
• This unit does not work at all. ] Have you reset your unit?<br />
WARNINGS / ADVERTENCIAS / AVERTISSEMENTS<br />
• Para evitar cortocircuitos:<br />
– Desconecte el terminal negativo de la batería y realice todas las<br />
conexiones eléctricas antes de instalar la unidad.<br />
– Cubra los terminales de los conductores NO UTILIZADOS con<br />
cinta aislante.<br />
• Asegúrese de volver a conectar a masa esta unidad al chasis del<br />
automóvil después de la instalación.<br />
• Reemplace el fusible por uno con la corriente especificada.<br />
• Conecte los altavoces con una potencia máxima de más de 50 W<br />
(impedancia de 4 Ω a 8 Ω). De lo contrario, cambie el ajuste . (Véase la página 28 del MANUAL DE INSTRUCCIONES).<br />
• El sumidero térmico estará muy caliente después del uso. Asegúrese<br />
de no tocarlo al desmontar esta unidad.<br />
PRECAUCIONES sobre las conexiones de la<br />
fuente de alimentación y de los altavoces<br />
• NO conecte los conductores de altavoz del cable de alimentación a la<br />
batería de automóvil, pues podrían producirse graves daños en la unidad.<br />
• ANTES de conectar a los altavoces los conductores de altavoz del cable<br />
de alimentación, verifique el conexionado de altavoz de su automóvil.<br />
INSTALLATION / INSTALACION / INSTALLATION<br />
La siguiente ilustración muestra una instalación típica. Si tiene alguna<br />
pregunta o necesita información acerca de las herramientas para<br />
instalación, consulte con su concesionario de JVC de equipos de audio<br />
para automóviles o a una compañía que suministra tales herramientas.<br />
Bracket / Ménsula / Support * 2<br />
Do the required electrical connections.<br />
Realice las conexiones eléctricas requeridas.<br />
Réalisez les connexions électriques.<br />
Bend the appropriate tabs to hold the sleeve firmly in place.<br />
Doble las lengüetas apropiadas para retener firmemente la<br />
manga en su lugar.<br />
Tordez les languettes appropriées pour maintenir le manchon<br />
en place.<br />
Removing the unit / Extracción de la unidad /<br />
Retrait de l’appareil<br />
Release the rear section first... / Primero libere la sección trasera... /<br />
Ouvrez la section arrière en premier...<br />
• El fusible se quema. ] ¿Están los conductores rojo y negro<br />
correctamente conectados?<br />
• No es posible conectar la alimentación. ] ¿Está el cable amarillo<br />
conectado?<br />
• No sale sonido de los altavoces. ] ¿Está el cable de salida del<br />
altavoz cortocircuitado?<br />
• Aparece “PROTECT” en la pantalla y no se puede realizar<br />
ninguna operación. ] ¿El conductor de salida de altavoz está en<br />
cortocircuito o en contacto con el chasis del automóvil/auriculares? ;<br />
¿Reinicializó la unidad?<br />
• El sonido presenta distorsión. ] ¿Está el cable de salida del altavoz<br />
conectado a masa? ; ¿Están los terminales “–” de los altavoces L y R<br />
conectados a una masa común?<br />
• Perturbación de ruido. ] ¿El terminal de tierra trasero está conectado<br />
al chasis del automóvil utilizando los cordones más corto y más grueso?<br />
• Esta unidad se calienta. ] ¿Está el cable de salida del altavoz<br />
conectado a masa? ; ¿Están los terminales “–” de los altavoces L y R<br />
conectados a una masa común?<br />
• Esta unidad no funciona en absoluto. ] ¿Reinicializó la unidad?<br />
1<br />
1209DTSMDTJEIN<br />
EN, SP, FR<br />
© 2009 Victor Company of Japan, Limited<br />
To the car system / Al sistema de automóvil<br />
/ Au système autoradio<br />
• Pour éviter les courts-circuits:<br />
– Déconnectez la borne négative de la batterie et réaliser toutes les<br />
connexions avant d’installer l’appareil.<br />
– Recouvrez les prises des fils NON UTILISÉS avec du ruban isolant.<br />
• Assurez-vous de raccorder de nouveau la mise à la masse de cet appareil<br />
au châssis de la voiture après l’installation.<br />
• Remplacer le fusible par un de la valeur précisée.<br />
• Connectez des enceintes avec une puissance maximum de 50 W<br />
(impédance de 4 Ω à 8 Ω). Sinon, changez le réglage . (Voir<br />
la page 28 du MANUEL D’INSTRUCTIONS.)<br />
• Le dissipateur de chaleur devient très chaud après usage. Faire attention<br />
de ne pas le toucher en retirant cet appareil.<br />
PRECAUTIONS sur l’alimentation et la<br />
connexion des enceintes<br />
• NE CONNECTEZ PAS les fils d’enceintes du cordon d’alimentation à la<br />
batterie; sinon, l’appareil serait sérieusement endommagé.<br />
• AVANT de connecter les fils d’enceintes du cordon d’alimentation aux<br />
enceintes, vérifiez le câblage des enceintes de votre voiture.<br />
L’illustration suivante est un exemple d’installation typique. Si vous avez des<br />
questions ou avez besoin d’information sur des kits d’installation, consulter<br />
votre revendeur d’autoradios JVC ou une compagnie d’approvisionnement.<br />
Install the unit at an angle of less<br />
than 30˚.<br />
Instale la unidad a un ángulo de<br />
menos de 30˚.<br />
Installez l’appareil avec un angle de<br />
moins de 30˚.<br />
TROUBLESHOOTING / LOCALIZACION DE AVERIAS / EN CAS DE DIFFICULTES<br />
Part list / Lista de componentes / Liste<br />
de pièces<br />
A Hard case (for KD-R618/KD-A615)<br />
/ Estuche duro (para KD-R618/<br />
KD-A615) / Etui de transport (pour le<br />
KD-R618/KD-A615) (×1)<br />
B Control panel / Panel de control /<br />
Panneau de commande (×1)<br />
C Sleeve / Cubierta / Manchon (×1)<br />
D Trim plate / Placa de guarnición /<br />
Plaque d’assemblage (×1)<br />
E Power cord / Cordón de<br />
alimentación / Cordon d’alimentation<br />
(×1)<br />
F Handles / Manijas / Poignées (×2)<br />
* 1 When you stand the unit, be careful<br />
not to damage the fuse on the rear.<br />
/ Al poner la unidad vertical, tenga<br />
cuidado de no dañar el fusible provisto<br />
en la parte posterior. / Lorsque vous<br />
mettez l’appareil à la verticale, faire<br />
attention de ne pas endommager le<br />
fusible situé sur l’arrière.<br />
* 2 Not supplied for this unit. / No<br />
suministrado con esta unidad. / Non<br />
fourni avec cet appareil.<br />
• Le fusible saute. ] Les fils rouge et noir sont-ils racordés correctement?<br />
• L’appareil ne peut pas être mise sous tension. ] Le fil jaune estelle<br />
raccordée?<br />
• Pas de son des enceintes. ] Le fil de sortie d’enceinte est-il court-circuité?<br />
• “PROTECT” apparaît sur l’affichage et aucune opération ne peut<br />
être réalisée. ] Est-ce qu’un fil de sortie d’enceinte est court-circuité ou<br />
touche le châssis de la voiture/appareil principal? ; Avez-vous réinitialisé<br />
votre appareil?<br />
• Le son est déformé. ] Le fil de sortie d’enceinte est-il à la masse? ; Les<br />
bornes “–” des enceintes gauche et droit sont-elles mises ensemble à la masse?<br />
• Interférence avec les sons. ] La prise arrière de mise à la terre est-elle<br />
connectée au châssis de la voiture avec un cordon court et épais?<br />
• Cet appareil devient chaud. ] Le fil de sortie d’enceinte est-il à la<br />
masse? ; Les bornes “–” des enceintes gauche et droit sont-elles mises<br />
ensemble à la masse?<br />
• Cet appareil ne fonctionne pas du tout. ] Avez-vous réinitialisé<br />
votre appareil?
ELECTRICAL CONNECTIONS / CONEXIONES ELECTRICAS / RACCORDEMENTS ELECTRIQUES<br />
Reset the unit. / Reinicialice el<br />
receptor. / Réinitialisez l’autoradio.<br />
Front speaker (left) /<br />
Altavoz delantero (izquierdo)<br />
/ Enceintes avant (gauche)<br />
Front speaker (right) /<br />
Altavoz delantero (derecho)<br />
/ Enceintes avant (droit)<br />
Rear speaker (left) /<br />
Altavoz trasero (izquierdo)<br />
/ Enceintes arrière (gauche)<br />
Rear speaker (right) /<br />
Altavoz trasero (derecho)<br />
/ Enceintes arrière (droit)<br />
Antenna input /<br />
Entrada de antena /<br />
Entrée d’antenne<br />
White / Blanco / Blanc<br />
White (black stripe) / Blanco (rayas<br />
negras) / Blanc (bande noire)<br />
Gray / Gris / Gris<br />
Gray (black stripe) / Gris (rayas<br />
negras) / Gris (bande noire)<br />
Green / Verde / Vert<br />
Green (black stripe) / Verde (rayas<br />
negras) / Vert (bande noire)<br />
Purple / Púrpura / Violet<br />
Purple (black stripe) / Púrpura (rayas<br />
negras) / Violet (bande noire)<br />
* 1 Not supplied for this unit.<br />
* 2 Firmly attach the ground wire to the metallic body or to the chassis<br />
of the car—to the place uncoated with paint.<br />
* 3 Before checking the operation of this unit prior to installation, this<br />
lead must be connected; otherwise, the power cannot be turned on.<br />
* 4 Connect the power cord supplied for the component separately for<br />
power supply.<br />
* 5 This model is a component of SIRIUS satellite radio System.<br />
* 6 This model is a component of XM satellite radio System.<br />
* 7 To use these components, set the external input setting correctly<br />
(see page 28 of the INSTRUCTIONS).<br />
Connecting the external amplifiers or subwoofer / Conexión de los amplificadores o subwoofer externos /<br />
Connexion d’amplificateurs extérieurs ou d’un caisson de grave<br />
Remote lead / Cable remoto / Fil d’alimentation à distance<br />
Signal cord / Cable de señal /<br />
Cordon de signal * 1<br />
Remote lead / Cable remoto / Fil d’alimentation à distance<br />
Rear ground terminal / Terminal de<br />
tierra posterior / Borne arrière de masse<br />
15 A fuse /<br />
Fusible de 15 A /<br />
Fusible 15 A<br />
Expansion port /<br />
Puerto de<br />
expansión /<br />
Port d’extension<br />
Black / Negro /<br />
Noir<br />
Yellow / Amarillo /<br />
Jaune * 3<br />
Red / Rojo /<br />
Rouge<br />
JVC Amplifier /<br />
Amplificador de JVC /<br />
JVC Amplificateur<br />
Blue (white stripe) / Azul (rayas<br />
blancas) / Bleu (bande blanche)<br />
*<br />
2<br />
1 No suministrado con esta unidad.<br />
* 2 Fije firmemente el cable de tierra a la carrocería metálica o al<br />
chasis—a un lugar no cubierto con pintura.<br />
* 3 Antes de comprobar el funcionamiento de esta unidad previa a de<br />
la instalación, es necesario conectar este cable, de lo contrario no se<br />
podrá conectar la alimentación.<br />
* 4 Conecte el cable de alimentación suministrado separadamente para<br />
el componente.<br />
* 5 Este modelo es un componente del sistema de radio satelital SIRIUS.<br />
* 6 Este modelo es un componente del sistema de radio XM Satellite.<br />
* 7 Para utilizar estos componentes, configure el ajuste de entrada<br />
externa correctamente (consulte la página 28 del MANUAL DE<br />
INSTRUCCIONES).<br />
To the blue (white stripe) lead of<br />
the unit / Al conductor azul (rayas<br />
blancas) de la unidad / Au fil bleu<br />
(bande blanche) de l’appareil<br />
Rear speakers or subwoofer (Make the setting accordingly,<br />
see page 27 of the INSTRUCTIONS.) / Altavoces traseros o subwoofer<br />
(Realice el ajuste de conformidad, consulte la página 27<br />
del MANUAL DE INSTRUCCIONES). / Enceintes arrière ou le caisson de<br />
grave (Faite le réglage en fonction, voir page 27 du MANUEL<br />
D’INSTRUCTIONS.)<br />
Y-connector / Conector en Y / Connecteur Y * 1<br />
Y-connector / Conector en Y / Connecteur Y * 1<br />
To the metallic body or chassis of the car /<br />
A un cuerpo metálico o chasis del automóvil /<br />
Vers corps métallique ou châssis de la voiture<br />
To a live terminal (constant 12 V) /<br />
A un terminal activo (12 V constantes) /<br />
À une borne sous tension (12 V constant)<br />
To an accessory terminal / A un terminal<br />
para accesorios / À une prise accessoire<br />
To the blue (white stripe) lead of<br />
the unit / Al conductor azul (rayas<br />
blancas) de la unidad / Au fil bleu<br />
(bande blanche) de l’appareil<br />
Steering wheel remote input (for KD-R618/KD-A615) / Entrada del control remoto del<br />
volante de dirección (para KD-R618/KD-A615) / Entrée de la télécommande de volant<br />
(pour le KD-R618/KD-A615)<br />
IMPORTANT: A custom wiring harness (separately purchased) which is suitable for your car is<br />
recommended for connection between the unit and your car.<br />
• Consult your JVC car audio dealer or a company supplying kits for details.<br />
IMPORTANTE: Para la conexión entre la unidad y su vehículo, se recomienda utilizar un mazo<br />
de cables personalizado (vendido separadamente) que sea adecuado para su vehículo.<br />
• Si desea información más detallada, consulte con su distribuidor de equipos de Car audio JVC<br />
o con una compañía proveedora de kits.<br />
IMPORTANT: Un faisceau de câbles personnalisé (vendu séparément) correspondant à votre voiture<br />
est recommandé pour raccorder l’appareil et votre voiture.<br />
• Pour en savoir plus, consultez votre revendeur autoradio JVC ou une compagnie fournissant des kits.<br />
Ignition switch /<br />
Interruptor de encendido /<br />
Interrupteur d’allumage<br />
Fuse block /<br />
Bloque de fusibles /<br />
Porte-fusible<br />
To the remote lead of other equipment or automatic antenna if any<br />
(200 mA max.) / Al conductor remoto de otro equipo o de la antena<br />
automática, si hubiere (máx. 200 mA) / Au fil de télécommande de l’autre<br />
appareil ou à l’antenne automatique s’il y en a une (200 mA max.)<br />
Connecting the external components in series / Conexión de componentes externos en serie / Connexion d’appareils extérieurs en série<br />
When connecting the external components, refer also to the manuals supplied for the components and adapter. / Cuando conecte componentes externos, consulte, también, los manuales suministrados con los<br />
componentes y el adaptador. / Lors de la connexion des appareils extérieurs, référez-vous aussi aux manuels fournis avec les appareils et les adaptateurs.<br />
Expansion port of the unit /<br />
Puerto de expansión de la unidad<br />
/ Port d’extension de l’appareil<br />
To disconnect... /<br />
Para desconectar... /<br />
Pour déconnecter...<br />
Signal cord / Cable de señal /<br />
Cordon de signal * 1 JVC Amplifier /<br />
Amplificador de JVC /<br />
JVC Amplificateur<br />
Orange with white stripe /<br />
Naranja con rayas blancas /<br />
Orange avec bande blanche<br />
Two components / Dos componentes / Deux appareil:<br />
A KT-HD300 * 4 / KS-SRA100 * 4, * 5 / KS-BTA200 / XMDJVC100 / CNP2000UC *<br />
B* 7 KS-U57 / KS-U58<br />
Three components / Tres componentes / Trois appareils:<br />
A KT-HD300 * 4 / KS-SRA100 * 4, * 5 / XMDJVC100 / CNP2000UC * 4,* 6<br />
B KS-BTA200<br />
C* 7 KS-U57 / KS-U58<br />
You can connect the HD Radio TM tuner box (KT-HD300) or the following components through the various JVC adapters or system to the expansion port. / Puede conectar el sintonizador HD Radio TM (KT-HD300) o los<br />
siguientes componentes al puerto de expansión, a través de los diversos adaptadores o sistema JVC. / Vous pouvez connecter le tuner HD Radio TM (KT-HD300) ou les appareils suivants à l’aide de divers adaptateur JVC ou système<br />
au port d’extension.<br />
• Connection cords may need to be purchased separately. / Puede ser necesario comprar los cables de conexión por separado. / Vous pouvez avoir besoin d’acheter certains cordons de connexion séparément.<br />
Component / Componente / Appareil Adapter/System / Adaptador/Sistema / Adaptateur/Système<br />
Model name / Nombre del<br />
modelo / Nom du modèle<br />
Bluetooth device / Dispositivo Bluetooth / Périphérique Bluetooth Bluetooth adapter / Adaptador Bluetooth / Adaptateur Bluetooth KS-BTA200<br />
XMDirect Tuner Box / XMDirect Tuner Box / XMDirect Tuner Box Smart Digital Adapter / Adaptador digital inteligente / Adaptateur numérique intelligent XMDJVC100<br />
XMDirect2 Tuner System / Sistema de sintonizador XMDirect2 / XMDirect2 Tuner System XM satellite radio System / Sistema de radio XM Satellite / Système radio satellite XM CNP2000UC, CNPJVC1<br />
SIRIUS satellite radio / Radio por satélite SIRIUS / Radio satellite SIRIUS SIRIUS satellite radio System / Sistema de radio satelital SIRIUS / Système radio satellite SIRIUS<br />
SC-C1, KS-SRA100<br />
PnP, SC-VDOC1, KS-SRA100<br />
Portable audio player with line output jacks / Reproductor de audio portátil con jacks de<br />
salida de línea / Lecteur audio portable avec prises de sortie de ligne<br />
Portable audio player with 3.5 mm (3/16") stereo mini jack / Reproductor de audio portátil<br />
Line input adapter / Adaptador de entrada por línea / Adaptateur d’entrée de ligne KS-U57<br />
con jack mini estéreo de 3,5 mm (3/16 pulgada) / Lecteur audio portable avec mini fiche<br />
stéréo de 3,5 mm (3/16 pouces)<br />
AUX input adapter / Adaptador de entrada AUX / Adaptateur d’entrée auxiliaire KS-U58<br />
XM Radio and SIRIUS satellite radio cannot be used together. / No puede utilizar juntas la radio XM y la radio satelital SIRIUS. / La radio XM et SIRIUS ne peuvent pas être utilisées en même temps.<br />
• HD Radio is a proprietary trademark of iBiquity Digital Corp. / HD Radio es una marca comercial de iBiquity Digital Corp. / HD Radio est une marque de commerce d’iBiquity Digital Corp.<br />
4,* 6<br />
Front speakers /<br />
Altavoces delanteros /<br />
Enceintes avant<br />
To car light control switch / Al interruptor de control de las luces del<br />
automóvil / À l’interrupteur d’éclairage de la voiture<br />
Not recommended... / No recomendado... / Non recommandé...<br />
Caution / Precaucion / Precaution:<br />
Before connecting the external components, make sure that the unit is turned<br />
off. / Antes de conectar los componentes externos, asegúrese de que la unidad<br />
esté apagada. / Avant de connecter les appareils extérieurs, assurez-vous que<br />
l’appareil est hors tension.<br />
* 1 Non fourni avec cet appareil.<br />
* 2 Attachez solidement le fil de mise à la masse au châssis métallique de la<br />
voiture—à un endroit qui n’est pas recouvert de peinture.<br />
* 3 Pour vérifier le fonctionnement de cet appareil avant installation, ce fil<br />
doit être raccordé, sinon l’appareil ne peut pas être mis sous tension.<br />
* 4 Connectez le cordon d’alimentation fourni avec les appareils<br />
séparément à l’alimentation.<br />
* 5 Ce modèle est un composant du système radio satellite SIRIUS.<br />
* 6 Ce modèle est un composant du système radio satellite XM.<br />
* 7 Pour utiliser ces appareils, réglez l’entrée extérieure correctement (voir<br />
page 28 du MANUEL D’INSTRUCTIONS).
KD-R616<br />
CD RECEIVER /<br />
For canceling the display demonstration, see page 4. /<br />
For installation and connections, refer to the separate manual.<br />
INSTRUCTIONS<br />
ENGLISH<br />
GET0639-001A<br />
[U/UH]
Thank you for purchasing a JVC product.<br />
Please read all <strong>instructions</strong> carefully before operation, to ensure your complete understanding and<br />
to obtain the best possible performance from the unit.<br />
IMPORTANT FOR LASER PRODUCTS<br />
1. CLASS 1 LASER PRODUCT<br />
2. CAUTION: Do not open the top cover. There are no user serviceable parts inside the unit; leave<br />
all servicing to qualified service personnel.<br />
3. CAUTION: Visible and/or invisible class 1M laser radiation when open. Do not view directly with<br />
optical instruments.<br />
4. REPRODUCTION OF LABEL: CAUTION LABEL, PLACED OUTSIDE THE UNIT.<br />
2 ENGLISH<br />
[European Union only]<br />
Warning:<br />
If you need to operate the unit while driving,<br />
be sure to look around carefully or you may be<br />
involved in a traffic accident.<br />
For safety...<br />
• Do not raise the volume level too much, as<br />
this will block outside sounds, making driving<br />
dangerous.<br />
• Stop the car before performing any<br />
complicated operations.<br />
Temperature inside the car...<br />
If you have parked the car for a long time in<br />
hot or cold weather, wait until the temperature<br />
in the car becomes normal before operating<br />
the unit.<br />
How to read this manual<br />
The following icons/symbols are used to<br />
indicate:<br />
[Hold]<br />
Press and hold the button(s)<br />
until the desired operation<br />
begins.<br />
Turn the control dial.<br />
( XX)<br />
Turn the control dial<br />
to make a selection,<br />
then press to confirm.<br />
Reference page number<br />
Menu setting item<br />
Continued on the next page
How to attach/detach the control<br />
panel<br />
How to reset your unit<br />
Your preset adjustments<br />
will also be erased (except<br />
the registered Bluetooth<br />
device). ( 11)<br />
How to forcibly eject a disc<br />
[Hold]<br />
• You can forcibly eject the loaded disc even<br />
if the disc is locked. To lock/unlock the disc,<br />
9.<br />
• Be careful not to drop the disc when it ejects.<br />
• If this does not work, reset your unit.<br />
CONTENTS<br />
2 How to read this manual<br />
3 How to attach/detach the control<br />
panel<br />
3 How to reset your unit<br />
3 How to forcibly eject a disc<br />
4 Canceling the display<br />
demonstration<br />
4 Setting the clock<br />
5 Preparing the remote controller<br />
(RM-RK50)<br />
6 Basic operations<br />
7 Listening to the radio<br />
9 Listening to a disc<br />
10 Listening to the USB device<br />
11 Using Bluetooth ® devices<br />
13 Using a Bluetooth mobile phone<br />
14 Using a Bluetooth audio player<br />
16 Listening to the iPod/iPhone<br />
18 Listening to the other external<br />
components<br />
19 Selecting a preset sound mode<br />
20 Menu operations<br />
26 More about this unit<br />
29 Maintenance<br />
30 Troubleshooting<br />
34 Specifications<br />
ENGLISH<br />
3
Canceling the display demonstration<br />
1 Turn on the power.<br />
2<br />
3<br />
Setting the clock<br />
1 Turn on the power.<br />
2<br />
(Initial setting)<br />
3 Select .<br />
4 Select .<br />
5 Adjust the hour.<br />
6 Adjust the minute.<br />
7 Finish the procedure.<br />
4 ENGLISH<br />
[Hold]<br />
[Hold]<br />
(Initial setting)<br />
4 Select .<br />
5<br />
6 Finish the procedure.
Preparing the remote controller (RM-RK50)<br />
When you use the remote controller for the first<br />
time, pull out the insulation sheet.<br />
Insulation sheet<br />
If the effectiveness of the remote controller<br />
decreases, replace the battery.<br />
Replacing the lithium coin battery<br />
CR2025<br />
Caution:<br />
• Danger of explosion if battery is incorrectly<br />
replaced. Replace only with the same or<br />
equivalent type.<br />
• Battery shall not be exposed to excessive heat<br />
such as sunshine, fire, or the like.<br />
Warning (to prevent accidents and<br />
damage):<br />
• Do not install any battery other than CR2025<br />
or its equivalent.<br />
• Do not leave the remote controller in a place<br />
(such as dashboards) exposed to direct<br />
sunlight for a long time.<br />
• Store the battery in a place where children<br />
cannot reach.<br />
• Do not recharge, short, disassemble, heat the<br />
battery, or dispose of it in a fire.<br />
• Do not leave the battery with other metallic<br />
materials.<br />
• Do not poke the battery with tweezers or<br />
similar tools.<br />
• Wrap the battery with tape and insulate when<br />
throwing away or saving it.<br />
This unit is equipped with the steering wheel<br />
remote control function.<br />
Before operating, connect an exclusive remote<br />
adapter (not supplied) which matches your car<br />
to the steering wheel remote input terminal on<br />
the rear of the unit.<br />
• For details, refer also to the <strong>instructions</strong><br />
supplied with the remote adapter.<br />
ENGLISH<br />
5
Basic operations<br />
Ejects the disc Loading slot Display window USB (Universal Serial Bus) input jack<br />
Detaches the panel<br />
6 ENGLISH<br />
Control dial<br />
When you press or hold the following button(s)...<br />
Main unit<br />
Remote<br />
controller<br />
General operation<br />
Auxiliary<br />
input jack<br />
Turns on.<br />
• When the power is on, pressing /I/ATT on the remote controller<br />
also mutes the sound or pauses. Press /I/ATT again to cancel<br />
muting or resume playback.<br />
Turns off if pressed and held.<br />
Selects the available sources (if the power is turned on).<br />
• If the source is ready, playback also starts.<br />
Adjusts the volume level.<br />
— Selects items.<br />
—<br />
Remote sensor<br />
• DO NOT expose to bright sunlight.<br />
• Mutes the sound while listening to a source. If the source is “CD,”<br />
“USB” or “USB-IPOD,” playback pauses. Press the control dial again<br />
to cancel muting or resume playback.<br />
• Confirms selection.<br />
Selects the sound mode.<br />
• Enters tone level adjustment directly ( 19) if pressed and held<br />
EQ/BASS-TRE on the main unit.
Main unit<br />
Manual search<br />
“M” flashes, then press<br />
the button repeatedly.<br />
When an FM stereo broadcast is<br />
hard to receive<br />
1<br />
2<br />
Remote<br />
controller<br />
—<br />
] ] ]<br />
<br />
Reception improves, but stereo effect<br />
will be lost.<br />
To restore the stereo effect, repeat the same<br />
procedure to select .<br />
General operation<br />
• Enters setting directly ( 24).<br />
• Enters setting directly ( 25) if pressed and held.<br />
— Returns to the previous menu.<br />
—<br />
Listening to the radio<br />
~ ] “FM” or “AM”<br />
[Hold]<br />
[Hold]<br />
Power off : Checks the current clock time.<br />
Power on : Changes the display information.<br />
Ÿ<br />
“ST” lights up when receiving an FM stereo broadcast<br />
with sufficient signal strength.<br />
Automatic presetting (FM)—<br />
SSM (Strong-station Sequential Memory)<br />
You can preset up to 18 stations for FM.<br />
While listening to a station...<br />
1<br />
2<br />
[Hold]<br />
] ] ]<br />
/ /<br />
<br />
“SSM” flashes and local stations with<br />
the strongest signals are searched and<br />
stored automatically.<br />
To preset another 6 stations, repeat the above<br />
procedure by selecting one of the other 6 SSM<br />
setting ranges.<br />
ENGLISH<br />
7
Manual presetting (FM/AM)<br />
You can preset up to 18 stations for FM and 6<br />
stations for AM.<br />
Ex.: Storing FM station of 92.50 MHz into preset<br />
number “04.”<br />
1<br />
2<br />
3<br />
8 ENGLISH<br />
] “92.50MHz”<br />
“PRESET MODE” flashes.<br />
] Selects preset number “04.”<br />
“P04” flashes and “MEMORY” appears.<br />
Selecting a preset station<br />
1<br />
or<br />
[Hold]<br />
2<br />
Changing the display information<br />
Station name * = Frequency =<br />
Clock = (back to the beginning)<br />
* If no title is assigned to a station, “NO NAME”<br />
appears for a few seconds.<br />
Using the remote controller<br />
5 U / D ∞ : Changes the preset<br />
stations<br />
2 R / F 3 : Searches for stations<br />
Title assignment<br />
You can assign titles up to 30 station<br />
frequencies (FM and AM) using 8 characters<br />
(maximum) for each title.<br />
• If you try to assign titles to more than 30<br />
station frequencies, “NAME FULL” appears.<br />
Delete unwanted titles before assignment.<br />
1<br />
2<br />
3<br />
4<br />
5<br />
6<br />
] “FM” or “AM”<br />
] Show the title entry screen.<br />
] Select a character.<br />
[Hold]<br />
] Move to the next (or previous)<br />
character position.<br />
Repeat steps 3 and 4 until you have<br />
finished entering the title.<br />
To erase the entire title, press and hold DISP<br />
after step 2, then press the control dial.<br />
Available characters<br />
A B C D E F G H I<br />
J K L M N O P Q R<br />
S T U V W X Y Z 0<br />
1 2 3 4 5 6 7 8 9<br />
— / < > Space
Listening to a disc<br />
~ ] Turn on the power.<br />
Stopping playback and ejecting<br />
the disc<br />
“NO DISC” appears.<br />
Press / SOURCE to listen to<br />
another playback source.<br />
Prohibiting disc ejection<br />
To cancel the prohibition, repeat the same<br />
procedure.<br />
[Hold]<br />
Selects folder of the MP3/WMA<br />
Selects track<br />
Fast-forwards or<br />
reverses the track<br />
Selecting a track/folder<br />
Ÿ<br />
[Hold]<br />
For MP3/WMA discs, select the desired folder,<br />
then the desired track by repeating the control<br />
dial procedures.<br />
• If the MP3/WMA disc contains many tracks,<br />
you can fast search (±10, ±100, ±1000)<br />
through the disc by turning the control dial<br />
quickly.<br />
• To return to the previous menu, press BACK.<br />
All tracks will be played repeatedly until you change<br />
the source or eject the disc.<br />
Caution on volume setting:<br />
Discs produce very little noise compared<br />
with other sources. Lower the volume before<br />
playing a disc to avoid damaging the speakers<br />
by the sudden increase of the output level.<br />
Selecting the playback modes<br />
You can use only one of the following playback<br />
modes at a time.<br />
1<br />
2<br />
3<br />
[Hold]<br />
] “REPEAT” j “RANDOM”<br />
REPEAT<br />
TRACK RPT : Repeats current track<br />
FOLDER RPT : Repeats current folder<br />
RANDOM<br />
FOLDER RND : Randomly plays all tracks<br />
of current folder, then<br />
tracks of next folders<br />
ALL RND : Randomly plays all tracks<br />
To cancel repeat play or random play, select<br />
“RPT OFF” or “RND OFF.”<br />
ENGLISH<br />
9
Changing the display information<br />
Disc title/Album name/performer (folder<br />
name)* = Track title (file name)* = Current<br />
track number with the elapsed playing time<br />
= Current track number with the clock<br />
time = (back to the beginning)<br />
* If the current disc is an audio CD, “NO NAME”<br />
appears.<br />
If an MP3/WMA file does not have Tag<br />
information or is set to<br />
( 20), folder name and file name<br />
appear.<br />
Listening to the USB device<br />
This unit can play MP3/WMA files stored on a USB mass storage class device.<br />
You can connect a USB mass storage class device such as a USB memory, Digital Audio Player,<br />
etc. to the unit.<br />
• You can also connect an Apple iPod/iPhone to the USB input jack. For details of the operations,<br />
16 – 17.<br />
~ Ÿ USB input jack<br />
] Turn on the power.<br />
Caution on volume setting:<br />
USB devices produce very little noise compared<br />
with other sources. Lower the volume before<br />
playing a USB to avoid damaging the speakers<br />
by sudden increase of the output level.<br />
If you have turned off the power (without<br />
detaching the USB device)...<br />
Pressing / SOURCE turns on the power and<br />
playback starts from where it has been stopped<br />
previously.<br />
• If a different USB device is currently attached,<br />
playback starts from the beginning.<br />
10 ENGLISH<br />
Using the remote controller<br />
5 U / D ∞ : Selects folder of the<br />
MP3/WMA<br />
2 R / F 3 : Selects track<br />
2 R / F 3<br />
[Hold]<br />
: Fast-forwards or<br />
reverses the track<br />
USB memory<br />
All tracks will be played repeatedly until you change the<br />
source or detach the USB device.<br />
Stop playing and detaching the<br />
USB device<br />
Straightly pull it out from the unit.<br />
“NO USB” appears. Press / SOURCE to listen to<br />
another playback source.<br />
You can operate the USB device in the same<br />
way you operate the files on a disc. ( 9)
Cautions:<br />
• Avoid using the USB device if it might hinder<br />
your safety driving.<br />
• Do not pull out and attach the USB device<br />
repeatedly while “READING” is shown on the<br />
display.<br />
• Do not start the car engine if a USB device is<br />
connected.<br />
• This unit may not be able to play the files<br />
depending on the type of USB device.<br />
• Operation and power supply may not work as<br />
intended for some USB devices.<br />
Using Bluetooth ® devices<br />
For Bluetooth operations, it is required to<br />
connect the Bluetooth adapter, KS-BTA200 (not<br />
supplied) to the expansion port on the rear of<br />
this unit.<br />
• Refer to pages i and ii at the end of the<br />
manual to check the countries where you<br />
may use the Bluetooth ® function.<br />
• For details, refer also to the <strong>instructions</strong><br />
supplied with the Bluetooth adapter and the<br />
Bluetooth device.<br />
To use a Bluetooth device through the unit<br />
(“BT-PHONE” and “BT-AUDIO”) for the first time,<br />
you need to establish a Bluetooth wireless<br />
connection between the unit and the device.<br />
• Once the connection is established, it is<br />
registered on the unit even if you reset your<br />
unit. Up to five devices can be registered in<br />
total.<br />
• Only one device can be connected at a time<br />
for each source (“BT-PHONE” and “BT-AUDIO”).<br />
Registration (Pairing) methods<br />
Use either of the following items (“OPEN” or<br />
“SEARCH” ) in the Bluetooth menu to register<br />
and make the unit ready to establish a new<br />
Bluetooth connection with a device.<br />
• You cannot connect a computer to the USB<br />
input terminal of the unit.<br />
• Make sure all important data has been backed<br />
up to avoid losing the data.<br />
• Do not leave a USB device in the car, expose<br />
to direct sunlight, or high temperature to<br />
avoid deformation or cause damages to the<br />
device.<br />
• Some USB devices may not work immediately<br />
after attaching USB device or turn on the<br />
power.<br />
• For more details about USB operations,<br />
27, 28.<br />
“OPEN” : Connection is established by<br />
operating the Bluetooth device.<br />
“SEARCH” : Connection is established by<br />
operating the unit.<br />
Registering using “OPEN”<br />
Preparation: Operate the device to turn on its<br />
Bluetooth function.<br />
1<br />
2<br />
3<br />
] “BT-PHONE” or “BT-AUDIO”<br />
] “NEW DEVICE” ] “OPEN”<br />
] Enter a PIN (Personal Identification<br />
Number) code in to the unit.<br />
You can enter any number you like<br />
(1-digit to 16-digit number).<br />
[Initial: 0000]<br />
• Some devices have their own PIN<br />
code. Enter the specified PIN code in<br />
to the unit.<br />
ENGLISH<br />
11
4<br />
5<br />
12 ENGLISH<br />
Repeat step 3 on page 11 until you<br />
have finished entering the PIN code.<br />
“OPEN..” flashes.<br />
6 Use the Bluetooth device to search and<br />
connect.<br />
On the device to be connected, enter<br />
the same PIN code you have just<br />
entered for this unit. “CONNECTED”<br />
appears.<br />
Now connection is established and you<br />
can use the device through the unit.<br />
The device remains registered even after you<br />
disconnect the device. Use “CONNECT“ (or<br />
activate “AUTO CNNCT”) to connect the same<br />
device from next time on. ( 15)<br />
Registering using<br />
“SEARCH”/“SPECIAL”<br />
1<br />
2<br />
3<br />
] “BT-PHONE” or “BT-AUDIO”<br />
] “NEW DEVICE”<br />
] “SEARCH” : To search for available<br />
devices<br />
The unit searches and displays the list<br />
of the available devices. “UNFOUND”<br />
appears if no available device is<br />
detected.<br />
– – – – – or – – – – –<br />
] “SPECIAL” : To connect a special<br />
device<br />
The unit displays the list of the preset<br />
devices.<br />
4<br />
5<br />
] Select a device you want to connect.<br />
For available devices...<br />
] Enter the specific PIN code of the<br />
device to the unit.<br />
• Refer to the <strong>instructions</strong> supplied with<br />
the device to check the PIN code.<br />
Use the Bluetooth device to connect.<br />
Now connection is established and you<br />
can use the device through the unit.<br />
For special device...<br />
Use “OPEN” or “SEARCH” to connect.<br />
Connecting/disconnecting/<br />
deleting a registered device<br />
1<br />
2<br />
3<br />
] “BT-PHONE” or “BT-AUDIO”<br />
] Select a device you want to<br />
connect/disconnect/delete.<br />
] “CONNECT” or “DISCONNECT” : To<br />
connect/disconnect the selected device<br />
– – – – – or – – – – –<br />
] “DELETE” ] “YES” : To delete the<br />
selected device<br />
You can set the unit to connect the Bluetooth<br />
device automatically when the unit is turned<br />
on. ( “AUTO CNNCT,” 15)
Using a Bluetooth<br />
mobile phone<br />
~<br />
Ÿ<br />
] “BT-PHONE”<br />
] Bluetooth menu<br />
! Make a call or setting using<br />
the Bluetooth setting menu.<br />
( 15)<br />
When a call comes in....<br />
The source is automatically changed to<br />
“BT-PHONE.”<br />
• The display will flash in blue. (,<br />
21)<br />
When “AUTO ANSWER” is activated....<br />
The unit answers the incoming calls<br />
automatically. ( 15)<br />
• When “AUTO ANSWER” is deactivated, press<br />
any button (except / SOURCE / / 0) to<br />
answer the incoming call.<br />
• You can adjust the microphone volume level.<br />
( 15)<br />
To end the call<br />
Hold any button (except / SOURCE / / 0).<br />
When a text message comes in....<br />
If the mobile phone is compatible with text<br />
message (notified through JVC Bluetooth<br />
adapter) and “MSG INFO” (message info) is<br />
set to “AUTOMATIC” ( 15), the unit rings to<br />
inform you of the message arrival.<br />
• “RCV MESSAGE” (receiving message) appears<br />
and the display illuminate in blue. (, 21)<br />
Using the remote controller<br />
Making a call<br />
1<br />
2<br />
3<br />
4<br />
5 U / D ∞ / : Answers calls<br />
2 R / F 3 /<br />
SOURCE<br />
5 U / D ∞ / : Rejects calls<br />
2 R / F 3 /<br />
SOURCE<br />
[Hold]<br />
] “BT-PHONE”<br />
] Select “DIAL” menu.<br />
] Select a calling method.<br />
PHONE BOOK* j MISSED* j<br />
NUMBER j VOICE DIAL j<br />
REDIAL*j RECEIVED* j (back to<br />
the beginning)<br />
* Displays only when your mobile phone<br />
is equipped with these functions and is<br />
compatible with this unit.<br />
ENGLISH<br />
13
5<br />
14 ENGLISH<br />
For REDIAL, RECEIVED, MISSED<br />
] Repeat step 4 on page 13 to select<br />
a name (if it is acquired) or a phone<br />
number.<br />
For PHONE BOOK<br />
] Repeat step 4 on page 13 to select a<br />
name or a phone number.<br />
For NUMBER<br />
] Enter a phone number.<br />
] Confirm.<br />
For VOICE DIAL<br />
] Speak the name you want to call<br />
when “SAY NAME” appears.<br />
• If your mobile phone does not support<br />
the voice recognition system, “ERROR”<br />
appears.<br />
• Using voice tags may be difficult in<br />
a noisy environment or during an<br />
emergency.<br />
• To return to the previous menu, press 5.<br />
Using a Bluetooth audio<br />
player<br />
] “BT-AUDIO”<br />
If playback does not start, operate the<br />
Bluetooth audio player to start playback.<br />
Operate the Bluetooth audio player to<br />
pause (if playback does not pause when you<br />
change the source).<br />
Reverse skips/forward<br />
skips<br />
Pauses/starts playback*<br />
* Operation may be different<br />
according to the connected<br />
Bluetooth audio player.<br />
Enter setting menu (Device<br />
list)<br />
For connecting/disconnecting/deleting a<br />
registered device, 12.<br />
Using the remote controller<br />
2 R / F 3 : Reverse skips/forward<br />
skips<br />
Changing the Bluetooth settings<br />
1<br />
2<br />
3<br />
4<br />
] “BT-PHONE” or “BT-AUDIO”<br />
] Bluetooth menu<br />
] “SETTINGS”<br />
] Select a setting item.<br />
AUTO CNNCT j AUTO ANSWER * 1<br />
j MSG INFO * 2 j MIC SETTING * 1<br />
j VERSION * 3 j (back to the<br />
beginning)
5<br />
] Change the setting accordingly. For<br />
setting menu, right column.<br />
* 1 Appears only when a Bluetooth phone is<br />
connected.<br />
* 2 Appears only when a Bluetooth phone is<br />
connected and it is compatible with text<br />
message (notified through JVC Bluetooth<br />
adapter).<br />
* 3 Bluetooth Audio: Shows only “Version.”<br />
Setting menu [Initial: Underlined]<br />
AUTO CNNCT (connect)<br />
When the unit is turned on, the connection is<br />
established automatically with...<br />
OFF: No Bluetooth device.<br />
LAST: The last connected Bluetooth device.<br />
ORDER: The available registered Bluetooth<br />
device found at first.<br />
AUTO ANSWER<br />
Only for the device being connected for<br />
“BT-PHONE.”<br />
ON: The unit answers the incoming calls<br />
automatically.<br />
OFF: The unit does not answer the calls<br />
automatically. Answer the calls<br />
manually.<br />
REJECT: The unit rejects all incoming calls.<br />
MSG INFO (message info)<br />
Only for the device being connected for<br />
“BT-PHONE.”<br />
AUTOMATIC: The unit informs you of the<br />
arrival of a message by ringing<br />
and displaying “RCV MESSAGE”<br />
(receiving message).<br />
• The display illuminate in blue.<br />
(, 21)<br />
MANUAL: The unit does not inform you of<br />
the arrival of a message.<br />
MIC SETTING (microphone setting)<br />
Only for the device being connected for<br />
“BT-PHONE.” Adjust microphone volume<br />
connected to the Bluetooth adapter,<br />
[LEVEL 01/02/03].<br />
VERSION<br />
The Bluetooth software and hardware versions<br />
are shown.<br />
Warning messages<br />
ERROR CNNCT (Error Connection)<br />
The device is registered but the connection<br />
has failed. Use “CONNECT” to connect the<br />
device again. ( 12)<br />
ERROR<br />
Try the operation again. If “ERROR” appears<br />
again, check if the device supports the<br />
function you have tried.<br />
UNFOUND<br />
No available Bluetooth device is detected<br />
by “SEARCH.”<br />
LOADING *<br />
The unit is updating the phone book.<br />
PLEASE WAIT<br />
The unit is preparing to use the Bluetooth<br />
function. If the message does not disappear,<br />
turn off and turn on the unit, then connect<br />
the device again (or reset the unit).<br />
RESET 8<br />
Check the connection between the adapter<br />
and this unit.<br />
* Displays only when your mobile phone<br />
is equipped with these functions and is<br />
compatible with this unit.<br />
Bluetooth Information:<br />
If you wish to receive more information<br />
about Bluetooth, visit the following JVC web<br />
site: <br />
(English website only)<br />
ENGLISH<br />
15
Listening to the iPod/iPhone<br />
You can connect the iPod/iPhone using the USB 2.0 cable (accessory of the iPod/iPhone) to the<br />
USB input jack on the control panel.<br />
• Disconnecting the iPod/iPhone will stop<br />
playback. Press / SOURCE to listen to another<br />
playback source.<br />
• For details, refer also to the <strong>instructions</strong><br />
supplied with your iPod/iPhone.<br />
Caution:<br />
• Avoid using the iPod/iPhone if it might hinder<br />
your safety while driving.<br />
• Make sure all important data has been backed<br />
up to avoid losing the data.<br />
There are two control terminals:<br />
• Control by this unit.<br />
• Control by the connected<br />
iPod/iPhone.<br />
Preparation: Select the controlling terminal,<br />
or for iPod<br />
playback:<br />
• Press and hold BACK button.<br />
• Make the selection from <br />
setting, 23.<br />
16 ENGLISH<br />
USB input jack<br />
The operations explained below are under<br />
.<br />
~<br />
Ÿ<br />
USB 2.0 cable (accessory<br />
of the iPod/iPhone)<br />
] “USB-IPOD”<br />
Playback starts automatically.<br />
] Select a song.<br />
[Hold]<br />
Apple iPod/iPhone<br />
Pauses or resumes<br />
playback<br />
Selects track<br />
Fast-forwards or<br />
reverses the track
Selecting a track from the menu<br />
1<br />
2<br />
3<br />
] Select the desired menu.<br />
PLAYLISTS j ARTISTS j ALBUMS<br />
j SONGS j PODCASTS j<br />
GENRES j COMPOSERS j<br />
AUDIOBOOKS j (back to the<br />
beginning)<br />
] Select the desired track.<br />
Repeat this procedure until the desired<br />
track is selected.<br />
• If the selected menu contains many tracks,<br />
you can fast search (±10, ±100, ±1000)<br />
through the menu by turning the control dial<br />
quickly.<br />
• To return to the previous menu, press BACK.<br />
Selecting the playback modes<br />
1<br />
2<br />
[Hold]<br />
] “REPEAT” j “RANDOM”<br />
3<br />
REPEAT<br />
ONE RPT : Functions the same as<br />
“Repeat One” of the iPod<br />
ALL RPT : Functions the same as<br />
“Repeat All” of the iPod<br />
RANDOM<br />
ALBUM RND : Functions the same as<br />
“Shuffle Albums” of the<br />
iPod<br />
SONG RND : Functions the same as<br />
“Shuffle Songs” of the<br />
iPod<br />
• To cancel repeat play or random play, select<br />
“RPT OFF” or “RND OFF.”<br />
• “ALBUM RND” is not available for some iPod.<br />
• To return to the previous menu, press BACK.<br />
Changing the display information<br />
Album name/performer = Track title =<br />
Current track number with the elapsed<br />
playing time = Current track number with<br />
the clock time = (back to the beginning)<br />
Using the remote controller<br />
2 R / F 3 : Selects track<br />
2 R / F 3<br />
[Hold]<br />
: Fast-forwards or<br />
reverses the track<br />
Notice:<br />
When operating an iPod, some operations<br />
may not be performed correctly or as<br />
intended. In this case, visit the following JVC<br />
web site: <br />
(English website only)<br />
ENGLISH<br />
17
Listening to the other external<br />
components<br />
You can connect an external component to:<br />
• EXT INPUT: Expansion port on the rear of<br />
this unit using the following adapters (not<br />
supplied):<br />
– KS-U57, Line Input Adapter<br />
– KS-U58, AUX Input Adapter<br />
Preparation: Make sure is selected<br />
for the = setting.<br />
( 23)<br />
• AUX IN: AUX (auxiliary) input jack on the<br />
control panel.<br />
Preparation: Make sure is<br />
selected for the = <br />
setting. ( 23)<br />
• For details, refer also to the <strong>instructions</strong><br />
supplied with the adapter or external<br />
components.<br />
18 ENGLISH<br />
~<br />
Connecting an external component to the AUX input jack<br />
3.5 mm stereo mini plug<br />
(not supplied)<br />
] “EXT INPUT” or “AUX IN”<br />
Ÿ Turn on the connected<br />
component and start<br />
playing the source.<br />
!<br />
] Adjust the volume.<br />
⁄ Adjust the sound as you<br />
want. ( 19)<br />
Portable audio player,<br />
etc.
Selecting a preset sound mode<br />
You can select a preset sound mode suitable<br />
for the music genre.<br />
FLAT = NATURAL = DYNAMIC = VOCAL<br />
BOOST = BASS BOOST = USER = (back to<br />
the beginning)<br />
While listening, you can adjust the tone level of<br />
the selected sound mode.<br />
1<br />
2<br />
[Hold]<br />
Adjust the level (–06 to +06) of the<br />
selected tone (BASS / MID / TRE).<br />
The sound mode is automatically stored<br />
and changed to “USER.”<br />
Tone<br />
Sound element<br />
Frequency Level Q<br />
BASS 60 Hz –06 to +06 Q1.0<br />
80 Hz<br />
Q1.25<br />
100 Hz<br />
Q1.5<br />
200 Hz<br />
Q2.0<br />
MIDDLE 0.5 kHz –06 to +06 Q0.75<br />
1.0 kHz<br />
Q1.0<br />
1.5 kHz<br />
2.5 kHz<br />
Q1.25<br />
TREBLE 10.0 kHz<br />
12.5 kHz<br />
15.0 kHz<br />
17.5 kHz<br />
–06 to +06 Q FIX<br />
Storing your own sound mode<br />
You can store your own adjustments in<br />
memory.<br />
1<br />
2<br />
3<br />
[Hold]<br />
] ] / /<br />
<br />
Adjust the sound elements of the<br />
selected tone. ( table on the left)<br />
4 Repeat steps 2 and 3 to adjust other<br />
tones.<br />
The adjustments made will be stored<br />
automatically in “USER.”<br />
The current sound mode changes to “USER”<br />
automatically.<br />
ENGLISH<br />
19
Menu operations<br />
1 2 3<br />
20 ENGLISH<br />
Repeat step 2 if necessary.<br />
• To return to the previous menu,<br />
press BACK.<br />
• To exit from the menu, press DISP<br />
or MENU.<br />
Category Menu item Selectable setting, [Initial: Underlined]<br />
DEMO<br />
CLOCK<br />
PRO EQ<br />
DISPLAY<br />
[Hold]<br />
DEMO<br />
Display<br />
demonstration<br />
CLOCK SET<br />
Clock setting<br />
• DEMO ON<br />
• DEMO OFF<br />
—<br />
[1:00]<br />
: Display demonstration will be activated<br />
automatically if no operation is done for about<br />
20 seconds.<br />
: Cancels. ( 4)<br />
: Adjust the hour, then the minute. ( 4)<br />
BASS<br />
MIDDLE<br />
TREBLE<br />
— : For settings, 19.<br />
DIMMER • DIMMER AUTO : Dims the display when you turn on the<br />
headlights. *<br />
• DIMMER ON<br />
• DIMMER OFF<br />
1<br />
: Dims the display and button illumination.<br />
: Cancels.<br />
SCROLL * 2 • SCROLL ONCE : Scrolls the displayed information once.<br />
• SCROLL AUTO : Repeats scrolling (at 5-second intervals).<br />
• SCROLL OFF : Cancels.<br />
Pressing DISP for more than one second can scroll the display<br />
regardless of the setting.<br />
TAG DISPLAY • TAG ON<br />
• TAG OFF<br />
: Shows the Tag information while playing MP3/<br />
WMA tracks.<br />
: Cancels.<br />
* 1 The illumination control lead connection is required. (See “Installation/Connection Manual.”) This<br />
setting may not work correctly on some vehicles (particularly on those having a control dial for<br />
dimming). In this case, change the setting to any other than .<br />
* 2 Some characters or symbols will not be shown correctly (or will be blanked) on the display.
Category Menu item Selectable setting, [Initial: Underlined]<br />
TUNER<br />
COLOR<br />
COLOR SETUP<br />
SSM * 3<br />
Strong-station<br />
Sequential<br />
Memory<br />
MONO * 3<br />
Monaural mode<br />
IF BAND<br />
Intermediate<br />
frequency band<br />
• SSM 01 – 06<br />
• SSM 07 – 12<br />
• SSM 13 – 18<br />
• MONO ON<br />
• MONO OFF<br />
• AUTO<br />
• WIDE<br />
: For settings, 7.<br />
: Activate monaural mode to improve FM<br />
reception, but stereo effect will be lost. ( 7)<br />
: Restore the stereo effect.<br />
: Increases the tuner selectivity to reduce<br />
interference noises between adjacent stations.<br />
(Stereo effect may be lost.)<br />
: Subject to interference noises from adjacent<br />
stations, but sound quality will not be<br />
degraded and the stereo effect will remain.<br />
BUTTON ZONE COLOR 01 — : For settings, 24.<br />
DISP ZONE<br />
Display zone<br />
ALL ZONE<br />
COLOR 29, USER<br />
DAY COLOR • BUTTON ZONE : For settings, 25.<br />
NIGHT COLOR<br />
• DISP ZONE<br />
MENU COLOR • ON<br />
: Changes the display and buttons (except for<br />
EQ/BASS-TRE / DISP) illumination during menu,<br />
list search and playback mode operations.<br />
• OFF<br />
: Cancels.<br />
RING COLOR * 4 • ON<br />
: When a call comes in, the display will flash in<br />
blue.<br />
• The display will change to the original color<br />
when the call is answered or the incoming<br />
call stops.<br />
When the unit receives a text message, the<br />
display only illuminate in blue.<br />
• OFF<br />
: Cancels.<br />
* 3 Displayed only when the source is “FM.”<br />
* 4 Displayed only when Bluetooth adapter, KS-BTA200 is connected.<br />
ENGLISH<br />
21
Category Menu item Selectable setting, [Initial: Underlined]<br />
AUDIO<br />
22 ENGLISH<br />
FADER * 5 R06 – F06<br />
[00]<br />
BALANCE * 6 L06 – R06<br />
[00]<br />
LOUD<br />
Loudness<br />
VOL ADJUST<br />
Volume adjust<br />
L/O MODE<br />
Line output<br />
mode<br />
SUB.W FREQ * 7<br />
Subwoofer cutoff<br />
frequency<br />
SUB.W LEVEL * 7<br />
Subwoofer level<br />
• LOUD ON<br />
• LOUD OFF<br />
VOL ADJ –05 —<br />
VOL ADJ +05<br />
[VOL ADJ 00]<br />
• SUB.W<br />
• REAR<br />
• LOW<br />
• MID<br />
• HIGH<br />
SUB.W 00 —<br />
SUB.W 08<br />
[SUB.W 04]<br />
* 5 If you are using a two-speaker system, set the fader level to “00.”<br />
* 6 This adjustment will not affect the subwoofer output.<br />
* 7 Displayed only when is set to .<br />
: Adjust the front and rear speaker output<br />
balance.<br />
: Adjust the left and right speaker output<br />
balance.<br />
: Boost low and high frequencies to produce a<br />
well-balanced sound at a low volume level.<br />
: Cancels.<br />
: Preset the volume adjustment level of<br />
each source (except FM), compared to the<br />
FM volume level. The volume level will<br />
automatically increase or decrease when you<br />
change the source.<br />
• Before making an adjustment, select the<br />
source you want to adjust.<br />
• “VOL ADJ FIX” appears on the display if “FM”<br />
is selected as the source.<br />
: Select if the REAR LINE OUT terminals are<br />
used for connecting a subwoofer (through<br />
an external amplifier).<br />
: Select if the REAR LINE OUT terminals are<br />
used for connecting the speakers (through<br />
an external amplifier).<br />
: Frequencies lower than 72 Hz are sent to the<br />
subwoofer.<br />
: Frequencies lower than 111 Hz are sent to<br />
the subwoofer.<br />
: Frequencies lower than 157 Hz are sent to<br />
the subwoofer.<br />
: Adjust the subwoofer output level.
Category Menu item Selectable setting, [Initial: Underlined]<br />
AUDIO<br />
SRC SELECT<br />
AUDIOBOOKS<br />
IPOD<br />
SWITCH<br />
BEEP<br />
Keytouch tone<br />
AMP GAIN * 8<br />
Amplifier gain<br />
control<br />
AM * 9<br />
AM station<br />
EXT IN * 10<br />
External input<br />
AUX IN * 11<br />
Auxiliary input<br />
AUDIOBOOKS * 12<br />
Speed control of<br />
“Audiobooks”<br />
IPOD SWITCH * 13<br />
iPod/iPhone<br />
control<br />
• BEEP ON<br />
• BEEP OFF<br />
• LOW POWER<br />
• HIGH POWER<br />
• AM ON<br />
• AM OFF<br />
• EXT ON<br />
• EXT OFF<br />
• AUX ON<br />
• AUX OFF<br />
• NORMAL<br />
• FASTER<br />
• SLOWER<br />
• HEAD MODE<br />
• IPOD MODE<br />
: Activates the keypress tone.<br />
: Deactivates the keypress tone.<br />
: VOLUME 00 – VOLUME 30 (Select if the<br />
maximum power of each speaker is less than<br />
50 W to prevent damaging the speakers.)<br />
: VOLUME 00 – VOLUME 50<br />
: Enable “AM” in source selection.<br />
: Disable “AM” in source selection.<br />
: Enable “EXT IN” in source selection.<br />
: Disable “EXT IN” in source selection.<br />
: Enable “AUX IN” in source selection.<br />
: Disable “AUX IN” in source selection.<br />
: You can select the playback speed of the<br />
“Audiobook” sound file in your iPod.<br />
• Initial selected item depends on your iPod<br />
setting.<br />
: Controls iPod playback through the unit.<br />
: Controls iPod playback through the iPod/<br />
iPhone.<br />
* 8 The volume level automatically changes to “VOLUME 30” if you change to with the<br />
volume level set higher than “VOLUME 30.”<br />
* 9 Displayed only when any source other than “AM” is selected.<br />
* 10 Displayed only when any source other than “EXT IN“ is selected.<br />
* 11 Displayed only when any source other than “AUX IN“ is selected.<br />
* 12 Displayed only when an iPod is connected and playback is controlled from the unit.<br />
* 13 Displayed only when “USB-IPOD” is selected as the source and “IPOD MODE” is available for the<br />
connected iPod/iPhone ( 28).<br />
ENGLISH<br />
23
Selecting the variable buttons and display color illumination<br />
You can select your preferred color for buttons illumination (except for EQ/BASS-TRE / DISP) and<br />
display color separately.<br />
1<br />
2<br />
3<br />
24 ENGLISH<br />
or<br />
Button zone<br />
All zone<br />
[Hold] 4<br />
] ] /<br />
/ <br />
• Pressing COLOR in step 1 will enter<br />
zone selection menu (BUTTON ZONE /<br />
DISP ZONE / ALL ZONE) directly.<br />
] Select your preferred color from one<br />
of the 29 preset colors or color.<br />
Display zone<br />
Repeat steps 2 and 3 to select a<br />
different zone and your preferred color.<br />
• If is selected in step 2,<br />
the buttons and display illumination<br />
changed to the current/selected<br />
color.<br />
You can also change the <br />
color to one of your preferred color by<br />
performing step 3.<br />
5 or<br />
] Exit from the setting.
Creating your own day and night colors—USER<br />
You can create your own colors for and to apply to button zone<br />
and display zone.<br />
• Displayed when is set to .<br />
• Displayed when is set to .<br />
COLOR<br />
SETUP<br />
1<br />
2<br />
3<br />
Menu hierarchy Operation<br />
DAY<br />
COLOR<br />
• BUTTON<br />
ZONE<br />
• DISP ZONE<br />
Follow example below.<br />
Press BACK after step 5, then select DISP ZONE in step 2.<br />
• BUTTON Press BACK after step 5, then select NIGHT COLOR in<br />
NIGHT ZONE step 2.<br />
COLOR<br />
• DISP ZONE<br />
Ex.: Creating color for in .<br />
4<br />
[Hold] or<br />
[Hold]<br />
] ] <br />
] <br />
• Pressing COLOR in step 1 will enter<br />
zone selection menu (BUTTON ZONE /<br />
DISP ZONE) directly.<br />
] Select a primary color.<br />
RED j GREEN j BLUE j (back to<br />
the beginning)<br />
] Adjust the level of the selected<br />
primary color.<br />
00 to 31<br />
5 Repeat steps 3 and 4 to adjust other<br />
primary colors.<br />
6 or<br />
] Exit from the setting.<br />
If “00” is selected for all the primary colors (as<br />
in step 4) for , nothing appear on<br />
the display.<br />
ENGLISH<br />
25
More about this unit<br />
Basic operations<br />
General<br />
• If you turn off the power while listening to<br />
a track, playback will start from where it had<br />
been stopped previously next time you turn<br />
on the power.<br />
• If no operation is done for about 60 seconds<br />
after pressing MENU button, the operation will<br />
be canceled.<br />
Tuner operations<br />
Storing stations in memory<br />
• During SSM search...<br />
– All previously stored stations are erased and<br />
the stations are stored anew.<br />
– When SSM is over, the station stored in the<br />
lowest preset number will be automatically<br />
tuned in.<br />
• When storing a station manually, the<br />
previously preset station is erased when<br />
a new station is stored in the same preset<br />
number.<br />
Disc/USB operations<br />
Caution for DualDisc playback<br />
• The Non-DVD side of a “DualDisc” does not<br />
comply with the “Compact Disc Digital Audio”<br />
standard. Therefore, the use of Non-DVD side<br />
of a DualDisc on this product may not be<br />
recommended.<br />
General<br />
• This unit has been designed to reproduce<br />
CDs/CD Texts, and CD-Rs (Recordable)/CD-<br />
RWs (Rewritable) in audio CD (CD-DA), MP3<br />
and WMA formats.<br />
• If you change the source while listening to a<br />
disc, playback stops. Next time you select “CD”<br />
as the playback source, playback will start<br />
from where it had been stopped previously.<br />
26 ENGLISH<br />
• When a disc is inserted upside down, “PLEASE”<br />
and “EJECT” appear alternately on the display.<br />
Press 0 to eject the disc.<br />
• If the ejected disc is not removed within<br />
15 seconds, it is automatically inserted into<br />
the loading slot again to protect it from dust.<br />
Playback starts automatically.<br />
• MP3 and WMA “tracks” (words “file” and “track”<br />
are used interchangeably) are recorded in<br />
“folders.”<br />
• While fast-forwarding or reversing on an MP3<br />
or WMA disc, you can only hear intermittent<br />
sounds.<br />
Playing a CD-R or CD-RW<br />
• Use only “finalized” CD-Rs or CD-RWs.<br />
• This unit can only play back files of the same<br />
type as those detected first if a disc includes<br />
both audio CD (CD-DA) files and MP3/WMA<br />
files.<br />
• This unit can play back multi-session discs;<br />
however, unclosed sessions will be skipped<br />
while playing.<br />
• Some CD-Rs or CD-RWs may not play back on<br />
this unit because of their disc characteristics,<br />
or for the following reasons:<br />
– Discs are dirty or scratched.<br />
– Moisture condensation has occurred on the<br />
lens inside the unit.<br />
– The pickup lens inside the unit is dirty.<br />
– The files on the CD-R/CD-RW are written<br />
using the “Packet Write” method.<br />
– There are improper recording conditions<br />
(missing data, etc.) or media conditions<br />
(stained, scratched, warped, etc.).<br />
• CD-RWs may require a longer readout time<br />
since the reflectance of CD-RWs is lower than<br />
that of regular CDs.<br />
• Do not use the following CD-Rs or CD-RWs:<br />
– Discs with stickers, labels, or a protective seal<br />
stuck to the surface.
– Discs on which labels can be directly printed<br />
by an ink jet printer.<br />
Using these discs under high temperature<br />
or high humidity may cause malfunctions or<br />
damage to the unit.<br />
Playing an MP3/WMA disc<br />
• This unit can play back MP3/WMA files with<br />
the extension code or <br />
(regardless of the letter case—upper/lower).<br />
• This unit can show the names of albums,<br />
artists (performer), and Tag (Version 1.0, 1.1,<br />
2.2, 2.3, or 2.4) for MP3 files and for WMA files.<br />
• This unit can display only one-byte characters.<br />
No other characters can be correctly<br />
displayed.<br />
• This unit can play back MP3/WMA files<br />
meeting the conditions below:<br />
– Bit rate of MP3/WMA: 32 kbps — 320 kbps<br />
– Sampling frequency of MP3:<br />
32 kHz, 44.1 kHz, 48 kHz (for MPEG-1)<br />
16 kHz, 22.05 kHz, 24 kHz (for MPEG-2)<br />
– Sampling frequency of WMA:<br />
22.05 kHz, 32 kHz, 44.1 kHz, 48 kHz<br />
– Disc format: ISO 9660 Level 1/Level 2,<br />
Romeo, Joliet, Windows extension<br />
• The maximum number of characters for<br />
file/folder names (includes 4 extension<br />
characters— or ).<br />
– ISO 9660 Level 1: up to 12 characters<br />
– ISO 9660 Level 2: up to 31 characters<br />
– Romeo: up to 64 characters<br />
– Joliet: up to 32 characters<br />
– Windows extension: up to 64 characters<br />
• This unit can recognize a total of 512 files, 255<br />
folders, and 8 hierarchical levels.<br />
• This unit can play back files recorded in VBR<br />
(variable bit rate).<br />
Files recorded in VBR have a discrepancy<br />
in the elapsed time display, and do not<br />
show the actual elapsed time. In particular,<br />
this difference becomes noticeable after<br />
performing the search function.<br />
• This unit cannot play back the following files:<br />
– MP3 files encoded in MP3i and MP3 PRO<br />
format.<br />
– MP3 files encoded in an inappropriate<br />
format.<br />
– MP3 files encoded with Layer 1/2.<br />
– WMA files encoded in lossless, professional,<br />
and voice format.<br />
– WMA files which are not based upon<br />
Windows Media® Audio.<br />
– WMA files copy-protected with DRM.<br />
– Files which have data such as AIFF, ATRAC3,<br />
etc.<br />
• The search function works but search speed is<br />
not constant.<br />
Playing MP3/WMA tracks from a USB<br />
device<br />
• While playing from a USB device, the playback<br />
order may differ from other players.<br />
• This unit may be unable to play back some<br />
USB devices or some files due to their<br />
characteristics or recording conditions.<br />
• Depending on the shape of the USB devices<br />
and connection ports, some USB devices may<br />
not be attached properly or the connection<br />
might be loose.<br />
• Connect one USB mass storage class device to<br />
the unit at a time. Do not use a USB hub.<br />
• If the connected USB device does not have<br />
the correct files, “CANNOT PLAY” appears.<br />
• This unit can show Tag (Version 1.0, 1.1, 2.2,<br />
2.3, or 2.4) for MP3 files and for WMA files.<br />
• This unit can play back MP3/WMA files<br />
meeting the conditions below:<br />
– Bit rate of MP3/WMA: 32 kbps — 320 kbps<br />
– Sampling frequency of MP3:<br />
32 kHz, 44.1 kHz, 48 kHz (for MPEG-1)<br />
16 kHz, 22.05 kHz, 24 kHz (for MPEG-2)<br />
– Sampling frequency of WMA:<br />
22.05 kHz, 32 kHz, 44.1 kHz, 48 kHz<br />
• This unit can play back MP3 files recorded in<br />
VBR (variable bit rate).<br />
ENGLISH<br />
27
• The maximum number of characters for:<br />
– Folder names : 32 characters<br />
– File names : 32 characters<br />
– MP3 Tag : 64 characters<br />
– WMA Tag : 32 characters<br />
• This unit can recognize a total of 5 000 files,<br />
255 folders (255 files per folder including<br />
folder without unsupported files), and of 8<br />
hierarchies.<br />
• This unit does not support SD card reader.<br />
• This unit cannot recognize a USB device<br />
whose rating is other than 5 V and exceeds<br />
500 mA.<br />
• USB devices equipped with special functions<br />
such as data security functions cannot be<br />
used with the unit.<br />
• Do not use a USB device with 2 or more<br />
partitions.<br />
• This unit may not recognized a USB device<br />
connected through a USB card reader.<br />
• This unit may not play back files in a USB<br />
device properly when using a USB extension<br />
cord.<br />
• This unit cannot play back the following files:<br />
– MP3 files encoded in MP3i and MP3 PRO<br />
format.<br />
– MP3 files encoded in an inappropriate<br />
format.<br />
– MP3 files encoded with Layer 1/2.<br />
– WMA files encoded in lossless, professional,<br />
and voice format.<br />
– WMA files which are not based upon<br />
Windows Media® Audio.<br />
Bluetooth operations<br />
• While driving, do not perform complicated<br />
operation such as dialing the numbers, using<br />
phone book, etc. When you perform these<br />
operations, stop your car in a safe place.<br />
• Some Bluetooth devices may not be<br />
connected to this unit depending on the<br />
Bluetooth version of the device.<br />
28 ENGLISH<br />
• This unit may not work for some Bluetooth<br />
devices.<br />
• Connecting condition may vary depending<br />
on the circumstances around you.<br />
• When the unit is turned off, the device is<br />
disconnected.<br />
iPod/iPhone operations<br />
• You can control the following types of iPods/<br />
iPhone:<br />
– iPod with video (5th Generation) * 1<br />
– iPod classic * 1, * 2<br />
– iPod nano<br />
– iPod nano (2nd Generation)<br />
– iPod nano (3rd Generation) * 1, * 2<br />
– iPod nano (4th Generation) * 1, * 2<br />
– iPod nano (5th Generation) * 1, * 2<br />
– iPod touch * 1, * 2<br />
– iPod touch (2nd Generation) * 1, * 2<br />
– iPhone/iPhone 3G/iPhone 3GS * 1, * 2<br />
* 1 It is not possible to browse video files on the<br />
“Videos” menu.<br />
* 2 is available ( 16).<br />
• If the iPod does not play correctly, please<br />
update your iPod software to the latest<br />
version. For details about updating your iPod,<br />
visit .<br />
• When you turn on this unit, the iPod is<br />
charged through this unit.<br />
• iPod shuffle cannot be used with this unit.<br />
• The song order displayed on the selection<br />
menu of this unit may differ from that of the<br />
iPod.<br />
• The text information may not be displayed<br />
correctly:<br />
– Some characters such as accented letters<br />
cannot be shown correctly on the display.<br />
– Communication between the iPod and the<br />
unit is not stable.<br />
• If the text information includes more than 11<br />
characters, it scrolls on the display.<br />
This unit can display up to 64 characters.
Maintenance<br />
How to clean the connectors<br />
Frequent detachment will deteriorate the<br />
connectors.<br />
To minimize this possibility, periodically wipe<br />
the connectors with a cotton swab or cloth<br />
moistened with alcohol, being careful not to<br />
damage the connectors.<br />
Connectors<br />
Moisture condensation<br />
Moisture may condense on the lens inside the<br />
unit in the following cases:<br />
• After starting the heater in the car.<br />
• If it becomes very humid inside the car.<br />
Should this occur, the unit may malfunction.<br />
In this case, eject the disc and leave the unit<br />
turned on for a few hours until the moisture<br />
has evaporated.<br />
How to handle discs<br />
Center holder<br />
When removing a disc<br />
from its case, press down<br />
the center holder of the case<br />
and lift the disc out, holding<br />
it by the edges.<br />
• Always hold the disc by the edges. Do not<br />
touch its recording surface.<br />
When storing a disc in its case, gently insert<br />
the disc around the center holder (with the<br />
printed surface facing up).<br />
• Make sure to store discs in cases after use.<br />
To keep discs clean<br />
A dirty disc may not play<br />
correctly. If a disc does become<br />
dirty, wipe it with a soft cloth<br />
in a straight line from center to<br />
edge.<br />
• Do not use any solvents (for example,<br />
conventional record cleaner, spray, thinner,<br />
benzine, etc.) to clean discs.<br />
To play new discs<br />
New discs may have some<br />
rough spots around the inner<br />
and outer edges. If such a disc<br />
is used, this unit may reject the<br />
disc.<br />
To remove these rough spots, rub the edges<br />
with a pencil or ball-point pen, etc.<br />
Do not use the following discs:<br />
Single CD (8 cm disc) Warped disc<br />
Sticker and sticker<br />
residue<br />
Unusual shape<br />
Transparent or<br />
semitransparent<br />
parts on its recording<br />
area<br />
Stick-on label<br />
C-thru Disc<br />
(semitransparent<br />
disc)<br />
ENGLISH<br />
29
Troubleshooting<br />
General<br />
FM/AM<br />
Disc playback<br />
30 ENGLISH<br />
Symptom Remedy/Cause<br />
Sound cannot be heard from the<br />
speakers.<br />
“PROTECT” appears on the display<br />
and no operations can be done.<br />
The unit does not work at all. Reset the unit. ( 3)<br />
• Adjust the volume to the optimum level.<br />
• Make sure the unit is not muted/paused ( 6).<br />
• Check the cords and connections.<br />
Check to be sure the terminals of the speaker leads<br />
are covered with insulating tape properly, then<br />
reset the unit ( 3).<br />
If “PROTECT” does not disappear, consult your JVC<br />
car audio dealer or a company supplying kits.<br />
“AUX IN” cannot be selected. Check the = setting.<br />
( 23)<br />
Nothing appear on the display. Check the color settings ( 25).<br />
SSM automatic presetting does<br />
not work.<br />
Static noise while listening to the<br />
radio.<br />
Store stations manually.<br />
Connect the antenna firmly.<br />
“AM” cannot be selected. Check the = setting. ( 23)<br />
Disc cannot be played back. Insert the disc correctly.<br />
• CD-R/CD-RW cannot be played<br />
back.<br />
• Tracks on the CD-R/CD-RW<br />
cannot be skipped.<br />
Disc can neither be played back<br />
nor ejected.<br />
Disc sound is sometimes<br />
interrupted.<br />
• Insert a finalized CD-R/CD-RW.<br />
• Finalize the CD-R/CD-RW with the component<br />
which you used for recording.<br />
• Unlock the disc. ( 9)<br />
• Eject the disc forcibly. ( 3)<br />
• Stop playback while driving on rough roads.<br />
• Change the disc.<br />
• Check the cords and connections.<br />
“NO DISC” appears on the display. Insert a playable disc into the loading slot.<br />
“PLEASE” and “EJECT“ appear<br />
alternately on the display.<br />
Press 0, then insert a disc correctly.
MP3/WMA playback<br />
USB device playback<br />
Symptom Remedy/Cause<br />
Disc cannot be played back. • Use a disc with MP3/WMA tracks recorded in a format<br />
compliant with ISO 9660 Level 1, Level 2, Romeo, or<br />
Joliet.<br />
• Add the extension code or to the file<br />
names.<br />
Noise is generated. Skip to another track or change the disc. (Do not add<br />
the extension code or to non-MP3 or<br />
WMA tracks.)<br />
A longer readout time is<br />
required (“READING” keeps<br />
flashing on the display).<br />
Tracks do not play back in the<br />
order you have intended them<br />
to play.<br />
The elapsed playing time is not<br />
correct.<br />
“NO FILE” appears on the<br />
display.<br />
“NOT SUPPORT” appears on the<br />
display and track skips.<br />
The correct characters are not<br />
displayed (e.g. album name).<br />
Do not use too many hierarchical levels and folders.<br />
The playback order is determined when the files are<br />
recorded.<br />
This sometimes occurs during playback. This is caused<br />
by how the tracks are recorded on the disc.<br />
Selected folder is an empty folder * 1 . Select another<br />
folder that contains MP3/WMA tracks.<br />
Skip to the next track encoded in an appropriate format<br />
or to the next non-copy-protected WMA track.<br />
This unit can only display letters (upper case), numbers,<br />
and a limited number of symbols. ( 8)<br />
Noise is generated. The track played back is not an MP3/WMA track. Skip to<br />
another file. (Do not add the extension code or<br />
to non-MP3 or WMA tracks.)<br />
“READING” keeps flashing on<br />
the display.<br />
“NO FILE” appears on the<br />
display.<br />
“NOT SUPPORT” appears on the<br />
display and track skips.<br />
Tracks/folders are not played<br />
back in the order you have<br />
intended.<br />
• Readout time varies depending on the USB device.<br />
• Do not use too many hierarchy or folders.<br />
• Turn off the power then on again.<br />
• Reattach the USB device again.<br />
Selected folder is an empty folder * 1 . Select another<br />
folder that contains MP3/WMA tracks.<br />
Skip to the next track encoded in an appropriate format<br />
or to the next non-copy-protected WMA track.<br />
The playback order is determined by the write-in time<br />
stamp. The first track/folder written into the USB device<br />
will be the first track/folder for playback.<br />
* 1 Folder that is physically empty or folder that contains data but does not contain valid MP3/WMA track.<br />
ENGLISH<br />
31
USB device playback<br />
Bluetooth * 2<br />
32 ENGLISH<br />
Symptom Remedy/Cause<br />
• “CANNOT PLAY” flashes on<br />
the display.<br />
• “NO USB” appears on the<br />
display.<br />
• The unit cannot detect the<br />
USB device.<br />
While playing a track, sound is<br />
sometimes interrupted.<br />
Correct characters are not<br />
displayed (e.g. album name).<br />
Bluetooth device does not<br />
detect the unit.<br />
The unit does not detect the<br />
Bluetooth device.<br />
The unit does not make pairing<br />
with the Bluetooth device.<br />
• Attach a USB device that contains tracks encoded in<br />
an appropriate format.<br />
• Reattach the USB device again.<br />
The MP3/WMA tracks have not been properly copied<br />
into the USB device.<br />
Copy MP3/WMA tracks again into the USB device, and<br />
try again.<br />
This unit can only display letters (upper case),<br />
numbers, and a limited number of symbols. ( 8)<br />
The unit can be connected with one Bluetooth mobile<br />
phone and one Bluetooth audio device at a time.<br />
While connecting a device, this unit cannot be detected<br />
from another device. Disconnect currently connected<br />
device and search again.<br />
• Check the Bluetooth setting of the device.<br />
• Search from the Bluetooth device. After the device<br />
detects the unit, select “OPEN” on the unit to connect<br />
the device. ( 11)<br />
• Enter the same PIN code for both the unit and target<br />
device.<br />
• Select the device name from “SPECIAL,” then try to<br />
connect again. ( 12)<br />
• Try to pair/connect from the Bluetooth device.<br />
Echo or noise occurs. Adjust the microphone unit position.<br />
Phone sound quality is poor. • Reduce the distance between the unit and the<br />
Bluetooth mobile phone.<br />
• Move the car to a place where you can get a better<br />
signal reception.<br />
The sound is interrupted or<br />
skipped during playback of a<br />
Bluetooth audio device.<br />
The connected audio device<br />
cannot be controlled.<br />
• Reduce the distance between the unit and the<br />
Bluetooth audio device.<br />
• Disconnect the device connected for “BT-PHONE.”<br />
• Turn off, then turn on the unit.<br />
• (When the sound is not yet restored,) connect the<br />
device again.<br />
Check whether the connected audio device supports<br />
AVRCP (Audio/Video Remote Control Profile).<br />
* 2 For Bluetooth operations, refer also to the <strong>instructions</strong> supplied with the Bluetooth Adapter.
iPod/iPhone<br />
Symptom Remedy/Cause<br />
The iPod does not turn on or does not<br />
work.<br />
• Check the connecting cable and its<br />
connection.<br />
• Update the firmware version of the iPod/<br />
iPhone.<br />
• Charge the battery of the iPod/iPhone.<br />
• Reset the iPod/iPhone.<br />
• Check whether setting is<br />
appropriate ( 23).<br />
The sound is distorted. Deactivate the equalizer either on this unit or<br />
the iPod/iPhone.<br />
A lot of noise is generated. Turn off (uncheck) the “VoiceOver” feature of the<br />
iPod. For details, visit .<br />
Playback stops. The headphones are disconnected during<br />
playback. Restart the playback operation<br />
( 16).<br />
“CANNOT PLAY” appears on the<br />
display.<br />
No tracks are stored. Import tracks to the iPod/<br />
iPhone.<br />
“RESTRICTED” appears on the display. Check whether the connected iPod/iPhone is<br />
compatible with this unit ( 28).<br />
JVC bears no responsibility for any loss of data in an iPod/iPhone and/or USB mass storage class<br />
device while using this System.<br />
• Microsoft and Windows Media are either registered trademarks or trademarks of Microsoft<br />
Corporation in the United States and/or other countries.<br />
• The Bluetooth word mark and logos are owned by the Bluetooth SIG, Inc. and any use of such<br />
marks by Victor Company of Japan, Limited (JVC) is under license. Other trademarks and trade<br />
names are those of their respective owners.<br />
• “Made for iPod” means that an electronic accessory has been designed to connect specifically<br />
to iPod and has been certified by the developer to meet Apple performance standards.<br />
• “Works with iPhone” means that an electronic accessory has been designed to connect<br />
specifically to iPhone and has been certified by the developer to meet Apple performance<br />
standards.<br />
• Apple is not responsible for the operation of this device or its compliance with safety and<br />
regulatory standards.<br />
• iPod is a trademark of Apple Inc., registered in the U.S. and other countries.<br />
• iPhone is a trademark of Apple Inc.<br />
ENGLISH<br />
33
Specifications<br />
AUDIO AMPLIFIER SECTION<br />
TUNER SECTION<br />
34 ENGLISH<br />
Maximum Power Output: Front/<br />
Rear:<br />
Continuous Power Output (RMS): Front/<br />
Rear:<br />
50 W per channel<br />
20 W per channel into 4 Ω, 40 Hz to<br />
20 000 Hz at no more than 1% total<br />
harmonic distortion.<br />
Load Impedance: 4 Ω (4 Ω to 8 Ω allowance)<br />
Tone Control Range: Bass: ±12 dB (60 Hz, 80 Hz, 100 Hz, 200 Hz)<br />
Q1.0, Q1.25, Q1.5, Q2.0<br />
Middle: ±12 dB (0.5 kHz, 1.0 kHz, 1.5 kHz, 2.5 kHz)<br />
Q0.75, Q1.0, Q1.25<br />
Treble: ±12 dB (10.0 kHz, 12.5 kHz, 15.0 kHz,<br />
17.5 kHz)<br />
Q (Fixed)<br />
Frequency Response: 40 Hz to 20 000 Hz<br />
Signal-to-Noise Ratio: 70 dB<br />
Line-Out Level/Impedance: 5.0 V/20 kΩ load (full scale)<br />
Subwoofer-Out Level/Impedance: 5.0 V/20 kΩ load (full scale)<br />
Output Impedance: 1 kΩ<br />
Other Terminal: AUX (auxiliary) input jack, USB input jack, Antenna<br />
input, Expansion port, Steering wheel remote input<br />
Frequency Range: FM: 87.5 MHz to 108.0 MHz<br />
AM: 531 kHz to 1 602 kHz<br />
FM Tuner: Usable Sensitivity: 9.3 dBf (0.8 μV/75 Ω)<br />
50 dB Quieting<br />
Sensitivity:<br />
16.3 dBf (1.8 μV/75 Ω)<br />
Alternate Channel<br />
Selectivity (400 kHz):<br />
65 dB<br />
Frequency Response: 40 Hz to 15 000 Hz<br />
Stereo Separation: 40 dB<br />
AM Tuner: Sensitivity: 20 μV<br />
Selectivity: 40 dB
CD PLAYER SECTION<br />
USB SECTION<br />
GENERAL<br />
Type: Compact disc player<br />
Signal Detection System: Non-contact optical pickup<br />
(semiconductor laser)<br />
Number of Channels: 2 channels (stereo)<br />
Frequency Response: 5 Hz to 20 000 Hz<br />
Dynamic Range: 96 dB<br />
Signal-to-Noise Ratio: 98 dB<br />
Wow and Flutter: Less than measurable limit<br />
MP3 Decoding Format: (MPEG1/2 Audio Layer 3) Max. Bit Rate: 320 kbps<br />
WMA (Windows Media® Audio) Decoding Format: Max. Bit Rate: 320 kbps<br />
USB Standard: USB 1.1, USB 2.0<br />
Data Transfer Rate (Full Speed): Max. 12 Mbps<br />
Compatible Device: Mass storage class<br />
Compatible File System: FAT 32/16/12<br />
Playable Audio Format: MP3/WMA<br />
Max. Current: DC 5 V 500 mA<br />
Power Requirement: Operating Voltage: DC 14.4 V (11 V to 16 V allowance)<br />
Grounding System: Negative ground<br />
Allowable Operating Temperature: 0°C to +40°C<br />
Dimensions (W × H × D):<br />
(approx.)<br />
Installation Size: 182 mm × 52 mm × 160 mm<br />
Panel Size: 188 mm × 58 mm × 6 mm<br />
Mass: 1.3 kg (excluding accessories)<br />
Design and specifications are subject to change without notice.<br />
ENGLISH<br />
35
Having TROUBLE with operation?<br />
Please reset your unit<br />
Refer to page of How to reset your unit<br />
EN, TH<br />
© 2009 Victor Company of Japan, Limited<br />
1209DTSMDTJEIN
GET0639-006A<br />
[U/UH]<br />
Pocket / กระเป๋ า<br />
KD-R616<br />
Installation/Connection Manual<br />
การติดตั้ง/คู่มือการติดตั้ง<br />
You need the installation kits which corresponds to your car. /<br />
ต้องใช้ชุดติดตั้งที่เหมาะสมกับรถของท่าน<br />
• To prevent short circuits:<br />
– Disconnect the battery’s negative terminal and make all electrical connections before installing the unit.<br />
– Cover the terminals of the UNUSED leads with insulating tape.<br />
• Be sure to ground this unit to the car’s chassis again after installation.<br />
• Replace the fuse with one of the specified rating.<br />
• Connect speakers with a maximum power of more than 50 W (impedance of 4 Ω to 8 Ω). Otherwise,<br />
change the setting. (See page 23 of the INSTRUCTIONS.)<br />
• The heat sink becomes very hot after use. Be careful not to touch it when removing this unit.<br />
The following illustration shows a typical installation. If you have any questions or require information<br />
regarding installation kits, consult your JVC car audio dealer or a company supplying kits.<br />
In-dash mounting / การติดตั<br />
้งจอแบบ In-dash<br />
* 1<br />
Flat head screws (M5 × 8 mm) / ตะปูควงหัวแบน (M5 × 8 mm) * 2<br />
Bracket / ขาแขวน * 2<br />
ENGLISH / ไทย<br />
Check the battery system in your car /<br />
ตรวจสอบระบบแบตเตอรี่ในรถ<br />
WARNINGS / คำเตือน<br />
Heat sink / แผ่นระบายความร้อน<br />
PRECAUTIONS on power supply and speaker connections<br />
• DO NOT connect the speaker leads of the power cord to the car battery; otherwise, the unit will be<br />
seriously damaged.<br />
• BEFORE connecting the speaker leads of the power cord to the speakers, check the speaker wiring in<br />
your car.<br />
INSTALLATION / การติดตั้ง<br />
When installing the unit without using the sleeve / เมื่อติดตั้งเครื่องโดยไม่ใช้ปลอกหุ้ม<br />
* 1 When you stand the unit, be careful not to damage the fuse on the rear.<br />
* 2 Not supplied for this unit.<br />
1<br />
12 V DC, NEGATIVE ground /<br />
ไฟฟ้ ากระแสตรง 12 V, พื้นดินเป็นขั้วลบ<br />
1209DTSMDTJEIN<br />
EN, TH<br />
© 2009 Victor Company of Japan, Limited<br />
To the car system /<br />
สำหรับระบบในรถยนต์<br />
• เพื่อป้<br />
องกันไฟฟ้ าลัดวงจร:<br />
– ถอดขั้วลบของแบตเตอรี่ออก<br />
และเชื่อมต่อไฟฟ้<br />
าทั้งหมดก่อนติดตั้งเครื่อง<br />
– ปิดขั้วต่อของสายที่ไม่ได้ใช้ด้วยเทปป้<br />
องกัน<br />
• ตรวจสอบให้แน่ใจว่าติดตั้งเครื่องกับโครงรถก่อนการติดตั้ง<br />
• เปลี่ยนฟิวส์เป็นฟิวส์ตามพิกัดที่ระบุ<br />
• ต่อลำโพงเข้ากับแหล่งจ่ายไฟฟ้ าไม่เกิน 50 W (ค่าความต้านทาน 4 Ω ถึง 8 Ω) หรือเปลี่ยนการตั้งค่า<br />
(ดูหน้า<br />
23 คำแนะนำ)<br />
• แผ่นระบายความร้อนร้อนมากหลังใช้งาน ห้ามสัมผัสเมื่อถอดเครื่องออก<br />
ข้อควรระวังเกี่ยวกับการเชื่อมต่อแหล่งจ่ายไฟและลำโพง<br />
• อย่าต่อสายลำโพงที่เป็นสายไฟกับแบตเตอรี่รถยนต์<br />
ไม่เช่นนั้นเครื่องอาจได้รับความเสียหายร้ายแรง<br />
• ก่อนต่อสายลำโพงที่เป็นสายไฟกับลำโพง<br />
ควรตรวจสอบการเดินสายลำโพงในรถของท่าน<br />
ภาพประกอบต่อไปนี ้แสดงการติดตั้งแบบปกติ<br />
หากท่านมีคำถามหรือต้องการข้อมูลเกี่ยวกับชุดติดตั้ง<br />
โปรดปรึกษาตัวแทนจำหน่ายเครื่องเสียงติดรถยนต์ JVC ของท่านหรือบริษัทที่จัดหาชุดอุปกรณ์ให้<br />
Do the required electrical connections.<br />
เชื่อมต่อไฟฟ้<br />
าที่จำเป็น<br />
Install the unit at an angle of<br />
less than 30˚.<br />
ติดตั้งเครื่องในมุมน้อยกว่า<br />
30˚<br />
Bend the appropriate tabs to hold the sleeve firmly<br />
in place.<br />
บิดแถบล็อคเพื่อรองรับปลอกหุ้มให้เข้าที่อย่างแน่นหนา<br />
* 1 เมื่อวางเครื่อง<br />
ระวังอย่าทำให้ฟิวส์ด้านหลังเสียหาย<br />
* 2 ไมได้จัดส่งให้สำหรับเครื่องนี้<br />
Removing the unit / การถอดเครื่อง<br />
Release the rear section first... / ปล่อยส่วนหลังก่อน...<br />
Part list / รายการอุปกรณ์<br />
A Hard case / โครงแบบหนา (×1)<br />
B Control panel / แผงควบคุม (×1)<br />
C Sleeve / ปลอกหุ้ม<br />
(×1)<br />
D Trim plate / ทริมเพลท (×1)<br />
E Power cord / สายไฟ (×1)<br />
F Handles / ที่จับ<br />
(×2)
IMPORTANT: A custom wiring harness (separately purchased) which is suitable for your car is<br />
recommanded for connection between the unit and your car.<br />
• Consult your JVC car audio dealer or a company supplying kits for details.<br />
Reset the unit. / ตั้งค่าเครื่องใหม่<br />
Front speaker (left) /<br />
ลำโพงหน้า (ซ้าย)<br />
Front speaker (right) /<br />
ลำโพงหน้า (ขวา)<br />
Rear speaker (left) /<br />
ลำโพงหลัง (ซ้าย)<br />
Rear speaker (right) /<br />
ลำโพงหลัง (ขวา)<br />
Antenna input /<br />
อินพุตสายอากาศ<br />
White / สีขาว<br />
White (black stripe) / สีขาว (แถบสีดำ)<br />
Gray / สีเทา<br />
Gray (black stripe) / สีเทา (แถบสีดำ)<br />
Green / สีเขียว<br />
Green (black stripe) / สีเขียว (แถบสีดำ)<br />
Purple / สีม่วง<br />
Purple (black stripe) / สีม่วง (แถบสีดำ)<br />
Signal cord / สายสัญญาณ * 1<br />
Signal cord / สายสัญญาณ * 1<br />
Rear ground terminal / ขั<br />
้วต่อสายดินด้านหลัง<br />
15 A fuse / ฟิวส์ 15 A<br />
* 1 Not supplied for this unit.<br />
* 2 Firmly attach the ground wire to the metallic body or to the chassis of the car—to the place uncoated<br />
with paint.<br />
* 3 Before checking the operation of this unit prior to installation, this lead must be connected; otherwise,<br />
the power cannot be turned on.<br />
* 4 To use these components, set the external input setting correctly (see page 23 of the INSTRUCTIONS).<br />
• The fuse blows. ] Are the red and black leads connected correctly?<br />
• Power cannot be turned on. ] Is the yellow lead connected?<br />
• No sound from the speakers. ] Is the speaker output lead short-circuited?<br />
• “PROTECT” appears on the display and no operation can be done. ] Is the speaker output lead<br />
short-circuited or touches the chassis of the car/head unit? ; Have you reset your unit?<br />
• Sound is distorted. ] Is the speaker output lead grounded? ; Are the “–” terminals of L and R speakers<br />
grounded in common?<br />
• Noise interfere with sounds. ] Is the rear ground terminal connected to the car’s chassis using shorter<br />
and thicker cords?<br />
• This unit becomes hot. ] Is the speaker output lead grounded? ; Are the “–” terminals of L and R<br />
speakers grounded in common?<br />
• This unit does not work at all. ] Have you reset your unit?<br />
ELECTRICAL CONNECTIONS / การเชื่อมต่อไฟฟ้<br />
า<br />
Connecting the external amplifier or subwoofer / การเชื่อมต่อเครื่องขยายเสียงหรือซับวูฟเฟอร์ภายนอก<br />
Remote lead / สายรีโมท<br />
Remote lead / สายรีโมท<br />
Black / สีดำ<br />
Yellow / สีเหลือง * 3<br />
Red / สีแดง<br />
Blue / สีน้ำเงิน<br />
ข้อสำคัญ: ขอแนะนำให้ใช้ชุดสายไฟแบบสั่งทำ<br />
(แยกซื้อต่างหาก)<br />
ซึ ่งเหมาะสำหรับรถของคุณ<br />
เพื่อใช้เชื่อมต่อระหว่างเครื่องและรถ<br />
• สอบถามตัวแทนจำหน่ายวิทยุ JVC ของคุณหรือบริษัทที่จัดส่งชุดอุปกรณ์เพื่อขอรายละเอียด<br />
Blue (white stripe) /<br />
สีน้ำเงิน (แถบสีขาว)<br />
JVC Amplifier /<br />
แอมพลิฟลายเออร์ของ<br />
JVC<br />
JVC Amplifier /<br />
แอมพลิฟลายเออร์ของ<br />
JVC<br />
Expansion port / พอร์ตขยาย<br />
Orange with white stripe /<br />
สีส้มแถบขาว<br />
* 1 ไมได้จัดส่งให้สำหรับเครื<br />
* 2 ติดสายดินกับตัวเครื่องที<br />
* 3 ก่อนตรวจสอบการทำงานของเครื<br />
* 4 หากต้องการใช้อุปกรณ์เหล่านี<br />
To the metallic body or chassis of the car /<br />
สำหรับตัวเครื่องที่เป็นโลหะหรือโครงรถ<br />
To a live terminal (constant 12 V) /<br />
สำหรับขั้วต่อที่ใช้งาน<br />
(คงที่<br />
12 V)<br />
TROUBLESHOOTING / การแก้ ไขปั ญหาเบื้องต้น<br />
Y-connector / ข้อต่อ Y * 1<br />
To the blue (white stripe) lead<br />
of the unit / สำหรับสายสีน้ำเงิน<br />
(แถบสีขาว) ของเครื่อง<br />
Rear speakers or subwoofer (Make the setting accordingly,<br />
see page 22 of the INSTRUCTIONS.) / ลำโพงหลังหรือซับวูฟเฟอร์ (ตั้งค่า<br />
ให้สอดคล้อง ดูหน้า 22 คำแนะนำ)<br />
Y-connector / ข้อต่อ Y * 1<br />
Front speakers / ลำโพงหน้า<br />
Steering wheel remote input / อินพุตรีโมทบนพวงมาลัย<br />
Ignition switch /<br />
สวิตช์จุดระเบิด<br />
To an accessory terminal /<br />
สำหรับขั้วต่ออุปกรณ์เสริม<br />
Fuse block /<br />
กล่องฟิวส์<br />
To the automatic antenna if any (250 mA max.) /<br />
สำหรับสายอากาศอัตโนมัติ ถ้ามี (สูงสุด 250 mA)<br />
To car light control switch /<br />
สวิตซ์ควบคุมไฟของรถยนฅร์<br />
To the blue (white stripe) lead<br />
of the unit / สำหรับสายสีน้ำเงิน<br />
(แถบสีขาว) ของเครื่อง<br />
To the remote lead of other equipment (200 mA max.) /<br />
สำหรับสายรีโมทของอุปกรณ์อื่น<br />
(สูงสุด 200 mA)<br />
Connecting the external components in series / การเชื่อมต่ออุปกรณ์ภายนอกในซีรี่ส์ต่างๆ<br />
When connecting the external components, refer also to the manuals supplied for the components and adapter. / เมื่อเชื่อมต่ออุปกรณ์ภายนอก<br />
โปรดดูคู่มือที่ให้มาสำหรับอุปกรณ์และอะแดปเตอร์ด้วย<br />
Expansion port of the unit / พอร์ตขยายของเครื่อง<br />
Caution / ข้อควรระวัง:<br />
A KS-BTA200<br />
B*<br />
You can connect the following components through the various JVC adapters to the expansion port. / ท่านสามารถเชื่อมต่ออุปกรณ์ต่อไปนี้ผ่านอะแดปเตอร์ต่างๆ<br />
ของ JVC กับพอร์ตขยาย<br />
• Connection cords may need to be purchased separately. / อาจต้องซื้อสายเชื่อมต่อแยกต่างหาก<br />
4 Before connecting the external components, make sure that the unit is turned off. /<br />
To disconnect... /<br />
การยกเลิกการเชื<br />
ก่อนเชื่อมต่ออุปกรณ์ภายนอก<br />
ตรวจสอบให้แน่ใจว่าปิดเครื่องแล้ว<br />
่อมต่อ...<br />
KS-U57 / KS-U58<br />
Component / อุปกรณ์ Adapter / อะแดปเตอร์ Model name / ชื่อรุ่น<br />
Bluetooth device / อุปกรณ์ Bluetooth Bluetooth adapter / อะแดปเตอร์ Bluetooth KS-BTA200<br />
Portable audio player with line output jacks /<br />
เครื่องเล่นเสียงแบบพกพาที่มีช่องเสียบสัญญาณออก<br />
Line input adapter / อะแดปเตอร์สัญญาณเข้า KS-U57<br />
Portable audio player with 3.5 mm stereo mini jack /<br />
เครื่องเล่นเสียงแบบพกพาที่มีช่องเสียบมินิสเตอริโอขนาด<br />
3.5 มม.<br />
AUX input adapter / อะแดปเตอร์สัญญาณเข้า AUX KS-U58<br />
่องนี้<br />
่เป็นโลหะหรือโครงรถให้แน่นหนา—ในส่วนที่ไม่ได้พ่นสีทับ<br />
่องนี้ก่อนการติดตั้ง<br />
สายไฟต้องต่อไว้แล้ว ไม่เช่นนั้นจะไม่สามารถเปิดเครื่องได้<br />
้ ใช้การตั้งค่าสัญญาณเข้าภายนอกให้ถูกต้อง<br />
(ดูหน้า 23 ของคำแนะนำ)<br />
• ฟิ วส์ขาด ] ต่อสายสีแดงและสีดำถูกต้องหรือไม่?<br />
• ไม่สามารถเปิ ดเครื่องได้<br />
] ต่อสายสีเหลืองแล้วหรือไม่?<br />
• ไม่ได้ยินเสียงจากลำโพง ] สายสัญญาณออกของลำโพงลัดวงจรหรือไม่?<br />
• ข้อความ “PROTECT” ปรากฏขึ ้นบนหน้าจอและเครื่องไม่สามารถทำงานได้<br />
] สายสัญญาณออกของลำโพงลัดวงจร<br />
หรือสัมผัสกับโครงรถ/ตัวเครื่องหลักหรือไม่?<br />
; ท่านตั้งเครื่องใหม่ใช่หรือไม่?<br />
• เสียงผิดเพี้ยน<br />
] สายสัญญาณออกของลำโพงต่อกับสายดินหรือไม่? ; ขั้วต่อ<br />
“–” ของลำโพง L (ซ้าย) และ R (ขวา)<br />
ต่อสายดินไว้ด้วยกันหรือไม่?<br />
• มีเสียงรบกวน ] ขั้วต่อสายดินด้านหลังที่ต่อกับโครงรถใช้สายที่สั้นและหนากว่าหรือไม่?<br />
• เครื่องร้อน<br />
] สายสัญญาณออกของลำโพงต่อกับสายดินหรือไม่? ; ขั้วต่อ<br />
“–” ของลำโพง L (ซ้าย) และ R (ขวา)<br />
ต่อสายดินไว้ด้วยกันหรือไม่?<br />
• เครื่องใช้งานไม่ได้เลย<br />
] ท่านตั้งเครื่องใหม่ใช่หรือไม่?<br />
2
KD-R611<br />
CD RECEIVER / RÉCEPTEUR CD<br />
For canceling the display demonstration, see page 4. / Pour annuler la démonstration des<br />
affichages, référez-vous à la page 4.<br />
For installation and connections, refer to the separate manual. / Pour l’installation et les<br />
raccordements, se référer au manuel séparé.<br />
INSTRUCTIONS<br />
MANUEL D’INSTRUCTIONS<br />
ENGLISH<br />
FRANÇAIS<br />
GET0640-003A<br />
[E/EU]
Thank you for purchasing a JVC product.<br />
Please read all <strong>instructions</strong> carefully before operation, to ensure your complete understanding and<br />
to obtain the best possible performance from the unit.<br />
IMPORTANT FOR LASER PRODUCTS<br />
1. CLASS 1 LASER PRODUCT<br />
2. CAUTION: Do not open the top cover. There are no user serviceable parts inside the unit; leave<br />
all servicing to qualified service personnel.<br />
3. CAUTION: Visible and/or invisible class 1M laser radiation when open. Do not view directly with<br />
optical instruments.<br />
4. REPRODUCTION OF LABEL: CAUTION LABEL, PLACED OUTSIDE THE UNIT.<br />
Battery<br />
Products<br />
Information for Users on Disposal of<br />
Old Equipment and Batteries<br />
[European Union only]<br />
These symbols indicate that the product and<br />
the battery with this symbol should not be<br />
disposed as general household waste at its<br />
end-of-life.<br />
If you wish to dispose of this product and<br />
the battery, please do so in accordance with<br />
applicable national legislation or other rules<br />
in your country and municipality.<br />
By disposing of this product correctly, you<br />
will help to conserve natural resources and<br />
will help prevent potential negative effects<br />
on the environment and human health.<br />
Notice:<br />
The sign Pb below the symbol for batteries<br />
indicates that this battery contains lead.<br />
2 ENGLISH<br />
Warning:<br />
If you need to operate the unit while driving,<br />
be sure to look around carefully or you may be<br />
involved in a traffic accident.<br />
For safety...<br />
• Do not raise the volume level too much, as<br />
this will block outside sounds, making driving<br />
dangerous.<br />
• Stop the car before performing any<br />
complicated operations.<br />
Temperature inside the car...<br />
If you have parked the car for a long time in<br />
hot or cold weather, wait until the temperature<br />
in the car becomes normal before operating<br />
the unit.
How to read this manual<br />
The following icons/symbols are used to<br />
indicate:<br />
Press and hold the button(s)<br />
[Hold] until the desired operation<br />
begins.<br />
Turn the control dial.<br />
( XX)<br />
Turn the control dial<br />
to make a selection,<br />
then press to confirm.<br />
Reference page number<br />
Menu setting item<br />
Continued on the next page<br />
How to attach/detach the control<br />
panel<br />
How to reset your unit<br />
Your preset adjustments<br />
will also be erased (except<br />
the registered Bluetooth<br />
device). ( 13)<br />
How to forcibly eject a disc<br />
[Hold]<br />
• You can forcibly eject the loaded disc even<br />
if the disc is locked. To lock/unlock the disc,<br />
10.<br />
• Be careful not to drop the disc when it ejects.<br />
• If this does not work, reset your unit.<br />
CONTENTS<br />
3 How to read this manual<br />
3 How to attach/detach the control<br />
panel<br />
3 How to reset your unit<br />
3 How to forcibly eject a disc<br />
4 Canceling the display<br />
demonstration<br />
4 Setting the clock<br />
5 Preparing the remote controller<br />
(RM-RK50)<br />
6 Basic operations<br />
7 Listening to the radio<br />
10 Listening to a disc<br />
11 Listening to the USB device<br />
12 Using Bluetooth ® devices<br />
14 Using a Bluetooth mobile phone<br />
15 Using a Bluetooth audio player<br />
17 Listening to the iPod/iPhone<br />
19 Listening to the DAB tuner<br />
21 Listening to the other external<br />
components<br />
22 Selecting a preset sound mode<br />
23 Menu operations<br />
30 More about this unit<br />
34 Maintenance<br />
35 Troubleshooting<br />
40 Specifications<br />
ENGLISH<br />
3
Canceling the display demonstration<br />
1 Turn on the power.<br />
2<br />
3<br />
Setting the clock<br />
4 ENGLISH<br />
[Hold]<br />
1 Turn on the power.<br />
2<br />
[Hold]<br />
(Initial setting)<br />
(Initial setting)<br />
3 Select .<br />
4 Select .<br />
5 Adjust the hour.<br />
4 Select .<br />
5<br />
6 Finish the procedure.<br />
6 Adjust the minute.<br />
7 Select .<br />
8 Select or<br />
.<br />
9 Finish the procedure.
Preparing the remote controller (RM-RK50)<br />
When you use the remote controller for the first<br />
time, pull out the insulation sheet.<br />
Insulation sheet<br />
If the effectiveness of the remote controller<br />
decreases, replace the battery.<br />
Replacing the lithium coin battery<br />
CR2025<br />
Caution:<br />
• Danger of explosion if battery is incorrectly<br />
replaced. Replace only with the same or<br />
equivalent type.<br />
• Battery shall not be exposed to excessive heat<br />
such as sunshine, fire, or the like.<br />
Warning (to prevent accidents and<br />
damage):<br />
• Do not install any battery other than CR2025<br />
or its equivalent.<br />
• Do not leave the remote controller in a place<br />
(such as dashboards) exposed to direct<br />
sunlight for a long time.<br />
• Store the battery in a place where children<br />
cannot reach.<br />
• Do not recharge, short, disassemble, heat the<br />
battery, or dispose of it in a fire.<br />
• Do not leave the battery with other metallic<br />
materials.<br />
• Do not poke the battery with tweezers or<br />
similar tools.<br />
• Wrap the battery with tape and insulate when<br />
throwing away or saving it.<br />
This unit is equipped with the steering wheel<br />
remote control function.<br />
Before operating, connect a JVC's OE remote<br />
adapter (not supplied) which matches your car<br />
to the steering wheel remote input terminal on<br />
the rear of the unit.<br />
• For details, refer also to the <strong>instructions</strong><br />
supplied with the remote adapter.<br />
ENGLISH<br />
5
Basic operations<br />
Ejects the disc Loading slot Display window USB (Universal Serial Bus) input jack<br />
Detaches the panel<br />
6 ENGLISH<br />
Control dial<br />
When you press or hold the following button(s)...<br />
Main unit<br />
Remote<br />
controller<br />
General operation<br />
Auxiliary<br />
input jack<br />
Turns on.<br />
• When the power is on, pressing /I/ATT on the remote controller<br />
also mutes the sound or pauses. Press /I/ATT again to cancel<br />
muting or resume playback.<br />
Turns off if pressed and held.<br />
Selects the available sources (if the power is turned on).<br />
• If the source is ready, playback also starts.<br />
Adjusts the volume level.<br />
Remote sensor<br />
• DO NOT expose to bright sunlight.<br />
— Selects items.<br />
• Mutes the sound while listening to a source. If the source is “CD,”<br />
“USB” or “USB-IPOD,” playback pauses. Press the control dial again<br />
—<br />
to cancel muting or resume playback.<br />
• Confirms selection.<br />
Selects the sound mode.<br />
• Enters tone level adjustment directly ( 22) if pressed and held<br />
EQ/BASS-TRE on the main unit.
Main unit<br />
Manual search<br />
“M” flashes, then press<br />
the button repeatedly.<br />
When an FM stereo broadcast is<br />
hard to receive<br />
1<br />
2<br />
Remote<br />
controller<br />
—<br />
—<br />
—<br />
Listening to the radio<br />
~ ] “FM” or “AM”<br />
[Hold]<br />
[Hold]<br />
] ] ]<br />
<br />
Reception improves, but stereo effect<br />
will be lost.<br />
To restore the stereo effect, repeat the same<br />
procedure to select .<br />
General operation<br />
• Enters setting directly ( 28).<br />
• Enters setting directly ( 29) if pressed and held.<br />
• Activates/deactivates TA Standby Reception.<br />
• Enters PTY Searching mode if pressed and held.<br />
• Returns to the previous menu.<br />
Power off : Checks the current clock time.<br />
Power on : Changes the display information.<br />
Ÿ<br />
“ST” lights up when receiving an FM stereo broadcast<br />
with sufficient signal strength.<br />
Automatic presetting (FM)—<br />
SSM (Strong-station Sequential Memory)<br />
You can preset up to 18 stations for FM.<br />
While listening to a station...<br />
1<br />
2<br />
[Hold]<br />
] ] ]<br />
/ /<br />
<br />
“SSM” flashes and local stations with<br />
the strongest signals are searched and<br />
stored automatically.<br />
To preset another 6 stations, repeat the above<br />
procedure by selecting one of the other 6 SSM<br />
setting ranges.<br />
ENGLISH<br />
7
Manual presetting (FM/AM)<br />
You can preset up to 18 stations for FM and 6<br />
stations for AM.<br />
Ex.: Storing FM station of 92.50 MHz into preset<br />
number “04.”<br />
1<br />
2<br />
3<br />
8 ENGLISH<br />
] “92.50MHz”<br />
“PRESET MODE” flashes.<br />
] Selects preset number “04.”<br />
“P04” flashes and “MEMORY” appears.<br />
Selecting a preset station<br />
1<br />
or<br />
[Hold]<br />
2<br />
Changing the display information<br />
Frequency = Clock = (back to<br />
the beginning)<br />
Using the remote controller<br />
5 U / D ∞ : Changes the preset<br />
stations<br />
2 R / F 3 : Searches for stations<br />
The following features are available<br />
only for FM Radio Data System stations.<br />
Searching for your favourite<br />
FM Radio Data System<br />
programme—PTY Search<br />
You can tune in to a station broadcasting your<br />
favourite programme by searching for a PTY<br />
code.<br />
1<br />
2<br />
[Hold]<br />
The last selected PTY code appears.<br />
] Select one of your favourite<br />
programme types or a PTY code, and<br />
start searching.<br />
If there is a station broadcasting a<br />
programme of the same PTY code as you<br />
have selected, that station is tuned in.<br />
PTY codes: NEWS, AFFAIRS, INFO, SPORT,<br />
EDUCATE, DRAMA, CULTURE, SCIENCE,<br />
VARIED, POP M (music), ROCK M (music),<br />
EASY M (music), LIGHT M (music), CLASSICS,<br />
OTHER M (music), WEATHER, FINANCE,<br />
CHILDREN, SOCIAL, RELIGION, PHONE IN,<br />
TRAVEL, LEISURE, JAZZ, COUNTRY,<br />
NATION M (music), OLDIES, FOLK M (music),<br />
DOCUMENT
Standby receptions<br />
TA Standby Reception<br />
TA Standby Reception allows the unit to switch<br />
temporarily to Traffic Announcement (TA) from<br />
any source other than AM.<br />
• The volume changes to the preset TA volume<br />
level if the current level is lower than the<br />
preset level. (, 24)<br />
To activate TA Standby Reception<br />
If the TP indicator lights up, TA<br />
Standby Reception is activated.<br />
If the TP indicator flashes, TA<br />
Standby Reception is not yet<br />
activated.<br />
• To activate the reception, tune in to another<br />
station providing Radio Data System signals<br />
required for TA Standby Reception.<br />
• To deactivate the reception, press T/P BACK<br />
again.<br />
PTY Standby Reception<br />
PTY Standby Reception allows the unit to<br />
switch temporarily to your favourite PTY<br />
programme from any source other than AM.<br />
To activate and select your favourite<br />
PTY code for PTY Standby Reception, see<br />
( 24)<br />
If the PTY indicator lights up, PTY Standby<br />
Reception is activated.<br />
If the PTY indicator flashes, PTY Standby<br />
Reception is not yet activated.<br />
• To activate the reception, tune in to another<br />
station providing these signals.<br />
• To deactivate the reception, select <br />
( 24) for the PTY code. The PTY indicator<br />
goes off.<br />
• When a DAB tuner is connected, TA/PTY<br />
Standby Reception also searches for services<br />
( 20).<br />
• The unit will not switch to Traffic<br />
Announcement or PTY programme when<br />
a call connection is established through<br />
“BT-PHONE.”<br />
Tracing the same programme—<br />
Network-Tracking Reception<br />
When driving in an area where FM reception is<br />
not sufficient enough, this unit automatically<br />
tunes in to another FM Radio Data System<br />
station of the same network, possibly<br />
broadcasting the same programme with<br />
stronger signals.<br />
Programme A broadcasting on different<br />
frequency areas (01 – 05)<br />
To change the Network-Tracking Reception<br />
setting, see ( 24).<br />
• When the DAB tuner is connected, refer to<br />
“Tracing the same programme—Alternative<br />
Frequency Reception (DAB AF),” ( 20).<br />
Automatic station selection—<br />
Programme Search<br />
Usually when you select a preset number, the<br />
station preset in that number is tuned in.<br />
If the signals from the FM Radio Data System<br />
preset station are not sufficient for good<br />
reception, this unit, using the AF data, tunes in<br />
to another frequency possibly broadcasting the<br />
same programme as the original preset station<br />
is broadcasting. (, 24)<br />
Changing the display information<br />
Station name (PS) = Station<br />
Frequency = Programme<br />
type (PTY) = Clock = (back to<br />
the beginning)<br />
ENGLISH<br />
9
Listening to a disc<br />
~ ] Turn on the power.<br />
Stopping playback and ejecting<br />
the disc<br />
“NO DISC” appears.<br />
Press / SOURCE to listen to<br />
another playback source.<br />
Prohibiting disc ejection<br />
To cancel the prohibition, repeat the same<br />
procedure.<br />
[Hold]<br />
10 ENGLISH<br />
Selects folder of the MP3/WMA<br />
Selects track<br />
Fast-forwards or<br />
reverses the track<br />
Selecting a track/folder<br />
Ÿ<br />
[Hold]<br />
For MP3/WMA discs, select the desired folder,<br />
then the desired track by repeating the control<br />
dial procedures.<br />
• If the MP3/WMA disc contains many tracks,<br />
you can fast search (±10, ±100, ±1000)<br />
through the disc by turning the control dial<br />
quickly.<br />
• To return to the previous menu, press<br />
T/P BACK.<br />
All tracks will be played repeatedly until you change<br />
the source or eject the disc.<br />
Caution on volume setting:<br />
Discs produce very little noise compared with<br />
other sources. Lower the volume before playing<br />
a disc to avoid damaging the speakers by the<br />
sudden increase of the output level.<br />
Selecting the playback modes<br />
You can use only one of the following playback<br />
modes at a time.<br />
1<br />
2<br />
3<br />
[Hold]<br />
] “REPEAT” j “RANDOM”<br />
REPEAT<br />
TRACK RPT : Repeats current track<br />
FOLDER RPT : Repeats current folder<br />
RANDOM<br />
FOLDER RND : Randomly plays all tracks<br />
of current folder, then<br />
tracks of next folders<br />
ALL RND : Randomly plays all tracks<br />
To cancel repeat play or random play, select<br />
“RPT OFF” or “RND OFF.”
Changing the display information<br />
Disc title/Album name/performer (folder<br />
name)* = Track title (file name)* = Current<br />
track number with the elapsed playing time<br />
= Current track number with the clock<br />
time = (back to the beginning)<br />
* If the current disc is an audio CD, “NO NAME”<br />
appears.<br />
If an MP3/WMA file does not have Tag<br />
information or is set to<br />
( 24), folder name and file name<br />
appear.<br />
Listening to the USB device<br />
This unit can play MP3/WMA files stored on a USB mass storage class device.<br />
You can connect a USB mass storage class device such as a USB memory, Digital Audio Player,<br />
etc. to the unit.<br />
• You can also connect an Apple iPod/iPhone to the USB input jack. For details of the operations,<br />
32.<br />
~ Ÿ USB input jack<br />
] Turn on the power.<br />
Caution on volume setting:<br />
USB devices produce very little noise compared<br />
with other sources. Lower the volume before<br />
playing a USB to avoid damaging the speakers<br />
by sudden increase of the output level.<br />
Using the remote controller<br />
5 U / D ∞ : Selects folder of the<br />
MP3/WMA<br />
2 R / F 3 : Selects track<br />
2 R / F 3<br />
[Hold]<br />
: Fast-forwards or<br />
reverses the track<br />
USB memory<br />
All tracks will be played repeatedly until you change the<br />
source or detach the USB device.<br />
If you have turned off the power (without<br />
detaching the USB device)...<br />
Pressing / SOURCE turns on the power and<br />
playback starts from where it has been stopped<br />
previously.<br />
• If a different USB device is currently attached,<br />
playback starts from the beginning.<br />
ENGLISH<br />
11
Stop playing and detaching the<br />
USB device<br />
Straightly pull it out from the unit.<br />
“NO USB” appears. Press / SOURCE to listen to<br />
another playback source.<br />
You can operate the USB device in the same<br />
way you operate the files on a disc.<br />
( 10, 11)<br />
Cautions:<br />
• Avoid using the USB device if it might hinder<br />
your safety driving.<br />
• Do not pull out and attach the USB device<br />
repeatedly while “READING” is shown on the<br />
display.<br />
• Do not start the car engine if a USB device is<br />
connected.<br />
Using Bluetooth ® devices<br />
For Bluetooth operations, it is required to<br />
connect the Bluetooth adapter, KS-BTA200 (not<br />
supplied) to the expansion port on the rear of<br />
this unit.<br />
• Refer to pages i and ii at the end of the<br />
manual to check the countries where you<br />
may use the Bluetooth ® function.<br />
• For details, refer also to the <strong>instructions</strong><br />
supplied with the Bluetooth adapter and the<br />
Bluetooth device.<br />
To use a Bluetooth device through the unit<br />
(“BT-PHONE” and “BT-AUDIO”) for the first time,<br />
you need to establish a Bluetooth wireless<br />
connection between the unit and the device.<br />
12 ENGLISH<br />
• This unit may not be able to play the files<br />
depending on the type of USB device.<br />
• Operation and power supply may not work as<br />
intended for some USB devices.<br />
• You cannot connect a computer to the USB<br />
input terminal of the unit.<br />
• Make sure all important data has been backed<br />
up to avoid losing the data.<br />
• Do not leave a USB device in the car, expose<br />
to direct sunlight, or high temperature to<br />
avoid deformation or cause damages to the<br />
device.<br />
• Some USB devices may not work immediately<br />
after attaching USB device or turn on the<br />
power.<br />
• For more details about USB operations,<br />
32.<br />
• Once the connection is established, it is<br />
registered on the unit even if you reset your<br />
unit. Up to five devices can be registered in<br />
total.<br />
• Only one device can be connected at a time<br />
for each source (“BT-PHONE” and “BT-AUDIO”).<br />
Registration (Pairing) methods<br />
Use either of the following items (“OPEN” or<br />
“SEARCH” ) in the Bluetooth menu to register<br />
and make the unit ready to establish a new<br />
Bluetooth connection with a device.<br />
“OPEN” : Connection is established by<br />
operating the Bluetooth device.<br />
“SEARCH” : Connection is established by<br />
operating the unit.
Registering using “OPEN”<br />
Preparation: Operate the device to turn on its<br />
Bluetooth function.<br />
1<br />
2<br />
3<br />
4<br />
5<br />
] “BT-PHONE” or “BT-AUDIO”<br />
] “NEW DEVICE” ] “OPEN”<br />
] Enter a PIN (Personal Identification<br />
Number) code in to the unit.<br />
You can enter any number you like<br />
(1-digit to 16-digit number).<br />
[Initial: 0000]<br />
• Some devices have their own PIN<br />
code. Enter the specified PIN code in<br />
to the unit.<br />
Repeat step 3 until you have finished<br />
entering the PIN code.<br />
“OPEN..” flashes.<br />
6 Use the Bluetooth device to search and<br />
connect.<br />
On the device to be connected, enter<br />
the same PIN code you have just<br />
entered for this unit. “CONNECTED”<br />
appears.<br />
Now connection is established and you<br />
can use the device through the unit.<br />
The device remains registered even after you<br />
disconnect the device. Use “CONNECT“ (or<br />
activate “AUTO CNNCT”) to connect the same<br />
device from next time on. ( 16)<br />
Registering using<br />
“SEARCH”/“SPECIAL”<br />
1<br />
2<br />
3<br />
4<br />
5<br />
] “BT-PHONE” or “BT-AUDIO”<br />
] “NEW DEVICE”<br />
] “SEARCH” : To search for available<br />
devices<br />
The unit searches and displays the list<br />
of the available devices. “UNFOUND”<br />
appears if no available device is<br />
detected.<br />
– – – – – or – – – – –<br />
] “SPECIAL” : To connect a special<br />
device<br />
The unit displays the list of the preset<br />
devices.<br />
] Select a device you want to connect.<br />
For available devices...<br />
] Enter the specific PIN code of the<br />
device to the unit.<br />
• Refer to the <strong>instructions</strong> supplied with<br />
the device to check the PIN code.<br />
Use the Bluetooth device to connect.<br />
Now connection is established and you<br />
can use the device through the unit.<br />
For special device...<br />
Use “OPEN” or “SEARCH” to connect.<br />
ENGLISH<br />
13
Connecting/disconnecting/<br />
deleting a registered device<br />
1<br />
2<br />
3<br />
14 ENGLISH<br />
] “BT-PHONE” or “BT-AUDIO”<br />
] Select a device you want to<br />
connect/disconnect/delete.<br />
] “CONNECT” or “DISCONNECT” : To<br />
connect/disconnect the selected device<br />
– – – – – or – – – – –<br />
] “DELETE” ] “YES” : To delete the<br />
selected device<br />
You can set the unit to connect the Bluetooth<br />
device automatically when the unit is turned<br />
on. ( “AUTO CNNCT,” 16)<br />
Using a Bluetooth<br />
mobile phone<br />
~<br />
Ÿ<br />
] “BT-PHONE”<br />
] Bluetooth menu<br />
! Make a call or setting using<br />
the Bluetooth setting menu.<br />
( 16)<br />
When a call comes in....<br />
The source is automatically changed to<br />
“BT-PHONE.”<br />
• The display will flash in blue. (,<br />
25)<br />
When “AUTO ANSWER” is activated....<br />
The unit answers the incoming calls<br />
automatically. ( 16)<br />
• When “AUTO ANSWER” is deactivated, press<br />
any button (except / SOURCE / / 0) to<br />
answer the incoming call.<br />
• You can adjust the microphone volume level.<br />
( 16)<br />
To end the call<br />
Hold any button (except / SOURCE / / 0).<br />
When a text message comes in....<br />
If the mobile phone is compatible with text<br />
message (notified through JVC Bluetooth<br />
adapter) and “MSG INFO” (message info) is<br />
set to “AUTOMATIC” ( 16), the unit rings to<br />
inform you of the message arrival.<br />
• “RCV MESSAGE” (receiving message) appears<br />
and the display illuminate in blue. (, 25)<br />
Using the remote controller<br />
Making a call<br />
1<br />
2<br />
3<br />
5 U / D ∞ / : Answers calls<br />
2 R / F 3 /<br />
SOURCE<br />
5 U / D ∞ / : Rejects calls<br />
2 R / F 3 /<br />
SOURCE<br />
[Hold]<br />
] “BT-PHONE”<br />
] Select “DIAL” menu.
4<br />
5<br />
] Select a calling method.<br />
PHONE BOOK* j MISSED* j<br />
NUMBER j VOICE DIAL j<br />
REDIAL* j RECEIVED* j (back to<br />
the beginning)<br />
* Displays only when your mobile phone<br />
is equipped with these functions and is<br />
compatible with this unit.<br />
For REDIAL, RECEIVED, MISSED<br />
] Repeat step 4 to select a name (if it is<br />
acquired) or a phone number.<br />
For PHONE BOOK<br />
] Repeat step 4 to select a name or a<br />
phone number.<br />
For NUMBER<br />
] Enter a phone number.<br />
] Confirm.<br />
For VOICE DIAL<br />
] Speak the name you want to call<br />
when “SAY NAME” appears.<br />
• If your mobile phone does not support<br />
the voice recognition system, “ERROR”<br />
appears.<br />
• Using voice tags may be difficult in<br />
a noisy environment or during an<br />
emergency.<br />
Using a Bluetooth audio<br />
player<br />
] “BT-AUDIO”<br />
If playback does not start, operate the<br />
Bluetooth audio player to start playback.<br />
Operate the Bluetooth audio player to<br />
pause (if playback does not pause when you<br />
change the source).<br />
Reverse skips/forward<br />
skips<br />
Pauses/starts playback*<br />
* Operation may be different<br />
according to the connected<br />
Bluetooth audio player.<br />
Enter setting menu (Device<br />
list)<br />
For connecting/disconnecting/deleting a<br />
registered device, 14.<br />
Using the remote controller<br />
2 R / F 3 : Reverse skips/forward<br />
skips<br />
ENGLISH<br />
15
Changing the Bluetooth settings<br />
1<br />
2<br />
3<br />
4<br />
5<br />
16 ENGLISH<br />
] “BT-PHONE” or “BT-AUDIO”<br />
] Bluetooth menu<br />
] “SETTINGS”<br />
] Select a setting item.<br />
AUTO CNNCT j AUTO ANSWER * 1<br />
j MSG INFO * 2 j MIC SETTING * 1<br />
j VERSION * 3 j (back to the<br />
beginning)<br />
] Change the setting accordingly. For<br />
setting menu, right column.<br />
* 1 Appears only when a Bluetooth phone is<br />
connected.<br />
* 2 Appears only when a Bluetooth phone is<br />
connected and it is compatible with text<br />
message (notified through JVC Bluetooth<br />
adapter).<br />
* 3 Bluetooth Audio: Shows only “Version.”<br />
Bluetooth Information:<br />
If you wish to receive more information<br />
about Bluetooth, visit the following JVC web<br />
site: <br />
(English website only)<br />
Setting menu [Initial: Underlined]<br />
AUTO CNNCT (connect)<br />
When the unit is turned on, the connection is<br />
established automatically with...<br />
OFF: No Bluetooth device.<br />
LAST: The last connected Bluetooth device.<br />
ORDER: The available registered Bluetooth<br />
device found at first.<br />
AUTO ANSWER<br />
Only for the device being connected for<br />
“BT-PHONE.”<br />
ON: The unit answers the incoming calls<br />
automatically.<br />
OFF: The unit does not answer the calls<br />
automatically. Answer the calls<br />
manually.<br />
REJECT: The unit rejects all incoming calls.<br />
MSG INFO (message info)<br />
Only for the device being connected for<br />
“BT-PHONE.”<br />
AUTOMATIC: The unit informs you of the<br />
arrival of a message by ringing<br />
and displaying “RCV MESSAGE”<br />
(receiving message).<br />
• The display illuminate in blue.<br />
(, 25)<br />
MANUAL: The unit does not inform you of<br />
the arrival of a message.<br />
MIC SETTING (microphone setting)<br />
Only for the device being connected for<br />
“BT-PHONE.” Adjust microphone volume<br />
connected to the Bluetooth adapter,<br />
[LEVEL 01/02/03].<br />
VERSION<br />
The Bluetooth software and hardware versions<br />
are shown.
Warning messages<br />
ERROR CNNCT (Error Connection)<br />
The device is registered but the connection<br />
has failed. Use “CONNECT” to connect the<br />
device again. ( 14)<br />
ERROR<br />
Try the operation again. If “ERROR” appears<br />
again, check if the device supports the<br />
function you have tried.<br />
UNFOUND<br />
No available Bluetooth device is detected<br />
by “SEARCH.”<br />
LOADING *<br />
The unit is updating the phone book.<br />
Listening to the iPod/iPhone<br />
PLEASE WAIT<br />
The unit is preparing to use the Bluetooth<br />
function. If the message does not disappear,<br />
turn off and turn on the unit, then connect<br />
the device again (or reset the unit).<br />
RESET 8<br />
Check the connection between the adapter<br />
and this unit.<br />
* Displays only when your mobile phone<br />
is equipped with these functions and is<br />
compatible with this unit.<br />
You can connect the iPod/iPhone using the USB 2.0 cable (accessory of the iPod/iPhone) to the<br />
USB input jack on the control panel.<br />
USB input jack<br />
• Disconnecting the iPod/iPhone will stop<br />
playback. Press / SOURCE to listen to another<br />
playback source.<br />
• For details, refer also to the <strong>instructions</strong><br />
supplied with your iPod/iPhone.<br />
Apple iPod/iPhone<br />
USB 2.0 cable (accessory of<br />
the iPod/iPhone)<br />
Caution:<br />
• Avoid using the iPod/iPhone if it might hinder<br />
your safety while driving.<br />
• Make sure all important data has been backed<br />
up to avoid losing the data.<br />
ENGLISH<br />
17
There are two control terminals:<br />
• Control by this unit.<br />
• Control by the connected<br />
iPod/iPhone.<br />
Preparation: Select the controlling terminal,<br />
or for iPod<br />
playback:<br />
• Press and hold T/P BACK button.<br />
• Make the selection from <br />
setting, 27.<br />
The operations explained below are under<br />
.<br />
~<br />
Ÿ<br />
18 ENGLISH<br />
] “USB-IPOD”<br />
Playback starts automatically.<br />
] Select a song.<br />
[Hold]<br />
Pauses or resumes<br />
playback<br />
Selects track<br />
Fast-forwards or<br />
reverses the track<br />
Selecting a track from the menu<br />
1<br />
2<br />
3<br />
] Select the desired menu.<br />
PLAYLISTS j ARTISTS j ALBUMS<br />
j SONGS j PODCASTS j<br />
GENRES j COMPOSERS j<br />
AUDIOBOOKS j (back to the<br />
beginning)<br />
] Select the desired track.<br />
Repeat this procedure until the desired<br />
track is selected.<br />
• If the selected menu contains many tracks,<br />
you can fast search (±10, ±100, ±1000)<br />
through the menu by turning the control dial<br />
quickly.<br />
• To return to the previous menu, press<br />
T/P BACK.<br />
Selecting the playback modes<br />
1<br />
2<br />
[Hold]<br />
] “REPEAT” j “RANDOM”
3<br />
REPEAT<br />
ONE RPT : Functions the same as<br />
“Repeat One” of the iPod<br />
ALL RPT : Functions the same as<br />
“Repeat All” of the iPod<br />
RANDOM<br />
ALBUM RND : Functions the same as<br />
“Shuffle Albums” of the<br />
iPod<br />
SONG RND : Functions the same as<br />
“Shuffle Songs” of the<br />
iPod<br />
• To cancel repeat play or random play, select<br />
“RPT OFF” or “RND OFF.”<br />
• “ALBUM RND” is not available for some iPod.<br />
• To return to the previous menu, press<br />
T/P BACK.<br />
Listening to the DAB tuner<br />
Changing the display information<br />
Album name/performer = Track title =<br />
Current track number with the elapsed<br />
playing time = Current track number with<br />
the clock time = (back to the beginning)<br />
Using the remote controller<br />
2 R / F 3 : Selects track<br />
2 R / F 3<br />
[Hold]<br />
: Fast-forwards or<br />
reverses the track<br />
Notice:<br />
When operating an iPod, some operations<br />
may not be performed correctly or as<br />
intended. In this case, visit the following JVC<br />
web site: <br />
(English website only)<br />
Before operating, connect the JVC DAB tuner, KT-DB1000 (not supplied) to the expansion port on<br />
the rear of the unit.<br />
Preparation: Make sure is selected in the = setting. ( 27)<br />
• For details, refer also to the <strong>instructions</strong> supplied with the JVC DAB tuner.<br />
~<br />
Ÿ<br />
] “DAB”<br />
] Search for an ensemble.<br />
When an ensemble is tuned in,<br />
searching stops. To stop searching,<br />
press the same button again.<br />
!<br />
] Select a service (primary or<br />
secondary) to listen to.<br />
ENGLISH<br />
19
Manual search for an ensemble<br />
20 ENGLISH<br />
“M” flashes, then press<br />
the button repeatedly.<br />
Storing DAB services in memory<br />
You can preset six DAB services (primary).<br />
Ex.: Storing an ensemble (primary service) into<br />
the preset number “04.”<br />
1 Select a service (steps ~ to ! , 19).<br />
2<br />
3<br />
[Hold]<br />
“PRESET MODE” flashes.<br />
] Selects preset number “04.”<br />
“P04” flashes and “MEMORY” appears.<br />
Selecting a preset station<br />
1<br />
or<br />
[Hold]<br />
2<br />
Changing the display information<br />
Service name = Ensemble<br />
name = Channel number =<br />
Frequency = Clock = (back to<br />
the beginning)<br />
Using the remote controller<br />
5 U / D ∞ : Changes the DAB<br />
preset stations<br />
2 R / F 3 : Searches for DAB<br />
stations<br />
Tracing the same programme—<br />
Alternative Frequency Reception (DAB AF)<br />
You can keep listening to the same programme<br />
by activating the Alternative Frequency<br />
Reception.<br />
• While receiving a DAB service:<br />
When driving in an area where a service<br />
cannot be received, this unit automatically<br />
tunes in to another ensemble or FM Radio<br />
Data System station, broadcasting the same<br />
programme.<br />
• While receiving an FM Radio Data System<br />
station:<br />
When driving in an area where a DAB service<br />
is broadcasting the same programme as the<br />
FM Radio Data System station is broadcasting,<br />
this unit automatically tunes in to the DAB<br />
service.<br />
When shipped from the factory, Alternative<br />
Frequency Reception is activated.<br />
To deactivate the Alternative Frequency<br />
Reception, 25.
Listening to the other external<br />
components<br />
You can connect an external component to:<br />
• EXT INPUT: Expansion port on the rear of<br />
this unit using the following adapters (not<br />
supplied):<br />
– KS-U57, Line Input Adapter<br />
– KS-U58, AUX Input Adapter<br />
Preparation: Make sure is selected<br />
for the = setting.<br />
( 27)<br />
• AUX IN: AUX (auxiliary) input jack on the<br />
control panel.<br />
Preparation: Make sure is<br />
selected for the = <br />
setting. ( 27)<br />
• For details, refer also to the <strong>instructions</strong><br />
supplied with the adapter or external<br />
components.<br />
~<br />
Connecting an external component to the AUX input jack<br />
3.5 mm stereo mini plug<br />
(not supplied)<br />
] “EXT INPUT” or “AUX IN”<br />
Ÿ Turn on the connected<br />
component and start<br />
playing the source.<br />
!<br />
] Adjust the volume.<br />
⁄ Adjust the sound as you<br />
want. ( 22)<br />
Portable audio player,<br />
etc.<br />
ENGLISH<br />
21
Selecting a preset sound mode<br />
You can select a preset sound mode suitable<br />
for the music genre.<br />
FLAT = NATURAL = DYNAMIC = VOCAL<br />
BOOST = BASS BOOST = USER = (back to<br />
the beginning)<br />
While listening, you can adjust the tone level of<br />
the selected sound mode.<br />
1<br />
2<br />
22 ENGLISH<br />
[Hold]<br />
Adjust the level (–06 to +06) of the<br />
selected tone (BASS / MID / TRE).<br />
The sound mode is automatically stored<br />
and changed to “USER.”<br />
Tone<br />
Sound element<br />
Frequency Level Q<br />
BASS 60 Hz –06 to +06 Q1.0<br />
80 Hz<br />
Q1.25<br />
100 Hz<br />
Q1.5<br />
200 Hz<br />
Q2.0<br />
MIDDLE 0.5 kHz –06 to +06 Q0.75<br />
1.0 kHz<br />
Q1.0<br />
1.5 kHz<br />
2.5 kHz<br />
Q1.25<br />
TREBLE 10.0 kHz<br />
12.5 kHz<br />
15.0 kHz<br />
17.5 kHz<br />
–06 to +06 Q FIX<br />
Storing your own sound mode<br />
You can store your own adjustments in<br />
memory.<br />
1<br />
2<br />
3<br />
[Hold]<br />
] ] / /<br />
<br />
Adjust the sound elements of the<br />
selected tone. ( table on the left)<br />
4 Repeat steps 2 and 3 to adjust other<br />
tones.<br />
The adjustments made will be stored<br />
automatically in “USER.”<br />
The current sound mode changes to “USER”<br />
automatically.
Menu operations<br />
1 2 3<br />
Repeat step 2 if necessary.<br />
• To return to the previous menu,<br />
press T/P BACK.<br />
• To exit from the menu, press DISP<br />
or MENU.<br />
Category Menu item Selectable setting, [Initial: Underlined]<br />
DEMO<br />
CLOCK<br />
PRO EQ<br />
DISPLAY<br />
[Hold]<br />
DEMO<br />
Display<br />
demonstration<br />
CLOCK SET<br />
Clock setting<br />
24H/12H<br />
Time display<br />
mode<br />
CLOCK ADJ * 1<br />
Clock<br />
adjustment<br />
• DEMO ON<br />
• DEMO OFF<br />
—<br />
[0:00]<br />
• 24 HOUR<br />
• 12 HOUR<br />
: Display demonstration will be activated<br />
automatically if no operation is done for about<br />
20 seconds.<br />
: Cancels. ( 4)<br />
: Adjust the hour, then the minute. ( 4)<br />
: For settings, 4.<br />
• AUTO : The built-in clock is automatically adjusted<br />
using the CT (clock time) data in the Radio Data<br />
System signal.<br />
• OFF<br />
: Cancels.<br />
BASS<br />
MIDDLE<br />
TREBLE<br />
— : For settings, 22.<br />
DIMMER • DIMMER AUTO : Dims the display when you turn on the<br />
headlights. *<br />
• DIMMER ON<br />
• DIMMER OFF<br />
2<br />
: Dims the display and button illumination.<br />
: Cancels.<br />
* 1 Takes effect only when CT (clock time) data is received.<br />
* 2 The illumination control lead connection is required. (See “Installation/Connection Manual.”) This<br />
setting may not work correctly on some vehicles (particularly on those having a control dial for<br />
dimming). In this case, change the setting to any other than .<br />
ENGLISH<br />
23
Category Menu item Selectable setting, [Initial: Underlined]<br />
DISPLAY<br />
TUNER<br />
24 ENGLISH<br />
SCROLL * 3 • SCROLL ONCE : Scrolls the displayed information once.<br />
• SCROLL AUTO : Repeats scrolling (at 5-second intervals).<br />
• SCROLL OFF : Cancels.<br />
Pressing DISP for more than one second can scroll the display<br />
regardless of the setting.<br />
TAG DISPLAY • TAG ON<br />
SSM * 4<br />
Strong-station<br />
Sequential<br />
Memory<br />
AF-REG *5<br />
Alternative<br />
frequency/<br />
regionalization<br />
reception<br />
PTY-<br />
STANDBY * 4, * 5<br />
TA VOLUME * 5<br />
Traffic<br />
announcement<br />
volume<br />
P-SEARCH * 5<br />
Programme<br />
search<br />
• TAG OFF<br />
• SSM 01 – 06<br />
• SSM 07 – 12<br />
• SSM 13 – 18<br />
: Shows the Tag information while playing MP3/<br />
WMA/WAV tracks.<br />
: Cancels.<br />
: For settings, 7.<br />
• AF ON : When the currently received signals become<br />
weak, the unit switches to another station (the<br />
programme may differ from the one currently<br />
received). (The AF indicator lights up.)<br />
• AF-REG ON : When the currently received signals become<br />
weak, the unit switches to another station<br />
broadcasting the same programme. (The AF<br />
and REG indicators light up.)<br />
• OFF<br />
: Cancels (not selectable when is set<br />
to ).<br />
• PTY OFF, PTY : Activates PTY Standby Reception with one of<br />
codes<br />
the PTY codes ( 9).<br />
• VOLUME 00<br />
– VOLUME 50<br />
(or<br />
VOLUME 00 –<br />
VOLUME 30) * 6<br />
[ VOLUME 15 ]<br />
: —<br />
• SEARCH ON<br />
• SEARCH OFF<br />
: Activates Programme Search. ( 9)<br />
: Cancels.<br />
*3 Some characters or symbols will not be shown correctly (or will be blanked) on the display.<br />
* 4 Displayed only when the source is “FM.”<br />
* 5 Only for FM Radio Data System stations.<br />
* 6 Depends on the amplifier gain control.
Category Menu item Selectable setting, [Initial: Underlined]<br />
TUNER<br />
COLOR<br />
COLOR SETUP<br />
DAB AF * 7<br />
Alternative<br />
frequency<br />
reception<br />
MONO * 8<br />
Monaural mode<br />
IF BAND<br />
Intermediate<br />
frequency band<br />
• AF ON<br />
• AF OFF<br />
• MONO ON<br />
• MONO OFF<br />
• AUTO<br />
• WIDE<br />
: Traces the programme among DAB services<br />
and FM Radio Data System stations. ( 20)<br />
: Cancels.<br />
: Activate monaural mode to improve FM<br />
reception, but stereo effect will be lost. ( 7)<br />
: Restore the stereo effect.<br />
: Increases the tuner selectivity to reduce<br />
interference noises between adjacent stations.<br />
(Stereo effect may be lost.)<br />
: Subject to interference noises from adjacent<br />
stations, but sound quality will not be<br />
degraded and the stereo effect will remain.<br />
BUTTON ZONE COLOR 01 — : For settings, 28.<br />
DISP ZONE<br />
Display zone<br />
ALL ZONE<br />
COLOR 29, USER<br />
DAY COLOR • BUTTON ZONE : For settings, 29.<br />
NIGHT COLOR<br />
• DISP ZONE<br />
MENU COLOR • ON<br />
: Changes the display and buttons (except for<br />
EQ/BASS-TRE / DISP ) illumination during menu,<br />
list search and playback mode operations.<br />
• OFF<br />
: Cancels.<br />
RING COLOR * 9 • ON<br />
: When a call comes in, the display will flash in<br />
blue.<br />
• The display will change to the original color<br />
when the call is answered or the incoming<br />
call stops.<br />
When the unit receives a text message, the<br />
display only illuminate in blue.<br />
• OFF<br />
: Cancels.<br />
* 7 Displayed only when DAB tuner is connected.<br />
* 8 Displayed only when the source is “FM.”<br />
* 9 Displayed only when Bluetooth adapter, KS-BTA200 is connected.<br />
ENGLISH<br />
25
Category Menu item Selectable setting, [Initial: Underlined]<br />
AUDIO<br />
26 ENGLISH<br />
FADER * 10 R06 – F06<br />
[00]<br />
BALANCE * 11 L06 – R06<br />
[00]<br />
LOUD<br />
Loudness<br />
VOL ADJUST<br />
Volume adjust<br />
L/O MODE<br />
Line output<br />
mode<br />
SUB.W FREQ * 12<br />
Subwoofer cutoff<br />
frequency<br />
SUB.W LEVEL * 12<br />
Subwoofer level<br />
• LOUD ON<br />
• LOUD OFF<br />
VOL ADJ –05 —<br />
VOL ADJ +05<br />
[VOL ADJ 00]<br />
• SUB.W<br />
• REAR<br />
• LOW<br />
• MID<br />
• HIGH<br />
SUB.W 00 —<br />
SUB.W 08<br />
[SUB.W 04]<br />
* 10 If you are using a two-speaker system, set the fader level to “00.”<br />
* 11 This adjustment will not affect the subwoofer output.<br />
* 12 Displayed only when is set to .<br />
: Adjust the front and rear speaker output<br />
balance.<br />
: Adjust the left and right speaker output<br />
balance.<br />
: Boost low and high frequencies to produce a<br />
well-balanced sound at a low volume level.<br />
: Cancels.<br />
: Preset the volume adjustment level of<br />
each source (except FM), compared to the<br />
FM volume level. The volume level will<br />
automatically increase or decrease when you<br />
change the source.<br />
• Before making an adjustment, select the<br />
source you want to adjust.<br />
• “VOL ADJ FIX” appears on the display if “FM”<br />
is selected as the source.<br />
: Select if the REAR LINE OUT terminals are<br />
used for connecting a subwoofer (through<br />
an external amplifier).<br />
: Select if the REAR LINE OUT terminals are<br />
used for connecting the speakers (through<br />
an external amplifier).<br />
: Frequencies lower than 72 Hz are sent to the<br />
subwoofer.<br />
: Frequencies lower than 111 Hz are sent to<br />
the subwoofer.<br />
: Frequencies lower than 157 Hz are sent to<br />
the subwoofer.<br />
: Adjust the subwoofer output level.
Category Menu item Selectable setting, [Initial: Underlined]<br />
AUDIO<br />
SRC SELECT<br />
AUDIOBOOKS<br />
IPOD<br />
SWITCH<br />
BEEP<br />
Keytouch tone<br />
TEL MUTING<br />
Telephone<br />
muting<br />
AMP GAIN * 13<br />
Amplifier gain<br />
control<br />
AM * 14<br />
AM station<br />
EXT IN * 15<br />
External input<br />
AUX IN * 16<br />
Auxiliary input<br />
AUDIOBOOKS * 17<br />
Speed control of<br />
“Audiobooks”<br />
IPOD SWITCH * 18<br />
iPod/iPhone<br />
control<br />
• BEEP ON<br />
• BEEP OFF<br />
• MUTING 1/<br />
MUTING 2<br />
• MUTING OFF<br />
• LOW POWER<br />
• HIGH POWER<br />
• AM ON<br />
• AM OFF<br />
• EXT ON<br />
• EXT OFF<br />
• AUX ON<br />
• AUX OFF<br />
• NORMAL<br />
• FASTER<br />
• SLOWER<br />
• HEAD MODE<br />
• IPOD MODE<br />
: Activates the keypress tone.<br />
: Deactivates the keypress tone.<br />
: Select either one which mutes the sounds<br />
while using a mobile phone.<br />
: Cancels.<br />
: VOLUME 00 – VOLUME 30 (Select if the<br />
maximum power of each speaker is less than<br />
50 W to prevent damaging the speakers.)<br />
: VOLUME 00 – VOLUME 50<br />
: Enable “AM” in source selection.<br />
: Disable “AM” in source selection.<br />
: Enable “EXT IN” in source selection.<br />
: Disable “EXT IN” in source selection.<br />
: Enable “AUX IN” in source selection.<br />
: Disable “AUX IN” in source selection.<br />
: You can select the playback speed of the<br />
“Audiobook” sound file in your iPod.<br />
• Initial selected item depends on your iPod<br />
setting.<br />
: Controls iPod playback through the unit.<br />
: Controls iPod playback through the iPod/<br />
iPhone.<br />
*13 The volume level automatically changes to “VOLUME 30” if you change to with the<br />
volume level set higher than “VOLUME 30.”<br />
* 14 Displayed only when any source other than “AM” is selected.<br />
* 15 Displayed only when any source other than “EXT IN“ is selected.<br />
* 16 Displayed only when any source other than “AUX IN“ is selected.<br />
* 17 Displayed only when an iPod is connected and playback is controlled from the unit.<br />
* 18 Displayed only when “USB-IPOD” is selected as the source and “IPOD MODE” is available for the<br />
connected iPod/iPhone ( 33).<br />
ENGLISH<br />
27
Selecting the variable buttons and display color illumination<br />
You can select your preferred color for buttons illumination (except for EQ/BASS-TRE / DISP ) and<br />
display color separately.<br />
1<br />
2<br />
3<br />
28 ENGLISH<br />
[Hold]<br />
or<br />
Button zone<br />
All zone<br />
] ] /<br />
/ <br />
• Pressing COLOR in step 1 will enter<br />
zone selection menu (BUTTON ZONE /<br />
DISP ZONE / ALL ZONE) directly.<br />
] Select your preferred color from one<br />
of the 29 preset colors or color.<br />
Display zone<br />
4<br />
Repeat steps 2 and 3 to select a<br />
different zone and your preferred color.<br />
• If is selected in step 2,<br />
the buttons and display illumination<br />
changed to the current/selected<br />
color.<br />
You can also change the <br />
color to one of your preferred color by<br />
performing step 3.<br />
5 or<br />
] Exit from the setting.
Creating your own day and night colors—USER<br />
You can create your own colors for and to apply to button zone<br />
and display zone.<br />
• Displayed when is set to .<br />
• Displayed when is set to .<br />
COLOR<br />
SETUP<br />
1<br />
2<br />
3<br />
Menu hierarchy Operation<br />
• BUTTON Follow example below.<br />
DAY ZONE<br />
COLOR • DISP ZONE Press T/P BACK after step 5, then select DISP ZONE in<br />
step 2.<br />
• BUTTON Press T/P BACK after step 5, then select NIGHT COLOR<br />
NIGHT ZONE in step 2.<br />
COLOR<br />
• DISP ZONE<br />
Ex.: Creating color for in .<br />
[Hold] or<br />
[Hold]<br />
] ] <br />
] <br />
• Pressing COLOR in step 1 will enter<br />
zone selection menu (BUTTON ZONE /<br />
DISP ZONE) directly.<br />
] Select a primary color.<br />
RED j GREEN j BLUE j (back to<br />
the beginning)<br />
4<br />
] Adjust the level of the selected<br />
primary color.<br />
00 to 31<br />
5 Repeat steps 3 and 4 to adjust other<br />
primary colors.<br />
6 or<br />
] Exit from the setting.<br />
If “00” is selected for all the primary colors (as<br />
in step 4) for , nothing appear on<br />
the display.<br />
ENGLISH<br />
29
More about this unit<br />
Basic operations<br />
General<br />
• If you turn off the power while listening to<br />
a track, playback will start from where it had<br />
been stopped previously next time you turn<br />
on the power.<br />
• If no operation is done for about 60 seconds<br />
after pressing MENU button, the operation will<br />
be canceled.<br />
Tuner operations<br />
Storing stations in memory<br />
• During SSM search...<br />
– All previously stored stations are erased and<br />
the stations are stored anew.<br />
– When SSM is over, the station stored in the<br />
lowest preset number will be automatically<br />
tuned in.<br />
• When storing a station manually, the<br />
previously preset station is erased when<br />
a new station is stored in the same preset<br />
number.<br />
FM Radio Data System operations<br />
• Network-Tracking Reception requires two<br />
types of Radio Data System signals—PI<br />
(Programme Identification) and AF<br />
(Alternative Frequency) to work correctly.<br />
• If a Traffic Announcement is received by<br />
TA Standby Reception, the volume level<br />
automatically changes to the preset level<br />
(TA VOLUME) if the current level is lower than<br />
the preset level.<br />
• When Alternative Frequency Reception is<br />
activated (with AF selected), Network-Tracking<br />
Reception is also activated automatically. On<br />
the other hand, Network-Tracking Reception<br />
cannot be deactivated without deactivating<br />
Alternative Frequency Reception. ( 25)<br />
30 ENGLISH<br />
Disc/USB operations<br />
Caution for DualDisc playback<br />
• The Non-DVD side of a “DualDisc” does not<br />
comply with the “Compact Disc Digital Audio”<br />
standard. Therefore, the use of Non-DVD side<br />
of a DualDisc on this product may not be<br />
recommended.<br />
General<br />
• This unit has been designed to reproduce<br />
CDs/CD Texts, and CD-Rs (Recordable)/<br />
CD-RWs (Rewritable) in audio CD (CD-DA),<br />
MP3 and WMA formats.<br />
• If you change the source while listening to a<br />
disc, playback stops. Next time you select “CD”<br />
as the playback source, playback will start<br />
from where it had been stopped previously.<br />
• When a disc is inserted upside down, “PLEASE”<br />
and “EJECT” appear alternately on the display.<br />
Press 0 to eject the disc.<br />
• If the ejected disc is not removed within<br />
15 seconds, it is automatically inserted into<br />
the loading slot again to protect it from dust.<br />
Playback starts automatically.<br />
• MP3 and WMA “tracks” (words “file” and “track”<br />
are used interchangeably) are recorded in<br />
“folders.”<br />
• While fast-forwarding or reversing on an MP3<br />
or WMA disc, you can only hear intermittent<br />
sounds.
Playing a CD-R or CD-RW<br />
• Use only “finalized” CD-Rs or CD-RWs.<br />
• This unit can only play back files of the same<br />
type as those detected first if a disc includes<br />
both audio CD (CD-DA) files and MP3/WMA<br />
files.<br />
• This unit can play back multi-session discs;<br />
however, unclosed sessions will be skipped<br />
while playing.<br />
• Some CD-Rs or CD-RWs may not play back on<br />
this unit because of their disc characteristics,<br />
or for the following reasons:<br />
– Discs are dirty or scratched.<br />
– Moisture condensation has occurred on the<br />
lens inside the unit.<br />
– The pickup lens inside the unit is dirty.<br />
– The files on the CD-R/CD-RW are written<br />
using the “Packet Write” method.<br />
– There are improper recording conditions<br />
(missing data, etc.) or media conditions<br />
(stained, scratched, warped, etc.).<br />
• CD-RWs may require a longer readout time<br />
since the reflectance of CD-RWs is lower than<br />
that of regular CDs.<br />
• Do not use the following CD-Rs or CD-RWs:<br />
– Discs with stickers, labels, or a protective seal<br />
stuck to the surface.<br />
– Discs on which labels can be directly printed<br />
by an ink jet printer.<br />
Using these discs under high temperature<br />
or high humidity may cause malfunctions or<br />
damage to the unit.<br />
Playing an MP3/WMA disc<br />
• This unit can play back MP3/WMA files with<br />
the extension code or <br />
(regardless of the letter case—upper/lower).<br />
• This unit can show the names of albums,<br />
artists (performer), and Tag (Version 1.0, 1.1,<br />
2.2, 2.3, or 2.4) for MP3 files and for WMA files.<br />
• This unit can display only one-byte characters.<br />
No other characters can be correctly<br />
displayed.<br />
• This unit can play back MP3/WMA files<br />
meeting the conditions below:<br />
– Bit rate of MP3/WMA: 32 kbps — 320 kbps<br />
– Sampling frequency of MP3:<br />
32 kHz, 44.1 kHz, 48 kHz (for MPEG-1)<br />
16 kHz, 22.05 kHz, 24 kHz (for MPEG-2)<br />
– Sampling frequency of WMA:<br />
22.05 kHz, 32 kHz, 44.1 kHz, 48 kHz<br />
– Disc format: ISO 9660 Level 1/Level 2,<br />
Romeo, Joliet, Windows extension<br />
• The maximum number of characters for<br />
file/folder names (includes 4 extension<br />
characters— or ).<br />
– ISO 9660 Level 1: up to 12 characters<br />
– ISO 9660 Level 2: up to 31 characters<br />
– Romeo: up to 64 characters<br />
– Joliet: up to 32 characters<br />
– Windows extension: up to 64 characters<br />
• This unit can recognize a total of 512 files, 255<br />
folders, and 8 hierarchical levels.<br />
• This unit can play back files recorded in VBR<br />
(variable bit rate).<br />
Files recorded in VBR have a discrepancy<br />
in the elapsed time display, and do not<br />
show the actual elapsed time. In particular,<br />
this difference becomes noticeable after<br />
performing the search function.<br />
• This unit cannot play back the following files:<br />
– MP3 files encoded in MP3i and MP3 PRO<br />
format.<br />
– MP3 files encoded in an inappropriate<br />
format.<br />
– MP3 files encoded with Layer 1/2.<br />
– WMA files encoded in lossless, professional,<br />
and voice format.<br />
– WMA files which are not based upon<br />
Windows Media® Audio.<br />
– WMA files copy-protected with DRM.<br />
– Files which have data such as AIFF, ATRAC3,<br />
etc.<br />
• The search function works but search speed is<br />
not constant.<br />
ENGLISH<br />
31
Playing MP3/WMA tracks from a USB<br />
device<br />
• While playing from a USB device, the playback<br />
order may differ from other players.<br />
• This unit may be unable to play back some<br />
USB devices or some files due to their<br />
characteristics or recording conditions.<br />
• Depending on the shape of the USB devices<br />
and connection ports, some USB devices may<br />
not be attached properly or the connection<br />
might be loose.<br />
• Connect one USB mass storage class device to<br />
the unit at a time. Do not use a USB hub.<br />
• If the connected USB device does not have<br />
the correct files, “CANNOT PLAY” appears.<br />
• This unit can show Tag (Version 1.0, 1.1, 2.2,<br />
2.3, or 2.4) for MP3 files and for WMA files.<br />
• This unit can play back MP3/WMA files<br />
meeting the conditions below:<br />
– Bit rate of MP3/WMA: 32 kbps — 320 kbps<br />
– Sampling frequency of MP3:<br />
32 kHz, 44.1 kHz, 48 kHz (for MPEG-1)<br />
16 kHz, 22.05 kHz, 24 kHz (for MPEG-2)<br />
– Sampling frequency of WMA:<br />
22.05 kHz, 32 kHz, 44.1 kHz, 48 kHz<br />
• This unit can play back MP3 files recorded in<br />
VBR (variable bit rate).<br />
• The maximum number of characters for:<br />
– Folder names : 32 characters<br />
– File names : 32 characters<br />
– MP3 Tag : 64 characters<br />
– WMA Tag : 32 characters<br />
• This unit can recognize a total of 5 000 files,<br />
255 folders (255 files per folder including<br />
folder without unsupported files), and of 8<br />
hierarchies.<br />
• This unit does not support SD card reader.<br />
• This unit cannot recognize a USB device<br />
whose rating is other than 5 V and exceeds<br />
500 mA.<br />
32 ENGLISH<br />
• USB devices equipped with special functions<br />
such as data security functions cannot be<br />
used with the unit.<br />
• Do not use a USB device with 2 or more<br />
partitions.<br />
• This unit may not recognized a USB device<br />
connected through a USB card reader.<br />
• This unit may not play back files in a USB<br />
device properly when using a USB extension<br />
cord.<br />
• This unit cannot play back the following files:<br />
– MP3 files encoded in MP3i and MP3 PRO<br />
format.<br />
– MP3 files encoded in an inappropriate<br />
format.<br />
– MP3 files encoded with Layer 1/2.<br />
– WMA files encoded in lossless, professional,<br />
and voice format.<br />
– WMA files which are not based upon<br />
Windows Media® Audio.<br />
Bluetooth operations<br />
• While driving, do not perform complicated<br />
operation such as dialing the numbers, using<br />
phone book, etc. When you perform these<br />
operations, stop your car in a safe place.<br />
• Some Bluetooth devices may not be<br />
connected to this unit depending on the<br />
Bluetooth version of the device.<br />
• This unit may not work for some Bluetooth<br />
devices.<br />
• Connecting condition may vary depending<br />
on the circumstances around you.<br />
• When the unit is turned off, the device is<br />
disconnected.
iPod/iPhone operations<br />
• You can control the following types of iPods/<br />
iPhone:<br />
– iPod with video (5th Generation) * 1<br />
– iPod classic * 1, * 2<br />
– iPod nano<br />
– iPod nano (2nd Generation)<br />
– iPod nano (3rd Generation) * 1, * 2<br />
– iPod nano (4th Generation) * 1, * 2<br />
– iPod nano (5th Generation) * 1, * 2<br />
– iPod touch * 1, * 2<br />
– iPod touch (2nd Generation) * 1, * 2<br />
– iPhone/iPhone 3G/iPhone 3GS * 1, * 2<br />
* 1 It is not possible to browse video files on the<br />
“Videos” menu.<br />
* 2 is available ( 27).<br />
• If the iPod does not play correctly, please<br />
update your iPod software to the latest<br />
version. For details about updating your iPod,<br />
visit .<br />
• When you turn on this unit, the iPod is<br />
charged through this unit.<br />
• iPod shuffle cannot be used with this unit.<br />
• The song order displayed on the selection<br />
menu of this unit may differ from that of the<br />
iPod.<br />
• The text information may not be displayed<br />
correctly:<br />
– Some characters such as accented letters<br />
cannot be shown correctly on the display.<br />
– Communication between the iPod and the<br />
unit is not stable.<br />
• If the text information includes more than 11<br />
characters, it scrolls on the display.<br />
This unit can display up to 64 characters.<br />
DAB operations<br />
• Only the primary DAB service can be preset<br />
even when you store a secondary service.<br />
• A previously preset DAB service is erased<br />
when a new DAB service is stored in the same<br />
preset number.<br />
JVC bears no responsibility for any loss of data<br />
in an iPod/iPhone and/or USB mass storage<br />
class device while using this System.<br />
ENGLISH<br />
33
Maintenance<br />
How to clean the connectors<br />
Frequent detachment will deteriorate the<br />
connectors.<br />
To minimize this possibility, periodically wipe<br />
the connectors with a cotton swab or cloth<br />
moistened with alcohol, being careful not to<br />
damage the connectors.<br />
34 ENGLISH<br />
Connectors<br />
Moisture condensation<br />
Moisture may condense on the lens inside the<br />
unit in the following cases:<br />
• After starting the heater in the car.<br />
• If it becomes very humid inside the car.<br />
Should this occur, the unit may malfunction.<br />
In this case, eject the disc and leave the unit<br />
turned on for a few hours until the moisture<br />
has evaporated.<br />
How to handle discs<br />
When removing a disc Center holder<br />
from its case, press down<br />
the center holder of the case<br />
and lift the disc out, holding<br />
it by the edges.<br />
• Always hold the disc by the edges. Do not<br />
touch its recording surface.<br />
When storing a disc in its case, gently insert<br />
the disc around the center holder (with the<br />
printed surface facing up).<br />
• Make sure to store discs in cases after use.<br />
To keep discs clean<br />
A dirty disc may not play<br />
correctly. If a disc does become<br />
dirty, wipe it with a soft cloth<br />
in a straight line from center to<br />
edge.<br />
• Do not use any solvents (for example,<br />
conventional record cleaner, spray, thinner,<br />
benzine, etc.) to clean discs.<br />
To play new discs<br />
New discs may have some<br />
rough spots around the inner<br />
and outer edges. If such a disc<br />
is used, this unit may reject the<br />
disc.<br />
To remove these rough spots, rub the edges<br />
with a pencil or ball-point pen, etc.<br />
Do not use the following discs:<br />
Single CD (8 cm disc) Warped disc<br />
Sticker and sticker<br />
residue<br />
Unusual shape<br />
Transparent or<br />
semitransparent<br />
parts on its recording<br />
area<br />
Stick-on label<br />
C-thru Disc<br />
(semitransparent<br />
disc)
Troubleshooting<br />
General<br />
FM/AM<br />
Disc playback<br />
Symptom Remedy/Cause<br />
Sound cannot be heard from the<br />
speakers.<br />
“PROTECT” appears on the display<br />
and no operations can be done.<br />
The unit does not work at all. Reset the unit. ( 3)<br />
• Adjust the volume to the optimum level.<br />
• Make sure the unit is not muted/paused ( 6).<br />
• Check the cords and connections.<br />
Check to be sure the terminals of the speaker leads<br />
are covered with insulating tape properly, then reset<br />
the unit ( 3).<br />
If “PROTECT” does not disappear, consult your JVC<br />
IN-CAR ENTERTAINMENT dealer or a company<br />
supplying kits.<br />
“AUX IN” cannot be selected. Check the = setting.<br />
( 27)<br />
Nothing appear on the display. Check the color settings ( 29).<br />
SSM automatic presetting does<br />
not work.<br />
Static noise while listening to the<br />
radio.<br />
Store stations manually.<br />
Connect the aerial firmly.<br />
“AM” cannot be selected. Check the = setting. ( 27)<br />
Disc cannot be played back. Insert the disc correctly.<br />
• CD-R/CD-RW cannot be played<br />
back.<br />
• Tracks on the CD-R/CD-RW<br />
cannot be skipped.<br />
Disc can neither be played back<br />
nor ejected.<br />
Disc sound is sometimes<br />
interrupted.<br />
• Insert a finalized CD-R/CD-RW.<br />
• Finalize the CD-R/CD-RW with the component<br />
which you used for recording.<br />
• Unlock the disc. ( 10)<br />
• Eject the disc forcibly. ( 3)<br />
• Stop playback while driving on rough roads.<br />
• Change the disc.<br />
• Check the cords and connections.<br />
“NO DISC” appears on the display. Insert a playable disc into the loading slot.<br />
“PLEASE” and “EJECT“ appear<br />
alternately on the display.<br />
Press 0, then insert a disc correctly.<br />
ENGLISH<br />
35
MP3/WMA playback<br />
USB device playback<br />
36 ENGLISH<br />
Symptom Remedy/Cause<br />
Disc cannot be played back. • Use a disc with MP3/WMA tracks recorded in a format<br />
compliant with ISO 9660 Level 1, Level 2, Romeo, or<br />
Joliet.<br />
• Add the extension code or to the file<br />
names.<br />
Noise is generated. Skip to another track or change the disc. (Do not add<br />
the extension code or to non-MP3 or<br />
WMA tracks.)<br />
A longer readout time is<br />
required (“READING” keeps<br />
flashing on the display).<br />
Tracks do not play back in the<br />
order you have intended them<br />
to play.<br />
The elapsed playing time is not<br />
correct.<br />
“NO FILE” appears on the<br />
display.<br />
“NOT SUPPORT” appears on the<br />
display and track skips.<br />
The correct characters are not<br />
displayed (e.g. album name).<br />
Do not use too many hierarchical levels and folders.<br />
The playback order is determined when the files are<br />
recorded.<br />
This sometimes occurs during playback. This is caused<br />
by how the tracks are recorded on the disc.<br />
Selected folder is an empty folder * 1. Select another<br />
folder that contains MP3/WMA tracks.<br />
Skip to the next track encoded in an appropriate format<br />
or to the next non-copy-protected WMA track.<br />
This unit can only display letters (upper case), numbers,<br />
and a limited number of symbols.<br />
Noise is generated. The track played back is not an MP3/WMA track. Skip to<br />
another file. (Do not add the extension code or<br />
to non-MP3 or WMA tracks.)<br />
“READING” keeps flashing on<br />
the display.<br />
“NO FILE” appears on the<br />
display.<br />
“NOT SUPPORT” appears on the<br />
display and track skips.<br />
• Readout time varies depending on the USB device.<br />
• Do not use too many hierarchy or folders.<br />
• Turn off the power then on again.<br />
• Reattach the USB device again.<br />
Selected folder is an empty folder *1. Select another<br />
folder that contains MP3/WMA tracks.<br />
Skip to the next track encoded in an appropriate format<br />
or to the next non-copy-protected WMA track.<br />
* 1 Folder that is physically empty or folder that contains data but does not contain valid MP3/WMA<br />
track.
USB device playback<br />
Bluetooth * 2<br />
Symptom Remedy/Cause<br />
Tracks/folders are not played<br />
back in the order you have<br />
intended.<br />
• “CANNOT PLAY” flashes on<br />
the display.<br />
• “NO USB” appears on the<br />
display.<br />
• The unit cannot detect the<br />
USB device.<br />
While playing a track, sound is<br />
sometimes interrupted.<br />
Correct characters are not<br />
displayed (e.g. album name).<br />
Bluetooth device does not<br />
detect the unit.<br />
The unit does not detect the<br />
Bluetooth device.<br />
The unit does not make pairing<br />
with the Bluetooth device.<br />
The playback order is determined by the write-in time<br />
stamp. The first track/folder written into the USB device<br />
will be the first track/folder for playback.<br />
• Attach a USB device that contains tracks encoded in<br />
an appropriate format.<br />
• Reattach the USB device again.<br />
The MP3/WMA tracks have not been properly copied<br />
into the USB device.<br />
Copy MP3/WMA tracks again into the USB device, and<br />
try again.<br />
This unit can only display letters (upper case),<br />
numbers, and a limited number of symbols.<br />
The unit can be connected with one Bluetooth mobile<br />
phone and one Bluetooth audio device at a time.<br />
While connecting a device, this unit cannot be detected<br />
from another device. Disconnect currently connected<br />
device and search again.<br />
• Check the Bluetooth setting of the device.<br />
• Search from the Bluetooth device. After the device<br />
detects the unit, select “OPEN” on the unit to connect<br />
the device. ( 13)<br />
• Enter the same PIN code for both the unit and target<br />
device.<br />
• Select the device name from “SPECIAL,” then try to<br />
connect again. ( 13)<br />
• Try to pair/connect from the Bluetooth device.<br />
Echo or noise occurs. Adjust the microphone unit position.<br />
Phone sound quality is poor. • Reduce the distance between the unit and the<br />
Bluetooth mobile phone.<br />
• Move the car to a place where you can get a better<br />
signal reception.<br />
* 2 For Bluetooth operations, refer also to the <strong>instructions</strong> supplied with the Bluetooth Adapter.<br />
ENGLISH<br />
37
Bluetooth<br />
iPod/iPhone<br />
38 ENGLISH<br />
Symptom Remedy/Cause<br />
The sound is interrupted or skipped<br />
during playback of a Bluetooth audio<br />
device.<br />
The connected audio device cannot be<br />
controlled.<br />
The iPod does not turn on or does not<br />
work.<br />
• Reduce the distance between the unit and the<br />
Bluetooth audio device.<br />
• Disconnect the device connected for<br />
“BT-PHONE.”<br />
• Turn off, then turn on the unit.<br />
• (When the sound is not yet restored,) connect<br />
the device again.<br />
Check whether the connected audio device<br />
supports AVRCP (Audio/Video Remote Control<br />
Profile).<br />
• Check the connecting cable and its<br />
connection.<br />
• Update the firmware version of the iPod/<br />
iPhone.<br />
• Charge the battery of the iPod/iPhone.<br />
• Reset the iPod/iPhone.<br />
• Check whether setting is<br />
appropriate ( 27).<br />
The sound is distorted. Deactivate the equalizer either on this unit or<br />
the iPod/iPhone.<br />
A lot of noise is generated. Turn off (uncheck) the “VoiceOver” feature of the<br />
iPod. For details, visit .<br />
Playback stops. The headphones are disconnected during<br />
playback. Restart the playback operation<br />
( 18).<br />
“CANNOT PLAY” appears on the<br />
display.<br />
No tracks are stored. Import tracks to the iPod/<br />
iPhone.<br />
“RESTRICTED” appears on the display. Check whether the connected iPod/iPhone is<br />
compatible with this unit ( 33).
DAB<br />
Symptom Remedy/Cause<br />
“noSIGNAL” appears on the display. Move to an area with stronger signals.<br />
“RESET 8” appears on the display. Connect this unit and the DAB tuner correctly<br />
and reset the unit ( 3).<br />
“ANTENNA NG” appears on the display. Check the cords and connections.<br />
The DAB tuner does not work at all. Reconnect this unit and the DAB tuner correctly<br />
and reset the unit ( 3).<br />
• Microsoft and Windows Media are either registered trademarks or trademarks of Microsoft<br />
Corporation in the United States and/or other countries.<br />
• The Bluetooth word mark and logos are owned by the Bluetooth SIG, Inc. and any use of such<br />
marks by Victor Company of Japan, Limited (JVC) is under license. Other trademarks and trade<br />
names are those of their respective owners.<br />
• “Made for iPod” means that an electronic accessory has been designed to connect specifically<br />
to iPod and has been certified by the developer to meet Apple performance standards.<br />
• “Works with iPhone” means that an electronic accessory has been designed to connect<br />
specifically to iPhone and has been certified by the developer to meet Apple performance<br />
standards.<br />
• Apple is not responsible for the operation of this device or its compliance with safety and<br />
regulatory standards.<br />
• iPod is a trademark of Apple Inc., registered in the U.S. and other countries.<br />
• iPhone is a trademark of Apple Inc.<br />
ENGLISH<br />
39
Specifications<br />
AUDIO AMPLIFIER SECTION<br />
TUNER SECTION<br />
40 ENGLISH<br />
Maximum Power Output: Front/Rear: 50 W per channel<br />
Continuous Power Output (RMS): Front/Rear: 20 W per channel into 4 Ω, 40 Hz to<br />
20 000 Hz at no more than 1% total<br />
harmonic distortion.<br />
Load Impedance: 4 Ω (4 Ω to 8 Ω allowance)<br />
Tone Control Range: Bass: ±12 dB (60 Hz, 80 Hz, 100 Hz, 200 Hz)<br />
Q1.0, Q1.25, Q1.5, Q2.0<br />
Middle: ±12 dB (0.5 kHz, 1.0 kHz, 1.5 kHz, 2.5 kHz)<br />
Q0.75, Q1.0, Q1.25<br />
Treble: ±12 dB (10.0 kHz, 12.5 kHz, 15.0 kHz,<br />
17.5 kHz)<br />
Q (Fixed)<br />
Frequency Response: 40 Hz to 20 000 Hz<br />
Signal-to-Noise Ratio: 70 dB<br />
Line-Out Level/Impedance: 2.5 V/20 kΩ load (full scale)<br />
Subwoofer-Out Level/Impedance: 2.5 V/20 kΩ load (full scale)<br />
Output Impedance: 1 kΩ<br />
Other Terminal: AUX (auxiliary) input jack, USB input jack, Aerial input,<br />
Expansion port, Steering wheel remote input<br />
Frequency Range: FM: 87.5 MHz to 108.0 MHz<br />
AM: MW: 522 kHz to 1 620 kHz<br />
LW: 144 kHz to 279 kHz<br />
FM Tuner: Usable Sensitivity: 9.3 dBf (0.8 μV/75 Ω)<br />
50 dB Quieting<br />
Sensitivity:<br />
16.3 dBf (1.8 μV/75 Ω)<br />
Alternate Channel<br />
Selectivity (400 kHz):<br />
65 dB<br />
Frequency Response: 40 Hz to 15 000 Hz<br />
Stereo Separation: 40 dB<br />
MW Tuner: Sensitivity: 20 μV<br />
Selectivity: 40 dB<br />
LW Tuner: Sensitivity: 50 μV
CD PLAYER SECTION<br />
USB SECTION<br />
GENERAL<br />
Type: Compact disc player<br />
Signal Detection System: Non-contact optical pickup<br />
(semiconductor laser)<br />
Number of Channels: 2 channels (stereo)<br />
Frequency Response: 5 Hz to 20 000 Hz<br />
Dynamic Range: 96 dB<br />
Signal-to-Noise Ratio: 98 dB<br />
Wow and Flutter: Less than measurable limit<br />
MP3 Decoding Format: (MPEG1/2 Audio Layer 3) Max. Bit Rate: 320 kbps<br />
WMA (Windows Media® Audio) Decoding Format: Max. Bit Rate: 320 kbps<br />
USB Standard: USB 1.1, USB 2.0<br />
Data Transfer Rate (Full Speed): Max. 12 Mbps<br />
Compatible Device: Mass storage class<br />
Compatible File System: FAT 32/16/12<br />
Playable Audio Format: MP3/WMA<br />
Max. Current: DC 5 V 500 mA<br />
Power Requirement: Operating Voltage: DC 14.4 V (11 V to 16 V allowance)<br />
Grounding System: Negative ground<br />
Allowable Operating Temperature: 0°C to +40°C<br />
Dimensions (W × H × D): Installation Size: 182 mm × 52 mm × 160 mm<br />
(approx.)<br />
Panel Size: 188 mm × 58 mm × 12 mm<br />
Mass: 1.3 kg (excluding accessories)<br />
Design and specifications are subject to change without notice.<br />
ENGLISH<br />
41
Having TROUBLE with operation?<br />
Please reset your unit<br />
Refer to page of How to reset your unit<br />
Vous avez des PROBLÈMES de fonctionnement?<br />
Réinitialisez votre appareil<br />
Référez-vous à la page intitulée Comment réinitialiser votre appareil<br />
Dear Customer,<br />
This apparatus is in conformance with the valid<br />
European directives and standards regarding<br />
electromagnetic compatibility and electrical safety.<br />
European representative of Victor Company of<br />
Japan, Limited is:<br />
JVC Technical Services Europe GmbH<br />
Postfach 10 05 04<br />
61145 Friedberg<br />
Germany<br />
EN, FR<br />
© 2009 Victor Company of Japan, Limited<br />
Cher(e) client(e),<br />
Cet appareil est conforme aux directives et normes<br />
européennes en vigueur concernant la compatibilité<br />
électromagnétique et à la sécurité électrique.<br />
Représentant européen de la société Victor<br />
Company of Japan, Limited:<br />
JVC Technical Services Europe GmbH<br />
Postfach 10 05 04<br />
61145 Friedberg<br />
Allemagne<br />
1209DTSMDTJEIN
GET0640-010A<br />
[E/EU]<br />
Flat head screws (M5 × 8 mm) /<br />
Vis à tête plate (M5 × 8 mm) * 2<br />
Pocket / Poche<br />
KD-R611<br />
Installation/Connection Manual<br />
Manuel d’installation/raccordement<br />
You need the installation kits which corresponds to your car. / Vous avez besoin des kits<br />
d’installation correspondants à votre voiture.<br />
• To prevent short circuits:<br />
– Disconnect the battery’s negative terminal and make all electrical connections before installing the unit.<br />
– Cover the terminals of the UNUSED leads with insulating tape.<br />
• Be sure to ground this unit to the car’s chassis again after installation.<br />
• Replace the fuse with one of the specified rating.<br />
• Connect speakers with a maximum power of more than 50 W<br />
(impedance of 4 Ω to 8 Ω). Otherwise, change the setting.<br />
(See page 27 of the INSTRUCTIONS.)<br />
• The heat sink becomes very hot after use. Be careful not to touch it<br />
when removing this unit.<br />
Heat sink / Dissipateur de chaleur<br />
PRECAUTIONS on power supply and speaker connections<br />
• DO NOT connect the speaker leads of the power cord to the car battery; otherwise, the unit will be<br />
seriously damaged.<br />
• BEFORE connecting the speaker leads of the power cord to the speakers, check the speaker wiring in<br />
your car.<br />
The following illustration shows a typical installation. If you have any questions or require information<br />
regarding installation kits, consult your JVC IN-CAR ENTERTAINMENT dealer or a company supplying kits.<br />
In-dash mounting / Montage encastré<br />
* 1<br />
Bracket / Support * 2<br />
ENGLISH / FRANÇAIS<br />
Check the battery system in your car /<br />
Vérifiez le système de batterie de<br />
votre voiture<br />
WARNINGS / AVERTISSEMENTS<br />
INSTALLATION / INSTALLATION<br />
When installing the unit without using the sleeve / Lors de l’installation de l’appareil<br />
scans utiliser de manchon<br />
* 1 When you stand the unit, be careful not to damage the fuse on the rear.<br />
* 2 Not supplied for this unit.<br />
• The fuse blows. ] Are the red and black leads connected correctly?<br />
• Power cannot be turned on. ] Is the yellow lead connected?<br />
• No sound from the speakers. ] Is the speaker output lead short-circuited?<br />
• “PROTECT” appears on the display and no operation can be done. ] Is the speaker output lead<br />
short-circuited or touches the chassis of the car/head unit? ; Have you reset your unit?<br />
• Sound is distorted. ] Is the speaker output lead grounded? ; Are the “–” terminals of L and R speakers<br />
grounded in common?<br />
• Noise interfere with sounds. ] Is the rear ground terminal connected to the car’s chassis using shorter<br />
and thicker cords?<br />
• This unit becomes hot. ] Is the speaker output lead grounded? ; Are the “–” terminals of L and R<br />
speakers grounded in common?<br />
• This unit does not work at all. ] Have you reset your unit?<br />
12 V DC, NEGATIVE ground / 12 V CC, masse NÉGATIVE<br />
1209DTSMDTJEIN<br />
EN, FR<br />
© 2009 Victor Company of Japan, Limited<br />
To the car system / Au système autoradio<br />
• Pour éviter les courts-circuits:<br />
– Déconnectez la borne négative de la batterie et réaliser toutes les connexions avant d’installer l’appareil.<br />
– Recouvrez les prises des fils NON UTILISÉS avec du ruban isolant.<br />
• Assurez-vous de raccorder de nouveau la mise à la masse de cet appareil au châssis de la voiture après<br />
l’installation.<br />
• Remplacer le fusible par un de la valeur précisée.<br />
• Connectez des enceintes avec une puissance maximum de 50 W (impédance de 4 Ω à 8 Ω). Sinon, changez le<br />
réglage . (Voir la page 27 du MANUEL D’INSTRUCTIONS.)<br />
• Le dissipateur de chaleur devient très chaud après usage. Faire attention de ne pas le toucher en retirant cet<br />
appareil.<br />
PRECAUTIONS sur l’alimentation et la connexion des enceintes<br />
• NE CONNECTEZ PAS les fils d’enceintes du cordon d’alimentation à la batterie; sinon, l’appareil serait<br />
sérieusement endommagé.<br />
• AVANT de connecter les fils d’enceintes du cordon d’alimentation aux enceintes, vérifiez le câblage des enceintes<br />
de votre voiture.<br />
L’illustration suivante est un exemple d’installation typique. Si vous avez des questions ou avez besoin<br />
d’information sur des kits d’installation, consulter votre revendeur d’autoradios JVC.<br />
Do the required electrical connections<br />
(see page 2).<br />
Réalisez les connexions électriques (voir<br />
page 2).<br />
Install the unit at an angle<br />
of less than 30˚.<br />
Installez l’appareil avec un<br />
angle de moins de 30˚.<br />
Bend the appropriate tabs to hold the sleeve<br />
firmly in place.<br />
Tordez les languettes appropriées pour maintenir le<br />
manchon en place.<br />
TROUBLESHOOTING / EN CAS DE DIFFICULTES<br />
Part list / Liste de pièces<br />
A Hard case / Etui de transport (×1)<br />
B Control panel / Panneau de<br />
commande (×1)<br />
C Sleeve / Manchon (×1)<br />
D Trim plate / Plaque d’assemblage<br />
(×1)<br />
E Power cord / Cordon d’alimentation<br />
(×1)<br />
F Handles / Poignées (×2)<br />
Removing the unit / Retrait de l’appareil<br />
Release the rear section first... / Ouvrez la section arrière en premier...<br />
* 1 Lorsque vous mettez l’appareil à la verticale, faire attention de ne pas endommager le fusible situé sur l’arrière.<br />
* 2 Non fourni avec cet appareil.<br />
• Le fusible saute. ] Les fils rouge et noir sont-ils racordés correctement?<br />
• L’appareil ne peut pas être mise sous tension. ] Le fil jaune est-elle raccordée?<br />
• Pas de son des enceintes. ] Le fil de sortie d’enceinte est-il court-circuité?<br />
• “PROTECT” apparaît sur l’affichage et aucune opération ne peut être réalisée. ] Est-ce qu’un fil de<br />
sortie d’enceinte est court-circuité ou touche le châssis de la voiture/appareil principal? ; Avez-vous réinitialisez<br />
votre appareil?<br />
• Le son est déformé. ] Le fil de sortie d’enceinte est-il à la masse? ; Les bornes “–” des enceintes gauche et droit<br />
sont-elles mises ensemble à la masse?<br />
• Interférence avec les sons. ] La prise arrière de mise à la terre est-elle connectée au châssis de la voiture avec<br />
un cordon court et épais?<br />
• Cet appareil devient chaud. ] Le fil de sortie d’enceinte est-il à la masse? ; Les bornes “–” des enceintes<br />
gauche et droit sont-elles mises ensemble à la masse?<br />
• Cet appareil ne fonctionne pas du tout. ] Avez-vous réinitialisé votre appareil?<br />
1
Reset the unit. / Réinitialisez<br />
l’autoradio.<br />
Aerial input / Entrée d’antenne<br />
ELECTRICAL CONNECTIONS / RACCORDEMENTS ELECTRIQUES<br />
Connecting the external amplifiers or subwoofer / Connexion d’amplificateurs extérieurs ou d’un caisson de grave<br />
Remote lead / Fil d’alimentation à distance<br />
Signal cord /<br />
Cordon de signal * 1<br />
Remote lead / Fil d’alimentation à distance<br />
Signal cord /<br />
Cordon de signal * 1<br />
15 A fuse / Fusible 15 A<br />
For some VW/Audi or Opel (Vauxhall) automobiles / Pour certaines<br />
automobiles VW/Audi ou Opel (Vauxhall)<br />
You may need to modify the wiring of the supplied power cord as illustrated. / Vous<br />
aurrez peut-être besoin de modifier le câblage du cordon d’alimentation fourni comme<br />
montré sur l’illustration.<br />
• Contact your authorized car dealer before installing this unit. / Contactez votre revendeur<br />
automobile autorisé avant d’installer l’appareil.<br />
Original wiring / Câblage original<br />
ISO connector /<br />
Connecteur ISO<br />
Modified wiring 1 / Câblage modifié 1<br />
Use modified wiring 2 if the unit does not turn on. / Utilisez le câblage modifié 2 si l’appareil<br />
ne se met pas sous tension.<br />
Modified wiring 2 / Câblage modifié 2<br />
Y: Yellow / Jaune<br />
R: Red / Rouge<br />
2<br />
JVC Amplifier /<br />
JVC Amplificateur<br />
JVC Amplifier /<br />
JVC Amplificateur<br />
Y-connector / Connecteur Y * 1<br />
Y-connector / Connecteur Y * 1<br />
To the blue (white stripe) lead of the unit /<br />
Au fil bleu (bande blanche) de l’appareil<br />
Rear speakers or subwoofer / Enceintes arrière ou le caisson de grave<br />
Make the setting accordingly, see page 26 of the INSTRUCTIONS. /<br />
Faite le réglage en fonction, voir page 26 du MANUEL D’INSTRUCTIONS.<br />
Rear ground terminal / Borne arrière de masse<br />
Steering wheel remote input /<br />
Entrée de la télécommande de volant<br />
To the blue (white stripe) lead of the unit /<br />
Au fil bleu (bande blanche) de l’appareil<br />
* 1 Not supplied for this unit. / Non fourni avec cet<br />
appareil.<br />
* 2 Firmly attach the ground wire to the metallic<br />
body or to the chassis of the car—to the place<br />
uncoated with paint. / Attachez solidement le<br />
fil de mise à la masse au châssis métallique de la<br />
voiture—à un endroit qui n’est pas recouvert de<br />
peinture.<br />
IMPORTANT/IMPORTANT: A custom wiring harness (separately purchased) which is suitable for your car is recommended for connection between the unit and your car. / Un faisceau de câbles personnalisé (vendu<br />
séparément) correspondant à votre voiture est recommandé pour raccorder l'appareil et votre voiture.<br />
(A) If your car has an ISO terminal / Si votre voiture possède une prise ISO (B) If your car does NOT have an ISO terminal / Si votre voiture ne possède pas de prise ISO<br />
Custom wiring harness (separately purchased) /<br />
Faisceau de fils personnalisé (à acheter séparément)<br />
ISO connector / Connecteur ISO<br />
Å/ ı Rear speaker, right (Purple/Purple, black stripe) (+/–) / Enceintes arrière, droit<br />
(Violet/Violet, bande noire) (+/–)<br />
Ç/ Î Front speaker, right (Gray/Gray, black stripe) (+/–) / Enceintes avant, droit (Gris/<br />
Gris, bande noire) (+/–)<br />
‰/ Ï Front speaker, left (White/White, black stripe) (+/–) / Enceintes avant, gauche<br />
(Blanc/Blanc, bande noire) (+/–)<br />
Ì/ Ó Rear speaker, left (Green/Green, black stripe) (+/–) / Enceintes arrière, gauche<br />
(Vert/ Vert, bande noire) (+/–)<br />
Ô To mobile phone system (Brown) / Au système de téléphoneportable (Marron)<br />
Ò Car battery 12 V (Yellow) / Batterie de la voiture 12 V (Jaune)<br />
˜ Remote lead/power aerial, 200 mA max. (Blue, white stripe) / Fil d’alimentation<br />
à distance/antenne automatique, 200 mA max. (Bleu, bande blanche)<br />
ˆ To car light control switch (Orange, white stripe) / À l'interrupteur d'éclairage de<br />
la voiture (orange, bande blanche)<br />
Ø Accessory terminal (Red) / Prise accessoire (Rouge)<br />
∏ Metallic body/chassis of the car (Black) / Corps métallique/châssis de la voiture<br />
(Noir)<br />
Consult your JVC IN-CAR ENTERTAINMENT dealer or a company supplying kits for details<br />
about connection. / Pour en savoir plus sur connexions, consultez votre revendeur d’autoradio<br />
JVC ou une compagnie fournissant des kits.<br />
Custom wiring harness (separately purchased) /<br />
Faisceau de fils personnalisé (à acheter séparément)<br />
Connecting the external components in series / Connexion d’appareils extérieurs en série<br />
When connecting the external components, refer also to the manuals supplied for the components and adapter. / Lors de la connexion des appareils extérieurs, référez-vous aussi aux manuels fournis avec les appareils et les<br />
adaptateurs.<br />
Expansion port of the unit /<br />
Port d’extension de l’appareil<br />
E Power cord (supplied) /<br />
Cordon d’alimentation (fournie)<br />
To disconnect... /<br />
Pour déconnecter...<br />
Two components / Deux appareils:<br />
KS-BTA200 / KT-DB1000 * 3<br />
KS-U57 / KS-U58 * 4<br />
Expansion port / Port d’extension<br />
Three components / Trois appareils:<br />
KS-BTA200<br />
KT-DB1000<br />
KS-U57 / KS-U58 * 4<br />
Front speakers / Enceintes avant<br />
E Power cord (supplied) / Cordon d’alimentation<br />
(fournie)<br />
E Power cord (supplied) /<br />
Cordon d’alimentation (fournie)<br />
Caution / Precaution:<br />
Before connecting the external components, make sure that the unit is<br />
turned off. / Avant de connecter les appareils extérieurs, assurez-vous que<br />
l’appareil est hors tension.<br />
You can connect the JVC DAB tuner (KT-DB1000) or the following components through the various JVC adapters to the expansion port. / Vous pouvez connecter le tuner DAB JVC (KT-DB1000) ou les appareils suivants à l'aide<br />
de divers adaptateur JVC au port d'extension.<br />
• Connection cords may need to be purchased separately. / Vous pouvez avoir besoin d’acheter certains cordons de connexion séparément.<br />
Component / Appareil Adapter / Adaptateur Model name / Nom du modèle<br />
Bluetooth device / Périphérique Bluetooth Bluetooth adapter / Adaptateur Bluetooth KS-BTA200<br />
Portable audio player with line output jacks / Lecteur audio portable avec prises de sortie de ligne Line input adapter / Adaptateur d’entrée de ligne KS-U57<br />
Portable audio player with 3.5 mm stereo mini jack / Lecteur audio portable avec mini fiche stéréo de 3,5 mm AUX input adapter / Adaptateur d’entrée auxiliaire KS-U58<br />
* 3 To use these components, set the external input setting correctly (see page 27 of the INSTRUCTIONS). / Pour utiliser ces appareils, réglez l’entrée extérieure correctement (voir page 27 du MANUEL D’INSTRUCTIONS).<br />
* 4 If KS-BTA200 is available, connect it to position and connect KT-DB1000 to position . / Si vous disposez du KS-BTA200, connectez-le à la position et connectez le KT-DB1000 à la position .