3D film making with Panasonics HDC-Z10000 - Panasonic Business
3D film making with Panasonics HDC-Z10000 - Panasonic Business
3D film making with Panasonics HDC-Z10000 - Panasonic Business

Create successful ePaper yourself
Turn your PDF publications into a flip-book with our unique Google optimized e-Paper software.
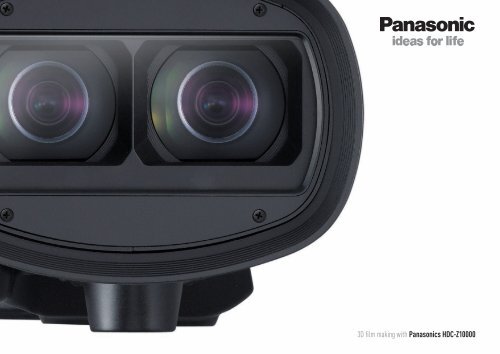
<strong>3D</strong> <strong>film</strong> <strong>making</strong> <strong>with</strong> <strong><strong>Panasonic</strong>s</strong> <strong>HDC</strong>-<strong>Z10000</strong>
tHe PanasoniC<br />
<strong>HDC</strong>-<strong>Z10000</strong><br />
Product photo 1.<br />
is the first full HD 2D/<strong>3D</strong> prosumer camcorder featuring<br />
numerous professional features and many manual setting<br />
options to come onto the market. The <strong>HDC</strong>-<strong>Z10000</strong> impresses<br />
at first sight <strong>with</strong> its robust camera body, but most of all it<br />
has plenty to offer from a technical point of view.<br />
stereo base<br />
The observer‘s first glance falls on the double lens which,<br />
<strong>with</strong> a fixed stereo base of 42 mm, offers a significantly<br />
more powerful <strong>3D</strong> effect than the <strong>3D</strong> ancillary lenses<br />
previously promoted by <strong>Panasonic</strong> in the consumer segment.<br />
Product photo 2.<br />
Lenses/foCaL LengtHs<br />
The two zoom lenses fitted make a very professional impression<br />
and provide plenty of latitude <strong>with</strong> a focal length<br />
of 32 - 320 mm (cf. 35 mm <strong>film</strong>). Furthermore, <strong>with</strong> an<br />
aperture of f1.5 (wide angle) and f2.8 (telephoto) they<br />
are very fast and therefore well-suited to indoor recording<br />
and low light situations. In addition, the lenses also enable<br />
<strong>3D</strong> macro recordings to be made down to a minimum distance<br />
of 45 cm for the first time.<br />
Timeline: 00:00:35 Timeline: 00:00:55 Timeline: 00:01:46<br />
Focal length: approx. f = 10 mm (90 mm equivalent <strong>with</strong> 35mm format)<br />
Focal length: approx. f = 20 mm (180 mm equivalent <strong>with</strong> 35mm format)<br />
Focal length: f = 2.8 mm (25.2 mm equivalent <strong>with</strong> 35mm format)<br />
Convergence: approx. C35<br />
Convergence: approx. C60<br />
Convergence: C30<br />
Aperture: T=2.8 Shutter: 1/50 sec<br />
Aperture: T=4 Shutter: 1/50 sec<br />
Aperture: T=3.5 Shutter: 1/1000 sec<br />
Object distance: approx. 1.2 m<br />
Object distance: approx. 4.0 m<br />
Object distance: Actor 5 m<br />
examPLe 1:<br />
out-of-sCreen effeCt<br />
A very strong negative parallax has been used for this closeup.<br />
The apparent window plane (screen plane) was aligned<br />
<strong>with</strong> the front part of the ski binder using the convergence<br />
dial. As a result, the ski projects a very long way out of the<br />
picture. As the image is restricted behind the skier by the rising<br />
piste, this avoids problems of too great a positive parallax<br />
in the background.<br />
examPLe 2:<br />
interview situation<br />
In order to be able to get „close“ to the actor in the interview,<br />
the lens was zoomed almost fully in for this „typical“ interview<br />
setting. The lenses were converged on the jacket so that the front<br />
part of the face protrudes slightly from the picture. To enable the<br />
viewer to concentrate fully on the actor and to avoid problems<br />
<strong>with</strong> too much positive parallax, the picture was set up so that the<br />
stone wall restricts the background.<br />
examPLe 3:<br />
aCtion sCene<br />
Wide angle settings provide an impressive <strong>3D</strong> effect.<br />
For this reason, most action scenes are shot in wide angle.<br />
The apparent window lies somewhat behind the front part of<br />
the yellow rail. It therefore projects slightly from the picture.<br />
The resulting unobtrusive infringement of the apparent<br />
window at the bottom edge of the picture was consciously<br />
accepted in the interests of better dynamics and a more powerful<br />
<strong>3D</strong> effect. The selected focal length, the distance from<br />
the object and the moderate convergence give no problems<br />
<strong>with</strong> background parallax.
Product photo 3.<br />
manuaL<br />
settings / automatiC<br />
For the first time, the <strong>Panasonic</strong> <strong>HDC</strong>-<strong>Z10000</strong> provides manual<br />
and very convenient control of the aperture, focus and zoom<br />
<strong>with</strong> three separate adjustment rings directly on the lens.<br />
(Product photo 3.)<br />
ia moDe<br />
Of course, the well-established ia mode (intelligent Auto)<br />
continues to be provided <strong>with</strong> many automatic functions such<br />
as auto focus and auto iris. The iA mode gives the beginner<br />
valuable assistance, while ambitious <strong>3D</strong> <strong>film</strong>makers will soon<br />
discover the creative options of the manual adjustments for<br />
themselves.<br />
Product photo 4.<br />
ConvergenCe DiaL<br />
The dial which is so important for <strong>3D</strong> recording is not located<br />
directly on the lens but on the side of the camera body.<br />
Marked <strong>with</strong> the abbreviation „Conv“, the convergence dial<br />
enables the convergence of the two camera images - the<br />
angle <strong>with</strong> respect to one another - to be adjusted, likewise<br />
manually. Along <strong>with</strong> the stereo base, the convergence is the<br />
decisive factor for a <strong>3D</strong> recording and determines where the<br />
apparent window plane (screen plane) for the recording lies.<br />
(Product photo 4.)<br />
Product photo 5. Product photo 6.<br />
autostereosCoPiC DisPLay anD <strong>3D</strong> guiDe<br />
The <strong>Z10000</strong> has two further features to enable you to play effectively <strong>with</strong> the convergence. Firstly, the 8.8 cm autostereoscopic<br />
LCD display which is concealed in the front part of the handle and can be folded out (Photo 5: Product photo „Display retracted“<br />
and Photo 6: Product photo „Display extended“), and secondly the <strong>3D</strong> guide, which processes the different camera parameters,<br />
displays the comfortable <strong>3D</strong> range and therefore ensures that you make <strong>3D</strong> recordings correctly. (Product photo 5-6.)<br />
The autostereoscopic display - which at the same time is a touch screen for controlling the camera menu - can have various<br />
display modes. As well as <strong>3D</strong> viewing <strong>with</strong>out glasses (autostereoscopy), one camera image or a mix of the two images can be<br />
placed alternately on the display, in which it is easy to assess the offset, the parallaxes of the images.
autostereosCoPiC<br />
DisPLay<br />
anD<br />
<strong>3D</strong> guiDe<br />
If you press the <strong>3D</strong> guide button on the side of the camera<br />
housing, particulars of the comfortable recording range for<br />
monitors up to 77“ (white) or optionally 200“ (green) appear<br />
next to the convergence (C value) on the display. This value<br />
displayed by the <strong>3D</strong> guide is a manufacturer‘s figure, which<br />
can of course vary depending on the subject. If the focal<br />
length and/or convergence are changed, then the recommended<br />
recording range for <strong>3D</strong> recordings also changes.<br />
DIY solution. Small auxiliary lines under the display provide a constant reminder not to overdo the image parallax.<br />
With 1 million pixels, the sharpness of the display is in<br />
most cases adequate for judging the focus. The camera also<br />
provides a „peaking“ function where the objects in focus are<br />
additionally accentuated.<br />
If you do not trust the display because of the ambient<br />
lighting, you can of course view the whole scene through the<br />
viewfinder.<br />
<strong>3D</strong> stabiLiZer<br />
<strong>3D</strong> is movement. It is therefore a good thing that <strong>Panasonic</strong><br />
has provided the <strong>HDC</strong>-<strong>Z10000</strong> <strong>with</strong> a <strong>3D</strong> stabilizer. Although<br />
this is not quite as good as the 2D version, you should certainly<br />
activate it when panning or holding the camera in your hand.<br />
(Product photo 7.)<br />
Product photo 7.<br />
user buttons for <strong>3D</strong><br />
(SeT-uP)<br />
The user buttons are a great feature. each of the three buttons<br />
can be individually allocated a selected camera function<br />
which can then be invoked directly, bypassing the menu.<br />
Depending on your preference, frequently used functions such<br />
as Focus Assist, <strong>3D</strong> mode or Histogram are therefore available<br />
at the press of a button. (Product photo 7.)<br />
reCorDing anD<br />
formats in <strong>3D</strong> moDe<br />
The camera is equipped <strong>with</strong> two 1/4.1 inch 3MOS sensors<br />
which each record a full HD signal in accordance <strong>with</strong> AVCHD<br />
2.0 standard or AVCHD <strong>3D</strong> / Progressive. Thanks to two SD<br />
card slots, you have a choice of either simultaneously creating<br />
a backup copy (safety copy) or writing the two SD cards consecutively<br />
(sequential usage) when saving the data. (Product<br />
photo 7.)
Zebra (beneFITS)<br />
Product photo 8.<br />
Another function from the professional sector is the so-called<br />
zebra. In zebra mode, the overexposed parts of the picture (hot<br />
spots) are marked on the display. This is particularly important<br />
for <strong>3D</strong>, as overexposed - and therefore completely white<br />
areas - no longer contain any depth information and irritate<br />
the viewer.<br />
Histogram (beneFITS)<br />
Another function from the professional sector is the so-called zebra. In zebra mode, the overexposed parts of the picture (hot<br />
spots) are marked on the display. This is particularly important for <strong>3D</strong>, as overexposed - and therefore completely white areas -<br />
no longer contain any depth information and irritate the viewer.<br />
Controlling the brightness distribution between the two camera lenses <strong>with</strong> the help of the histogram (in the monitor screen at the bottom right).
CoLor bars<br />
ein weiteres sinnvolles Feature des <strong>Z10000</strong> ist der Farbbalken.<br />
Dieses vom Camcorder generierte Testbild wird<br />
üblicherweise nach dem Formatieren als Farbreferenz auf<br />
die SD-Karte aufgezeichnet.<br />
Product photo 9.<br />
auDio funCtions<br />
(TWIn XLR TeRMInALS)<br />
Die XLR Audioschnittstelle<br />
befindet sich<br />
auf der anderen Seite.<br />
(höhe Display)<br />
The camera has an internal microphone which enables recordings to be made in 5.1 Surround and stereo. Two XLR ports also<br />
enable professional audio equipment to be connected. The audio input can be manually adjusted <strong>with</strong> the help of miniature<br />
control dials.<br />
Making of „fired up“
Making of „fired up“<br />
01<br />
01 02 03 04 05<br />
Shooting „Fired up“ on the Stubai Glacier was an absolute<br />
test of strength for the <strong>film</strong> team and the <strong>HDC</strong>-<strong>Z10000</strong>.<br />
02<br />
The <strong>film</strong> crew used two <strong>HDC</strong>-<strong>Z10000</strong>s for the camera test.<br />
03<br />
The A-camera was equipped to professional standards <strong>with</strong> a<br />
compendium, an additional control motor and a follow focus.<br />
04<br />
In order to cope <strong>with</strong> the extreme lighting conditions on the mountain, only an nD filter (nD9) was fitted in front of the lens on<br />
the b-camera, and the display was protected against direct light using a home-made shield.<br />
05<br />
The A-camera was used for all staged settings where maximum<br />
control was necessary, e.g. for interviews.
Making of „fired up“<br />
06<br />
06 07 08 09 10<br />
The b-camera was used for action shots on skis and for panning<br />
<strong>with</strong> the camera using the GlideCam. It was also used as<br />
a 2nd unit camera throughout the shooting.<br />
07<br />
Spectacular jumps were also captured <strong>with</strong> the <strong>HDC</strong>-<strong>Z10000</strong>.<br />
Here, freeski experts Roy Kittler and Florian Geyer cross a<br />
kicker together.<br />
08<br />
Preparations at base camp on the Stubai Glacier. The equipment<br />
had to be transported on the mountain using a gondola.<br />
09<br />
Second day of shooting. Shooting had to be spontaneously moved to the valley due to wind speeds of 120 km/h prevailing on<br />
the glacier. A rustic snack-bar and the Grawa Waterfall provided a great backdrop for atmospheric <strong>3D</strong> pictures.<br />
10<br />
The spray from the waterfall made it necessary to continuously<br />
clean the lens. Just a single drop in front of the lens<br />
destroys the spatial illusion.
Making of „fired up“<br />
11<br />
11 12 13 14 15 16<br />
The sun reflector was converted to an umbrella <strong>with</strong>out<br />
further ado.<br />
12<br />
Take 4. Full concentration from the camera crew.<br />
13<br />
Controlling the brightness distribution between the two<br />
camera lenses <strong>with</strong> the help of the histogram (in the monitor<br />
screen at the bottom right).<br />
14<br />
Preparing for the interview <strong>with</strong> freeski expert Roy Kittler at<br />
the Dresdner Hütte. A wide-angle macro setting or, as in this<br />
case, a long-focal-length setting <strong>with</strong> a minimum distance<br />
of approximately four metres are available for shooting closeups<br />
<strong>with</strong> the <strong>HDC</strong>-<strong>Z10000</strong>. Here, a stone wall of the house<br />
additionally restricts the view so as not to produce too great<br />
a parallax of the background.<br />
15<br />
DIY solution. Small auxiliary lines under the display provide a<br />
constant reminder not to overdo the image parallax.<br />
16<br />
The team from Saubere Filme after successful completion of<br />
their work. Frozen through but satisfied.
tiPs & triCks ks for <strong>3D</strong> vi viDeos eos<br />
witH tHe e <strong>HDC</strong>-<strong>Z10000</strong><br />
It is not easy to find the right settings for a <strong>3D</strong> picture. Here<br />
are a few suggestions and tips which will help you shoot<br />
impressive <strong>3D</strong> images <strong>with</strong> the <strong>HDC</strong>-<strong>Z10000</strong>.<br />
tHink in <strong>3D</strong>!<br />
Develop a story which will be shown to particular advantage<br />
in <strong>3D</strong>. Ask yourself where the added value of the story lies<br />
and only use „Out of Screen“ effects selectively. bear in<br />
mind that, as well as the spatial depth, you must also fill the<br />
emotional depth of your story.<br />
finD tHe rigHt subjeCt.<br />
Find shooting locations which offer plenty of depth but also<br />
enable you to confine the image. In this way, when taking close-up<br />
pictures for example, in spite of the fixed stereo base<br />
of 42 mm, you can prevent the foreground and background<br />
drifting apart and giving the viewer a headache.<br />
take t your time.<br />
To start <strong>with</strong>, you will need more time to find the right<br />
settings. not only must the exposure and focus be right, but<br />
the convergence must also be adjusted before every shot.<br />
Check <strong>with</strong> the help of the <strong>3D</strong> guide whether the convergence<br />
setting you have selected is suitable for the viewer. Do not<br />
worry; your working speed will soon increase <strong>with</strong> practice.<br />
keeP it CLean!<br />
Check that the lenses are really clean before every shot.<br />
Small specks, raindrops etc. on a lens cause massive irritation<br />
when watching <strong>3D</strong> recordings. Cleanliness also applies to<br />
the autostereoscopic touchscreen display This is because you<br />
can easily miss dirt on the lens if the touchscreen is covered<br />
in fingerprints.<br />
move tHe Camera!<br />
A change in perspective during a recording is important<br />
information for our spatial perception and reinforces the <strong>3D</strong><br />
effect of the image. In doing so, try to move the camcorder<br />
as smoothly as possible. The <strong>HDC</strong>-<strong>Z10000</strong>‘s <strong>3D</strong> stabiliser will<br />
provide valuable assistance.<br />
CLose-uP aCtion.<br />
In spite of the relatively large stereo base, portrait pictures<br />
can still be taken <strong>with</strong> the <strong>HDC</strong>-<strong>Z10000</strong>. use the <strong>3D</strong> macro<br />
<strong>with</strong> a minimum distance of 45 cm, or zoom in fully and choose<br />
a camera distance of approximately 4 m. Care is required<br />
<strong>with</strong> both options however. The background must not be infinite<br />
as otherwise the parallax exhibited will be too large, i.e.<br />
uncomfortable. The <strong>3D</strong> guide will again provide assistance.<br />
stage tHe PLayers<br />
in sPaCe!<br />
Consider how and where you are going to put the people in<br />
front of the camera. Have them come towards you moving<br />
through the picture; place them next to one another or staggered<br />
etc. In doing so, put your 2D habits to one side.<br />
tv or Large sCreen<br />
Cinema?<br />
While you are shooting, think about the size at which your<br />
<strong>3D</strong> video will finally be shown. In Mode 1, the <strong>3D</strong> guide<br />
calculates comfortable parallaxes for displays up to 77“ and<br />
in Mode 2 a setup for 200“ displays. Try to work <strong>with</strong>in the<br />
stated number of metres - then there will be nothing to stand<br />
in the way of a pleasant <strong>3D</strong> viewing experience.<br />
Caution -<br />
„risk of injury“!<br />
Make sure that no objects which lie in front of the apparent<br />
window are cut off by the image. In particular, objects which<br />
protrude into the image from the side are perceived as irritating<br />
by many people and spoil the three-dimensional illusion<br />
(window violation or apparent window violation).<br />
Don‘t be DaZZLeD!<br />
back-lit shots can be very beautiful and atmospheric - this<br />
also applies to <strong>3D</strong>. However, try to avoid lens flare at all<br />
costs! As the light strikes the two lenses at an angle of<br />
incidence which is easily changed, the light is broken up<br />
differently. Lens flares on the left and right camera image<br />
then look different and irritate the viewer.<br />
triaL anD error – im-<br />
Prove anD sHare.<br />
Try different focal lengths and different convergences and<br />
document your settings. In this way, you will soon get a feel<br />
for what works well and what does not work so well. Gain<br />
your own experience and share your knowledge <strong>with</strong> other<br />
<strong>3D</strong> <strong>film</strong>makers. This is the only way for the <strong>3D</strong> community to<br />
grow.
<strong>Panasonic</strong> Deutschland<br />
Winsbergring 15<br />
22525 Hamburg<br />
Tel. 040 / 8549-0<br />
Fax 040 / 8549-2500<br />
www.panasonic.de<br />
<strong>Panasonic</strong> Marketing europe GmbH<br />
Hagenauer Strasse 43<br />
65203 Wiesbaden