pdf for printing - Image Processing and Analysis Group
pdf for printing - Image Processing and Analysis Group
pdf for printing - Image Processing and Analysis Group

Create successful ePaper yourself
Turn your PDF publications into a flip-book with our unique Google optimized e-Paper software.
Programming <strong>for</strong> <strong>Image</strong><br />
<strong>Processing</strong>/<strong>Analysis</strong> <strong>and</strong><br />
Visualization using<br />
The Visualization Toolkit<br />
http://noodle.med.yale.edu/seminar/seminar.html<br />
Xenios Papademetris<br />
papad@noodle.med.yale.edu<br />
BML 325, 5-7294<br />
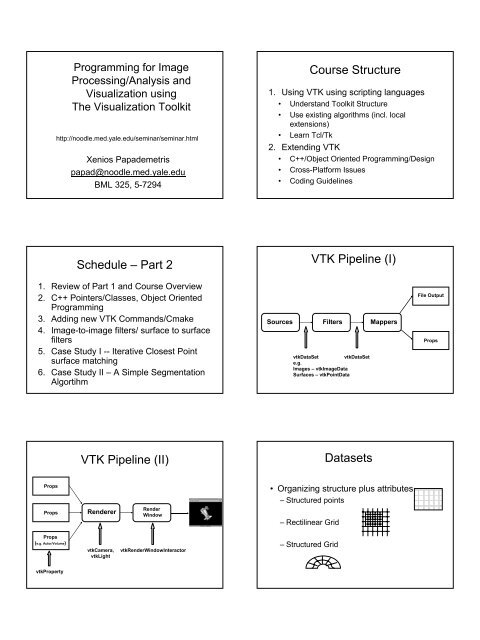
Schedule – Part 2<br />
1. Review of Part 1 <strong>and</strong> Course Overview<br />
2. C++ Pointers/Classes, Object Oriented<br />
Programming<br />
3. Adding new VTK Comm<strong>and</strong>s/Cmake<br />
4. <strong>Image</strong>-to-image filters/ surface to surface<br />
filters<br />
5. Case Study I -- Iterative Closest Point<br />
surface matching<br />
6. Case Study II – A Simple Segmentation<br />
Algortihm<br />
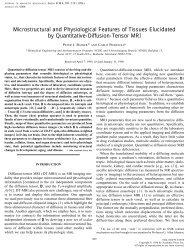
Props<br />
Props<br />
Props<br />
(e.g. Actor/Volume)<br />
vtkProperty<br />
VTK Pipeline (II)<br />
Renderer<br />
vtkCamera,<br />
vtkLight<br />
Render<br />
Window<br />
vtkRenderWindowInteractor<br />
Course Structure<br />
1. Using VTK using scripting languages<br />
• Underst<strong>and</strong> Toolkit Structure<br />
• Use existing algorithms (incl. local<br />
extensions)<br />
• Learn Tcl/Tk<br />
2. Extending VTK<br />
• C++/Object Oriented Programming/Design<br />
• Cross-Plat<strong>for</strong>m Issues<br />
• Coding Guidelines<br />
VTK Pipeline (I)<br />
Sources Filters Mappers<br />
vtkDataSet<br />
vtkDataSet<br />
e.g.<br />
<strong>Image</strong>s – vtk<strong>Image</strong>Data<br />
Surfaces – vtkPointData<br />
• Organizing structure plus attributes<br />
– Structured points<br />
– Rectilinear Grid<br />
– Structured Grid<br />
Datasets<br />
File Output<br />
Props
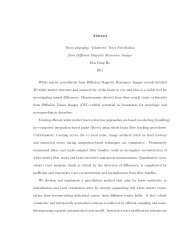
Data Set<br />
Data Representation<br />
(vtkDataSet)<br />
Points<br />
(vtkPoints)<br />
Define Location<br />
Cells<br />
(vtkCellArray)<br />
Define Topology<br />
Point Attributes<br />
(vtkPointData)<br />
Point Properties<br />
(e.g. intensity)<br />
Arrays of<br />
Numbers<br />
(one per point<br />
or cell)<br />
vtkDataArray<br />
Cell Attributes<br />
(vtkPointData)<br />
Point Properties<br />
(e.g. normal)<br />
Representing arrays with<br />
vtkDataArray<br />
• vtkDataArray is an abstract superclass <strong>for</strong> classes representing<br />
arrays of vectors called tuples (or numbers treated as vectors of<br />
length 1). Each tuple consists of a set of numbers or<br />
components.<br />
• Derived Classes include vtkUnsignedCharArray,<br />
vtkShortArray, vtkFloatArray, vtkDoubleArray etc.<br />
• Can function either as a dynamic array (lower per<strong>for</strong>mance) or<br />
a fixed length array<br />
• All data in VTK is stored ultimately in one of the many derived<br />
classes of vtkDataArray,<br />
e.g. in the case of vtk<strong>Image</strong>Data the intensities are stored in a<br />
vtkDataArray having dimensions equal to the number of voxels<br />
<strong>and</strong> vector length typically equal to 1 (3 <strong>for</strong> color images,<br />
Number of Frames <strong>for</strong> multiframe data such as fMRI cardiac<br />
etc.)<br />
A concrete example vtkFloatArray<br />
Mode 1 – Fixed Length Array:<br />
To create in TCL type<br />
vtkFloatArray arr<br />
arr SetNumberOfComponents 1<br />
arr SetNumberOfTuples 20<br />
arr SetComponent 10 0 10.0<br />
arr SetTuple1 11 9.0<br />
set b [ arr GetComponent 10 0 ]<br />
This creates an array of 20 (Number of Tuples) vectors each<br />
having size 1 (Number of Components)<br />
We access elements in this array be using the SetComponent<br />
<strong>and</strong> GetComponent methods. All indices start at 0.<br />
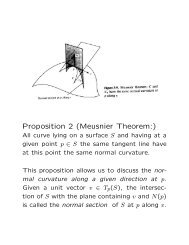
Cells<br />
• Cell is defined by an ordered list of<br />
points<br />
– Triangle, quadrilateral points specified<br />
counter clockwise<br />
– Others as shown<br />
6<br />
2<br />
Tetrahedron<br />
0<br />
3<br />
4<br />
5<br />
1 3<br />
2<br />
vtkDataArray Hierarchy<br />
0<br />
7<br />
1<br />
Hexahedron<br />
A concrete example vtkFloatArray<br />
Mode 2 – Dynamic Array<br />
To create in TCL type<br />
vtkFloatArray arr<br />
arr SetNumberOfComponents 1<br />
arr InsertNextTuple1 5<br />
arr InsertNextTuple1 10<br />
set b [ arr GetComponent 1 0 ]<br />
This creates a dynamic array of vectors each having size 1<br />
(Number of Components). The InsertNextTuple comm<strong>and</strong><br />
allocates memory dynamically <strong>and</strong> places the value there<br />
Note also (InsertNextTuple2, InsertNextTuple3,4,9 <strong>for</strong> multicomponent<br />
arrays)
<strong>Image</strong>s are Simple Data-sets<br />
vtk<strong>Image</strong>Data<br />
Points<br />
(vtkPoints)<br />
Define Location<br />
Cells<br />
(vtkCellArray)<br />
Define Topology<br />
Implicitly Defined by <strong>Image</strong> Specification<br />
Point Attributes<br />
(vtkPointData)<br />
Point Properties<br />
(e.g. intensity)<br />
Arrays of<br />
Numbers<br />
(one per point<br />
or cell)<br />
vtkDataArray<br />
Cell Attributes<br />
(vtkCellData)<br />
Cell Properties<br />
(e.g. normal)<br />
Rarely Used<br />
Manually Creating an <strong>Image</strong> in TCL<br />
vtk<strong>Image</strong>Data img<br />
img SetDimensions 10 10 2<br />
img SetOrigin 0 0 0<br />
img SetSpacing 0.78 0.78 1.5<br />
img SetScalarType $VTK_SHORT<br />
img SetNumberOfScalarComponents 1<br />
img AllocateScalars<br />
Intensity values can be accessed using the scalar array i.e.<br />
Point 0 is (0,0,0), point 1 is (1,0,0), point 10 is (0,1,0), point 100 is (0,0,1)<br />
set data [ [ img GetPointData ] GetScalars ]<br />
$data SetComponent 10 0 5.0<br />
set v [ $data GetComponent 10 0 ]<br />
Set v2 [ $img GetScalarComponentAsFloat 0 1 0 0 ]<br />
( this un<strong>for</strong>tunately is the nearest vtk comes to a getvoxel, no set voxel<br />
comm<strong>and</strong>)<br />
A First Example<br />
(http://www.vtk.org/example-code.php)<br />
Creating a sphere in Tcl, C++ or Java, using the underlying<br />
C++ VTK libraries.<br />
vtk<strong>Image</strong>Data<br />
• vtk<strong>Image</strong>Data is the basic VTK class <strong>for</strong> storing<br />
images.<br />
• It is defined by 4 key elements<br />
– Dimensions -- these define the size of the image<br />
– Origin -- the position in 3D space of point 0 0 0<br />
– Spacing -- the voxel dimensions<br />
– Scalar Type -- the type of the image (e.g. float, short<br />
etc)<br />
• An 4x4x4 image has 4x4x4=64 points <strong>and</strong><br />
3x3x3=27 cubic cells (both are implicitly defined)<br />
Multi-Plat<strong>for</strong>m Program Structure<br />
Our own C++ Code<br />
Computational<br />
Aspects<br />
Our own Tcl/Tk Code (or Python, Java)<br />
VTK<br />
Open GL<br />
3D<br />
Graphics<br />
Hardware Layer (Windows/Linux/Unix/Mac OS X)<br />
TCL – part 1<br />
Tcl / Tk<br />
(or Python/Tk<br />
or Java)<br />
Graphical User<br />
Interface (GUI)<br />
# First we include the VTK Tcl packages which will make available<br />
# all of the vtk comm<strong>and</strong>s from Tcl. The vtkinteraction package defines<br />
# a simple Tcl/Tk interactor widget.<br />
package require vtk;<br />
package require vtkinteraction<br />
# create sphere geometry<br />
vtkSphereSource sphere<br />
sphere SetRadius 1.0<br />
sphere SetThetaResolution 18<br />
sphere SetPhiResolution 18<br />
# map to graphics library<br />
vtkPolyDataMapper map;<br />
map SetInput [sphere GetOutput]<br />
# actor coordinates geometry, properties, trans<strong>for</strong>mation<br />
vtkActor aSphere<br />
aSphere SetMapper map<br />
[aSphere GetProperty] SetColor 0 0 1; # blue<br />
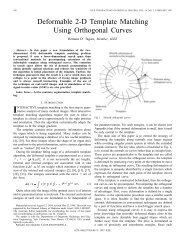
Source<br />
Mapper<br />
Actor
TCL – part 2<br />
# actor coordinates geometry, properties, trans<strong>for</strong>mation<br />
vtkActor aSphere<br />
aSphere SetMapper map<br />
[aSphere GetProperty] SetColor 0 0 1; # blue<br />
# create a renderer add the sphere<br />
vtkRenderer ren1<br />
ren1 AddActor aSphere<br />
ren1 SetBackground 1 1 1;# Background color white<br />
# create a window to render into<br />
vtkRenderWindow renWin<br />
renWin AddRenderer ren1<br />
# create an interactor<br />
vtkRenderWindowInteractor iren<br />
iren SetRenderWindow renWin<br />
vtkRenderWindowInteractor<br />
# Render an image; since no lights/cameras specified, created automatically<br />
renWin Render<br />
Java – part 1<br />
import vtk.*;<br />
public class test {<br />
// in the static constructor we load in the native code<br />
// The libraries must be in your path to work<br />
static {<br />
System.loadLibrary("vtkCommonJava"); System.loadLibrary("vtkFilteringJava");<br />
System.loadLibrary("vtkIOJava"); System.loadLibrary("vtkImagingJava");<br />
System.loadLibrary("vtkGraphicsJava"); System.loadLibrary("vtkRenderingJava");<br />
}<br />
public static void main (String[] args)<br />
{<br />
// create sphere geometry<br />
vtkSphereSource sphere = new vtkSphereSource();<br />
sphere.SetRadius(1.0);<br />
sphere.SetThetaResolution(18);<br />
sphere.SetPhiResolution(18);<br />
// map to graphics objects<br />
vtkPolyDataMapper map = new vtkPolyDataMapper();<br />
map.SetInput(sphere.GetOutput());<br />
// actor coordinates geometry, properties, trans<strong>for</strong>mation<br />
vtkActor aSphere = new vtkActor();<br />
aSphere.SetMapper(map);<br />
aSphere.GetProperty().SetColor(0,0,1); // color blue<br />
Programming Languages<br />
Mapper<br />
Actor<br />
Renderer<br />
Render<br />
Window<br />
Source<br />
Mapper<br />
Actor<br />
• Interpreted vs Compiled Languages<br />
– Note that classic distinction is blurring thanks to onthe-fly<br />
compilers (e.g. Tcl 8.x)<br />
• Interpreted Languages<br />
– e.g. BASIC, Matlab, Tcl, Python, Perl …<br />
– Fast development, computationally inefficient<br />
• Compiled Languages<br />
– e.g. C/C++, Fortran, Java(?)<br />
– Computationally more efficient but extra step in<br />
development cycle<br />
#include "vtkSphereSource.h"<br />
#include "vtkPolyDataMapper.h"<br />
#include "vtkActor.h"<br />
#include "vtkRenderWindow.h"<br />
#include "vtkRenderer.h"<br />
#include "vtkRenderWindowInteractor.h"<br />
C++ – part 1<br />
void main ()<br />
{<br />
// create sphere geometry<br />
vtkSphereSource *sphere = vtkSphereSource::New();<br />
sphere->SetRadius(1.0);<br />
sphere->SetThetaResolution(18);<br />
sphere->SetPhiResolution(18);<br />
vtkPolyDataMapper *map = vtkPolyDataMapper::New();<br />
map->SetInput(sphere->GetOutput());<br />
// actor coordinates geometry, properties, trans<strong>for</strong>mation<br />
vtkActor *aSphere = vtkActor::New();<br />
aSphere->SetMapper(map);<br />
aSphere->GetProperty()->SetColor(0,0,1); // sphere color blue<br />
…<br />
}<br />
Source<br />
Mapper<br />
Actor<br />
Comment on Language Selection<br />
• VTK can be used from any one of C++/Java/Tcl<br />
<strong>and</strong> Python<br />
• Some features not accessible from the scripting<br />
languages<br />
• In Java/Tcl/Python our own code can:<br />
– Be used to join st<strong>and</strong>ard VTK elements in a pipeline<br />
– Call existing VTK routines<br />
• In C++ we can do all of the above plus<br />
– Write new filters/sources etc as required (which can in<br />
turn be used from the other languages)<br />
Interpreted Languages<br />
• Program execution is per<strong>for</strong>med by the interpreter or<br />
shell e.g.<br />
– TCL (tcsh/wish)<br />
• Allows <strong>for</strong> interactive comm<strong>and</strong> execution<br />
• Faster development cycle because there is no lengthy<br />
compilation step<br />
• Slower per<strong>for</strong>mance as each comm<strong>and</strong> needs to be<br />
parsed be<strong>for</strong>e it is executed<br />
• Simpler to use!
Compiled Languages<br />
• Compiler converts source code into executable.<br />
• Typically allows <strong>for</strong> st<strong>and</strong>alone programs<br />
(especially if statically linked – more later)<br />
• Slower development cycle because there is a<br />
compilation step.<br />
• Less prone to syntax errors as compiler flags<br />
these out.<br />
• More complex to use some underst<strong>and</strong>ing of<br />
lower level computer fundamentals is necessary.<br />
Step 1 – creating the object file<br />
(compiling)<br />
(This is assuming a UNIX setup)<br />
In the same directory as the file cosine.c type<br />
g++ –c cosine.c<br />
This if everything works out will produce the object file<br />
cosine.o<br />
Step 3 -- Execution<br />
Typing `cosine’ on the comm<strong>and</strong> prompt, will (roughly)<br />
1. Load the program cosine into memory<br />
2. Load the system shared libraries into memory (e.g. libC<br />
<strong>and</strong> libm)<br />
3. Start the program by calling the main function.<br />
Compiling a simple C++ program<br />
(single source file cosine.c)<br />
#include <br />
#include <br />
int main(int argv,char** argv)<br />
{<br />
printf(”Sin(40)=%5.3f\n”,<br />
sin(40.0*M_PI/180.0));<br />
}<br />
(In case you are unsure this program simply prints the value of<br />
the cosine of 40 degrees, the ugly 40.0*M_PI/180.0 construct is<br />
needed as the cos function requires its arguments to be in radians)<br />
Step 2 – creating the executable<br />
(linking)<br />
(Again assuming a UNIX setup)<br />
In the same directory as the file cosine.o type<br />
g++ –o cosine cosine.o -lm<br />
Output File<br />
Statement to link in the math library<br />
libm.so. In unix shared libraries are<br />
assumed to begin with `lib’ which is<br />
not included in the link directive.<br />
More on Libraries<br />
• Typically many different programs are built using st<strong>and</strong>ard<br />
building blocks e.g.<br />
– Math Library<br />
– I/O Library<br />
– Graphics Library<br />
– Custom libraries e.g. to read/write certain medical image <strong>for</strong>mats<br />
• Libraries can be created as static or dynamic.<br />
– Static: each program has its own copy of the library embedded in the<br />
executable (typically .a or .lib)<br />
– Dynamic: one copy of the library <strong>for</strong> the whole system (typically .dll or<br />
.so)
Compiling a more complicated<br />
C++ program <strong>and</strong> library<br />
Project consists of 5 files:<br />
1. utility.h -- header file defining the specifications of the utility code<br />
2. Utility.cpp – actual code <strong>for</strong> the utility code<br />
3. Print.h – header file <strong>for</strong> the <strong>printing</strong> code<br />
4. print.cpp – implementation of the <strong>printing</strong> code<br />
5. Main.cpp -- main program that uses code in utility.cpp <strong>and</strong><br />
print.cpp<br />
Plan:<br />
1. Create a library containing the code in utility.cpp <strong>and</strong> readwrite.cpp<br />
2. Link the library with the object file main.o to create the executable<br />
print.h<br />
print.h <strong>and</strong> print.cpp<br />
#include <br />
void printnumber(float t);<br />
print.cpp<br />
#inlcude “print.h”<br />
void printnumber(float t)<br />
{<br />
printf(”The number is %5.2f\n”,t);<br />
}<br />
Compling <strong>and</strong> Linking<br />
Method 1 – no libaries<br />
g++ -c utility.c produces utility.o<br />
g++ -c print.c produces print.o<br />
g++ -c main.c produces main.o<br />
g++ -o main main.o utility.o print.o –lm<br />
This yields the final executable main<br />
Note that the following one-step procedure is also possible but only<br />
useful <strong>for</strong> really small projects:<br />
g++ -o main main.cpp utility.cpp print.cpp –lm<br />
Utility.h<br />
Utility.h <strong>and</strong> Utility.cpp<br />
#include <br />
float deg2rad(float t);<br />
Utility.cpp<br />
#include “utility.h”<br />
float deg2rad(float t)<br />
{<br />
return t*M_PI/180.0;<br />
}<br />
main.cpp<br />
#include “print.h”<br />
#include “utility.h”<br />
#include “math.h”<br />
Main.cpp<br />
int main (int argc,char **argv)<br />
{<br />
float t=40.0;<br />
float trad=deg2rad(t);<br />
float costrad=cos(trad);<br />
printnumber(costrad);<br />
}<br />
Compling <strong>and</strong> Linking<br />
Method 2 – static library method<br />
g++ -c utility.c produces utility.o<br />
g++ -c print.c produces print.o<br />
ar -cr libutil.a print.o utility.o produces libutil.a<br />
(a ranlib step may also be needed)<br />
g++ -c main.c produces main.o<br />
g++ -o main -lutil –lm<br />
This yields the final executable main by linking it with the library libutil.a <strong>and</strong> the<br />
math library libm.so. The size of main is approximately equal to<br />
Size(main,o) + size(libutil.a) + overhead<br />
The executable main will run just fine even if libutil.a is deleted.
Compling <strong>and</strong> Linking<br />
Method 3 – shared library method<br />
g++ -c utility.c produces utility.o<br />
g++ -c print.c produces print.o<br />
g++ -shared -o libutil.so print.o utility.o produces libutil.so<br />
g++ -c main.c produces main.o<br />
g++ -o main -lutil –lm<br />
This yields the final executable main by linking it with the library libutil.so <strong>and</strong><br />
the math library libm.so. The size of main is approximately equal to<br />
Size(main,o) + overhead<br />
The executable main will NOT run if libutil.a is deleted.<br />
The LD_LIBRARY_PATH variable also needs to be set to point to the location<br />
of libutil.so<br />
Extending VTK – the gameplan<br />
• Gather our own code into one or more shared libraries<br />
• Automatically wrap the library to generate interface code to<br />
make our library accessible from TCL (Java/Python also<br />
possible)<br />
• Load our library into the tcl interpreter in effect making our code<br />
appear as additional TCL comm<strong>and</strong>s<br />
• Use TCL as a glue language to test/call/debug our C++ code.<br />
“Homework’’<br />
• If you are not familiar with basic C/C++ get a book <strong>and</strong> read<br />
about it. I will discuss the object stuff in detail but you should be<br />
familiar with<br />
– Basic syntax<br />
– Loop/conditional operators<br />
– Procedures <strong>and</strong> functions<br />
– Input/output statements<br />
– Variable types<br />
• If you have not already go through the slides from the last<br />
seminar series <strong>and</strong> freshen up on some of the material there. I<br />
will be assuming some familiarity with it.<br />
Automating compiling/linking<br />
The make comm<strong>and</strong><br />
The compiling process of even the simplest project involves the<br />
typing of a large number of comm<strong>and</strong>s.<br />
• The process is automated on UNIX using the make comm<strong>and</strong><br />
<strong>and</strong> its corresponding macro file (makefile)<br />
• On Windows (using Visual C++) the same is done using either<br />
nmake (<strong>and</strong> makefiles) or project files in Visual Studio<br />
• VTK uses a higher level program called cmake<br />
(www.cmake.org) which produces output <strong>for</strong> either unix<br />
makefiles or windows visual C++ project files/makefiles.<br />
• We will only describe cmake next week.<br />
Next Week<br />
• Discuss pointers <strong>and</strong> memory allocation issues<br />
• Discuss Object-Oriented Design Philosophy in more detail<br />
– Constructors/Destructors<br />
– Inheritance<br />
– Abstract Classes<br />
– Virtual Functions<br />
– Overriding Functions<br />
• Discuss reference counted allocation/de-allocation