i1166 EN Manual 021611.indd - Radio Shack
i1166 EN Manual 021611.indd - Radio Shack
i1166 EN Manual 021611.indd - Radio Shack

Create successful ePaper yourself
Turn your PDF publications into a flip-book with our unique Google optimized e-Paper software.
9 | iLuv<br />
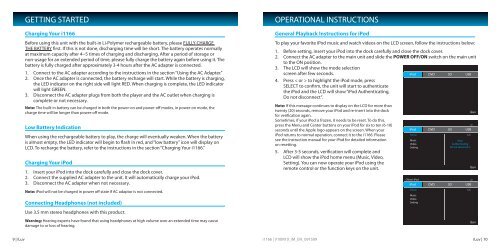
GETTING STARTED<br />
Charging Your <strong>i1166</strong><br />
Before using this unit with the built-in Li-Polymer rechargeable battery, please FULLY CHARGE<br />
THE BATTERY first. If this is not done, discharging time will be short. The battery operates normally<br />
at maximum capacity after 4~5 times of charging and discharging. After a period of storage or<br />
non-usage for an extended period of time, please fully charge the battery again before using it. The<br />
battery is fully charged after approximately 3-4 hours after the AC adapter is connected.<br />
1. Connect to the AC adapter according to the instructions in the section “Using the AC Adapter.”<br />
2. Once the AC adapter is connected, the battery recharge will start. While the battery is charging,<br />
the LED indicator on the right side will light RED. When charging is complete, the LED indicator<br />
will light GRE<strong>EN</strong>.<br />
3. Disconnect the AC adapter plugs from both the player and the AC outlet when charging is<br />
complete or not necessary.<br />
Note: The built-in battery can be charged in both the power-on and power-off modes, in power-on mode, the<br />
charge time will be longer than power-off mode.<br />
Low Battery Indication<br />
When using the rechargeable battery to play, the charge will eventually weaken. When the battery<br />
is almost empty, the LED indicator will begin to flash in red, and “low battery” icon will display on<br />
LCD. To recharge the battery, refer to the instructions in the section “Charging Your <strong>i1166</strong>.”<br />
Charging Your iPod<br />
1. Insert your iPod into the dock carefully and close the dock cover.<br />
2. Connect the supplied AC adapter to the unit. It will automatically charge your iPod.<br />
3. Disconnect the AC adapter when not necessary.<br />
Note: iPod will not be charged in power off state if AC adaptor is not connected.<br />
Connecting Headphones (not included)<br />
Use 3.5 mm stereo headphones with this product.<br />
Warning: Hearing experts have found that using headphones at high volume over an extended time may cause<br />
damage to or loss of hearing.<br />
OPERATIONAL INSTRUCTIONS<br />
General Playback Instructions for iPod<br />
To play your favorite iPod music and watch videos on the LCD screen, follow the instructions below:<br />
1. Before setting, insert your iPod into the dock carefully and close the dock cover.<br />
2. Connect the AC adapter to the main unit and slide the POWER OFF/ON switch on the main unit<br />
to the ON position.<br />
3. The LCD will show the mode selection<br />
screen after few seconds.<br />
4. Press < or > to highlight the iPod mode, press<br />
SELECT to confirm, the unit will start to authenticate<br />
the iPod and the LCD will show “iPod Authenticating,<br />
Do not disconnect”.<br />
Note: If this message continues to display on the LCD for more than<br />
twenty (20) seconds, remove your iPod and re-insert into the dock<br />
for verification again.<br />
Sometimes, if your iPod is frozen, it needs to be reset. To do this,<br />
press the Menu and Center buttons on your iPod for six to ten (6-10)<br />
seconds until the Apple logo appears on the screen. When your<br />
iPod returns to normal operation, connect it to the <strong>i1166</strong>. Please<br />
see the instruction manual for your iPod for detailed information<br />
on resetting.<br />
5. After 3-5 seconds, verification will complete and<br />
LCD will show the iPod home menu (Music, Video,<br />
Setting). You can now operate your iPod using the<br />
remote control or the function keys on the unit.<br />
<strong>i1166</strong> | V10M10_IM_<strong>EN</strong>_091509<br />
iLuv | 10