INSTRUCTION MANUAL - Canyon
INSTRUCTION MANUAL - Canyon
INSTRUCTION MANUAL - Canyon

You also want an ePaper? Increase the reach of your titles
YUMPU automatically turns print PDFs into web optimized ePapers that Google loves.
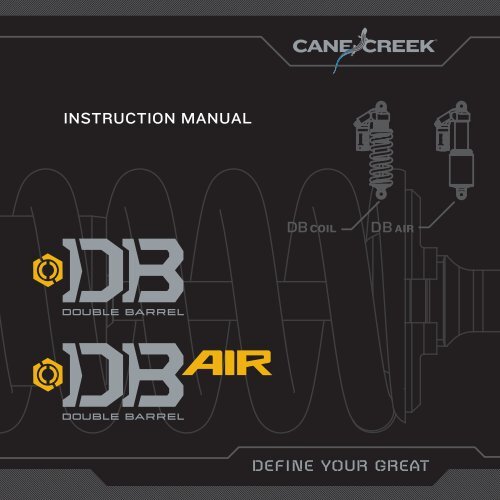
<strong>INSTRUCTION</strong> <strong>MANUAL</strong><br />
DB COIL DB AIR<br />
2
TABLE OF CONTENTS<br />
2 Safety<br />
3 Product Anatomy Chart - DBcoil<br />
4 Product Highlights - DBcoil<br />
5 Installation - DBcoil<br />
6 Frame and Clearance - DBcoil<br />
7 Spring Selection & Installation - DBcoil<br />
8 Sag Adjustment - DBcoil<br />
11 Product Anatomy Chart - DBair<br />
12 Product Highlights - DBair<br />
13 Installation - DBair<br />
14 Frame and Clearance - DBair<br />
15 Sag Adjustment - DBair<br />
17 Tuning Adjustments<br />
20 Tuning Tips<br />
24 Service, Maintenance and Cleaning<br />
26 Warranty<br />
Congratulations on the purchase of your Cane Creek Double Barrel rear shock. The<br />
Double Barrel brings revolutionary suspension technology to the bicycle market. Based<br />
on a foundation of precision quality and cutting-edge innovation, the DBcoil and DBair<br />
represent the pinnacle of high-performance suspension systems. Cane Creek technology<br />
offers the broadest adjustment range available giving you the control to tune the<br />
shock your way for your bike.<br />
This owner’s manual is your reference guide to understanding and tuning your Double<br />
Barrel rear shock. It also provides important information about proper installation,<br />
set-up and maintenance of your shock. If you have questions, visit canecreek.com or<br />
contact the Cane Creek Customer Service Team who is readily available to assist you.<br />
Register your shock online at The Owners Lounge<br />
www.canecreek.com/products/suspension/the-lounge<br />
1
SAFETY<br />
The rear shock is an important part of your bike. Before installing and using your new<br />
rear shock, carefully read this owner’s manual to learn the correct installation and<br />
adjustment procedures of the shock. Improperly installed and/or adjusted shocks can<br />
cause serious harm or death and may severely damage your bike.<br />
WARNING: A broken or malfunctioning shock may cause loss of vehicle control<br />
and result in SERIOUS INJURY OR DEATH. If the shock ever loses oil, air or makes<br />
unusual noises, stop riding and have the shock inspected by a Cane Creek Authorized<br />
Suspension Service Center or call the Cane Creek Customer Service Team.<br />
WARNING: Modification, improper service or use of aftermarket replacement<br />
parts voids the warranty and may cause the shock to malfunction, resulting in loss of<br />
vehicle control and SERIOUS INJURY OR DEATH. Do not modify your bike frame or<br />
shock. Use only genuine Cane Creek Double Barrel parts.<br />
Follow service maintenance recommendations. Shock service should be performed by<br />
Cane Creek Cycling Components or a Cane Creek Authorized Suspension Service<br />
Center. Visit www.canecreek.com or contact us at 800-234-2725 to locate a Cane<br />
Creek Authorized Suspension Service Center<br />
WARNING: Cane Creek rear shocks contain a nitrogen charge in the reservoir.<br />
Opening a nitrogen pressurized shock is dangerous and can result in SERIOUS IN-<br />
JURY OR DEATH. The nitrogen charged portion of the shock should only be opened<br />
by a Cane Creek Authorized Suspension Service Center.<br />
WARNING: Cane Creek rear shocks are manufactured exclusively for the bike<br />
model that they were ordered for. Switching units between different bikes may not only decrease<br />
performance but might also cause damage to the bike and can result in SERIOUS<br />
INJURY OR DEATH. Always contact Cane Creek or Cane Creek Authorized Suspension<br />
Service Center to verify compatibility before switching units from one bike to another.<br />
2
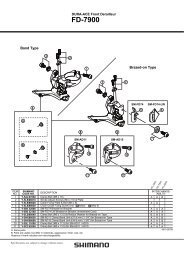
PRODUCT ANATOMY CHART: DBcoil<br />
Compression<br />
& Rebound<br />
Adjusters<br />
Shock<br />
Reservoir<br />
End Eyelet<br />
Shock eyelet<br />
Cylinder Head<br />
Spring<br />
Adjustment Nut<br />
Shaft<br />
Spring<br />
Spring Clip<br />
3
PRODUCT HIGHLIGHTS: DBcoil<br />
Four-way independent adjustability<br />
Twin-tube damping technology<br />
Precision-machined parts for maximum<br />
performance and reliability<br />
8mm shaft provides unparalleled<br />
small-bump sensitivity.<br />
4
INSTALLATION: DBcoil<br />
Mounting Hardware – Your Cane Creek rear shock is equipped with exclusive<br />
Norglide ® bushings and comes with mounting hardware specifi c to your<br />
bike’s frame specifi cations.<br />
1 Press axle into shock eyelet<br />
and end eyelet.<br />
Axle<br />
3 Slide assembly from step 2 into the<br />
bracket on bike and insert bolt and tighten.<br />
2 Slide spacers provided by Cane<br />
Creek over axle in the order below.<br />
Quad-ring<br />
Spacers. Vary by frame.<br />
Outer spacer w/ O-Ring<br />
4 Make sure bolt is secure and no<br />
side-to-side play exists.<br />
5
FRAME AND SHOCK CLEARANCE: DBcoil<br />
1 Remove spring from the shock (see<br />
instructions on next page).<br />
3 Reinstall the spring and attach<br />
shock to frame.<br />
2 Carefully cycle shock through<br />
full travel checking for free movement<br />
without restriction.<br />
6
SPRING SELECTION AND INSTALLATION: DBcoil<br />
Spring Selection<br />
Selecting the appropriate spring rate is an important variable in achieving optimal<br />
set-up of the DBcoil. Your ideal spring rate will be based on rider weight, frame design,<br />
and riding style. (See our online calculator at canecreek.com or call the Cane Creek<br />
Service Team).<br />
Spring Removal and Installation<br />
To remove the spring, turn the Spring Adjustment Nut to remove all preload (the spring<br />
should become loose). Push down on the spring clip and slide it off the shock. Once<br />
the clip is removed, slide the spring off the shock. Certain frames require longer<br />
mounting hardware, it may be necessary to remove the mounting hardware from the<br />
end eyelet before the spring can be removed.<br />
180 degrees apart<br />
WARNING: Always make sure the end of the spring’s coil is aligned on the<br />
opposite side of the slot in the spring clip. An improperly oriented spring can fail prematurely,<br />
causing loss of vehicle control and SERIOUS INJURY OR DEATH.<br />
7
SAG ADJUSTMENT: DBcoil<br />
Spring preload is the compression applied to the spring by the Spring Adjustment<br />
Nut. The preload adjustment is used to fine-tune the optimal amount of sag to achieve<br />
proper ride height.<br />
Measuring and Setting Sag<br />
To achieve the best performance from your Double Barrel rear shock, the proper setting<br />
of sag is vitally important. As a starting point, we recommend a sag setting equal to<br />
30% of available travel unless the frame manufacturer recommends otherwise.<br />
Sag is part of shock tuning, so you should experiment and vary your sag percentage to<br />
better suit your riding style and personal preferences. For example, if your style is more<br />
downhill, you can increase your sag percentage (by reducing preload) to add some plushness<br />
to your suspension. If your style is more all-mountain/XC, you can decrease your sag<br />
percentage (by increasing preload) to firm up your suspension.<br />
To Measure Sag<br />
1 - Make sure that you are on a level surface.<br />
With the rear wheel off the ground, measure<br />
the length of your shock from eye-to-eye and<br />
record this measurement.<br />
2 - Dressed to ride (including filled hydration<br />
bag, if you use one), position your bike next<br />
to a wall or table to support yourself. Mount<br />
your bicycle and assume your normal riding<br />
position. Measure the shock length again<br />
from eye-to-eye. You may need someone<br />
to assist in this measurement. Record this<br />
measurement.<br />
8
SAG ADJUSTMENT: DBcoil<br />
3 - The difference between the two measurements<br />
is the sag.<br />
%Sag = [(Free shock length - Weighted<br />
Length) ÷ Shock Stroke] x 100<br />
Free Shock length: Measured in Step 1.<br />
Weighted Length: Measured in Step 2.<br />
Shock Stroke: Stroke is indicated on the<br />
spring that came with your DBcoil. If you<br />
are unsure of your shock’s travel, visit<br />
canecreek.com or contact the Cane Creek<br />
Customer Service Team.<br />
Increasing Spring Preload<br />
To increase the preload on your spring,<br />
turn the Spring Adjustment Nut clockwise.<br />
Increasing the preload will increase the<br />
ride height and reduce sag. This will result<br />
in a more responsive ride. Be careful not<br />
to apply too much preload (not more than<br />
6 turns of the Spring Adjustment Nut) as<br />
this can cause “coil binding”, which can<br />
damage the spring, the shock, and can be<br />
dangerous for the rider.<br />
9
SAG ADJUSTMENT: DBcoil<br />
Reducing Spring Preload<br />
To reduce the preload on your spring, turn<br />
the Spring Adjustment Nut counter-clockwise.<br />
Reducing the preload will decrease<br />
the ride height and increase sag. This will<br />
result in a more plush ride. Do not reduce<br />
spring preload below 1 turn. The shock<br />
requires some spring preload to rebound<br />
properly.<br />
IMPORTANT<br />
If more than 6 turns preload is needed to achieve proper sag, you will need to change<br />
to a stiffer (higher rate) spring. If less than 1 turn of preload is needed to achieve<br />
proper sag, you will need to change to a lower spring rate.<br />
For more information on adjusting your Spring Preload, view our suspension instructional<br />
videos online at canecreek.com.<br />
10
PRODUCT ANATOMY CHART: DBair<br />
Cylinder Head<br />
Air Valve Cap<br />
Air Valve<br />
Air Can<br />
End Eyelet<br />
Shock Eyelet<br />
Compression &<br />
Rebound Adjusters<br />
Shock<br />
Reservoir<br />
Volume<br />
Adjustment Spacer<br />
11
PRODUCT HIGHLIGHTS: DBair<br />
F<br />
d<br />
Twin-tube damping for unparalleled<br />
small bump sensitivity and<br />
adjustability<br />
Auto-adjust negative air spring<br />
12<br />
Air-spring tuned to match the Double<br />
Barrel damping capability<br />
Precision-machined parts for<br />
maximum performance and reliability
INSTALLATION: DBair<br />
Mounting Hardware – Your Cane Creek rear shock is equipped with exclusive<br />
Norglide ® bushings and comes with mounting hardware specifi c to your<br />
bike’s frame specifi cations.<br />
1 Press axle into shock eyelet<br />
and end eyelet.<br />
Axle<br />
3 Slide assembly from step 2 into the<br />
bracket on bike and insert bolt and tighten.<br />
2 Slide spacers provided by Cane<br />
Creek over axle in the order below.<br />
Quad-ring<br />
Spacers. Vary by frame.<br />
Outer spacer w/ O-Ring<br />
4 Make sure bolt is secure and no<br />
side-to-side play exists.<br />
13
CHECK FRAME AND SHOCK CLEARANCE: DBair<br />
1 Remove air from DBair by pressing<br />
air valve. The shock must be defl ated to<br />
rotate the Air Can.<br />
3 Carefully cycle shock through full travel<br />
checking for movement without restriction.<br />
2 The Air Valve must clear the shock<br />
reservoir and any part of the frame. Using<br />
a rubber strap wrench, rotate the Air Can<br />
to adjust the Air Valve position.<br />
4 Refi ll shock to desired air pressure.<br />
Reinstall Air Valve cap.<br />
14
SAG ADJUSTMENT: DBair<br />
Air spring preload is the amount of air pressure in the air chamber of the shock. The<br />
preload adjustment is used to fi ne-tune the optimal amount of sag to achieve the<br />
proper ride height.<br />
Measuring and Setting Sag<br />
To achieve the best performance from your Double Barrel rear shock, the proper setting<br />
of sag is vitally important. As a starting point, we recommend a sag setting equal to<br />
30% of available travel.<br />
Sag is part of shock tuning, so you should experiment and vary your sag percentage to<br />
better suit your riding style and personal preferences. For example, if your style is more<br />
downhill, you can increase your sag percentage (by reducing air pressure) to add some<br />
plushness to your suspension. If your style is more all-mountain/XC, you can decrease your<br />
sag percentage (by increasing air pressure) to fi rm up your suspension.<br />
To Measure/Set Sag<br />
1 - Attach high pressure shock pump to<br />
air valve and Infl ate to ~50-75psi.<br />
2 - Slowly cycle the shock. This will<br />
charge the negative air chamber.<br />
15
SAG ADJUSTMENT: DBair<br />
3 - Infl ate shock to starting pressure,<br />
remove air pump. Slide travel indicating<br />
O-ring against air can.<br />
O-Ring<br />
O-Ring<br />
16<br />
4 - On a level surface, position your<br />
bike next to a wall or table to support<br />
yourself. Mount your bicycle and assume<br />
your normal riding position. Dismount<br />
bicycle and measure distance travel<br />
indicating O-ring has moved. This measurement<br />
is your sag<br />
5 - Sag = Distance from air can to O-ring<br />
Shock stroke = If you are unsure of your shock’s travel, visit canecreek.com or contact<br />
the Cane Creek Customer Service Team.<br />
%Sag = (Sag ÷ Shock Stroke] x 100.<br />
Make sure the shock pump is NOT connected to the DBair when measuring sag.<br />
When the proper sag value is reached, record the pressure required to achieve this sag<br />
value to make setup faster in the future.
TUNING ADJUSTMENTS: DBcoil | DBair<br />
Unique to bike suspension, the Double Barrel’s Twin-Tube Technology with 4-Way<br />
Independent Adjustment isolates both high-speed and low-speed rebound and<br />
compression circuits. This proprietary design allows for rider-tuned suspension, by<br />
providing an unsurpassed range of damper adjustment by simply turning external<br />
adjusters. Because these adjusters act completely independent of one another, adjustment<br />
of one will not affect the performance of another. Thus we invite you to DEFINE<br />
YOUR GREAT.<br />
Low-Speed Compression (LSC)<br />
Low-Speed Compression (LSC) controls traction and chassis stabilization. LSC<br />
adjustment is used to eliminate pedal induced “bob”, influences small bump sensitivity,<br />
and affects how the bike will react to weight changes. The Double Barrel decouples<br />
the LSC from the HSC (see HSC) so that the shock can address the aforementioned<br />
issues while still feeling supple and bottomless.<br />
To increase the low-speed compression turn the LSC adjuster<br />
clockwise (screw in).<br />
To reduce the low-speed compression damping, turn the LSC<br />
adjuster counterclockwise (unscrew).<br />
17
TUNING ADJUSTMENTS: DBcoil | DBair<br />
High-Speed<br />
Compression (HSC)<br />
Low-Speed<br />
Compression (LSC)<br />
Low-Speed Rebound (LSR)<br />
Low-Speed Rebound (LSR) works with LSC to stabilize the chassis and manage traction.<br />
It is similar to the single rebound adjuster on most other rear shocks. Rider-tuned<br />
LSR adjustment (combined with LSC) ensures maximum traction everywhere from<br />
technical climbs, high-speed chatter, off-camber corners, to braking in stutter bumps.<br />
To increase low-speed rebound, turn the LSR adjuster<br />
clockwise (screw in).<br />
To reduce the low-speed rebound, turn the LSR adjuster<br />
counterclockwise (unscrew).<br />
High-Speed<br />
Rebound (HSR)<br />
Low-Speed<br />
Rebound (LSR)<br />
18
TUNING ADJUSTMENTS: DBcoil | DBair<br />
High-Speed Compression (HSC)<br />
High-Speed Compression (HSC) is critical to absorbing energy from high impact<br />
forces, such as square edge hits and harsh landings. When set properly, the highspeed<br />
compression (HSC) circuit allows the wheel to effectively absorb all impacts<br />
without harshly bottoming out or using too much travel.<br />
To increase high-speed compression, turn the HSC adjuster clockwise (screw in).<br />
To reduce high-speed compression, turn the HSC adjuster<br />
counterclockwise (unscrew).<br />
High-Speed Rebound (HSR)<br />
An adjustment unique to the Double Barrel, High-Speed Rebound (HSR) enables a<br />
bike to recover quickly from deep in suspension travel while enabling controlled takeoffs<br />
from jump faces. By giving the rider independent control of HSR and LSR, bucking<br />
(a high shaft-speed problem) can be eliminated while allowing the shock to recover<br />
quickly to prevent packing up (a low shaft-speed problem).<br />
To increase high-speed rebound, turn the HSR adjuster clockwise (screw in).<br />
To reduce high-speed rebound, turn the HSR adjuster counterclockwise<br />
(unscrew).<br />
Note: when turning HSC the LSC adjuster will turn with HSC adjuster, DO NOT<br />
hold the LSC adjuster when turning the HSC adjuster.<br />
19
TUNING TIPS: DBcoil | DBair<br />
Your Double Barrel has arrived preset from the factory, though for most riders these<br />
settings are only a starting point. Some bike-specific tuning suggestions are available<br />
at www.canecreek.com and/or are shown on the Double Barrel hang tag that came<br />
with your bike. Aftermarket shocks and shocks for bikes that do not yet have hang tags<br />
are set from the factory as follows:<br />
HSC [HIGH SPEED COMPRESSION]<br />
PLUSH<br />
LSC [LOW SPEED COMPRESSION]<br />
SUPPLE<br />
HSR [HIGH SPEED REBOUND]<br />
LIVELY POP<br />
LSR [LOW SPEED REBOUND]<br />
PLUSH<br />
2<br />
0 TURNS TURNS 4<br />
0 CLICKS<br />
12<br />
CLICKS 25<br />
2<br />
0 4<br />
RESITS<br />
BOTTOMING<br />
PEDAL<br />
EFFICIENCY<br />
G-OUT<br />
CONTROL<br />
12<br />
0 CLICKS CLICKS 25 FIRM<br />
20
TUNING TIPS: DBcoil | DBair<br />
To enjoy the full benefits of your Double Barrel shock, it is important that your shock is<br />
tuned specifically to your bike and riding style. The Symptoms section below will help<br />
you find your own ideal settings to Define Your Great. As a general rule, use the following<br />
order to adjust your shock:<br />
1 Verify correct sag. For additional assistance, see the relevant sections<br />
for Adjusting Sag.<br />
2 On a familiar trail, fine tune Low-Speed Compression (LSC) and Low-Speed Rebound<br />
(LSR) to suit your preferences for resistance to pedaling induced chassis<br />
motion and traction. For additional assistance, see the Symptoms listed.<br />
3 Adjust High-Speed Compression (HSC) so that all the travel is occasionally<br />
used, but no harsh bottom out is felt. For additional assistance, see the<br />
Symptoms listed.<br />
4 Adjust High-Speed Rebound (HSR) to prevent bucking. For additional<br />
assistance, see the Symptoms listed.<br />
No shock adjustments should be made without first setting sag properly.<br />
Failure to do so will lead to incorrect damper adjustments.<br />
21
TUNING TIPS: DBcoil<br />
Symptom: Shock is harshly bottoming out.<br />
Causes: Incorrect spring rate and/or insufficient high-speed compression (HSC).<br />
Remedy: First confirm that your spring rate is correct, so that proper sag is achieved.<br />
See page 8 for details. Next, increase (clockwise) high-speed compression (HSC) until<br />
no harsh bottoming out is experienced while full travel is being used.<br />
Symptom: Bike wallows under pedaling (pedal bob); overall ride is too soft.<br />
Causes: Not enough low-speed damping.<br />
Remedy: Increase (clockwise) both low-speed compression (LSC) and low-speed<br />
rebound (LSR) to slow the movement of the suspension.<br />
Symptom: Shock is harsh over chatter, braking bumps, and square edge hits.<br />
Causes: Spring rate too high and/or too much high speed compression (HSC).<br />
Remedy: First confirm that your spring rate is correct, so that proper sag is achieved.<br />
See page 8 for details. Next, decrease (counterclockwise) high-speed compression<br />
damping (HSC) until harshness is removed. If symptoms persists with HSC fully counterclockwise,<br />
gradually decrease LSC (counterclockwise).<br />
Symptom: Rear end is bucking upon impacts, bike is nose-diving when jumping.<br />
Causes: Not enough high-speed rebound (HSR).<br />
Remedy: Increase (clockwise) high-speed rebound (HSR) until rear wheel rebounds<br />
properly from deep in travel.<br />
For more information on tuning your Double Barrel shock, view our<br />
suspension instructional videos online at canecreek.com<br />
22
TUNING TIPS: DBair<br />
Note: In the following symptoms, there is a difference between air volume and air pressure.<br />
Air pressure is changed with the shock pump. Air volume is changed by adding/<br />
removing the included air volume adjustment spacers.<br />
Symptom: Shock is harshly bottoming out.<br />
Causes: Insufficient high-speed compression (HSC) and/or incorrect air volume setting.<br />
Remedy: Increase (clockwise) high-speed compression (HSC) until no harsh bottoming<br />
is experienced but full travel is being used. If enough HSC is required that the ride<br />
becomes harsh, you may need to modify your air volume using the included air volume<br />
adjustment spacers. For instructions on how to do this, go to www.canecreek.com.<br />
Symptom: Bike wallows under pedaling (pedal bob); overall ride is too soft.<br />
Causes: Not enough low-speed damping.<br />
Remedy: Increase (clockwise) both low-speed compression (LSC) and low-speed<br />
rebound (LSR) to slow the movement of the suspension.<br />
Symptom: Shock is harsh over chatter, braking bumps, square edge hits.<br />
Causes: Too much high speed compression damping (HSC) and/or incorrect air<br />
volume setting.<br />
Remedy: Decrease HSC (counterclockwise) until harshness is removed. If HSC is<br />
fully counterclockwise but the harshness remains, you may need to modify your air<br />
volume using the included air volume adjustment spacers. For instructions on how to<br />
do this, go to www.canecreek.com.<br />
Symptom: Rear end is bucking upon impacts, bike is nose-diving when jumping.<br />
Causes: Not enough high-speed rebound (HSR).<br />
Remedy: Increase (clockwise) high-speed rebound (HSR) until rear wheel rebounds<br />
properly from deep in travel.<br />
23
SERVICE, MAINTENANCE, AND CLEANING: DBcoil | DBair<br />
Cane Creek Double Barrel rear shocks are designed for long-term durability, though<br />
some simple maintenance steps can ensure long-life and smooth function.<br />
IMPORTANT NOTES<br />
Do not use compressed air to clean any Double Barrel shock.<br />
Do not use any solvents or de-greasers, as these products can damage the<br />
shock’s exterior finish or its anodized parts.<br />
Do not spray water directly at any seal. Never use a high pressure washer<br />
on your rear shock.<br />
When dirt dries onto the shock body, it may damage seals. With a damaged<br />
seal, dirt works its way into the shock and can hinder performance and cause damage.<br />
Simple, periodic maintenance can greatly extend the service life of your shock. If you<br />
ride in extreme weather conditions, the service intervals should be more frequent.<br />
Check for any oil leaks. If you are unsure if there is a leak or simply a seepage of<br />
assembly grease, proceed with the cleaning steps below and recheck the suspect<br />
area after riding.<br />
Before every ride, check that the mounting hardware is tight and ensure there is no play<br />
between the Norglide ® bushing and the mounting hardware.<br />
For cleaning, use mild soapy water, a very light pressure water spray to rinse, and wipe<br />
dry with a clean, dry cloth.<br />
24
SERVICE, MAINTENANCE, AND CLEANING: DBcoil and DBair<br />
DBcoil<br />
DBair<br />
1 Clean around the Spring Adjustment Nut to prevent damage to the<br />
threads on the shock body<br />
2 Clean shock body exterior<br />
3 Clean shaft<br />
4 Wipe off spring<br />
1 Clean shock body exterior, including travel indicating O-ring and blue shaft wiper<br />
2 Wipe off air valve cap to prevent dirt from entering the air spring during inflation<br />
3 Inspect the air sealing surfaces for scratches, dents, or other damage. Significant<br />
damage to air sealing surfaces may prevent the shock from holding air.<br />
Recommended Service is every 100 hours of use.<br />
Service should only be performed by a Cane Creek Authorized Service Center. Visit<br />
www.canecreek.com or call the Cane Creek Customer Service Team at 800-234-2725<br />
to locate a service center near you.<br />
CAUTION Do not attempt to disassemble or refill the gas or oil in<br />
the shock. Doing so could cause SERIOUS INJURY OR DEATH and will<br />
void the warranty.<br />
25
WARRANTY<br />
LIMITED ONE (1) YEAR WARRANTY ON SUSPENSION PRODUCTS<br />
Subject to the limitations, terms and conditions hereof, Cane Creek warrants, to<br />
the original retail owner of each new Cane Creek suspension product, that the<br />
Cane Creek suspension product, when new, is free from defects in materials and<br />
workmanship. This warranty expires one (1) year from the date of the original Cane<br />
Creek suspension product retail purchase from an authorized Cane Creek dealer<br />
or from a Cane Creek authorized Original Equipment Manufacturer where Cane<br />
Creek suspension is included as original equipment on a purchased bike, unless<br />
otherwise dictated by requirement of law.<br />
TERMS OF WARRANTY<br />
This warranty is conditioned on the Cane Creek suspension product being operated<br />
under normal conditions and properly maintained as specified by Cane Creek.<br />
This warranty is only applicable to Cane Creek suspension purchased new from<br />
an authorized Cane Creek source and is made only to the original retail owner of<br />
the new Cane Creek suspension product and is not transferable to subsequent<br />
owners. This warranty is void if the Cane Creek suspension product is subjected to<br />
abuse, neglect, improper or unauthorized repair, improper or unauthorized service<br />
or maintenance, alteration, modification, accident or other abnormal, excessive, or<br />
improper use. Should it be determined, by Cane Creek in its sole and final discretion,<br />
that a Cane Creek suspension product is covered by this warranty, it will be<br />
repaired or replaced, by a comparable model, at Cane Creek’s sole option, which<br />
will be conclusive and binding.<br />
THIS IS THE EXCLUSIVE REMEDY UNDER THIS WARRANTY. ANY AND ALL<br />
OTHER REMEDIES AND DAMAGES THAT MAY OTHERWISE BE APPLICABLE<br />
ARE EXCLUDED, INCLUDING, BUT NOT LIMITED TO, INCIDENTAL OR CONSE-<br />
QUENTIAL DAMAGES OR PUNITIVE DAMAGES.<br />
26
WARRANTY<br />
This limited warranty does not apply to normal wear and tear, malfunctions or<br />
failures that result from abuse, improper assembly, neglect, alteration, improper<br />
maintenance, crash, misuse or collision. Subject to the terms and conditions of<br />
this warranty, leaking seals will be replaced within 90 days from the original date of<br />
purchase. Such replacement notwithstanding, seals are subject to relative movement<br />
between parts and are normal wear and tear items not subject to warranty<br />
coverage.<br />
This limited warranty gives the consumer specific legal rights. The consumer may<br />
also have other legal rights which vary from state to state or country to country.<br />
Some states and countries do not allow the exclusion or limitation of incidental<br />
or consequential damages or warranties, so the above limitations or exclusions<br />
may not apply to you. If it is determined by a court of competent jurisdiction that a<br />
certain provision of this limited warranty does not apply, such determination shall<br />
not affect any other provision of this limited warranty and all other provisions shall<br />
remain in effect.<br />
THIS IS THE ONLY WARRANTY MADE BY CANE CREEK ON ITS SUSPEN-<br />
SION PRODUCTS AND COMPONENTS, AND THERE ARE NO WARRANTIES<br />
THAT EXTEND BEYOND THE DESCRIPTION HEREIN. ANY WARRANTIES<br />
THAT MAY OTHERWISE BE IMPLIED BY LAW INCLUDING, BUT NOT LIMITED<br />
TO, ANY IMPLIED WARRANTY OF MERCHANTABILITY OR FITNESS FOR A<br />
PARTICULAR PURPOSE ARE EXCLUDED.<br />
27
MY SETTINGS<br />
RIDING WEIGHT<br />
SHOCK AND STROKE LENGTH<br />
SAG<br />
SPRING RATE / AIR PRESSURE<br />
TRAIL<br />
28
Register your shock online<br />
www.canecreek.com/products/suspension/the-lounge<br />
1