DURA-ACE Front Chainwheel - Canyon
DURA-ACE Front Chainwheel - Canyon
DURA-ACE Front Chainwheel - Canyon

Create successful ePaper yourself
Turn your PDF publications into a flip-book with our unique Google optimized e-Paper software.
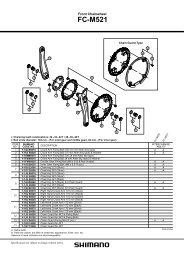
ITEM<br />
NO.<br />
1<br />
11<br />
*<br />
12<br />
*<br />
*<br />
*<br />
2<br />
3<br />
4<br />
5<br />
6<br />
7<br />
8<br />
9<br />
10<br />
13<br />
14<br />
1<br />
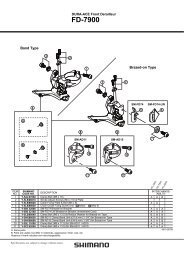
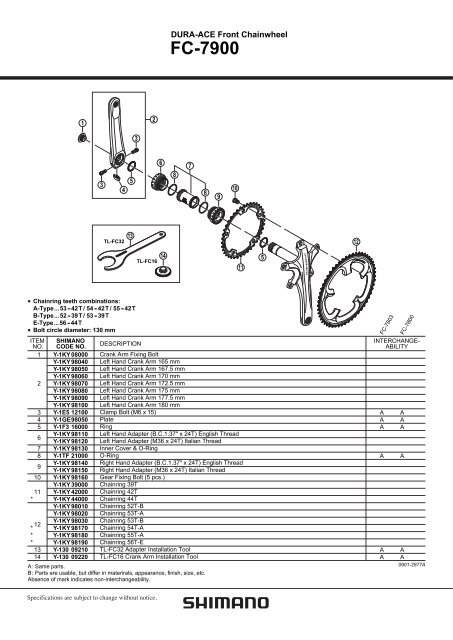
Chainring teeth combinations:<br />
A-Type...53 -- 42T / 54 -- 42T / 55 -- 42T<br />
B-Type...52 -- 39T / 53 -- 39T<br />
E-Type...56 -- 44T<br />
Bolt circle diameter: 130 mm<br />
SHIMANO<br />
CODE NO.<br />
Y-1KY 08000<br />
Y-1KY 98040<br />
Y-1KY 98050<br />
Y-1KY 98060<br />
Y-1KY 98070<br />
Y-1KY 98080<br />
Y-1KY 98090<br />
Y-1KY 98100<br />
Y-1E5 12100<br />
Y-1GE98050<br />
Y-1F3 16000<br />
Y-1KY 98110<br />
Y-1KY 98120<br />
Y-1KY 98130<br />
Y-1TF 21000<br />
Y-1KY 98140<br />
Y-1KY 98150<br />
Y-1KY 98160<br />
Y-1KY 39000<br />
Y-1KY 42000<br />
Y-1KY 44000<br />
Y-1KY 98010<br />
Y-1KY 98020<br />
Y-1KY 98030<br />
Y-1KY 98170<br />
Y-1KY 98180<br />
Y-1KY 98190<br />
Y-130 09210<br />
Y-130 09220<br />
3<br />
DESCRIPTION<br />
Crank Arm Fixing Bolt<br />
Left Hand Crank Arm 165 mm<br />
Left Hand Crank Arm 167.5 mm<br />
Left Hand Crank Arm 170 mm<br />
Left Hand Crank Arm 172.5 mm<br />
Left Hand Crank Arm 175 mm<br />
Left Hand Crank Arm 177.5 mm<br />
Left Hand Crank Arm 180 mm<br />
Clamp Bolt (M6 x 15)<br />
Plate<br />
Ring<br />
Left Hand Adapter (B.C.1.37" x 24T) English Thread<br />
Left Hand Adapter (M36 x 24T) Italian Thread<br />
Inner Cover & O-Ring<br />
O-Ring<br />
Right Hand Adapter (B.C.1.37" x 24T) English Thread<br />
Right Hand Adapter (M36 x 24T) Italian Thread<br />
Gear Fixing Bolt (5 pcs.)<br />
Chainring 39T<br />
Chainring 42T<br />
Chainring 44T<br />
Chainring 52T-B<br />
Chainring 53T-A<br />
Chainring 53T-B<br />
Chainring 54T-A<br />
Chainring 55T-A<br />
Chainring 56T-E<br />
TL-FC32 Adapter Installation Tool<br />
TL-FC16 Crank Arm Installation Tool<br />
A: Same parts.<br />
B: Parts are usable, but differ in materirals, appearance, finish, size, etc.<br />
Absence of mark indicates non-interchangeability.<br />
4<br />
13<br />
TL-FC32<br />
JAPAN TL-FC32<br />
5<br />
3<br />
2<br />
6<br />
14<br />
TL-FC16<br />
<strong>DURA</strong>-<strong>ACE</strong> <strong>Front</strong> <strong>Chainwheel</strong><br />
FC-7900<br />
8<br />
7<br />
8<br />
9<br />
10<br />
11<br />
5<br />
12<br />
FC-7803<br />
INTERCHANGE-<br />
ABILITY<br />
A A<br />
A A<br />
A A<br />
A A<br />
FC-7800<br />
A A<br />
A A<br />
0901-2877A
General Safety Information<br />
WARNING<br />
• Be careful not to let the cuffs of your clothes get caught in the chain while riding, otherwise you may<br />
fall off the bicycle.<br />
• Check that the tension of the chain is correct and that the chain is not damaged. If the tension is too<br />
weak or the chain is damaged, the chain should be replaced. If this is not done, the chain may break<br />
and you may fall off the bicycle.<br />
• The two left crank arm mounting bolts should be tightened alternately in stages rather than each bolt<br />
being fully tightened all at once. Use a torque wrench to check that the final tightening torques are<br />
within the range of 12 - 14 N·m. Furthermore, after riding approximately 100 km (60 miles), use a<br />
torque wrench to re-check the tightening torques. It is also important to periodically check the<br />
tightening torques. If the tightening torques are too weak or if the mounting bolts are not tightened<br />
alternately in stages, the left crank arm may come off and the bicycle may fall over, and serious injury<br />
may occur as a result.<br />
• Check that there are no cracks in the crank arms before riding the bicycle. If there are any cracks, the<br />
crank arm may break and you may fall off the bicycle.<br />
• If the inner cover is not installed correctly, the axle may rust and become damaged, and the bicycle<br />
may fall over and serious injury may occur as a result.<br />
• Obtain and read the service instructions carefully prior to installing the parts. Loose, worn or<br />
damaged parts may cause the bicycle to fall over and serious injury may occur as a result. We<br />
strongly recommend only using genuine Shimano replacement parts.<br />
• Obtain and read the service instructions carefully prior to installing the parts. If adjustments are<br />
not carried out correctly, the chain may come off and this may cause you to fall off the bicycle which<br />
could result in serious injury.<br />
• Read these Technical Service Instructions carefully, and keep them in a safe place for later reference.<br />
Note<br />
• Make sure that the chainring combination matches the front chainwheel tooth configuration in the<br />
Product specifications table. If other combinations are used, the distance between the chainrings will<br />
be incorrect and the chain might slip off and get caught in between them.<br />
• When the chain is in the position shown in the illustration, the chain may<br />
contact the front chainrings or front derailleur and generate noise. If the noise is<br />
a problem, shift the chain onto the next-larger rear sprocket or the one after.<br />
• If the bottom bracket shell is not parallel, gear shifting performance will drop.<br />
• Before riding the bicycle, check that there is no play or looseness in the<br />
connection. Also, be sure to retighten the crank arm fixing bolt at periodic<br />
intervals. (BB-FC, FC-PD)<br />
<strong>Front</strong><br />
chainrings<br />
Rear<br />
sprockets<br />
• If a squeaking noise is heard coming from the bottom bracket axle and the left crank arm connector,<br />
apply grease to the connector and then tighten it to the specified torque.<br />
• If you feel any looseness in the bearings, the bottom bracket should be replaced.<br />
• In addition, if pedaling performance does not feel normal, check this once more.<br />
• Do not wash the bottom bracket with high-pressure jets of water.<br />
• When installing the left and right adapters, be sure to install the inner cover too, otherwise the<br />
waterproofing performance will drop.<br />
• Apply grease to the left and right adapters before installing them.<br />
• To ensure the best performance, be sure to use only the specified type of chain. The wide type of<br />
chain cannot be used.<br />
• If the chain keeps coming off the chainrings during use, replace the chainrings and the chain.<br />
• You should periodically wash the chainrings in a neutral detergent and then lubricate them again. In<br />
addition, cleaning the chain with neutral detergent and lubricating it can be an effective way of<br />
extending the useful life of the chainrings and the chain.<br />
• Parts are not guaranteed against natural wear or deterioration resulting from normal use.<br />
• For maximum performance we highly recommend Shimano lubricants and maintenance products.<br />
• For any questions regarding methods of installation, adjustment, maintenance or operation, please<br />
contact a professional bicycle dealer.<br />
This product has a serial number on it. You can complete the warranty application by filling in<br />
the user registration details on our website (http://www.shimano.com/ewp).<br />
Technical Service Instructions SI-1KY0A-002<br />
FC-7900<br />
FC-7950<br />
Specifications<br />
Model number FC-7900 FC-7950<br />
<strong>Chainwheel</strong> tooth combination<br />
Bolt circle diameter<br />
Crank arm length<br />
Pedal threads<br />
Applicable chain<br />
Chain line<br />
Bottom bracket shell width<br />
(Thread dimensions)<br />
A-53/42T, B-53/39T,<br />
52/39T, 54/42T,<br />
55/42T, 56/44T<br />
130 mm<br />
<strong>Front</strong> chainwheel<br />
CN-7900<br />
43.5 mm<br />
50/34T<br />
110 mm<br />
165, 167.5, 170, 172.5, 175, 177.5, 180 mm<br />
B.C. 9/16" x 20T.P.I. (English thread)<br />
68 mm (1.37 X 24 T.P.I.)<br />
70 mm (M36 X 24 T.P.I.)<br />
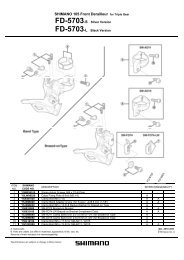
Installation of the front chainwheel<br />
Follow the procedure in the figure.<br />
1. 2. Use the TL-FC32/36 special tool to install the right<br />
adapter (counterclockwise thread), the inner cover<br />
and the left adapter (clockwise thread).<br />
Tightening torque: 35 - 50 N·m {305 - 435 in. lbs.}<br />
3. Insert the right crank unit.<br />
4. Set section A of the left crank into the axle of the<br />
right crank unit where the groove is wide.<br />
5. Use the TL-FC16 to tighten the cap.<br />
Tightening torque: 0.7 - 1.5 N·m {6 - 13 in. lbs.}<br />
6. Push in the stopper plate and check that the plate<br />
pin is securely in place, and then tighten the bolt<br />
of the left crank arm.<br />
Note : Each of the bolts should be evenly and<br />
equally tightened to 12 - 14 N·m {106 -<br />
122 in. lbs.}.<br />
TL-FC16<br />
Push up<br />
Plate pin<br />
Stopper plate<br />
Installation of the chainrings<br />
• Smooth shifting will not be possible if the chainrings are incorrectly<br />
installed, so be sure to install the chainrings in the correct positions.<br />
• Use the correct combination of genuine Shimano bolts, chainrings<br />
and crank arm, otherwise the large chainring may become damaged<br />
by the bolts.<br />
With the marked surface of<br />
the larger chainring facing<br />
out, set the larger chainring<br />
so that the chain drop<br />
prevention pin is lined up<br />
with the crank arm position.<br />
With the marked surface of the smaller<br />
chainring facing away from the crank arm,<br />
set the chainring so that the o mark is lined<br />
up with the crank arm position.<br />
Tightening torque:<br />
12 N·m {106 in. lbs.}<br />
5 2<br />
One Holland, Irvine, California 92618, U.S.A. Phone: +1-949-951-5003 Industrieweg 24, 8071 CT Nunspeet, The Netherlands Phone: +31-341-272222 3-77 Oimatsu-cho, Sakai-ku, Sakai-shi, Osaka 590-8577, Japan<br />
6<br />
4<br />
(A)<br />
TL-FC32<br />
Chain drop prevention pin<br />
Mark<br />
Serial number<br />
(Right crank arm)<br />
Bottom bracket shell<br />
•Right adapter<br />
Wide groove area<br />
Note :<br />
Set the stopper plate in the right<br />
direction as shown in illustration.<br />
1<br />
Outer side<br />
Crank arm<br />
clockwise thread for<br />
70 mm [M36] bottom brackets<br />
Inner cover<br />
Inner side<br />
o mark<br />
Crank arm<br />
Please note: specifications are subject to change for<br />
improvement without notice. (English)<br />
© Jul. 2008 by Shimano Inc. XBC SZK Printed in Japan<br />
3
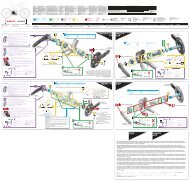
ITEM<br />
NO.<br />
1<br />
*<br />
2<br />
3<br />
4<br />
5<br />
6<br />
7<br />
8<br />
9<br />
10<br />
11<br />
12<br />
13<br />
14<br />
1<br />
Bolt circle diameter: 110 mm<br />
SHIMANO<br />
CODE NO.<br />
Y-1KY 08000<br />
Y-1KY 98040<br />
Y-1KY 98050<br />
Y-1KY 98060<br />
Y-1KY 98070<br />
Y-1KY 98080<br />
Y-1KY 98090<br />
Y-1KY 98100<br />
Y-1E5 12100<br />
Y-1GE98050<br />
Y-1F3 16000<br />
Y-1KY 98110<br />
Y-1KY 98120<br />
Y-1KY 98130<br />
Y-1TF 21000<br />
Y-1KY 98140<br />
Y-1KY 98150<br />
Y-1KY 98160<br />
Y-1KZ 34000<br />
Y-1KZ 98010<br />
Y-130 09210<br />
Y-130 09220<br />
3<br />
DESCRIPTION<br />
Crank Arm Fixing Bolt<br />
Left Hand Crank Arm 165 mm<br />
Left Hand Crank Arm 167.5 mm<br />
Left Hand Crank Arm 170 mm<br />
Left Hand Crank Arm 172.5 mm<br />
Left Hand Crank Arm 175 mm<br />
Left Hand Crank Arm 177.5 mm<br />
Left Hand Crank Arm 180 mm<br />
Clamp Bolt (M6 x 15)<br />
Plate<br />
Ring<br />
Left Hand Adapter (B.C.1.37" x 24T) English Thread<br />
Left Hand Adapter (M36 x 24T) Italian Thread<br />
Inner Cover & O-Ring<br />
O-Ring<br />
Right Hand Adapter (B.C.1.37" x 24T) English Thread<br />
Right Hand Adapter (M36 x 24T) Italian Thread<br />
Gear Fixing Bolt (5 pcs.)<br />
Chainring 34T<br />
Chainring 50T-F<br />
TL-FC32 Adapter Installation Tool<br />
TL-FC16 Crank Arm Installation Tool<br />
A: Same parts.<br />
B: Parts are usable, but differ in materirals, appearance, finish, size, etc.<br />
Absence of mark indicates non-interchangeability.<br />
4<br />
TL-FC32<br />
JAPAN TL-FC32<br />
5<br />
13<br />
3<br />
2<br />
TL-FC16<br />
6<br />
14<br />
<strong>DURA</strong>-<strong>ACE</strong> <strong>Front</strong> <strong>Chainwheel</strong><br />
FC-7950<br />
8<br />
7<br />
8<br />
9<br />
10<br />
11<br />
5<br />
12<br />
FC-7900<br />
FC-6650<br />
FC-6650-G<br />
INTERCHANGE-<br />
ABILITY<br />
A A B<br />
A<br />
A<br />
B B<br />
A B B<br />
A B B<br />
A<br />
A<br />
A<br />
A<br />
B B<br />
A A A<br />
A A A<br />
A B B<br />
A B B<br />
A B B<br />
A A A<br />
A B B<br />
A<br />
A<br />
B B<br />
A B B<br />
A A A<br />
A A A<br />
0808-2878
SI-0076A-002-00<br />
General Safety Information<br />
WARNING<br />
• If the inner cover is not installed correctly, the axle may rust and become damaged,<br />
and the bicycle may fall over and serious injury may occur as a result.<br />
• Obtain and read the service instructions carefully prior to installing the parts.<br />
Loose, worn or damaged parts may cause the bicycle to fall over and serious injury<br />
may occur as a result. We strongly recommend only using genuine Shimano<br />
replacement parts.<br />
• Obtain and read the service instructions carefully prior to installing the parts. If<br />
adjustments are not carried out correctly, the chain may come off and this may cause<br />
you to fall off the bicycle which could result in serious injury.<br />
• Read these Technical Service Instructions carefully, and keep them in a safe place for<br />
later reference.<br />
Note<br />
• If the bottom bracket shell is not parallel, gear shifting performance will drop.<br />
• Before riding the bicycle, check that there is no play or looseness in the connection.<br />
Also, be sure to retighten the crank arms and pedals at periodic intervals.<br />
• If you feel any looseness in the bearings, the bottom bracket should be replaced.<br />
• In addition, if pedaling performance does not feel normal, check this once more.<br />
• Do not wash the bottom bracket with high-pressure jets of water.<br />
• When installing the left and right adapters, be sure to install the inner cover too,<br />
otherwise the waterproofing performance will drop.<br />
• Apply grease to the left and right adapters before installing them.<br />
• Parts are not guaranteed against natural wear or deterioration resulting from normal<br />
use.<br />
• For maximum performance we highly recommend Shimano lubricants and<br />
maintenance products.<br />
• For any questions regarding methods of installation, adjustment, maintenance or<br />
operation, please contact a professional bicycle dealer.<br />
One Holland, Irvine, California 92618, U.S.A. Phone: +1-949-951-5003<br />
Industrieweg 24, 8071 CT Nunspeet, The Netherlands Phone: +31-341-272222 3-77 Oimatsu-cho, Sakai-ku, Sakai-shi, Osaka 590-8577, Japan<br />
Please note: specifications are subject to change for improvement without notice. (English)<br />
© Jan. 2009 by Shimano Inc. XBC SZK Printed in Japan.<br />
Technical Service Instructions SI-0076A-002<br />
SM-BB7900<br />
SM-FC7801/ SM-FC7800<br />
Specifications<br />
Bottom Bracket<br />
Model number<br />
Applicable front chainwheel<br />
Installation of the adapter<br />
SM-BB7900, SM-FC7801 / FC7800<br />
FC-7900 / 7950 / 7803 / 7800 / 7800-C<br />
Bottom bracket shell width 68 mm 70 mm<br />
Thread dimensions 1.37 X 24 T.P.I. M36 X 24 T.P.I.<br />
Use the TL-FC32/36 special tool to install the right adapter<br />
(counterclockwise thread), the inner cover and the left adapter<br />
(clockwise thread).<br />
Tightening torque: 35 - 50 N·m {305 - 435 in. lbs.}<br />
Left hand adapter<br />
clockwise thread for 70 mm<br />
[M36] bottom brackets<br />
Inner cover<br />
00<br />
Right hand adapter<br />
• Be sure to read the service instructions for the front chainwheel<br />
in conjunction with these service instructions.