Luteinizing Hormone (LH)
Luteinizing Hormone (LH)
Luteinizing Hormone (LH)

Create successful ePaper yourself
Turn your PDF publications into a flip-book with our unique Google optimized e-Paper software.
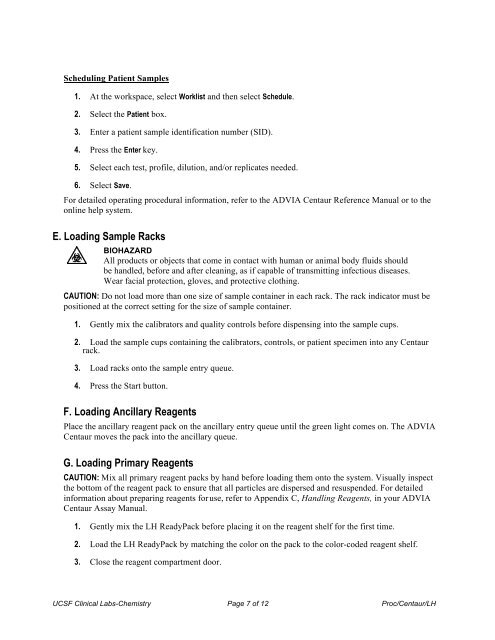
Scheduling Patient Samples<br />
1. At the workspace, select Worklist and then select Schedule.<br />
2. Select the Patient box.<br />
3. Enter a patient sample identification number (SID).<br />
4. Press the Enter key.<br />
5. Select each test, profile, dilution, and/or replicates needed.<br />
6. Select Save.<br />
For detailed operating procedural information, refer to the ADVIA Centaur Reference Manual or to the<br />
online help system.<br />
E. Loading Sample Racks<br />
BIOHAZARD<br />
All products or objects that come in contact with human or animal body fluids should<br />
be handled, before and after cleaning, as if capable of transmitting infectious diseases.<br />
Wear facial protection, gloves, and protective clothing.<br />
CAUTION: Do not load more than one size of sample container in each rack. The rack indicator must be<br />
positioned at the correct setting for the size of sample container.<br />
1. Gently mix the calibrators and quality controls before dispensing into the sample cups.<br />
2. Load the sample cups containing the calibrators, controls, or patient specimen into any Centaur<br />
rack.<br />
3. Load racks onto the sample entry queue.<br />
4. Press the Start button.<br />
F. Loading Ancillary Reagents<br />
Place the ancillary reagent pack on the ancillary entry queue until the green light comes on. The ADVIA<br />
Centaur moves the pack into the ancillary queue.<br />
G. Loading Primary Reagents<br />
CAUTION: Mix all primary reagent packs by hand before loading them onto the system. Visually inspect<br />
the bottom of the reagent pack to ensure that all particles are dispersed and resuspended. For detailed<br />
information about preparing reagents for use, refer to Appendix C, Handling Reagents, in your ADVIA<br />
Centaur Assay Manual.<br />
1. Gently mix the <strong>LH</strong> ReadyPack before placing it on the reagent shelf for the first time.<br />
2. Load the <strong>LH</strong> ReadyPack by matching the color on the pack to the color-coded reagent shelf.<br />
3. Close the reagent compartment door.<br />
UCSF Clinical Labs-Chemistry Page 7 of 12 Proc/Centaur/<strong>LH</strong>