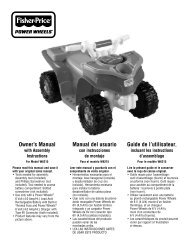
L3938 - Mattel
L3938 - Mattel
L3938 - Mattel

Create successful ePaper yourself
Turn your PDF publications into a flip-book with our unique Google optimized e-Paper software.
TM<br />
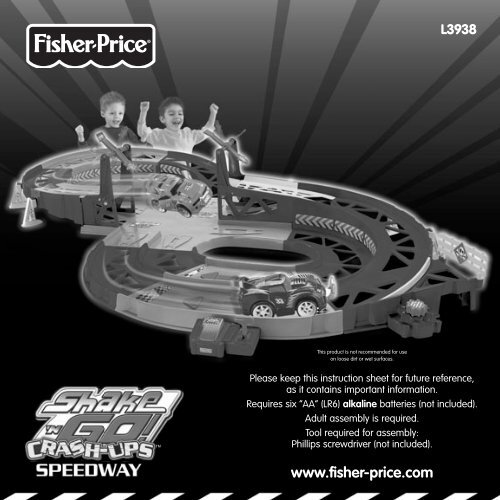
Please keep this instruction sheet for future reference,<br />
as it contains important information.<br />
Requires six “AA” (LR6) alkaline batteries (not included).<br />
Adult assembly is required.<br />
Tool required for assembly:<br />
Phillips screwdriver (not included).<br />
1<br />
This product is not recommended for use<br />
on loose dirt or wet surfaces.<br />
www.fisher-price.com<br />
<strong>L3938</strong>
CAUTION<br />
This product contains small part,<br />
for assembly by an adult. Take extra<br />
care during unpacking and assembly.<br />
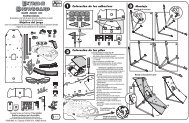
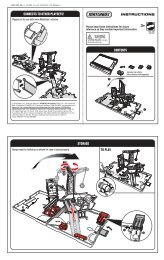
4 Center Tracks<br />
7 Tracks<br />
Parts Not Shown: 2 Cars, Label Sheet<br />
Parts<br />
2<br />
4 Inside Tracks<br />
2 Ramp Rails (Long) 2 Ramp Rails (Short)<br />
2 Ramps<br />
2 Ramp Connectors<br />
2 Ramp Bars<br />
2 Ramp Spinners<br />
Crash Gate Halves 8 Track Supports<br />
#4 x 3 /8" Screw – 12<br />
Shown Actual Size<br />
Note: Tighten and loosen all screws with a Phillips<br />
screwdriver. Do not over-tighten screws.<br />
Fisher-Price, Inc., a subsidiary of <strong>Mattel</strong>, Inc., East Aurora, NY 14052 U.S.A.<br />
©2007 <strong>Mattel</strong>, Inc. All Rights Reserved. ® and designate U.S. trademarks of <strong>Mattel</strong>, Inc.<br />
PRINTED IN CHINA <strong>L3938</strong>pr-0920
1<br />
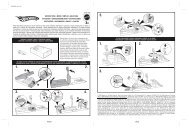
• “Snap” a ramp bar and ramp connector into one side<br />
of a long ramp rail.<br />
• “Snap” the other long ramp rail to the assembly.<br />
• “Snap” the ramp spinner onto the support bar.<br />
2<br />
Ramp Bar<br />
Ramp<br />
Connector<br />
Ramp<br />
Spinner<br />
Long<br />
Ramp Rail<br />
• Fit the pegs on the sides of a ramp into the holes in the<br />
long ramp assembly, as shown.<br />
Note: If the ramp does not fit, try the other ramp.<br />
• Repeat this procedure to build the short ramp assembly.<br />
• Set the ramp assemblies aside.<br />
Assembly<br />
3<br />
3<br />
• Fit an inside track marked “A” to track marked “A”.<br />
• Insert three screws into the assembly and tighten.<br />
• Repeat this procedure to join two additional “A”<br />
track assemblies.<br />
4<br />
• Fit an inside track marked “B” to track marked “B”.<br />
• Insert three screws into the assembly and tighten.<br />
5<br />
• Fit the four center tracks together, as shown.<br />
A<br />
B<br />
B<br />
A
6<br />
8<br />
7<br />
Assembly<br />
• Each track piece has a number on the bottom. Simply match the<br />
numbers and fit the pieces together.<br />
Hint: For best performance, we suggest assembling the track on<br />
a hard, flat surface.<br />
9<br />
6<br />
4<br />
1<br />
5<br />
4<br />
Assembly Tip: If you cannot join all the track<br />
pieces together, try fitting together in three<br />
large sections, as shown here.<br />
2<br />
3
7<br />
8<br />
1<br />
1<br />
1<br />
1<br />
16<br />
Assembly<br />
13 4<br />
Proper label application will help to keep the labels looking their best!<br />
• Make sure the areas where the labels will be applied are clean and dry. Wipe this product with a clean, soft, dry cloth to<br />
remove any dust or oils.<br />
• For best results, do not attempt to apply a label more than once.<br />
• Apply the labels as shown in the illustration above.<br />
• “Snap” the ramp assemblies to the track.<br />
• “Snap” the crash gate halves to the track.<br />
• Fit the eight track supports on to the matching posts around the track, as shown.<br />
Assembly is now complete.<br />
5<br />
13<br />
1 1 1<br />
3<br />
2<br />
16<br />
10<br />
12<br />
5<br />
14<br />
14<br />
11<br />
11<br />
15<br />
15<br />
9<br />
6 7<br />
8
Battery Installation Battery Safety Information<br />
• Locate the battery compartment on the bottom of<br />
each car.<br />
• Loosen the screw in the battery compartment door<br />
with a Phillips screwdriver. Remove the battery<br />
compartment door.<br />
• Insert three, new “AA” (LR6) alkaline batteries.<br />
Hint: We recommend using alkaline batteries for longer<br />
battery life.<br />
• Replace the battery compartment door and tighten<br />
the screw.<br />
• When sounds or motions become faint or stop,<br />
it’s time for an adult to change the batteries!<br />
• Protect the environment by not disposing of this<br />
product with household waste (2002/96/EC).<br />
Check your local authority for recycling advice<br />
and facilities.<br />
6<br />
1.5V x 3<br />
"AA" (LR6)<br />
In exceptional circumstances, batteries may leak fluids<br />
that can cause a chemical burn injury or ruin your toy.<br />
To avoid battery leakage:<br />
• Do not mix old and new batteries or batteries of<br />
different types: alkaline, standard (carbon-zinc) or<br />
rechargeable (nickel-cadmium).<br />
• Insert batteries as indicated inside the<br />
battery compartment.<br />
• Remove batteries during long periods of non-use.<br />
Always remove exhausted batteries from the toy.<br />
Dispose of batteries safely. Do not dispose of the<br />
product in a fire. The batteries inside may explode<br />
or leak.<br />
• Never short-circuit the battery terminals.<br />
• Use only batteries of the same or equivalent type,<br />
as recommended.<br />
• Do not charge non-rechargeable batteries.<br />
• Remove rechargeable batteries from the toy<br />
before charging.<br />
• If removable, rechargeable batteries are used, they are<br />
only to be charged under adult supervision.
• Slide the On/Off switch on the bottom of the car to on.<br />
2<br />
• Lift the car and shake it to start the "engine" and the<br />
sound effects.<br />
Hint: For maximum distance, shake the car 7 or 8 times.<br />
Shaking more than this does not increase the distance it<br />
will travel.<br />
Race! Smash! Crash!<br />
1 4<br />
3<br />
• Set the cars on the starting arrow and press the pedal to start.<br />
• When your car stops, pick it up and shake it. Set it down<br />
again to resume the race.<br />
• Pull the handle down to reset the pedal.<br />
7<br />
• When two cars collide, the doors and hood pop open.<br />
• To reset the car, press down on the hood area.<br />
5<br />
• Press the button to lower the guardrail and send a car<br />
crashing through the gate!<br />
• When you're finished, slide the On/Off switch to off.
FCC Statement<br />
United States Only<br />
This equipment has been tested and found to comply<br />
with the limits for a Class B digital device, pursuant to<br />
Part 15 of the FCC Rules. These limits are designed to<br />
provide reasonable protection against harmful interference<br />
in a residential installation. This equipment generates,<br />
uses and can radiate radio frequency energy and, if not<br />
installed and used in accordance with the instructions,<br />
may cause harmful interference to radio communications.<br />
However, there is no guarantee that interference will not<br />
occur in a particular installation. If this equipment does<br />
cause harmful interference to radio or television reception,<br />
which can be determined by turning the equipment off and<br />
on, the user is encouraged to try to correct the interference<br />
by one or more of the following measures:<br />
• Reorient or relocate the receiving antenna.<br />
• Increase the separation between the equipment<br />
and receiver.<br />
• Consult the dealer or an experienced radio/TV<br />
technician for help.<br />
Note: Changes or modifications not expressly approved by<br />
the manufacturer responsible for compliance could void<br />
the user's authority to operate the equipment.<br />
Care<br />
• Wipe with a clean cloth dampened with a mild soap and<br />
water solution. Do not immerse.<br />
8<br />
Consumer Information